
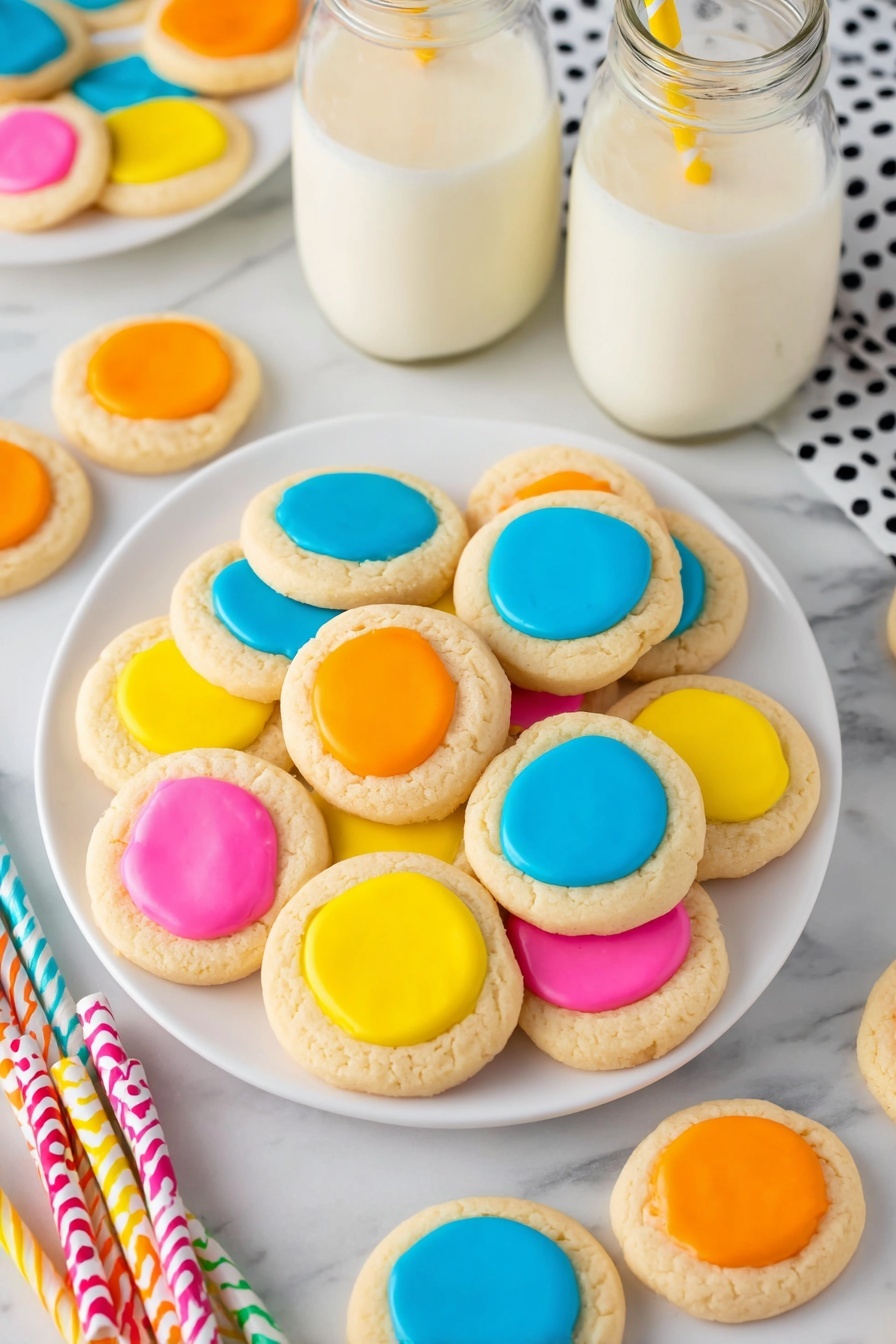
If you’re looking for a fun and colorful baking project that’s guaranteed to bring smiles, then you’re going to adore this Thumbprint Cookies with Icing Recipe. These delightful little treats combine buttery, tender cookies with a pop of vibrant icing right in the center – perfect for gifting, parties, or just a sweet pick-me-up. I absolutely love how these turn out every time, and I can’t wait to share some tips and tricks to make sure your batch is just as fantastic!
Why You’ll Love This Recipe
- Simple Ingredients: Basics you likely have on hand come together to make magic.
- Customizable Icing: Easily make as many colors as you like to fit any occasion.
- Kid-Friendly Baking: Fun shapes and decorating make this a hit with little helpers.
- Make Ahead Friendly: Dough and cookies freeze well, so you can prep anytime.

Ingredients You’ll Need
These ingredients come together for a classic, buttery cookie that holds just the right amount of icing in a colorful, sweet center. Here’s what you’ll want to have ready, along with some handy tips I’ve picked up to make your baking smoother.
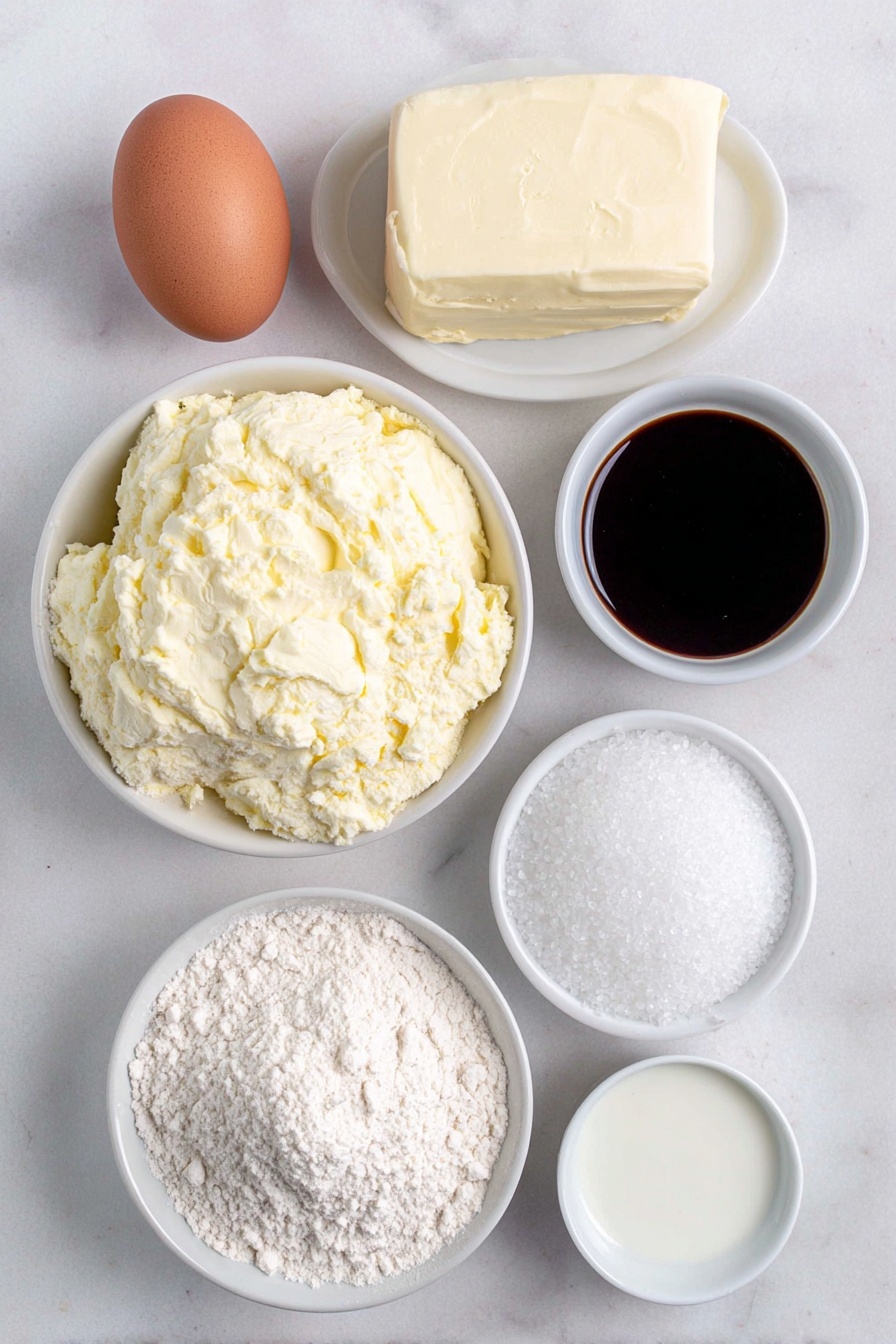
- All-purpose flour: The foundation for your cookies; picking a good quality flour helps with texture.
- Salt: Just a pinch to balance sweetness and enhance flavor.
- Unsalted butter: Make sure it’s softened to room temperature—this helps you get that perfect creamy batter.
- Granulated sugar: For just the right sweet crunch in the cookies.
- Large egg: Room temperature works best to blend smoothly and provide structure.
- Clear vanilla flavoring: I love this because it adds warm flavor without coloring the dough.
- Powdered sugar: Sift it for smooth icing free of lumps.
- Whole milk: Use to adjust icing consistency—start little by little.
- Gel food coloring: A few drops go a long way; I prefer gel for bright, vibrant colors without thinning out the icing.
Variations
One of the delights of making Thumbprint Cookies with Icing Recipe is how easy it is to tweak flavors and colors to fit your mood or what you have in the pantry. I often switch things up to keep the baking fun and fresh.
- Jam-Filled Variation: I sometimes swap the icing for dollops of raspberry or apricot jam for a classic fruit-filled twist that my family craves.
- Chocolate Icing: Adding a little cocoa powder to the icing creates a decadent chocolate glaze that totally elevates the cookie.
- Almond Extract: Replacing or combining vanilla with almond extract offers a lovely nutty aroma that pairs wonderfully with the buttery cookie base.
- Gluten-Free Option: I’ve had great success using a gluten-free flour blend; just be sure to chill the dough well so it holds together.
How to Make Thumbprint Cookies with Icing Recipe
Step 1: Creaming Your Way to Perfect Cookie Dough
Start by combining your softened butter and sugar in a large bowl and beat them together until they’re perfectly smooth — about 2 to 3 minutes. Trust me, this step makes such a difference in the texture of your cookies, giving them that melt-in-your-mouth quality you’ll love. Once creamy, add the egg and vanilla flavoring and mix again until everything is fully incorporated.
Step 2: Mixing in the Dry Ingredients Gently
Now, whisk together the flour and salt in a separate bowl. Then, slowly add these dry ingredients to your butter mixture on low speed so the dough stays tender and doesn’t get overworked. Scrape down the bowl sides so you don’t miss any flour lurking around. You’ll end up with a thick, smooth dough that’s ready for chilling.
Step 3: Chill Out Time for the Dough
Cover your dough with plastic wrap and pop it into the fridge for at least 30 minutes. This step is one I never skip because it makes the dough much easier to handle and helps the cookies hold their shape without spreading too much while baking.
Step 4: Forming Your Cookie Balls and Making the Indentation
Preheat your oven to 350°F and line your baking sheets with parchment paper. Grab a tablespoon scoop to portion your chilled dough, then roll each scoop gently between your palms into a smooth ball. Space them about two inches apart on the baking trays—you don’t want them sticking together!
Here’s the fun part: pressing the thumbprint. Using your thumb or a small rounded spoon, make a shallow indentation in the center of each cookie ball—about three-quarters to an inch wide. I like to keep a small bowl of flour nearby to dip my thumb into; it stops the dough from sticking and makes pressing much cleaner. Also, make sure not to press all the way through; this little pocket is what holds the icing!
Step 5: Bake Until Just Golden
Bake the cookies for 10-12 minutes or until you see light golden edges forming at the bottom. I’ve found that underbaking just a little helps keep them nice and tender. When you pull them out, let them rest on the baking sheets for 5 minutes — this helps them set up for easier handling before transferring to a cooling rack.
Step 6: Making the Colored Icing
While the cookies cool, whisk together your powdered sugar, whole milk, and vanilla in a bowl. I start with 2 tablespoons of milk and add a teaspoon at a time until the icing holds a thick but spreadable consistency. If it’s too runny, the icing won’t stay put in the indentations.
Add 2-3 drops of gel food coloring to your icing and stir well until you have a smooth, streak-free color. For multiple colors, divide the icing into smaller bowls and color each batch separately. This part is so fun and kids especially love helping here!
Step 7: Filling Your Cookies and Setting the Icing
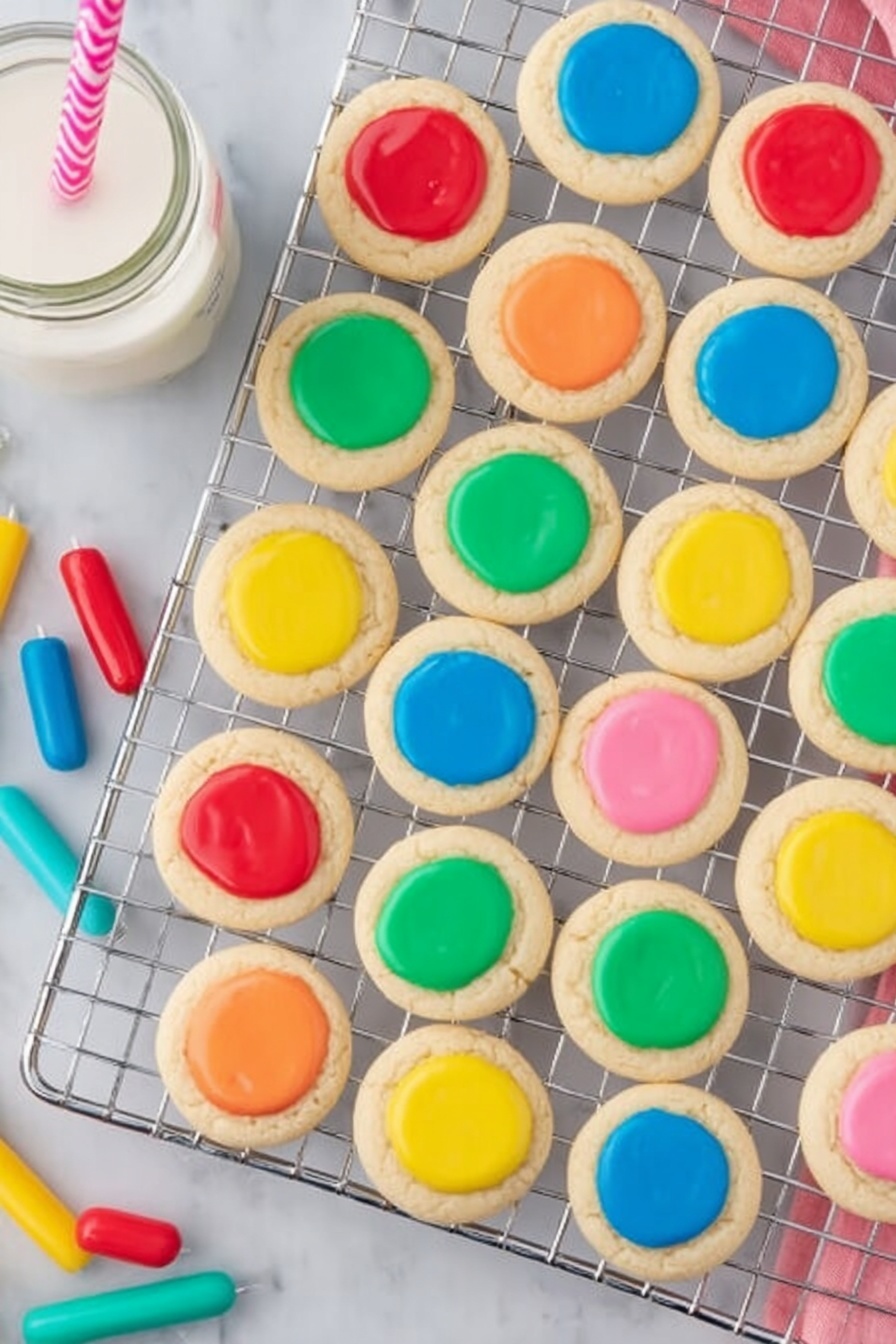
Spoon or pipe the colored icing into each cookie indentation, but don’t overfill as it can spill over the edges while drying. Set your filled cookies on a flat surface and let the icing firm up at room temperature—this usually takes a few hours or overnight if you have the patience like me. This step ensures a nice, slightly firm finish without the icing cracking.
Pro Tips for Making Thumbprint Cookies with Icing Recipe
- Chill Your Dough Well: I discovered this trick really helps your cookies keep their shape and prevents spreading, especially with buttery dough like this.
- Flour Your Thumb: Dipping your finger or spoon in flour before pressing the indentation keeps the dough from sticking and keeps those thumbprints crisp and neat.
- Don’t Overbake: Pull cookies out as soon as edges are lightly golden to maintain tenderness and that soft mouthfeel everyone loves.
- Give Icing Time to Set: Letting the icing firm up at room temp overnight improved my cookie stacking game and makes them more gift-ready.
How to Serve Thumbprint Cookies with Icing Recipe
Garnishes
I like to keep it simple and let the colored icing shine, but sometimes I sprinkle a bit of edible glitter or finely crushed nuts around the icing right after filling to add texture and shimmer. Fresh berries on the side can also add a fun pop for parties or tea time.
Side Dishes
Thumbprint cookies are fantastic with a cup of hot tea or coffee—my personal go-to. For festive gatherings, I pair them with a cheese platter or fresh fruit salad to balance the sweetness and keep snacks interesting.
Creative Ways to Present
I once made a colorful platter for a birthday, arranging thumbprint cookies by icing color in a rainbow pattern—turned out like edible art! You can also package them in clear cellophane bags tied with a ribbon for charming homemade gifts that everyone adores.
Make Ahead and Storage
Storing Leftovers
I store these cookies at room temperature in a single layer inside an airtight container. They keep perfectly fresh for up to 4-5 days, which means you can bake a big batch and enjoy them throughout the week without any hassle.
Freezing
If I’m planning ahead, I freeze the cookie dough balls before baking or the baked cookies without icing. They last up to 2 months frozen. Just remember to thaw dough in the fridge before making indentations to bake, and if you freeze baked cookies, add icing after they’ve fully thawed.
Reheating
If you prefer your cookies a little warm, I give them a quick zap in the microwave for 10-15 seconds — perfect for softening the cookie and slightly warming the icing. Just don’t go too long or the icing might melt too much!
FAQs
-
Can I use butter substitutes for this Thumbprint Cookies with Icing Recipe?
You can use margarine or vegan butter substitutes, but the flavor and texture might be slightly different. I recommend using unsalted real butter for the best classic taste and cookie texture, but if you need alternatives, chilled sticks of vegan butter have worked well for me.
-
How can I make the icing thicker or thinner?
The icing’s consistency depends on the amount of milk you add. For thicker icing, start with less milk (around 2 tablespoons) and add more gradually if needed. If it’s too thick, add a little milk by teaspoon until spreadable; too thin, add more powdered sugar.
-
What if my dough is too sticky to handle?
If your dough feels sticky, a quick chill in the fridge for an extra 30 minutes usually helps. You can also dust your hands lightly with flour when rolling the dough into balls to keep things manageable.
-
Can I make these cookies without icing?
Absolutely! The cookies are delicious on their own, and you can fill the indentations with jam, melted chocolate, or even a sprinkle of coarse sugar for a simpler treat.
-
How do I fix cookies if the indentations rise too much while baking?
When cookies come out of the oven warm, gently press the centers down with the back of a spoon or your thumb to recreate the indentation before they cool completely. This tip helps if the thumbprints puffed up during baking.
Final Thoughts
I’ve been baking this Thumbprint Cookies with Icing Recipe for years now, and it never fails to delight family and friends alike. The combination of tender buttery cookies with the sweet, colorful icing always feels a little like magic, especially when shared during holidays or celebrations. If you haven’t tried these yet, I truly encourage you to make a batch—you’ll enjoy both the baking process and the smiles these bring to the table. Plus, they’re a wonderful way to get creative with colors and flavors. Happy baking, friend!
Print
Thumbprint Cookies with Icing Recipe
- Prep Time: 15 minutes
- Cook Time: 10-12 minutes
- Total Time: 55 minutes
- Yield: 24 cookies 1x
- Category: Dessert
- Method: Baking
- Cuisine: American
Description
Delicious and colorful Thumbprint Cookies with smooth, sweet colored icing. These buttery cookies have a soft center indentation filled with a vibrant, flavored icing that makes them perfect for any occasion or celebration. Made with simple ingredients and easy to follow steps, they are a fun baking project for home bakers looking to add a pop of color to classic cookies.
Ingredients
Cookies:
- 2 cups all-purpose flour
- ½ teaspoon salt
- 1 cup unsalted butter, softened to room temperature
- ⅔ cup granulated sugar
- 1 large egg, room temperature
- 1 teaspoon clear vanilla flavoring
Colored Icing:
- 2 cups powdered sugar, sifted
- 2–3 tablespoons whole milk
- ½ teaspoon clear vanilla flavoring
- 2–3 drops gel food coloring (multiple colors optional)
Instructions
- Prepare dry ingredients: In a medium bowl, combine the all-purpose flour and salt. Set aside for later use.
- Cream butter and sugar: In a large mixing bowl, add the softened unsalted butter and granulated sugar. Using a hand mixer on medium speed, cream together for 2-3 minutes until smooth and fluffy.
- Add egg and vanilla: To the creamed mixture, add the egg and clear vanilla flavoring. Beat on medium speed for 1-2 minutes until fully incorporated.
- Combine dry and wet ingredients: Slowly add the flour and salt mixture to the wet ingredients. Beat on low speed until a thick, smooth dough forms. Use a rubber spatula to scrape the sides and bottom of the bowl to ensure all ingredients are well combined.
- Chill the dough: Cover the bowl of cookie dough with plastic wrap and refrigerate for 30-60 minutes to firm up the dough.
- Preheat oven and prepare sheets: Preheat your oven to 350°F (175°C). Line two large baking sheets with parchment paper.
- Form cookie balls: Using a 1-tablespoon cookie scoop, scoop level amounts of chilled dough and roll into smooth balls with your palms. Place them onto the prepared baking sheets, spacing about 2 inches apart.
- Create indentations: Using a small rounded measuring spoon or your thumb dipped lightly in flour, press an indentation about ¾–1 inch wide into the center of each dough ball without pressing through the bottom. Slightly flatten the ball as you do this.
- Bake cookies: Bake for 10-12 minutes or until the edges of the cookies are just lightly golden.
- Cool cookies: Remove from oven and allow the cookies to cool on the baking sheets for 5 minutes. Then transfer them to a wire rack to cool completely before icing.
- Make colored icing: In a large mixing bowl, whisk together sifted powdered sugar, 2 tablespoons whole milk, and clear vanilla flavoring until smooth. Adjust by adding up to 1 tablespoon more milk to reach a thicker, spreadable consistency.
- Add food coloring: Stir in 2-3 drops of gel food coloring until uniform in color. For multiple colors, divide icing into separate bowls and color as desired.
- Fill indentations with icing: Using a small spoon or a piping bag with the tip cut off, carefully fill each cookie indentation with colored icing, avoiding overfilling.
- Set the icing: Allow the iced cookies to sit at room temperature for several hours or overnight to let the icing firm up before storing or serving.
Notes
- Storage: Store iced thumbprint cookies at room temperature in a single layer inside an airtight container for 4-5 days.
- Freezing: Cookie dough balls or baked cookies without icing can be frozen for up to 2 months in airtight containers. Thaw dough in the refrigerator before shaping and baking.
- Indentation tip: Dip your thumb or spoon lightly in flour before pressing into dough balls to prevent sticking.
- Define indentations post-bake: If indentations rise too much during baking, gently press them down while the cookies are still warm to improve the well for icing.
- Icing firmness: The icing will firm up but will not harden completely like royal icing. Allow plenty of time for setting before stacking.
Nutrition
- Serving Size: 1 cookie
- Calories: 120
- Sugar: 8g
- Sodium: 55mg
- Fat: 7g
- Saturated Fat: 4.5g
- Unsaturated Fat: 2g
- Trans Fat: 0g
- Carbohydrates: 13g
- Fiber: 0.3g
- Protein: 1.5g
- Cholesterol: 25mg


