
If you’re looking for a cookie that’s as fun to make as it is to eat, you’ve got to try this Stained Glass Cookie Recipe. I absolutely love how these cookies sparkle with colorful candy centers that make them look like little edible works of art. When I first tried this recipe, I was amazed at how simple ingredients come together to create something so magical—and trust me, your friends and family will be just as enchanted when they see these on the cookie tray!
Why You’ll Love This Recipe
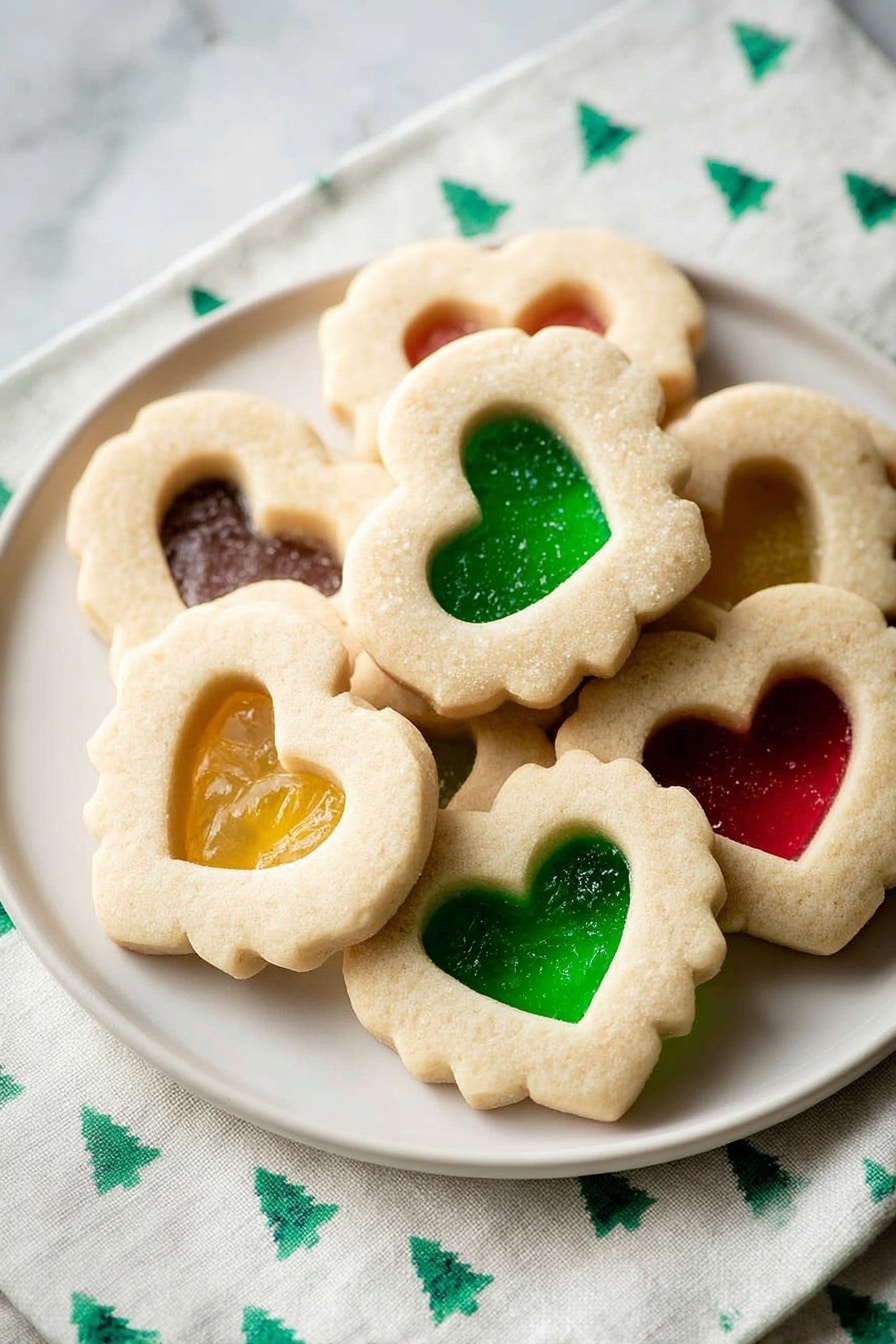
- Visually Stunning: The translucent candy centers create beautiful, colorful “windows” that brighten up any cookie platter.
- Simple Ingredients: You probably already have everything in your pantry to whip these up quickly.
- Fun for All Ages: Kids love helping with the crushed candies, and adults enjoy the nostalgic charm.
- Customizable: Use different flavored hard candies or cookie bases to suit any season or occasion.

Ingredients You’ll Need
This stained glass cookie recipe uses classic cookie dough components that work beautifully together to yield crisp, tender cookies with just the right chew—perfect for holding that shiny candy “glass” center. Grab your favorite hard candies, as they really make this recipe sing with color and flavor.
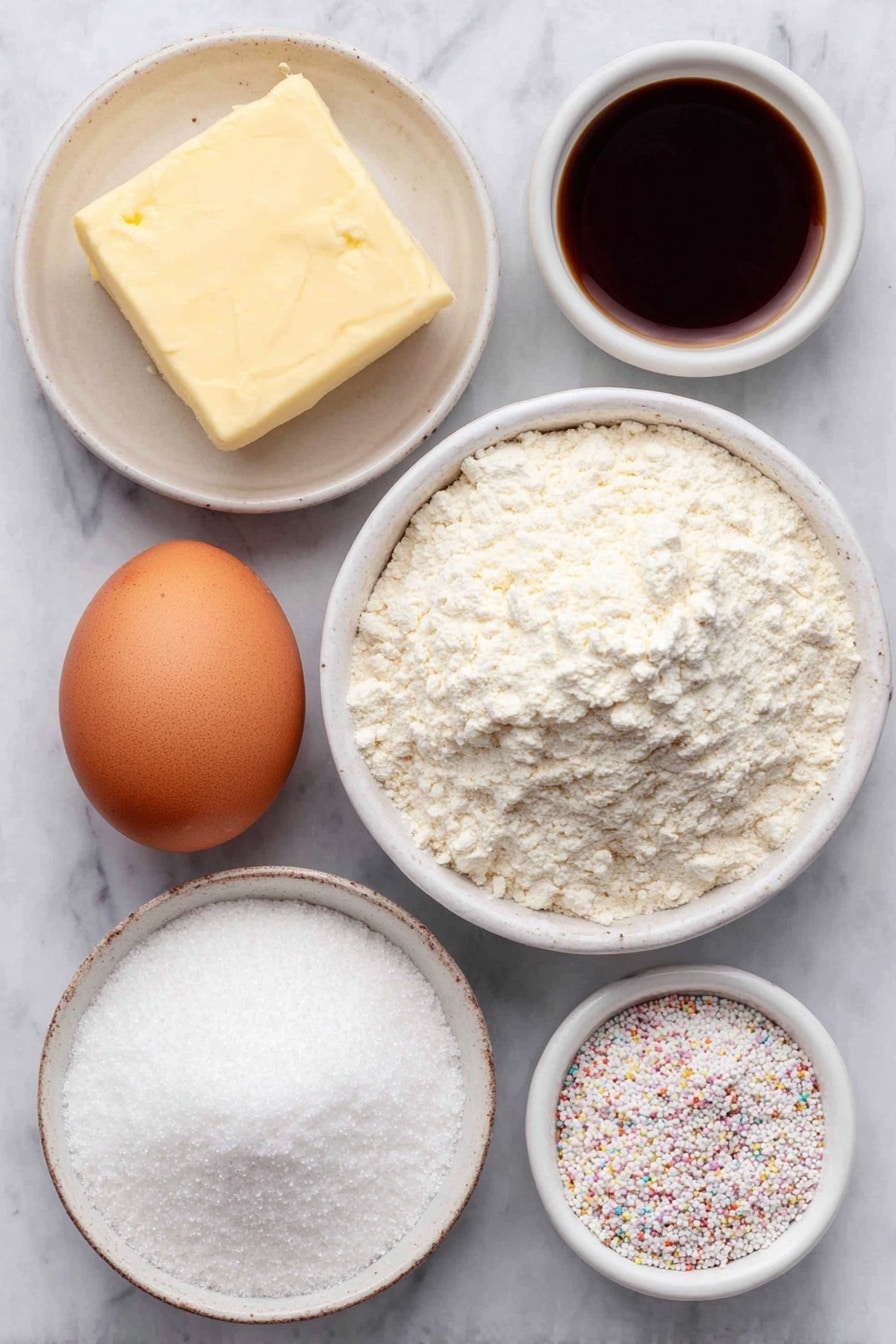
- Unsalted butter: Using softened, room temperature butter helps achieve the perfect dough texture and avoids greasy cookies.
- Granulated sugar: Gives just the right sweetness and helps the cookies brown nicely.
- Egg: Binds everything together and adds a bit of richness.
- Vanilla extract: Adds warm, aromatic depth—don’t skip this for the best flavor.
- Baking powder: Lightens the dough just enough for delicate edges without puffing the cookie up too much.
- Salt: Balances the sweetness and enhances the other flavors.
- All-purpose flour: The base that holds your sugary creation.
- Hard candies (like Jolly Ranchers): Crush these to fill the cookie centers and create that beautiful stained glass effect.
Variations
I love playing around with this stained glass cookie recipe to make it my own. The best part? You can easily mix up the types of hard candies or even swap out the cookie dough base depending on your mood or season.
- Use gingerbread dough: One winter, I switched to gingerbread cookie dough, turning these into festive holiday treats that had a spicy kick—my family went crazy for those!
- Try sour candies: For a fun twist, I once used sour hard candies, which added a tangy surprise under that sweet cookie shell.
- Gluten-free option: Substitute all-purpose flour with a gluten-free blend—just watch the dough as it may need extra time to chill before rolling.
- Mini stained glass gems: Use smaller cookie cutters to make tiny cookies perfect for tea parties or elegant dessert platters.
How to Make Stained Glass Cookie Recipe
Step 1: Cream the butter and sugar until fluffy
Start by beating your softened butter and granulated sugar together with a hand mixer on medium speed. I usually set a timer for about 2 minutes because beating it until light and fluffy is key for those tender, melt-in-your-mouth cookies. The more air you incorporate here, the better the texture gets!
Step 2: Add egg, vanilla, and dry ingredients
Once the butter and sugar have had their happy little dance in the mixer, mix in the egg and vanilla until just combined. Then, switch to low speed and add your baking powder, salt, and flour gradually. This prevents the flour from flying everywhere—I learned this the hard way once, and my kitchen looked like a winter wonderland of powdered sugar!
Step 3: Chill the dough for easier handling
Wrap your dough ball tightly in plastic wrap and pop it in the freezer for 30 minutes (or fridge it for an hour if you’re not in a rush). The chilling step is something I never skip because it helps the dough firm up, making it easier to roll without sticking or tearing when you cut the shapes.
Step 4: Roll out and cut your cookies
Lightly flour your surface and roll the dough out to about ¼ inch thick. Here’s a trick: use consistent pressure and try to keep the dough even in thickness so cookies bake uniformly. Use a larger cookie cutter (3 or 4 inches) for the outer shape, then a smaller one (1 to 1½ inches) to carve out the center “window.”
Step 5: Sprinkle crushed candies and bake
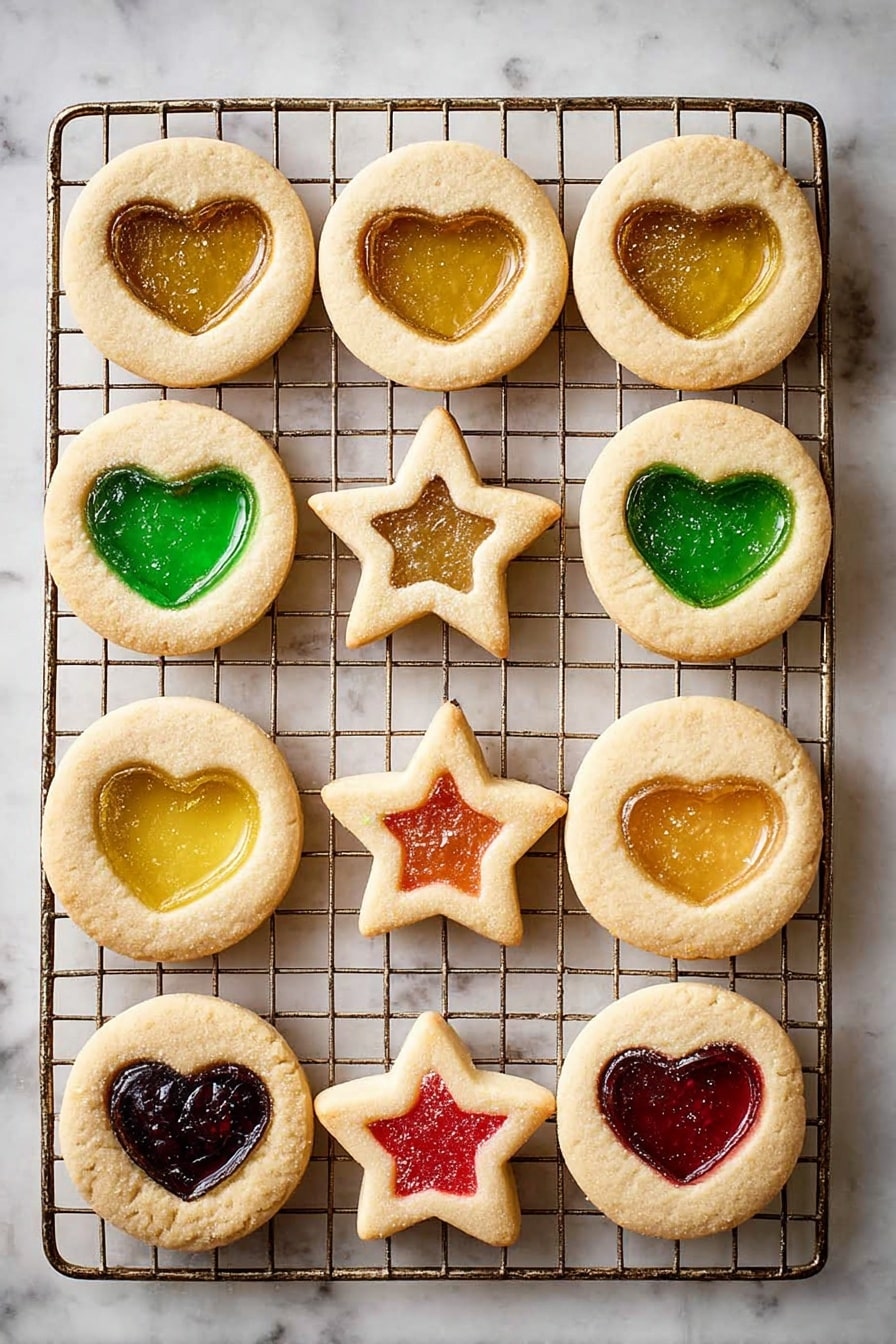
Transfer your cookie shapes onto a silicone mat–trust me, this prevents the melted candy from sticking and ruining your masterpiece. Fill the cookie centers with crushed hard candies, but careful not to overfill them—about ¾ full is perfect. Bake at 350°F for around 10 minutes. You’ll notice the candy melts into a gorgeous glossy pane when edges turn golden.
Step 6: Cool carefully and enjoy!
Let the cookies cool on the baking sheets for 10 minutes so the candy centers set up without cracking. Then gently move them to a wire rack to cool completely. This part is crucial—I learned that impatiently touching them too soon can cause the “glass” to crack or break.
Pro Tips for Making Stained Glass Cookie Recipe
- Crushing candies safely: I use a sturdy plastic bag and a meat tenderizer to crush candies evenly without making a mess.
- Use silicone mats: They prevent the melted candy from sticking—parchment paper just doesn’t cut it for this recipe.
- Don’t skip chilling: It makes rolling easier and results in cleaner cookie shapes.
- Fill the centers just right: Overstuffing leads to candy oozing over and sticky messes; about ¾ full works perfectly.
How to Serve Stained Glass Cookie Recipe
Garnishes
I usually keep garnishes simple for these cookies since their candy centers are already showstoppers. Sometimes, I dust a tiny bit of powdered sugar right before serving for a delicate frosted effect that’s especially lovely for holiday gatherings.
Side Dishes
When I serve stained glass cookies, I love pairing them with a hot cup of tea or rich, creamy hot chocolate to balance the sweet crunch. They’re also fantastic alongside a simple fruit platter or vanilla bean ice cream if you want to mix things up.
Creative Ways to Present
For holiday parties, I’ve stacked these cookies on tiered trays with twinkling fairy lights intertwined—it really amps up the stained glass effect in a charming way. Another fun idea is to use cookie cutters themed for occasions (think hearts for Valentine’s or stars for Christmas) to make the “windows” even more festive.
Make Ahead and Storage
Storing Leftovers
Once cooled, I store stained glass cookies in an airtight container between layers of parchment paper at room temperature. They keep well for about 4 days but be aware that humidity can make the candy centers sticky over time—so keep them somewhere cool and dry.
Freezing
I usually freeze only the cookie dough, not the baked cookies, because freezing and thawing can crack the delicate candy windows. Wrap the dough tightly and freeze for up to 2 months, then thaw overnight in the fridge before using—it’s saved me many a last-minute baking emergency!
Reheating
If you want to refresh your cookies a bit after storing, pop them in the oven for a few minutes at low heat (around 300°F) to warm through. This helps bring back some crispness but do it gently so the candy centers don’t soften too much or melt again.
FAQs
-
Can I use other types of hard candies besides Jolly Ranchers for stained glass cookies?
Absolutely! Jolly Ranchers work well because they come in a variety of colors and flavors, but you can experiment with any hard candy that melts well—like Life Savers or peppermints (especially for a holiday twist). Just crush them finely and avoid candies with fillings such as gum or cream centers.
-
How can I prevent the candy centers from cracking?
One of the best tips is to let the cookies cool completely on the baking sheet before moving them. Also, don’t overfill the centers, and avoid shaking or jarring the cookies while they’re still warm and setting. Using silicone baking mats instead of parchment paper can also help prevent cracking issues.
-
Can I prepare the dough ahead of time?
Yes! In fact, chilling the dough improves the texture and manageability. You can prepare it up to two months in advance by wrapping tightly and freezing, then thawing it overnight in the fridge before rolling and cutting your cookies.
-
What if my candy melts are sticky after a few days?
Humidity is usually the culprit. To keep your stained glass cookies from getting sticky, store them in a cool, dry place in an airtight container layered with parchment paper. If you live somewhere humid, you might want to keep them in the fridge for longer storage—just bring them to room temperature before serving.
Final Thoughts
This stained glass cookie recipe holds a special place in my heart because it turns baking into a fun, creative adventure. The way those colorful candy centers catch the light never fails to bring a smile to my face, and I hope it will for you too. If you want to feel like a kid again while impressing your guests with something unique and delicious, you really can’t go wrong with these cookies. Grab your rolling pin, crush those candies, and let’s make some magic together!
Print
Stained Glass Cookie Recipe
- Prep Time: 15 minutes
- Cook Time: 10 minutes
- Total Time: 1 hour 25 minutes
- Yield: 24–28 cookies 1x
- Category: Dessert
- Method: Baking
- Cuisine: American
Description
Stained Glass Window Cookies are a festive and colorful treat featuring buttery sugar cookies with centers filled with melted crushed hard candies, creating a beautiful translucent ‘stained glass’ effect. Perfect for holidays or special occasions, these cookies offer a delightful combination of crisp edges and sweet, flavorful candy centers.
Ingredients
Cookie Dough
- ½ cup unsalted butter, softened to room temperature
- ½ cup granulated sugar
- 1 large egg
- 1 teaspoon vanilla extract
- ½ teaspoon baking powder
- ¼ teaspoon salt
- 2 cups all-purpose flour
Candy Center
- 8–10 Jolly Ranchers or other hard candies, crushed
Instructions
- Cream the Butter and Sugar: In a large mixing bowl, use a hand mixer or stand mixer on medium speed to cream the softened butter and granulated sugar until light and fluffy, about 2 minutes.
- Add Wet Ingredients: Beat in the egg and vanilla extract until fully combined, then reduce the mixer speed to low and add baking powder and salt.
- Incorporate the Flour: Gradually add the all-purpose flour while mixing on low speed until the dough just comes together.
- Chill the Dough: Form the dough into a ball, wrap tightly in plastic cling wrap, and freeze for 30 minutes or refrigerate for at least 1 hour or up to overnight to firm.
- Preheat the Oven: Set the oven temperature to 350°F (175°C) and line two half-sheet baking pans with silicone baking mats.
- Roll and Cut the Dough: On a lightly floured surface, roll the chilled dough to ¼-inch thickness. Use a 3 or 4-inch cookie cutter to cut out cookie shapes and a smaller 1 or 1.5-inch cutter to cut out the centers of each cookie.
- Arrange Cookies on Baking Sheet: Transfer the cut cookies onto the lined baking sheets spaced 1 inch apart. Re-roll scraps to cut more cookies if necessary.
- Add Crushed Candy: Fill the centers of the cookies with crushed hard candies, filling about ¾ full to prevent overflow during baking.
- Bake: Bake in the preheated oven for 10 minutes or until the edges are golden brown and the candy centers have melted completely.
- Cool the Cookies: Allow the cookies to set on the baking sheets for 10 minutes to let the candy harden slightly, then carefully transfer them to a wire rack to cool completely.
Notes
- Crushing the Hard Candies: Place candies in a plastic ziplock bag and crush with a hammer, meat tenderizer, or mallet. A mini blender can also be used similarly to crushing coffee beans.
- Storage: Store cookies in an airtight container at room temperature layered with parchment paper for up to 4 days, or refrigerate for 1-2 weeks. Candy centers may get sticky over time due to humidity.
- Freezing Cookie Dough: Wrap dough tightly in plastic wrap and freeze in a freezer bag or airtight container for up to 2 months. Thaw overnight in the refrigerator before use and bring to room temperature.
- Freezing Baked Cookies: Not recommended as candy centers may crack. If desired, freeze in airtight containers with parchment paper layers for up to 3 months.
- Variations: Use other cookie bases like cut-out shortbread, gingerbread cookies, or incorporate for gingerbread houses for creative stained glass effects.
Nutrition
- Serving Size: 1 cookie
- Calories: 120
- Sugar: 9g
- Sodium: 50mg
- Fat: 5g
- Saturated Fat: 3g
- Unsaturated Fat: 2g
- Trans Fat: 0g
- Carbohydrates: 18g
- Fiber: 0.5g
- Protein: 1g
- Cholesterol: 20mg


