

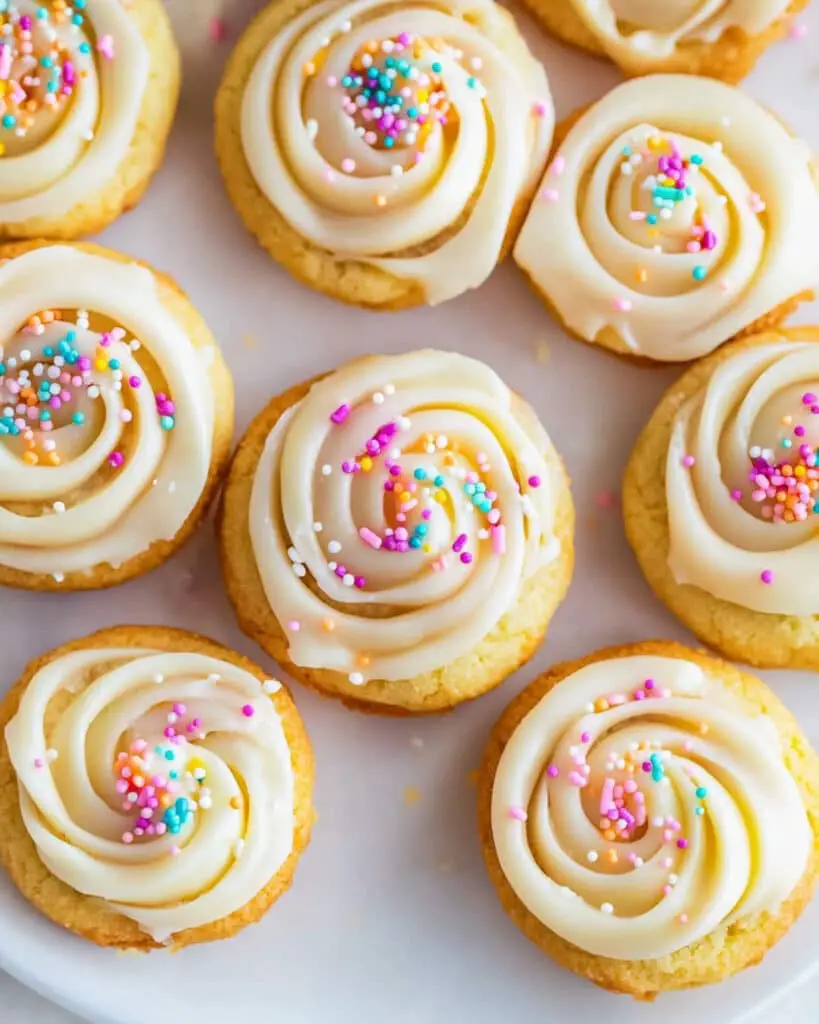
These Springtime Butter Cookies are a delightful treat that combines buttery richness with the sweet charm of white chocolate and festive sprinkles. Piped into beautiful swirls and finished with a touch of white chocolate and colorful sprinkles, these cookies are as gorgeous as they are delicious. Perfect for spring celebrations, afternoon tea, or simply brightening someone’s day with a homemade gift!
Why You’ll Love This Recipe
- Effortlessly Elegant: These cookies look fancy but are surprisingly simple to make – the piping technique creates professional-looking results without complicated decorating skills.
- Customizable: Change up the sprinkle colors to match any holiday or celebration throughout the year.
- Perfect Texture: These cookies strike the ideal balance between tender and crisp, with edges that have just the right amount of golden crispness.
- Make-Ahead Friendly: Perfect for busy schedules – the dough comes together quickly, and the cookies store beautifully, making them ideal for advance preparation.

Ingredients You’ll Need
- Butter: The star of the show! Use room temperature unsalted butter for that rich, melt-in-your-mouth texture. The quality of your butter will directly impact the flavor of your cookies.
- Granulated Sugar: Provides just the right amount of sweetness and helps create those crisp edges while maintaining a tender center.
- Vanilla Extract: Adds warmth and depth to the flavor profile – use pure vanilla extract for the best results.
- Salt: Enhances all the flavors and balances the sweetness. Don’t skip this little but mighty ingredient!
- Egg: Acts as a binder and adds richness to the dough. Make sure it’s at room temperature for the best incorporation.
- All-Purpose Flour: Forms the structure of our cookies. Measure carefully – too much will make them dry, too little will make them spread too much.
- White Chocolate: Creates a smooth, creamy coating that adds sweetness and visual appeal. Use good-quality white chocolate that melts smoothly.
- Pastel-Colored Sprinkles: Adds that perfect springtime touch and a bit of texture contrast. Choose colors that match your occasion or season.
Note: You’ll find the complete list of ingredients, along with their exact measurements, in the printable recipe card at the bottom of this post.
Variations
Want to customize these charming cookies? Here are some delicious ideas:
- Flavor Twists: Add lemon or orange zest to the dough for a citrusy spring version.
- Chocolate Options: Substitute dark or milk chocolate for the white chocolate coating.
- Seasonal Sprinkles: Switch up the sprinkle colors for different holidays – red and green for Christmas, orange and black for Halloween, or red, white, and blue for patriotic celebrations.
- Flavor Additions: Fold in finely chopped dried fruits like cranberries or cherries, or add a dash of almond extract for a marzipan-like flavor.
How to Make Springtime Butter Cookies
Step 1: Prepare Your Ingredients
Preheat your oven to 350°F and line baking sheets with parchment paper. Make sure your butter and egg are at room temperature for the best results.
Step 2: Make the Cookie Dough
Cream the butter and sugar together for 2 full minutes until the mixture is light and fluffy. This step is crucial for achieving that perfect texture! Add the salt and vanilla, then the egg, mixing just until combined. Gradually add the flour, half a cup at a time, mixing on low speed just until the dough comes together.
Step 3: Pipe the Cookies
Transfer your cookie dough to a piping bag fitted with a Wilton 1M star tip. Pipe beautiful swirls onto your prepared baking sheets, starting from the center and working outward in a circular motion. If needed, gently press the dough at the finishing point to complete the circle.
Step 4: Bake to Perfection
Bake in your preheated oven for 15 minutes, watching carefully as they approach the end of baking time. You’re looking for lightly golden edges – they can darken quickly! Cool completely on a wire rack.
Step 5: Add the Finishing Touches
Melt your white chocolate in short microwave bursts, stirring between each interval. Dip one side of each cooled cookie into the melted white chocolate and immediately sprinkle with your colorful sprinkles. Place on parchment paper until the chocolate sets completely.
Pro Tips for Making the Recipe
- Room Temperature Ingredients: Make sure your butter and egg are at room temperature for the smoothest dough.
- Don’t Overmix: Once you add the flour, mix just until combined to keep the cookies tender.
- Piping Pressure: Apply even pressure when piping for uniform cookies that will bake evenly.
- Chocolate Melting: Be very careful not to overheat the white chocolate – it can seize easily. Microwave in short bursts and stir thoroughly between each.
- Quick Sprinkle Action: Add sprinkles immediately after dipping in chocolate before it has a chance to set.
How to Serve
These Springtime Butter Cookies are versatile treats that can be served in various delightful ways:
Perfect Pairings:
Serve with afternoon tea or coffee for a lovely sweet treat. The buttery flavor pairs wonderfully with Earl Grey tea or a rich cup of coffee.
Display Ideas:
Arrange on a pretty platter for spring gatherings, baby showers, or Easter celebrations. Their beautiful swirl pattern and pastel sprinkles make them a visual centerpiece.
Gift Giving:
Package in clear cellophane bags tied with pastel ribbons for a thoughtful homemade gift that’s sure to delight.
Make Ahead and Storage
Storing Leftovers
Store plain butter cookies in an airtight container at room temperature for up to a week. For chocolate-dipped cookies, refrigerate them in an airtight container with parchment paper between layers. Let them come to room temperature before serving for the best flavor and texture.
Freezing
These cookies freeze beautifully! Place cooled cookies in a freezer-safe container with parchment paper between layers to prevent sticking. They’ll keep for up to two months in the freezer.
Reheating
No need to reheat! Simply thaw frozen cookies at room temperature for about 30 minutes before serving. If you’d like them slightly warm, a few seconds in the microwave will do the trick.
FAQs
-
Can I make the dough ahead of time?
Absolutely! The cookie dough can be made up to 24 hours in advance and stored in the refrigerator. When you’re ready to bake, let it sit at room temperature for about 30 minutes to soften slightly before piping. This actually helps the cookies hold their shape even better during baking.
-
Why did my cookies spread too much during baking?
If your cookies are spreading too much, your butter may have been too warm or you might need a bit more flour in your dough. Make sure to measure your flour correctly, and try chilling the piped cookies on the baking sheet for 15 minutes before baking to help them maintain their shape.
-
Can I use different piping tips for different patterns?
Definitely! While the recipe calls for a Wilton 1M tip, feel free to experiment with other large star tips for different effects. A large round tip will give you a different but equally beautiful cookie. Just make sure the opening is large enough for the dough to pass through easily.
-
Do I have to dip them in white chocolate?
Not at all! These cookies are delicious even without the white chocolate coating. You can enjoy them plain, dust them with powdered sugar, or drizzle with a simple glaze made from powdered sugar and milk instead.
Final Thoughts
These Springtime Butter Cookies bring together simple ingredients to create something truly special. Their delicate buttery flavor, beautiful appearance, and the joy they bring to any table make them worth every minute spent making them. Whether you’re baking for a special occasion or simply treating yourself to something sweet, these cookies are sure to bring a touch of springtime happiness to your day. Give them a try – I’m confident they’ll become a favorite in your recipe collection!
Print
Springtime Butter Cookies Recipe
- Prep Time: 10 minutes
- Cook Time: 15 minutes
- Total Time: 25 minutes
- Yield: 30 cookies 1x
- Category: Desserts
- Method: Baking
- Cuisine: American
Description
These buttery, melt-in-your-mouth springtime cookies are a delightful treat perfect for any occasion. Piped into elegant shapes, dipped in creamy white chocolate, and finished with pastel-colored sprinkles, these cookies are as delicious as they are beautiful. Simple to make, they’ll add charm and flavor to your dessert table or tea party.
Ingredients
Cookie Dough
- 1 cup butter
- 1/2 cup granulated sugar
- 1 1/2 teaspoons vanilla extract
- 1/4 teaspoon salt
- 1 large egg
- 2 cups all-purpose flour
Topping
- 200 g white chocolate, good quality
- 1/4 cup pastel-colored sprinkles
Instructions
- Preheat the Oven:
Preheat your oven to 350°F (175°C). Line baking sheets with parchment paper to prevent the cookies from sticking and set them aside. - Cream Butter and Sugar:
Using a stand mixer or an electric hand mixer in a large mixing bowl, cream together the butter and sugar for 2 minutes until the sugar is almost dissolved. - Add Vanilla and Egg:
Mix in the vanilla extract and salt, followed by the egg. Beat just until everything is combined. Overmixing can affect the texture of the dough. - Incorporate Flour:
Gradually add the all-purpose flour, 1/2 cup at a time. Mix on low speed until the mixture is just combined and forms a smooth dough. - Prepare to Pipe:
Transfer the cookie dough into a decorating bag fitted with a Wilton 1M piping tip. This will allow you to pipe elegant, circular cookie shapes. - Pipe the Cookies:
On the prepared baking sheets, begin piping by starting from the center and creating a swirl to form a circle. If needed, gently press the dough to the edges with your fingers to refine the shape. - Bake the Cookies:
Place the cookies into the preheated oven and bake for 15 minutes. The edges should turn a light golden brown. Watch them carefully to avoid over-browning. Once baked, transfer the cookies to a wire rack to cool completely. - Melt the Chocolate:
Melt the white chocolate in the microwave by heating it for 30 seconds, stirring, and then continuing in 10-second increments until smooth. Avoid overheating. - Dip and Decorate:
Dip one side of the cooled cookies into the melted white chocolate, then immediately sprinkle with pastel-colored sprinkles. Place each cookie on parchment paper and allow the chocolate to set completely before serving or storing.
Notes
- Storage: Store cookies in an airtight container at room temperature for up to 1 week. When dipped in chocolate, it’s best to store them in the refrigerator and bring them to room temperature before serving.
- Freezing: To freeze, place cooled cookies in an airtight container with parchment between layers. Freeze for up to 2 months for best flavor.
- Plain Cookies Option: If choosing to skip the chocolate, you can store the cookies in an airtight container at room temperature or freeze as described above.
Nutrition
- Serving Size: 1 cookie
- Calories: 120kcal
- Sugar: 6g
- Sodium: 60mg
- Fat: 8g
- Saturated Fat: 5g
- Unsaturated Fat: 2g
- Trans Fat: 0g
- Carbohydrates: 10g
- Fiber: 0g
- Protein: 1g
- Cholesterol: 25mg


