

If you’re looking to add a little creepy-cute magic to your Halloween spread, this Spooky Spider Cookies Recipe is exactly what you need. I absolutely love how these peanut butter cookies transform into adorable, inch-crawling spider critters with just a few creative decorating steps, making them a total showstopper at parties or for a fun kitchen afternoon with the kids. Trust me, once you try this recipe, you’ll be making these festive critters year after year.
Why You’ll Love This Recipe
- Fun and Festive: These cookies look spooky but taste incredibly delicious—perfect for Halloween vibes without screaming “too sweet.”
- Easy to Make: No complicated techniques here! Even if you’re a cookie beginner, you’ll nail these with simple step-by-step instructions.
- Kid-Friendly Activity: Decorating the spiders is half the fun; kids (and adults) will love helping with the marshmallow cobwebs and chocolate details.

Ingredients You’ll Need
These ingredients combine to make a soft, flavorful peanut butter cookie base, plus all the fun fixings to turn them into spooky spiders. I find that using room temperature butter and chilled miniature peanut butter cups really helps the assembly go smoothly.
- Unsalted Butter: Softened to room temperature so it blends smoothly with the sugars, making for perfectly tender cookies.
- Brown Sugar: Adds moisture and a subtle caramel note that pairs beautifully with peanut butter.
- Granulated Sugar: Used both in the dough and for rolling to give the cookies a slight crunchy edge.
- Creamy Peanut Butter: The heart of these cookies, giving them rich flavor and chewy texture.
- Eggs + Egg Yolk: Adds richness and helps the cookies hold their shape after baking.
- Vanilla Extract: Elevates the overall flavor with a warm, sweet hint.
- All-Purpose Flour: Balanced with cornstarch to keep cookies soft and less dense.
- Cornstarch: A secret weapon for softer cookies that melt in your mouth.
- Baking Soda: Gives the cookies just the right lift and tenderness.
- Salt: Enhances all the sweet and nutty flavors, balancing the cookie perfectly.
- Granulated Sugar (for rolling): Coats the dough balls to add a festive, sparkly finish and a hint of crispness.
- Dark Chocolate Melting Wafers: Easy to melt and perfect for piping spider legs and attaching decorations.
- Mini Marshmallows: Transformed into cobwebs, adding a fun, stretchy texture to your cookie design.
- Reese’s Miniature Peanut Butter Cups: Chilled so they stay firm and form the spider body.
- Small Candy Eyes: Bring the spiders to life and add just the right touch of whimsy.
Variations
I love playing around with this Spooky Spider Cookies Recipe depending on who I’m baking for and what flavors I’m in the mood for. Feel free to get creative—you’ll find these cookies adaptable and forgiving if you want to make them your own.
- Variation: For a chocolate twist, swap half the flour with cocoa powder—my family goes crazy for these fudgy spiders!
- Variation: If peanut butter isn’t your thing, try sunflower seed butter instead for a nut-free option that still tastes rich.
- Variation: Use white chocolate wafers and different colored candy eyes for a fun “ghost spider” look that’s perfect for little ones.
How to Make Spooky Spider Cookies Recipe
Step 1: Cream the Butter and Sugars
Start by combining the softened butter with the brown sugar and granulated sugar in a stand mixer bowl. I like to beat this mixture for about a minute until it’s light and fluffy — it really helps your cookies turn out tender and airy. A quick tip: scraping down the sides a couple of times keeps everything evenly mixed.
Step 2: Add the Peanut Butter and Eggs
Next, stir in the creamy peanut butter until nice and smooth. Then add the eggs, one at a time, and the extra egg yolk—pausing to scrape the bowl after each addition. This prevents lumps and ensures your batter stays velvety. Don’t forget the vanilla extract here; it deepens the flavor beautifully.
Step 3: Mix Dry Ingredients and Combine
In a separate bowl, whisk the flour, cornstarch, baking soda, and salt together. Gradually pour this into your peanut butter mixture, mixing until just combined. Overworking the dough can toughen cookies, so I always stop as soon as I see no more flour streaks.
Step 4: Chill the Dough
Place your dough in the fridge for at least 30 minutes, or up to an hour. I discovered this step is key for cookie shape—it prevents spreading so your spiders stay perfectly round. If, after 30 minutes, your dough’s still sticky, pop it back in for a bit longer.
Step 5: Roll, Sugar Coat, and Bake
Preheat the oven to 375°F (190°C) and line your cookie sheets with parchment. Roll the dough into 1½ tablespoon-sized balls, then roll each one in granulated sugar for a delightful crunchy surface. Space them at least 2 inches apart on the pan to give them room to puff just right. Bake for 8 to 10 minutes, then let them cool directly on the cookie sheet for 5 minutes before the next step.
Step 6: Add the Reese’s and Make Indents
While the cookies cool, get those chilled Reese’s miniature peanut butter cups ready. Gently press one into the top center of each warm cookie, making a little indent. This builds the spider’s body and adds that irresistible peanut butter punch I love in every bite.
Step 7: Create Marshmallow Cobwebs
Pop about a quarter cup of mini marshmallows in a microwave-safe bowl and zap them for around 10 seconds—watch carefully so they puff but don’t overflow. Stir the melted marshmallows down gently, then pull and stretch small bits over the cooled cookies like cobwebs. Marshmallows cool fast, so work quickly and refresh with small batches as needed.
Step 8: Pipe Chocolate for Legs and Eyes
Melt the dark chocolate wafers following package instructions, then let the chocolate rest for about 5 minutes—it’s easier to pipe once it’s not too hot. Snip a tiny corner off a plastic bag to make your piping bag, then carefully pipe a small dab on each cookie’s Reese’s to “glue” on the candy eyes. Next, pipe four “legs” on each side of the Reese’s, creating creepy but cute spider limbs.
Pro Tips for Making Spooky Spider Cookies Recipe
- Chill Those Reese’s Cups: I keep them in the fridge while I prep—the cold chocolate won’t melt quickly when pressed into the warm cookies.
- Marshmallow Timing: The marshmallow cobwebs get sticky fast, so I work in small batches and refresh often for easy handling.
- Use a Small Piping Tip or Snip Very Tiny: Control is everything when making spider legs—too big and it looks messy, too thin and it breaks easily.
- Don’t Skip Chilling the Dough: I used to skip this step and ended up with flat, sad spiders. Chilling is your friend for perfect shape and texture.
How to Serve Spooky Spider Cookies Recipe
Garnishes
I usually keep it simple here: those adorable candy eyes are all you need to bring these spider cookies to life. If you want to get fancy, a light dusting of powdered sugar “spider dust” or a drizzle of white chocolate for extra cobweb effect can be amazing. Plus, a few extra mini marshmallows on the side for snacking never hurt!
Side Dishes
These cookies go perfectly alongside a glass of cold milk or a warm mug of spiced pumpkin latte—my personal favorite combo! If you’re hosting a Halloween party, a charcuterie board with cheeses and nuts complements the peanut buttery richness really well, balancing the sweetness with some savory bites.
Creative Ways to Present
I’ve had fun arranging these Spooky Spider Cookies Recipe creations on a big platter lined with faux spider webs and a few plastic spiders for effect. Another time, I set them up on individual Halloween-themed cupcake liners for easy grab-and-go party favors. Serve with small bowls of “blood” (cherry sauce) for dunking—everyone gets a kick out of that!
Make Ahead and Storage
Storing Leftovers
Once decorated, I store the cookies in an airtight container at room temperature for up to 3 days. If you want to keep them fresh longer, I recommend layering parchment paper between cookies to keep the marshmallow webs and chocolate legs intact—no one wants a spider pile-up!
Freezing
Freezing already decorated spider cookies is tricky because of the delicate marshmallow and chocolate details. Instead, I freeze the cookie dough balls before baking—they actually freeze great and thaw in the fridge overnight. Then you can bake fresh cookies right when you need them and decorate as usual.
Reheating
I don’t recommend reheating decorated Spooky Spider Cookies as the marshmallow cobwebs and chocolate tend to melt or lose their shape. If you want to warm up just plain peanut butter cookies (freshly baked or reheated from frozen dough), a quick 10-second zap in the microwave revives that freshly-baked softness without drying them out.
FAQs
-
Can I make these cookies nut-free?
Absolutely! You can substitute the creamy peanut butter with sunflower seed butter or soy nut butter to keep a similar texture and moisture. Just be sure the substitute is creamy and smooth for the best results.
-
Why do I need to chill the dough?
Chilling the dough firm ups the fats and reduces spreading during baking, so your spider shapes stay nice and round. It also helps develop flavors, making those cookies extra tasty.
-
What if I don’t have candy eyes?
No worries! You can replace candy eyes with tiny dots of white chocolate or frosting and use a small dab of melted chocolate for the pupils. Or skip the eyes altogether for a minimalist spider look.
-
How do I store leftover marshmallow cobwebs?
Marshmallow cobwebs are best used fresh as they harden and become brittle over time. If you want to save some, keep them airtight at room temperature and use within a day to avoid losing that stretchy texture.
-
Can I make this recipe gluten-free?
Yes! Swap the all-purpose flour for a gluten-free blend (make sure it has xanthan gum if your blend doesn’t include it). The texture will be slightly different but still delicious.
Final Thoughts
I hope you enjoy making this Spooky Spider Cookies Recipe as much as I do. There’s something truly special about combining classic peanut butter cookie comfort with a little creative flair that brings the Halloween spirit straight into your kitchen. Whether you’re baking with kids, want a festive party treat, or just love peanut butter and chocolate (hello, me!), these spiders are sure to delight. Don’t be surprised if you catch yourself making these even when it’s not October—I know I have!
Print
Spooky Spider Cookies Recipe
- Prep Time: 1 hour
- Cook Time: 10 minutes
- Total Time: 1 hour 10 minutes
- Yield: 40 cookies 1x
- Category: Dessert
- Method: Baking
- Cuisine: American
Description
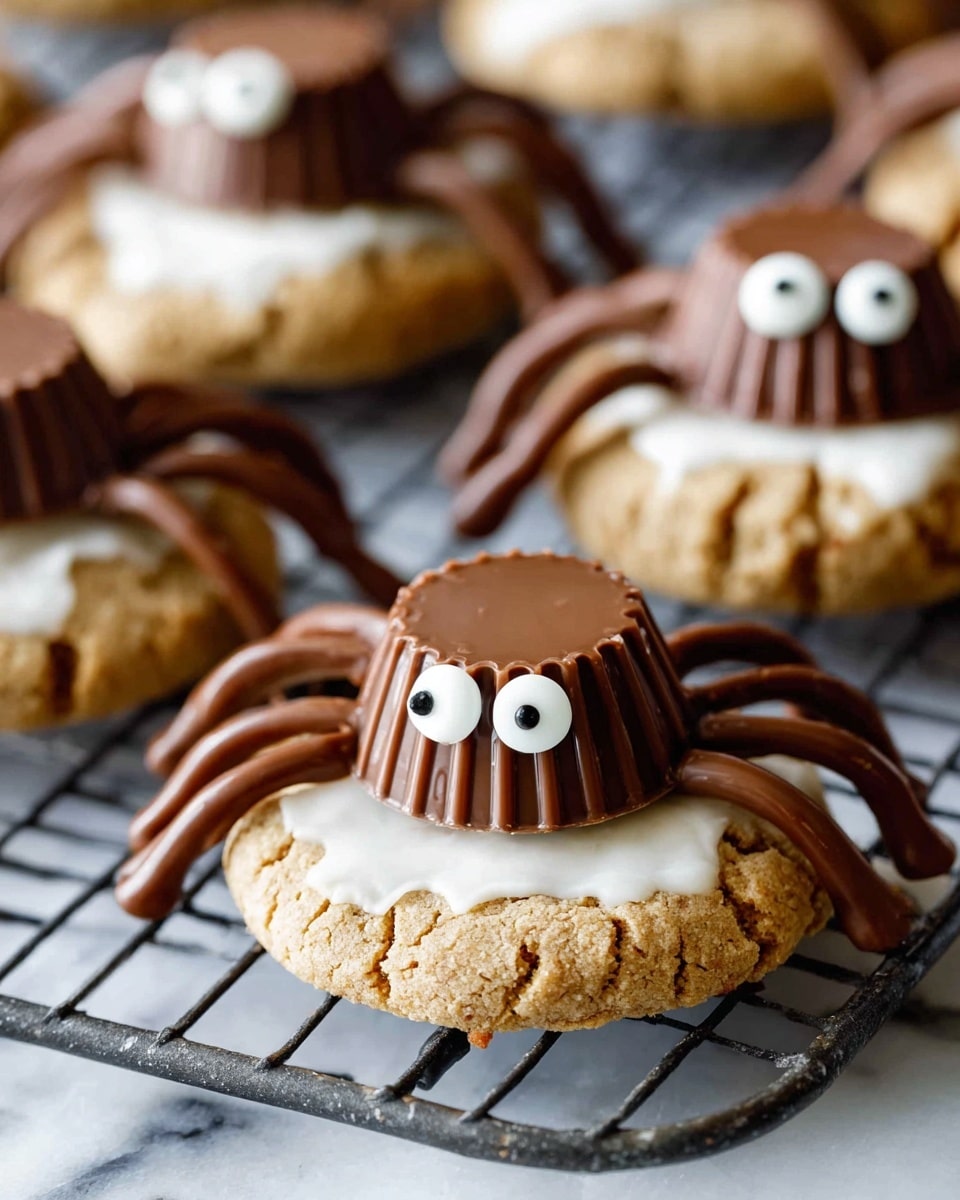
These Spooky Spider Cookies are a perfect Halloween treat combining the rich flavors of peanut butter and dark chocolate with fun, creepy marshmallow cobweb decorations. Soft peanut butter cookies are topped with Reese’s mini peanut butter cups, edible candy eyes, and delicate marshmallow spider webs, making them as delightful to look at as they are to eat.
Ingredients
Cookie Dough
- 1 ¼ cup (282 g) unsalted butter, softened to room temperature
- 1 ½ cup (300 g) light brown sugar, tightly packed
- ¼ cup (50 g) granulated sugar
- 1 cup (280 g) creamy peanut butter
- 2 eggs + 1 egg yolk
- 1 teaspoon vanilla extract
- 3 ¼ cups (400 g) all-purpose flour
- 1 Tablespoon corn starch
- 1 ½ teaspoons baking soda
- 1 ½ teaspoons salt
- ½ cup granulated sugar (for rolling)
Decorations
- 10 ounces (285 g) dark chocolate melting wafers
- 2 cups mini marshmallows, divided
- 40 Reese’s miniature peanut butter cups, chilled
- Small candy eyes for decorating
Instructions
- Make the Cookie Dough: In the bowl of a stand mixer, combine the softened butter with the light brown and granulated sugars and beat for about 1 minute until well combined. Add the creamy peanut butter and mix until incorporated. Then, add the eggs and egg yolk one at a time, scraping down the sides and bottom of the bowl after each addition. Stir in the vanilla extract.
- Mix Dry Ingredients: In a separate medium bowl, whisk together the all-purpose flour, corn starch, baking soda, and salt. Gradually add this flour mixture into the peanut butter batter, mixing thoroughly and scraping the bowl occasionally to ensure even blending.
- Chill the Dough: Place the cookie dough into the refrigerator for 30 minutes to 1 hour. This step firms up the dough to prevent spreading and helps achieve the perfect cookie texture.
- Prepare for Baking: Preheat your oven to 375°F (190°C) and line cookie sheets with parchment paper. Pour the remaining ½ cup granulated sugar into a small bowl for rolling.
- Shape and Bake Cookies: Remove the chilled dough from the fridge and roll into 1 ½ tablespoon-sized balls. Roll each ball through the sugar and place them on the prepared cookie sheets spaced at least 2 inches apart. Bake for 8-10 minutes. Once out of the oven, allow the cookies to cool on the sheet for 5 minutes.
- Add Reese’s Indent: Gently press a chilled Reese’s miniature peanut butter cup into the center of each warm cookie to make an indent without breaking the cookie. Let the cookies cool completely on the cookie sheets before continuing.
- Prepare Marshmallow Cobwebs: Place about ¼ cup of mini marshmallows in a microwave-safe dish and heat for about 10 seconds until they begin to puff. Stir the marshmallows to deflate slightly. Use your fingers to pinch, stretch, and pull the marshmallow mixture, draping it over the cooled cookies to create cobweb effect. Repeat with remaining marshmallows as needed. Let the marshmallow set for several minutes.
- Melt Chocolate Wafers: Prepare the dark chocolate melting wafers according to package directions. Allow the melted chocolate to cool for 5 minutes to achieve a workable consistency.
- Decorate Spiders: Pour melted chocolate into a small ziplock bag and snip a tiny corner. Pipe a small amount of chocolate into the Reese’s indent on each cookie. While the chocolate is still soft, place one Reese’s cup (with the larger surface facing down) into the chocolate on each cookie. Pipe four “legs” on each side of the peanut butter cup with chocolate. Dab chocolate on the backs of candy eyes and stick them onto the Reese’s cup to create spider eyes.
Notes
- Chilling the dough helps prevent cookies from spreading too much and produces a thicker, chewier cookie.
- Keep the Reese’s cups chilled until use to avoid melting when pressed into warm cookies.
- Work quickly while stretching the marshmallow spider webs as they set and harden fast.
- If the melted chocolate warms too much, let it cool slightly to improve control during piping.
- Cookies can be stored in an airtight container at room temperature for up to 3 days.
Nutrition
- Serving Size: 1 cookie
- Calories: 210
- Sugar: 18g
- Sodium: 210mg
- Fat: 13g
- Saturated Fat: 5g
- Unsaturated Fat: 7g
- Trans Fat: 0g
- Carbohydrates: 22g
- Fiber: 1g
- Protein: 4g
- Cholesterol: 35mg


