

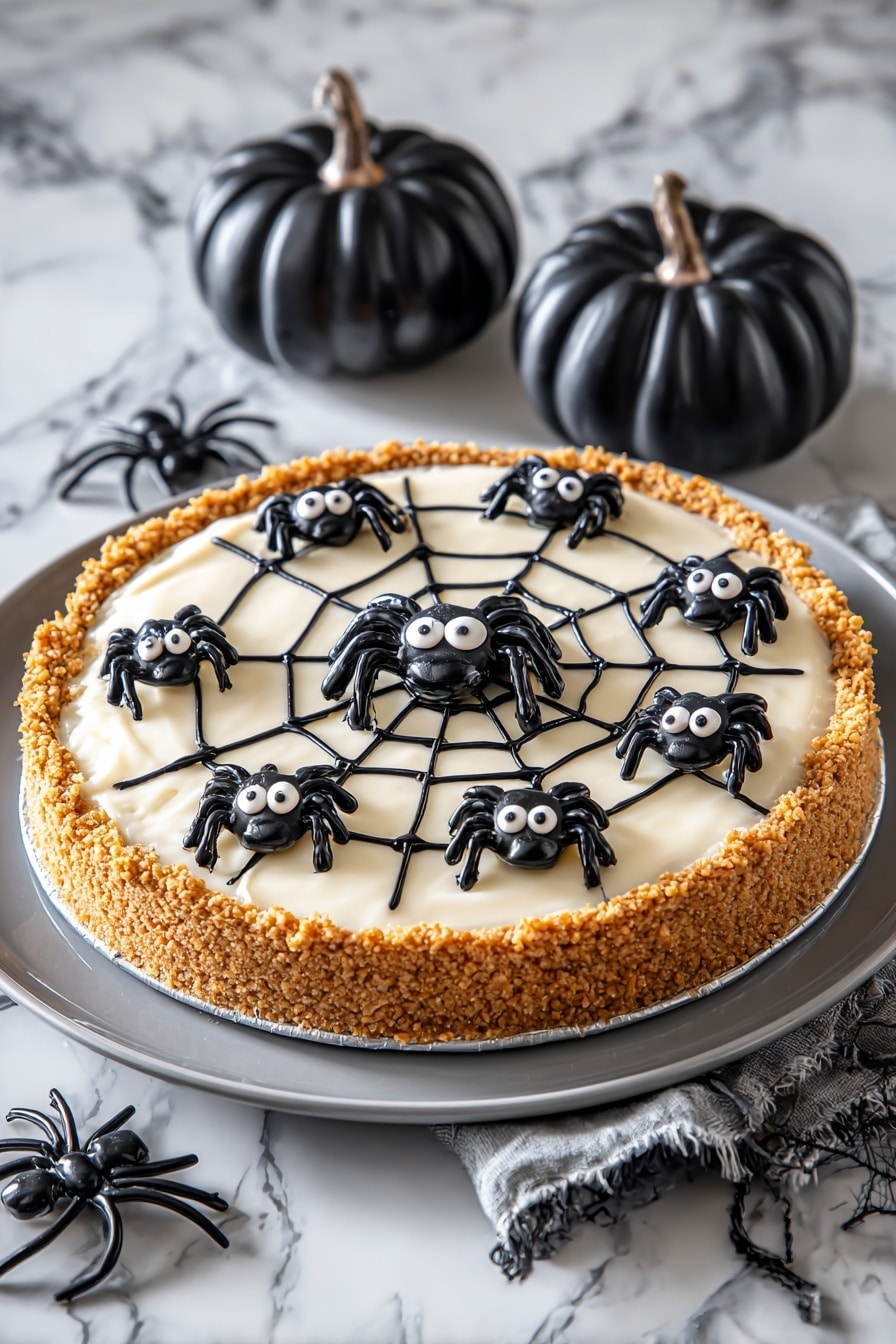
If you’re looking for a fun and festive way to impress your guests this Halloween, I’ve got just the thing for you—a fan-freaking-tastic Spider Pie for Halloween Recipe that’s as delicious as it is spooky! This layered pumpkin cheesecake pie wrapped in a creamy graham cracker crust and decorated with adorable spider-shaped Oreos is my absolute favorite way to celebrate the season. It’s surprisingly simple to make, yet the presentation is a total showstopper. Stick around because I’ll walk you through every step, share my little tricks, and help you nail this creepy-cute dessert perfectly.
Why You’ll Love This Recipe
- Deliciously Layered Flavors: The creamy cheesecake layers beautifully balance pumpkin spice with classic vanilla, making it a perfect fall treat.
- Fun & Festive Presentation: The cute mama spider and baby spiders made from Oreos add a spooky twist that kids and adults adore alike.
- Easy to Assemble: Even if you’re a bit nervous about fancy desserts, this recipe breaks it down into manageable steps that anyone can follow.
- Make-Ahead Friendly: Prep in advance and chill, so Halloween day is stress-free but still impressive.

Ingredients You’ll Need
Every ingredient in this Spider Pie for Halloween Recipe plays a role in creating that luscious, cozy flavor and the perfect texture. When shopping, I like to grab good-quality cream cheese for that extra smooth filling and make sure my pumpkin puree isn’t the pie filling kind, just pure pumpkin. Trust me, it makes a huge difference!
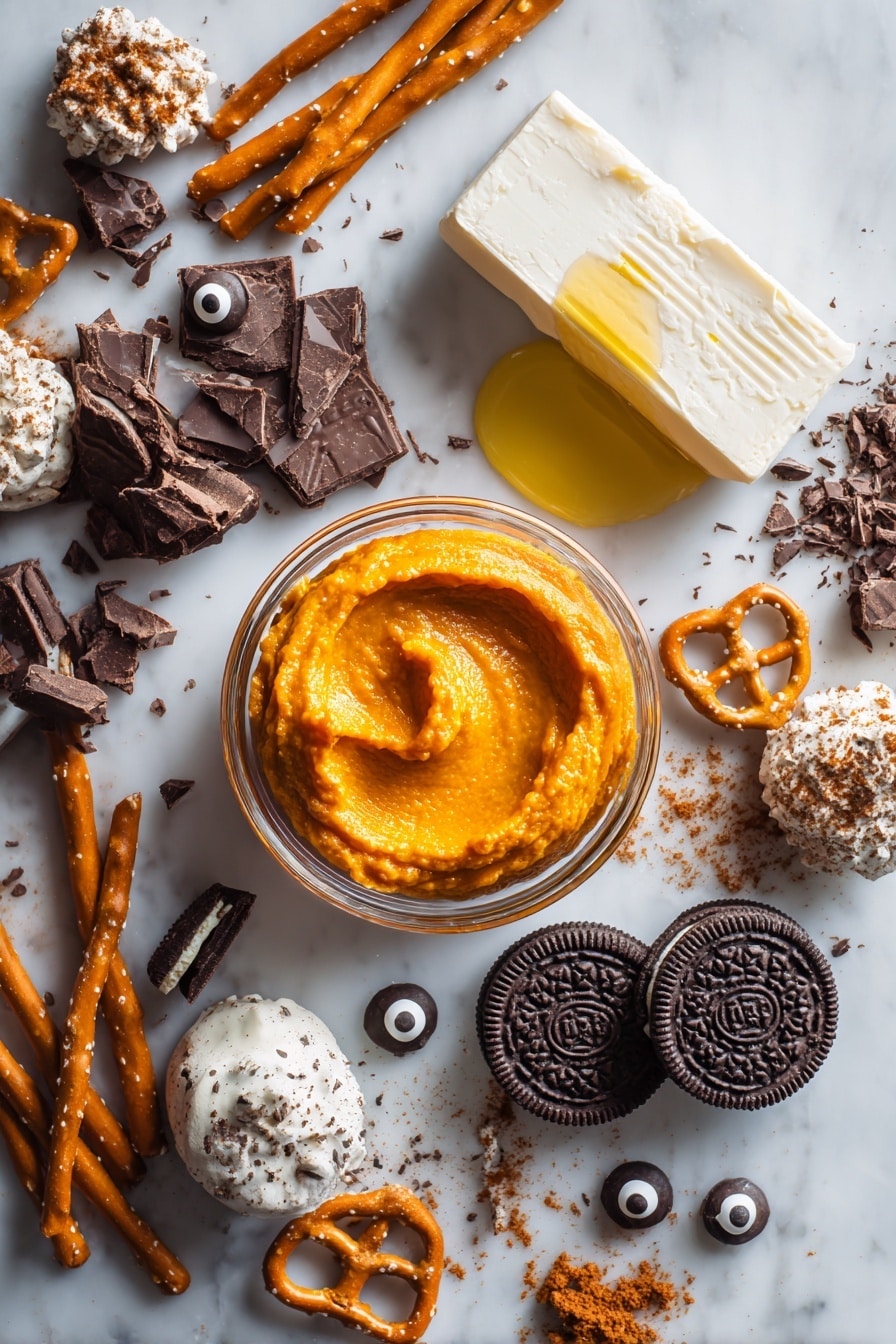
- Graham cracker crumbs: For that buttery, crunchy crust base—store-bought or homemade works great.
- Brown sugar: Adds subtle caramel notes that perfect the crust’s flavor.
- Unsalted butter: Melts into the crumbs to bind the crust and mixes smoothly in the filling.
- Full-fat cream cheese: Make sure it’s softened at room temperature for a smooth, fluffy cheesecake filling.
- Powdered sugar: Sweetens the filling and keeps it silky without grit.
- Vanilla extract: Essential for depth and warmth in your filling.
- Salt: Enhances all the flavors and balances the sweetness.
- Pumpkin puree: The star ingredient for that unmistakable fall vibe—don’t use pumpkin pie filling here.
- Pumpkin pie spice: Cinnamon, nutmeg, cloves—the essence of autumn wrapped in a teaspoon.
- Semi-sweet chocolate: For that rich spiderweb frosting, melts down to pipe perfectly.
- Black cocoa powder: Gives your spiderweb frosting that intense dark color.
- Refined coconut oil or unsalted butter: Makes the frosting glossy and pipeable.
- Oreos (normal size and mini): These become your spooky spider bodies and babies—mini Oreos are adorable for baby spiders.
- Candy eyes (normal and mini): Brings those little spider critters to life!
- Mini pretzels: Cut into legs for the mama spider—adds crunch and charm.
Variations
I love making this Spider Pie for Halloween Recipe my own by tweaking flavors or decorations depending on the mood or the crowd. Don’t hesitate to personalize it! Halloween is all about fun and creativity—and pies!
- Make it vegan: I switched cream cheese and butter for plant-based versions once, and though the texture changes a bit, it still satisfied everyone at my party.
- Spice it up: Adding a teaspoon of ginger or allspice to the pumpkin layer gives the pie an extra warm kick I’m obsessed with.
- Mini pie cups: I once made this recipe into little mason jar desserts for a Halloween potluck—double the fun and easier to serve.
- Alternative crust: Swap graham cracker crumbs with crushed gingersnaps for an extra spicy base that pairs beautifully with pumpkin.
How to Make Spider Pie for Halloween Recipe
Step 1: Craft the Perfect Crust
Start by mixing your graham cracker crumbs, brown sugar, and salt in a bowl. This step might seem simple, but I learned that evenly coating the crumbs with sugar and salt makes all the difference in flavor. Then, pour in your melted butter and stir until everything’s clumped together like wet sand. Press this mixture firmly into your pie pan, making sure it covers the bottom and goes slightly up the sides—this crust is going to be thick and sturdy enough to hold your luscious layers. Pop it in your freezer to firm up while you work on the filling. Freezing the crust not only helps it set but also keeps the layers from mixing later.
Step 2: Whip Up the Creamy Cheesecake Filling
The filling is where the magic happens. Using an electric hand mixer, beat your softened cream cheese and butter until super fluffy. It took me a couple of tries before I realized the ingredients have to be truly room temperature; otherwise, your filling ends up lumpy or hard to incorporate. Add powdered sugar, vanilla, and a pinch of salt, then mix again until smooth and velvety.
Take about a quarter of this white cheesecake mixture out into a separate bowl—this will transform into your pumpkin layer. Beat in the pumpkin puree and pumpkin pie spice gently on low speed until just combined.
Step 3: Layer It Up Like a Pro
Now it’s time to assemble the layers. Spread half of your white cheesecake filling evenly over the chilled crust. This first layer freezes pretty quickly—put the pie back in the freezer for 20 to 30 minutes until firm enough to handle without mixing the next layer.
Next, smooth the pumpkin-spiced cheesecake over the white base, then chill again for another 20 to 40 minutes until that layer is set enough to add the remaining white cheesecake filling on top. It’s all about patience here, but trust me, those layers really impress once sliced.
Step 4: Design Your Spooky Spiderweb and Spiders
This is my favorite part—the decoration! Melt your semi-sweet chocolate in the microwave in short bursts, stirring often. Mixing the cocoa powder and coconut oil (or butter) turns this into a luscious, glossy frosting perfect for piping. If the frosting feels too thin to hold shape, just chill it briefly and stir occasionally until it thickens to a fudge-like consistency.
Using a piping bag fitted with a small round tip (Wilton #5 works great), pipe a plus sign (+) on the top cheesecake layer right on the pie, then pipe an X over it. Connect the points by drawing gentle arcs between the lines to form your spiderweb. This technique creates an authentic web pattern without fuss.
For the spiders: carefully slice mini pretzels into legs with a sharp knife, then gently open a full-sized Oreo and place pretzel legs inside. Pipe a tiny amount of frosting to ‘glue’ the legs in place if you want it sturdier, but I found the legs stay put well enough on their own. Stick on two candy eyes with a dab of frosting and sandwich the Oreo back together. Place this mama spider at the center of your pie.
The baby spiders—made from mini Oreos with candy eyes glued on with frosting—surround mama spider. Use leftover chocolate frosting to pipe four tiny straight legs on each side of the baby spiders with a smaller piping tip. The effect is adorable and spooky, and kids love finding all the little spider babies!
Pro Tips for Making Spider Pie for Halloween Recipe
- Room Temperature is Key: Make sure your cream cheese and butter are fully softened to avoid lumps in the filling.
- Freeze Between Layers: Patience here saves you from smudged layers—each layer needs to be firm before adding the next.
- Chocolate Frosting Consistency: Adjust thickness by chilling a bit; too runny frosting won’t hold your spiderweb shape.
- Candy Eye Storage: Don’t refrigerate candy eyes—they can bleed color when cold and moist, which ruins the look.
How to Serve Spider Pie for Halloween Recipe
Garnishes
I usually keep garnishes simple with this pie—the spider decorations are the main event. Sometimes, I add a light dusting of cinnamon or cocoa powder around the edges for a subtle extra touch of warmth. If you want to get fancier, a dollop of whipped cream sprinkled with pumpkin pie spice is heavenly alongside each slice.
Side Dishes
This Spider Pie pairs perfectly with a hot cup of spiced apple cider or a cozy chai latte. For a party spread, I like to serve it alongside salty snacks like popcorn or a cheese board—sweet and savory together just rocks.
Creative Ways to Present
One year, I made individual mini spider pies in tartlet pans for a Halloween potluck, decorating each with tiny baby spiders for a playful touch. Another time, I set this pie on a black cake stand surrounded by fake spider webs and little plastic spiders for extra spooky ambiance—guests loved how the presentation enhanced the theme!
Make Ahead and Storage
Storing Leftovers
I usually cover the whole pie tightly with plastic wrap and keep it refrigerated for up to 4 days. The layers stay nice and firm, and the spider decorations hold up well as long as the pie isn’t transported too much after assembling.
Freezing
If you want to freeze this pie, wrap it tightly in plastic wrap and then foil to avoid freezer burn. I’ve found it freezes nicely for up to a month. Thaw overnight in the fridge—just be mindful that the spider decorations may get a little softer and delicate after freezing, so add those fresh if possible.
Reheating
This pie is best served chilled, so I skip reheating altogether. When slicing leftovers, I let the pie sit out at room temperature for 10-15 minutes to soften slightly for the perfect creamy bite.
FAQs
-
Can I use store-bought pumpkin pie spice for the Spider Pie for Halloween Recipe?
Absolutely! Store-bought pumpkin pie spice works perfectly in this recipe. It contains the essential warming spices like cinnamon, nutmeg, and cloves that add that classic pumpkin flavor. If you want to customize your spice blend, you can always adjust the amounts or add a pinch of ginger for a little extra warmth.
-
Can I prepare this Spider Pie for Halloween Recipe ahead of time?
Yes! This pie is fantastic for making a day or two ahead of your party. Just assemble it fully, decorate, and keep it refrigerated. The flavors even deepen with time. Just be cautious about transporting it after adding the delicate spider decorations.
-
What can I substitute for the Oreo spiders if my guests have allergies?
If Oreos aren’t an option, you can make spider decorations with small chocolate truffles and pipe eyes with white and dark chocolate. Alternatively, some people use licorice strings for legs and candy eyeballs glued on with frosting. Get creative—it’s all about the spooky vibes!
-
Is this Spider Pie for Halloween Recipe suitable for kids to help make?
Definitely! Kids love assembling the spiders and helping with the frosting piping (with supervision). It’s a great way to get them involved in the kitchen while having fun preparing a festive dessert.
Final Thoughts
I absolutely love how this Spider Pie for Halloween Recipe brings together my favorite fall flavors with a playful twist that never fails to wow guests. When I first tried this recipe, I was hooked by how easy it was to make such a layered, elegant dessert without stress. More importantly, watching my family’s eyes light up when they see the mama spider and her babies makes every minute in the kitchen worth it. Trust me, once you make this for Halloween, it’ll become your go-to party dessert—and I can’t wait for you to join the spider pie fan club!
Print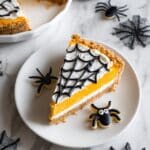
Spider Pie for Halloween Recipe
- Prep Time: 30 minutes
- Cook Time: 0 minutes
- Total Time: 2 hours
- Yield: 12 slices 1x
- Category: Dessert
- Method: No-Cook
- Cuisine: American
Description
This Spider Pie recipe is a fun and festive no-bake cheesecake dessert perfect for Halloween. Featuring a crunchy graham cracker crust, creamy vanilla and pumpkin cheesecake layers, and decorated with adorable Oreo spiders and a chocolate spiderweb, it’s both visually impressive and deliciously creamy. The rich pumpkin-spiced filling complements the smooth cheesecake for a unique treat that’s sure to be the centerpiece of your Halloween celebrations.
Ingredients
Crust
- 1 1/2 cups (180 grams) graham cracker crumbs
- 1/4 cup (50 grams) brown sugar
- 1/8 teaspoon salt
- 6 tablespoons (84 grams) unsalted butter, melted
Filling
- 16 ounces (454 grams) full-fat cream cheese, room temperature
- 1/2 cup (113 grams) unsalted butter, room temperature
- 2 cups (240 grams) powdered sugar
- 1 tablespoon vanilla extract
- pinch salt
- 1 teaspoon pumpkin pie spice
- 7.5 ounces (212 grams) canned pumpkin puree (half of a 15-ounce can)
Spiderweb and Baby Spider Leg Frosting
- 1/3 cup (56 grams) semi-sweet chocolate, chopped or chocolate chips
- 1 tablespoon black cocoa powder
- 3/4 teaspoon refined coconut oil or unsalted butter
Mama Spider
- 1 normal-sized Oreo
- 2 normal-sized candy eyes
- Mini pretzels
Baby Spiders
- 8 mini Oreos
- 16 mini candy eyes (1/4 inch or 6 mm in diameter)
- Leftover black frosting from the spiderweb
Instructions
- Prepare the crust: In a medium mixing bowl, stir together graham cracker crumbs, brown sugar, and salt until well combined. Stir in the melted butter until the mixture is cohesive. Press the crust mixture evenly into the bottom and up the sides of an ungreased 9-inch pie pan, patting to form a thick crust. Freeze the crust while preparing the filling to help it set.
- Prepare the filling: In a large bowl, use an electric hand mixer to beat the cream cheese, butter, powdered sugar, vanilla extract, and a pinch of salt until the mixture is light and fluffy. Remove one-quarter (about 197 grams) of this cheesecake filling into a separate bowl. To this smaller portion, gently beat in the pumpkin puree and pumpkin pie spice on low speed until combined. Set this pumpkin-spiced filling aside.
- Assemble the layers: Spread half (approximately 294 grams) of the plain white cheesecake filling over the frozen crust layer. Place the pie in the freezer for 20-30 minutes, or until the first layer is firm enough to comfortably spread the pumpkin layer over it. Next, evenly spread the entire pumpkin filling over the white layer. Freeze the pie again for 20-40 minutes until this layer is firm. Finally, spread the remaining white cheesecake filling evenly on top.
- Make the spiderweb frosting: Melt the semi-sweet chocolate in a microwave-safe bowl at half power in 30-second increments, stirring after each increment until fully melted. Stir in the black cocoa powder and refined coconut oil or unsalted butter; this will turn the chocolate into a glossy, fudge-like frosting. If the frosting is too runny for piping, allow it to cool at room temperature or refrigerate briefly while stirring often to thicken. Fill a piping bag fitted with a Wilton #5 tip with the black frosting. Pipe a plus sign (+) shape on the pie, followed by an X over it, then connect the lines with curved segments to create a spiderweb pattern.
- Assemble the mama spider: Use a sharp paring knife to carefully separate the normal-sized Oreo cookie into halves. Cut mini pretzel sticks into small leg-sized pieces. Place the pretzel legs between the two Oreo wafers with the legs pointing downwards like spider legs. To secure legs, optionally pipe a little frosting on the bottom wafer before placing the legs. Pipe small dots of frosting on two normal-sized candy eyes and attach them to the top Oreo wafer. Position the top wafer with eyes on the bottom wafer with legs to complete the spider and place it in the center of the pie.
- Create the baby spiders: Pipe small dots of leftover black frosting on the backs of each of the 16 mini candy eyes and attach two eyes per mini Oreo cookie. Place the eight mini Oreo baby spiders around the mama spider on the pie. Using the black frosting and a smaller piping tip (such as Wilton #2), pipe four small straight legs on each side of every baby spider to complete their look.
- Final assembly: Arrange the decorated mama spider in the center of the pie with the baby spiders surrounding her on the spiderweb. Refrigerate or freeze until ready to serve for best texture and to keep decorations intact.
Notes
- Use full-fat cream cheese at room temperature for the smoothest filling texture.
- The graham cracker crust can be frozen ahead to speed setting.
- Do not refrigerate candy eyes before decorating as moisture may cause the pupils to bleed or smear.
- To secure the mini pretzel legs on the Oreo, pipe a little chocolate frosting as glue and let it harden.
- This no-bake pie can be stored covered in the refrigerator for up to 3 days.
- Cut mini pretzel sticks carefully with a sharp knife for authentic spider leg appearance.
Nutrition
- Serving Size: 1 slice (1/12th of pie)
- Calories: 390
- Sugar: 28g
- Sodium: 210mg
- Fat: 28g
- Saturated Fat: 16g
- Unsaturated Fat: 10g
- Trans Fat: 0g
- Carbohydrates: 29g
- Fiber: 1g
- Protein: 5g
- Cholesterol: 70mg


