

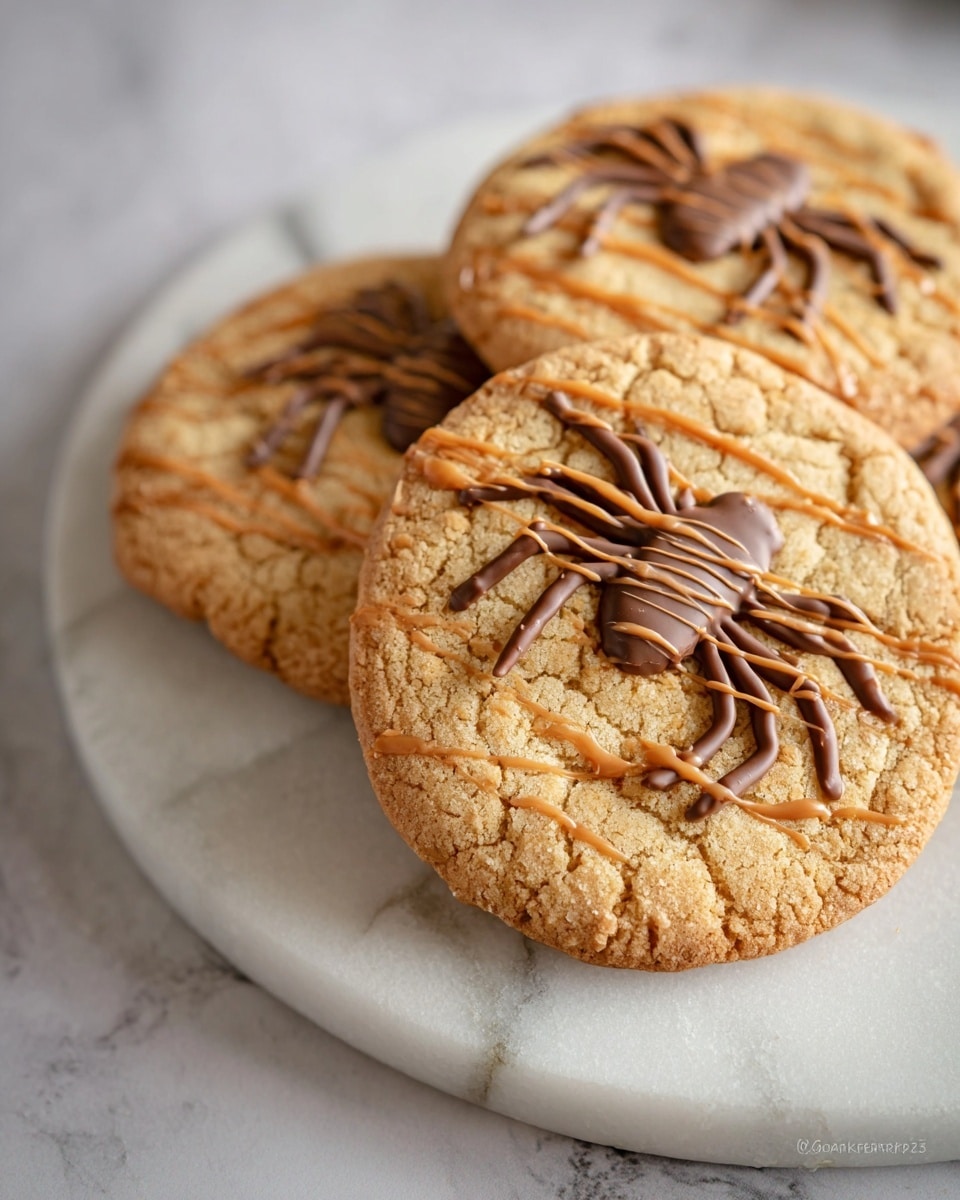
If you’re searching for a fun twist on a classic treat, then you’ve got to try this Spider Chocolate Chip Cookies Recipe. It’s not just any chocolate chip cookie — these little critters come to life with a chocolate “spider legs” design that’s super simple to do but looks impressively spooky and cute. I love this recipe because it blends the perfect chewy texture of gluten-free cookies with that gooey hit of chocolate chips. Whether it’s for a Halloween party or a cozy night in, you’ll find that these cookies steal the show — and your family will go crazy for them!
Why You’ll Love This Recipe
- Gluten-Free and Delicious: I was amazed how soft and chewy these cookies turned out using gluten-free flour without sacrificing flavor.
- Fun & Festive Presentation: The spider leg design adds a playful spooky touch, making them perfect for parties or kid-friendly gatherings.
- Quick and Easy: You can whip up this dough and have cookies baked in under 20 minutes—great for last-minute celebrations.
- Customizable Chocolate Goodness: With double chocolate chips inside and on top, each bite bursts with melty richness.

Ingredients You’ll Need
The beauty of this Spider Chocolate Chip Cookies Recipe is in its simple ingredients working harmoniously — especially with gluten-free flour that makes them accessible but still delightful. I always recommend using quality butter and pure extracts to bring out that classic cookie flavor.
- Gluten-free 1-to-1 baking flour: This blend makes the cookie texture just right; don’t swap for plain rice flour or you’ll lose the moisture balance.
- Baking soda: Helps your cookies rise and spread just enough for that soft chew.
- Real Salt: Enhances the sweetness and deepens overall flavor better than regular table salt.
- Brown sugar: Adds a warm molasses note and keeps cookies wonderfully moist.
- Granulated sugar: Gives crunch and balances the sweetness.
- Butter: Make sure it’s softened but not melted for the right cookie structure.
- Gluten-free vanilla extract: I usually grab a pure extract to get that authentic flavor burst.
- Gluten-free almond extract: This little twist adds subtle depth — you can skip if you’re not into nuts.
- Eggs: They bind everything perfectly and keep the dough tender.
- Chocolate chips: I recommend using semi-sweet for the classic combo, but you can mix milk or dark chocolate chips too.
Variations
I love to make this Spider Chocolate Chip Cookies Recipe my own, depending on the season or mood. Don’t be afraid to experiment — cookies are such a forgiving treat!
- Add a pinch of cinnamon or pumpkin spice: I tried this on a chilly fall evening, and the warm spices really elevated the cookies’ cozy vibe.
- Swap chocolate chips for chunks: When I used chopped dark chocolate bars, my family said it created a more “gourmet” bite.
- Use vegan butter and flax eggs: I tested this for a plant-based friend, and the texture stayed just as soft and delicious.
- Mix in chopped nuts or dried cherries: For extra texture and flavor, this little addition has become my secret crowd-pleaser twist.
How to Make Spider Chocolate Chip Cookies Recipe
Step 1: Cream Sugars and Butter Until Smooth
Start by preheating your oven to 350°F (175°C). Then, in your stand mixer fitted with the paddle attachment, beat together the brown sugar, granulated sugar, and softened butter until everything is silky smooth and combined. This step is crucial because it builds the base for tender, chewy cookies with that perfect balance of sweetness. I usually scrape down the sides once or twice to make sure every bit is mixed in well.
Step 2: Add Extracts and Eggs
Next, add your gluten-free vanilla and almond extracts to the creamed mixture for an extra flavor boost — trust me, this combo really makes each bite pop. Then, add the eggs one at a time, mixing on low speed after each addition so the batter emulsifies nicely without getting too runny. I learned that adding eggs slowly helps keep the dough dense and chewy rather than cakey.
Step 3: Combine Dry Ingredients Separately
In a separate bowl, whisk together the gluten-free 1-to-1 baking flour, baking soda, and Real Salt. This combination is key for delivering that classic cookie structure and perfectly balanced salty-sweet flavor. Using a separate bowl lets you evenly distribute the leavening agent and keeps everything light when it’s added to the wet mixture.
Step 4: Mix Dry Ingredients into Wet
Slowly add the dry ingredients into the wet butter mixture, mixing on low until combined. You want the dough to form consistently without overmixing — I’ve found stopping as soon as no streaks of flour remain keeps the cookies tender and prevents them from turning tough. Then gently fold in 1 to 2 cups of chocolate chips so you get even distribution of melty chocolate goodness in every bite.
Step 5: Scoop and Add Extra Chocolate Chips
Drop spoonfuls of cookie dough onto greased cookie sheets, spacing them well because they’ll spread a little during baking. Here’s my favorite trick: before baking, press 1 or 2 extra chocolate chips into the top of each cookie. Not only does this make them look beautiful, but it also gives you the perfect spot to “draw” spider legs later. It’s those little details that make this recipe feel extra special — my kids love helping with this part!
Step 6: Bake and Cool
Bake the cookies for 9 to 11 minutes, or until the edges are set but the centers still look soft — they will continue to firm up as they cool. Remove them from the oven and let them cool on the pan for a few minutes before transferring to a wire rack. This step keeps the bottoms crispy without overbaking the middle. I always tell friends not to skip the cooling; warm cookies are tempting but too delicate to decorate!
Step 7: Melt Chocolate and Draw Spider Legs
While cookies cool, melt ½ cup of chocolate chips in a microwave-safe bowl by heating them for one minute, stirring halfway through. Then pour the melted chocolate into a piping bag and snip off a tiny tip for precision. Carefully “draw” spider legs extending from the chocolate chips on the top of each cookie — this is the magical finishing touch. It’s easier than it looks; just drag the chocolate out in short lines around the chip. I discovered this trick after a few attempts, and it really brings the cookie theme alive.
Enjoy these wonderful spider-shaped chocolate chip cookies warm or at room temperature — I promise you, they’ll vanish fast!
Pro Tips for Making Spider Chocolate Chip Cookies Recipe
- Use Room Temperature Butter: It makes creaming quicker and helps the cookie’s texture stay tender, I learned this after struggling with greasy dough.
- Don’t Overmix Once Flour is Added: Overworking gluten-free flour can make cookies crumbly; stopping when the dough just comes together is key.
- Press Extra Chocolate Chips Before Baking: It creates an easy anchor point for your spider legs design and ups the chocolate factor.
- Let Cookies Cool Fully Before Decorating: This prevents melted chocolate from sliding off or spreading too much.
How to Serve Spider Chocolate Chip Cookies Recipe
Garnishes
When it comes to garnishes, I like to keep it simple because the spider legs are already a centerpiece. Sometimes I dust a tiny pinch of powdered sugar over the cooled cookies for a “misty” look — it adds a subtle elegance without hiding the fun details.
Side Dishes
These cookies pair perfectly with a cold glass of milk or a mug of warm chai tea. On a chilly evening, I love serving them alongside homemade pumpkin soup or even a fruit smoothie for a balanced snack that satisfies your sweet tooth without weighing you down.
Creative Ways to Present
For Halloween parties, I once arranged these Spider Chocolate Chip Cookies on a platter lined with fake spider webs and plastic spiders — it looks super spooky but is completely edible and fun. Another favorite is packaging a few cookies in cello bags tied with festive twine as special take-home treats.
Make Ahead and Storage
Storing Leftovers
I keep my leftover cookies in an airtight container at room temperature — they stay soft and chewy for about 3-4 days. If they get a bit firm, just pop a slice of bread in the container to help retain moisture, a little trick I picked up that works like magic.
Freezing
These cookies freeze wonderfully! I put them in a single layer on a baking sheet first, freeze solid, then transfer to a freezer-safe bag so they don’t stick together. Frozen cookies last up to 3 months — perfect for making batches ahead of time.
Reheating
To enjoy frozen cookies, I thaw them at room temp, then pop them in a 300°F oven for about 3-5 minutes to warm them up and revive that fresh-baked softness. If you’re in a hurry, just a 10-second zap in the microwave works, but watch out — they can get chewy quickly if overheated.
FAQs
-
Can I make this Spider Chocolate Chip Cookies Recipe without gluten-free flour?
Absolutely! You can substitute all-purpose flour if gluten isn’t an issue for you, but the texture will be slightly different — a bit more classic and less chewy. Just use the same amount and keep an eye on baking time.
-
What’s the best way to draw the spider legs with melted chocolate?
Melt your chocolate chips thoroughly but don’t overheat to avoid burning. Use a piping bag with a tiny snipped tip or even a toothpick to carefully drag short lines radiating from each chocolate chip on top of the cookie. Practice on parchment paper if you want to build confidence first!
-
Can I use chocolate chunks instead of chips?
Yes! Chocolate chunks melt differently and can create more intense pockets of chocolate in your cookie. For the spider leg design, chips work best due to their size and shape but you could try small chunks if you prefer.
-
Do I need to grease the baking sheet for these cookies?
Greasing the baking sheet or lining it with parchment paper is necessary to prevent sticking and help cookies bake evenly. I usually grease lightly with butter or use silicone baking mats for easy cleanup.
-
How long do these cookies stay fresh?
Stored in an airtight container at room temperature, they stay fresh for about 3-4 days. For longer storage, freezing is your friend!
Final Thoughts
Honestly, this Spider Chocolate Chip Cookies Recipe has become a family favorite for me, especially when I want something that’s equally playful and delicious. The way the chocolate spiders come to life on each cookie feels like a little kitchen magic I get to share with friends and loved ones. If you love chocolate chip cookies but want a fun project that’s totally doable, give this recipe a try — I promise you’ll be making them again and again, whether it’s for Halloween or just because.
Print
Spider Chocolate Chip Cookies Recipe
- Prep Time: 5 minutes
- Cook Time: 11 minutes
- Total Time: 16 minutes
- Yield: 18 cookies 1x
- Category: Dessert
- Method: Baking
- Cuisine: American
- Diet: Gluten Free
Description
These Spider Chocolate Chip Cookies are a fun and spooky twist on classic chocolate chip cookies, perfect for Halloween or any themed party. Made with gluten-free ingredients and topped with chocolate decorations that resemble spider legs, these cookies are delicious and visually impressive.
Ingredients
Dry Ingredients
- 2 ¼ cup gluten-free 1-to-1 baking flour
- 1 teaspoon baking soda
- 1 teaspoon Real Salt
Wet Ingredients
- 1 cup brown sugar, packed
- ½ cup granulated sugar
- 1 cup butter
- 1 teaspoon gluten-free vanilla extract
- ½ teaspoon gluten-free almond extract
- 2 eggs
Chocolate
- 1–2 cup chocolate chips
- ½ cup chocolate chips (for melting and decorating)
Instructions
- Preheat the oven: Set your oven temperature to 350 degrees Fahrenheit to prepare for baking the cookies evenly.
- Mix sugars and butter: In a stand mixer, beat together the brown sugar, granulated sugar, butter, and vanilla extract until the mixture becomes smooth and creamy.
- Add extracts: Incorporate the gluten-free vanilla and almond extracts into the mix to enhance flavor.
- Add eggs: Add eggs one at a time, mixing on low speed after each addition to fully combine without over-mixing.
- Combine dry ingredients: In a separate bowl, whisk together the gluten-free flour, baking soda, and Real Salt to ensure even distribution.
- Mix dry into wet ingredients: Gradually add the dry ingredient mixture to the wet ingredients, mixing until just combined to form the cookie dough.
- Add chocolate chips: Gently fold in 1 to 2 cups of chocolate chips to the dough for that classic chocolate chip cookie sweetness.
- Prepare cookie sheets: Drop spoonfuls of cookie dough onto greased cookie sheets, spacing them adequately to allow spreading.
- Decorate cookies: Press 1 to 2 extra chocolate chips on the top of each cookie to serve as the spider’s body.
- Bake: Bake the cookies in the preheated oven for 9 to 11 minutes until golden on the edges but still soft in the middle.
- Cool cookies: Let the cookies cool on the baking sheet for a few minutes, then transfer them to a wire rack to cool completely.
- Melt chocolate for decoration: While cookies cool, melt ½ cup chocolate chips in a microwave-safe bowl for about 1 minute, stirring halfway through.
- Pipe spider legs: Transfer melted chocolate into a piping bag with a very small cut tip, and draw spider legs extending outward from the chocolate chips on top of each cookie.
- Serve and Enjoy: Allow the chocolate legs to set, then enjoy your festive Spider Chocolate Chip Cookies!
Notes
- Use gluten-free 1-to-1 baking flour to ensure the cookies are gluten-free.
- Chilling the cookie dough for 30 minutes before baking can help control spreading.
- If you don’t have a piping bag, use a small zip-top bag with a tiny corner snipped off to pipe the chocolate.
- Store cookies in an airtight container at room temperature for up to 5 days.
- Adjust chocolate chip quantity for more or less chocolate in cookies.
Nutrition
- Serving Size: 1 cookie
- Calories: 180
- Sugar: 14g
- Sodium: 120mg
- Fat: 10g
- Saturated Fat: 6g
- Unsaturated Fat: 3g
- Trans Fat: 0g
- Carbohydrates: 22g
- Fiber: 1g
- Protein: 2g
- Cholesterol: 30mg


