These beautiful Speckled Egg Cookies are a showstopper that taste as amazing as they look! With their delicate pastel colors and charming speckled finish, they’re perfect for spring celebrations, Easter gatherings, or anytime you want to bring a touch of whimsy to your dessert table. The buttery sugar cookies provide the perfect canvas for the royal icing decoration, and the result is as delicious as it is adorable!
Why You’ll Love This Recipe
- Perfect for special occasions: These cookies make a stunning addition to Easter baskets, spring celebrations, or baby showers.
- Customizable colors: Create your own palette of pastel hues or stick with classic robin’s egg blue – the decorating possibilities are endless!
- Make-ahead friendly: Both the dough and the finished cookies can be prepared in advance, making them perfect for busy holiday planning.
- Foolproof technique: The royal icing method is surprisingly accessible, even for decorating beginners.
- Crowd-pleaser: The combination of buttery cookies and sweet icing will have everyone reaching for seconds!
Ingredients You’ll Need
- All-purpose flour: The foundation of our cookies, providing structure while keeping them tender.
- Salt: A little salt balances the sweetness and enhances all the flavors.
- Baking powder: Gives just the right amount of lift without making the cookies too puffy.
- Granulated sugar: Sweetens the cookie and helps create those crisp edges.
- Unsalted butter: Use room temperature butter for the perfect creamy texture. The fat adds richness and flavor.
- Eggs: Binds everything together and adds moisture to the dough.
- Vanilla extract: Adds that classic warm flavor, but feel free to swap in almond or lemon extract for a different twist.
- Sour cream: The secret ingredient! Adds moisture and a subtle tang that makes these cookies extra special.
- Meringue powder: The key to perfect royal icing that dries hard and smooth. Find it in craft stores or baking supply shops.
- Powdered sugar: Creates the sweet, smooth base for your royal icing.
- Light corn syrup: Adds shine and helps prevent the royal icing from becoming too brittle.
- Gel food coloring: Much better than liquid food coloring as it won’t thin your icing. Go for pastel colors for a classic speckled egg look.
- Cocoa powder: Mixed with water to create those classic speckles that make these cookies so distinctive.
Note: You’ll find the complete list of ingredients, along with their exact measurements, in the printable recipe card at the bottom of this post.
Variations
Want to put your own spin on these adorable cookies? Try these creative variations:
- Flavor twists: Add lemon zest to the cookie dough for a bright, citrusy flavor that pairs beautifully with the sweet icing.
- Cookie cutter options: Don’t have an egg cutter? Use any spring-themed shape like flowers, butterflies, or bunnies.
- Speckle alternatives: Instead of cocoa powder, try bronze or copper luster dust mixed with vodka for a more metallic speckle effect that evaporates quickly.
- Decoration upgrades: Before the icing dries completely, sprinkle with a little edible glitter for extra sparkle.
- Flavor the royal icing: A drop of different extracts in each color can create a multi-flavored cookie collection – try lemon, almond, or even rose water.
How to Make Speckled Egg Cookies
Step 1: Prepare the Cookie Dough
In a bowl, whisk together flour, salt, and baking powder. In your stand mixer, cream butter and sugar until fluffy. Beat in eggs one at a time, then add vanilla and sour cream. Gradually add the dry ingredients, mixing just until combined. Divide dough, wrap in plastic, and chill for 30 minutes.
Step 2: Roll Out and Bake
Roll the chilled dough between parchment paper to 1/4-inch thickness. Cut out egg shapes and place on parchment-lined baking sheets. For best results, freeze cut cookies for 10 minutes before baking. Bake at 350°F for about 8 minutes until edges are just barely golden. Cool completely before decorating.
Step 3: Prepare Royal Icing
Beat meringue powder and water until foamy. Add sifted powdered sugar, then corn syrup and extract. Mix on medium-high for 5 minutes until thick and glossy. Thin with water until it reaches the 15-second consistency (when a trail of icing disappears back into the bowl after 15 seconds). Divide and color as desired.
Step 4: Flood the Cookies
Pipe an outline around each cookie with royal icing, then fill in (flood) the center. Use a toothpick to gently pop any air bubbles and guide icing into corners. Let the cookies dry for at least 2 hours.
Step 5: Create the Speckled Effect
Mix cocoa powder with warm water to create a thin paste. Dip a clean toothbrush in this mixture, then run your thumb across the bristles to flick tiny specks onto the dried cookies. Work over parchment paper and wear gloves for easy cleanup!
Step 6: Let Dry Completely
Allow the decorated cookies to dry completely for at least 12 hours before stacking or packaging.
Pro Tips for Making the Recipe
- Room temperature ingredients matter: This ensures proper incorporation and the best texture in your cookies.
- Don’t over-mix: Stop mixing as soon as the flour is incorporated to prevent tough cookies.
- Chill between steps: If your dough gets sticky while working with it, pop it back in the refrigerator for a few minutes.
- Royal icing consistency: The perfect flooding consistency is key – too thick and you’ll see lines, too thin and it will run off the cookie.
- Practice the speckle technique: Test your speckle method on parchment paper first to get a feel for the pressure needed.
- Drying time: Patience is crucial! Make sure each layer of icing is completely dry before adding more decoration.
- Humidity matters: On humid days, allow extra drying time for the royal icing to set completely.
How to Serve
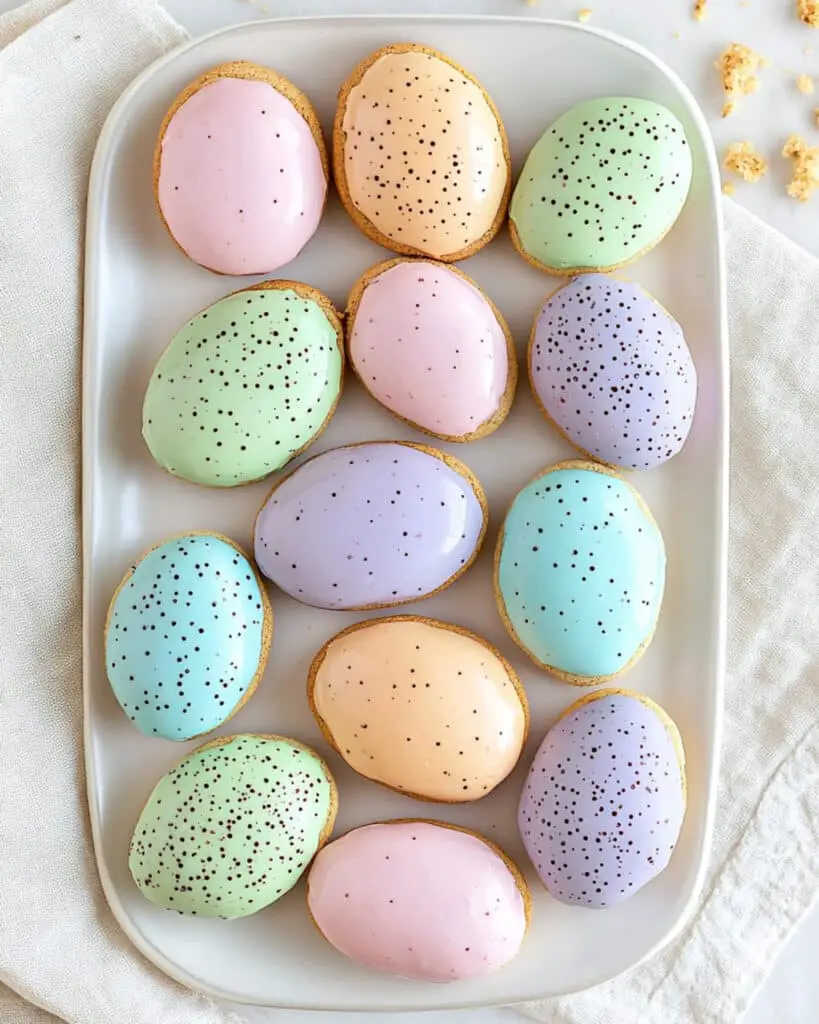
These cookies make a stunning presentation when displayed on a tiered serving plate or arranged in a pretty basket lined with colored paper grass. Here are some serving ideas:
Presentation Ideas
Display cookies on a beautiful spring-themed platter, nestled among fresh flowers or decorative Easter grass for a stunning centerpiece.
Pairing Suggestions
Serve with afternoon tea, coffee, or a glass of milk. For a spring brunch, pair with fresh fruit and mimosas.
Gift Packaging
Stack 3-4 cookies in clear cellophane bags tied with pastel ribbon for beautiful homemade gifts.
Make Ahead and Storage
Storing Leftovers
Store completely dried cookies in an airtight container at room temperature for up to two weeks. Place parchment paper between layers to prevent sticking.
Note: Never refrigerate decorated cookies as the humidity can make the royal icing dissolve.
Freezing
Decorated cookies freeze beautifully for up to 6 months! Wrap individually in plastic wrap, then place in an airtight container. Thaw at room temperature while still wrapped to prevent condensation issues.
Make-Ahead Options
The cookie dough can be made up to 3 days ahead and refrigerated, or frozen for up to 3 months. Royal icing can be prepared and refrigerated for up to a week (re-whip before using).
FAQs
-
Why did my royal icing not harden properly?
Royal icing needs adequate drying time (at least 12 hours for full hardness). High humidity can also impact drying time. Make sure you’re using meringue powder rather than egg whites for the most reliable results, and allow for extra drying time in humid environments.
-
Can I make these cookies without a stand mixer?
Absolutely! While a stand mixer makes the process easier, you can use a hand mixer for both the cookie dough and royal icing. For the cookies, cream the butter and sugar thoroughly, then follow the recipe as directed. For the royal icing, you’ll need to beat it a bit longer by hand to achieve the right consistency.
-
How far in advance can I make these cookies?
These cookies are perfect for making ahead! Once decorated and completely dry, they’ll keep for up to two weeks in an airtight container at room temperature. You can also freeze the decorated cookies for up to 6 months, making them perfect for advance holiday preparation.
-
My cookies spread too much when baking. What went wrong?
Cookie spreading is usually caused by dough that’s too warm or butter that was too soft. Make sure to chill the cut cookie shapes in the freezer for 10 minutes before baking. Also, check that your oven temperature is accurate with an oven thermometer, as ovens that run cool can cause spreading.
Final Thoughts
These Speckled Egg Cookies aren’t just treats – they’re little works of art that bring joy to any spring celebration. Don’t be intimidated by the decorating process; the beauty of these cookies is in their handcrafted charm and those delightful speckles that make each one unique. Whether you’re an experienced baker or trying decorated cookies for the first time, this recipe offers both delicious results and a creative outlet. So gather your supplies, set aside some time to play, and create something truly special that will delight everyone who sees (and tastes) them!
Print
Speckled Egg Cookies Recipe
- Prep Time: 1 hour 30 minutes
- Cook Time: 8 minutes
- Total Time: 1 hour 38 minutes
- Yield: 60 small cookies 1x
- Category: Desserts
- Method: Baking
- Cuisine: American
Description
Speckled Egg Cookies are a delightful treat perfect for any festive season! These buttery sugar cookies are shaped like eggs, topped with smooth royal icing, and decorated with charming speckled patterns using cocoa powder. They are a fun and creative baking project, sure to impress family and friends with both their taste and presentation. With their crisp texture and customizable festive look, they make for an irresistible dessert or snack.
Ingredients
For the Sugar Cookies
- 19 oz all-purpose flour (4 1/4 cups)
- 1 tsp salt
- 1 tsp baking powder
- 12.25 oz granulated sugar (1 3/4 cups)
- 8 oz unsalted butter (1 cup), at room temperature
- 2 large eggs, at room temperature
- 1 tsp vanilla extract (can substitute lemon or almond extract)
- 1 oz sour cream (2 tablespoons), at room temperature
For the Royal Icing
- 1.8 oz meringue powder (6 tablespoons)
- 3/4 cup water (6 fl oz)
- 24 oz powdered sugar (6 cups)
- 2 tsp light corn syrup
- 1/2 tsp almond extract (can substitute lemon or clear vanilla extract)
- Assorted gel food coloring, such as Americolor brand
To Decorate
- 1 tablespoon cocoa powder
- 1 tablespoon warm water
- Egg-shaped cookie cutter (about 2” tall)
- #2 piping tip
- Piping bags
- Clean unused toothbrush or paintbrush
Instructions
- Prepare the Sugar Cookie Dough
In a mixing bowl, whisk together the flour, salt, and baking powder, and set aside. In a stand mixer fitted with a paddle attachment, cream the butter and granulated sugar on medium speed until fluffy and well mixed, about 1-2 minutes. Add the eggs, one at a time, beating well with each addition, then mix in the vanilla extract and sour cream. Gradually add the dry ingredients, mixing until just incorporated. Scrape the bowl and finish mixing with a spatula. - Chill the Dough
Divide the dough into two portions, flatten into thin discs, and wrap in plastic wrap. Refrigerate for about 30 minutes until firmer but not hard, making it easier to roll. If chilled for longer, let it sit at room temperature for 10-15 minutes before working with it. - Roll and Cut Cookies
Preheat the oven to 350°F. Roll out the dough between sheets of parchment paper until 1/4-inch thick. Use an egg-shaped cookie cutter to cut out cookies and place them on a parchment-lined baking sheet. Re-roll scraps to cut additional cookies. - Chill and Bake
Optionally freeze the cut cookies for 10 minutes to maintain their shape. Bake for 8 minutes, until edges begin to color and the surface looks set. Let cookies cool on the baking sheet for 5 minutes, then transfer to a wire rack to cool completely. - Make the Royal Icing
In a stand mixer, combine meringue powder with water and mix on medium speed until foamy. Add powdered sugar and beat on low to incorporate. Add corn syrup and extract, then increase speed to medium-high and beat for 5 minutes until thick and shiny. Thin the icing by adding water, a little at a time, until it flows smoothly (15-second consistency). Divide into bowls and color as desired using gel food coloring. - Decorate the Cookies
Pipe a thin outline of royal icing around each cookie, then flood the center with icing. Use tools like a toothpick to smooth and fill gaps. Let cookies dry at room temperature for at least 2 hours. - Add Speckles
Combine cocoa powder and warm water into a thin paste. Dip a toothbrush into the mixture, and flick bristles over cookies to create speckles. Allow to fully dry before stacking or packaging. - Store or Freeze
Once dry, store cookies in an airtight container with parchment paper between layers. They can also be frozen for up to 6 months by individually wrapping and storing in a plastic container. Thaw in the container at room temperature to avoid moisture issues.
Notes
- Yield Tip: Makes about 60 small (2-inch) cookies or 36 medium (2.5-inch).
- Royal Icing Extra: You may have leftover icing, which can be refrigerated for 1 week or frozen for 6 months.
- Speckle Alternative: Other speckling methods include thin brown royal icing or luster dust mixed with vodka for a metallic effect.
- Packaging Tip: Allow at least 12 hours drying time before stacking or packaging cookies.
Nutrition
- Serving Size: 1 small
- Calories: 100kcal
- Sugar: 12g
- Sodium: 20mg
- Fat: 3g
- Saturated Fat: 2g
- Unsaturated Fat: 1g
- Trans Fat: 0g
- Carbohydrates: 18g
- Fiber: 0g
- Protein: 1g
- Cholesterol: 10mg

