
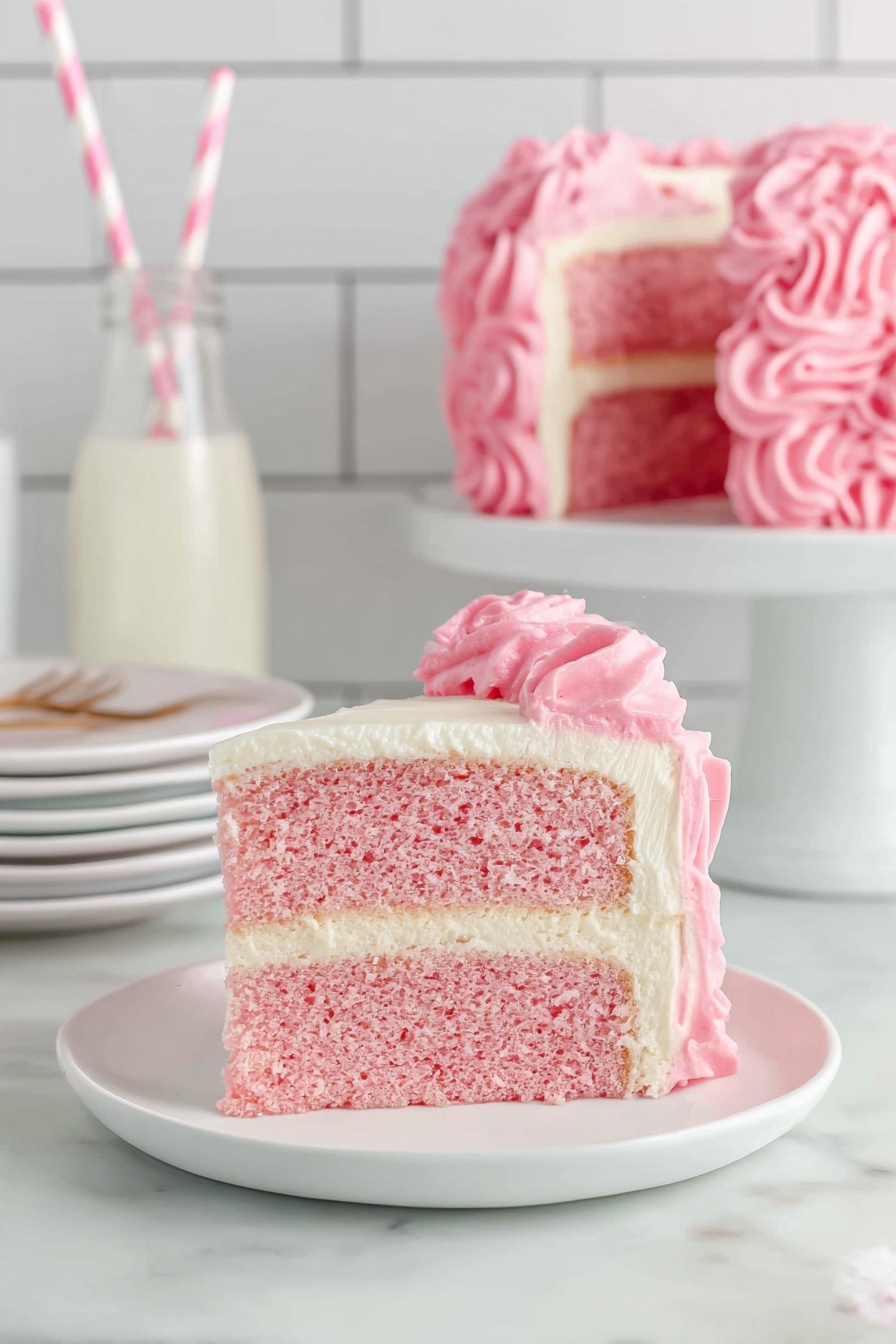
If you’re looking for a show-stopping dessert that’s as delightful to look at as it is to eat, my Pink Velvet Cake with Cream Cheese Frosting Recipe is exactly what you need. This cake has a tender crumb, a vibrant pink color that’ll wow your guests, and an insanely creamy frosting that ties it all together perfectly. Trust me, once you try this, you’ll want to make it for every special occasion—and maybe even some not-so-special ones!
Why You’ll Love This Recipe
- Vibrant Pink Color: The gel food coloring gives the cake a beautiful, rich pink without altering the texture.
- Moist and Tender Layers: Buttermilk and oil keep each slice wonderfully soft and moist every time.
- Cream Cheese Frosting: This isn’t just any frosting—it’s silky, tangy, and smooth, creating the perfect balance with the cake.
- Customizable Decoration: I share how to create a stunning ombré effect that’ll make your cake the centerpiece of any party.

Ingredients You’ll Need
The ingredients for this Pink Velvet Cake with Cream Cheese Frosting Recipe are straightforward and easy to find, but each plays an important role. For instance, using real buttermilk really makes a difference in the crumb and flavor, and the gel food coloring gives that intense pink you want without watering down the batter.
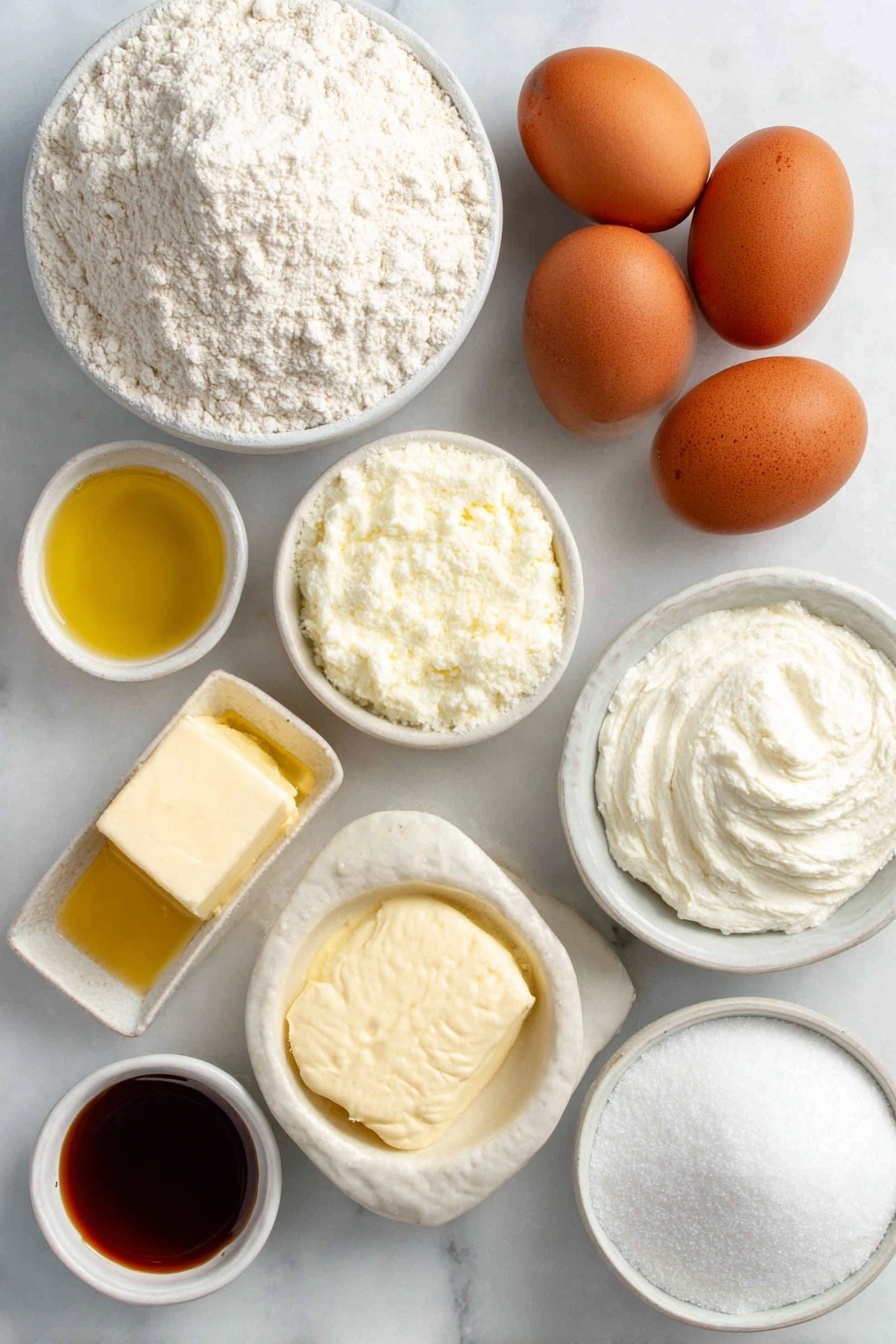
- All-purpose flour: The base for a light yet sturdy cake structure.
- Granulated sugar: Sweetens and helps with the cake’s tender crumb.
- Baking soda and baking powder: These leavening agents ensure a perfect rise and fluffy texture.
- Kosher salt: Balances all the sweet flavors.
- Buttermilk: Keeps the cake moist and adds a subtle tanginess—don’t skip this!
- Eggs: Give the cake structure and richness.
- Vegetable oil: For tender, moist layers without heaviness.
- White vinegar: Reacts with baking soda to help the cake rise beautifully.
- Pure vanilla extract: Adds depth to the overall flavor.
- Pink gel food coloring: This is key for that vivid pink hue without thinning the batter.
- Cream cheese: The star of the frosting, providing richness and tanginess.
- Unsalted butter: Slightly melted to make the frosting silky smooth.
- Powdered sugar: Sweetens and thickens the frosting perfectly.
Variations
One of my favorite things about this Pink Velvet Cake with Cream Cheese Frosting Recipe is how adaptable it is! You can tweak it to fit your taste or dietary needs without losing that magical flavor and texture.
- Gluten-Free Version: I substitute all-purpose flour with a 1-to-1 gluten-free flour blend and add a teaspoon of xanthan gum to help the cake hold together – it’s a crowd-pleaser, no one suspects a thing!
- Vegan Adaptation: I’ve played around using flax eggs and plant-based cream cheese; it works beautifully if you’re patient with frosting consistency.
- Flavor Twist: Sometimes I add a hint of almond or rose extract to the batter for a subtle, exotic flavor that pairs amazingly with the cream cheese frosting.
How to Make Pink Velvet Cake with Cream Cheese Frosting Recipe
Step 1: Prep and Mix the Dry Ingredients
Start by preheating your oven to 350°F and preparing two 8-inch round cake pans with nonstick spray and parchment paper — this little step saves layers from sticking and makes cleanup a breeze. In a large bowl, whisk together the flour, sugar, baking soda, baking powder, and salt. I like giving this mix a good stir so everything is evenly combined from the start.
Step 2: Whisk Wet Ingredients and Add Pink Color
Using a stand mixer fitted with the paddle attachment (or a strong hand with a whisk), combine the room-temperature buttermilk, eggs, oil, white vinegar, vanilla extract, and start with a couple of teaspoons of pink gel food coloring. Mix on low speed just until combined. Don’t be shy to add more gel coloring until you get the shade of pink you love — I usually aim for a bright but not neon pink. This step always excites me because the batter starts to look like the cake you’ve been dreaming about.
Step 3: Combine Wet and Dry Mixtures Gently
Pour the wet ingredients into the bowl of dry ingredients and mix on low just until combined. Be careful not to overmix; this keeps the cake layers tender. I always use a spatula to scrape down the sides to ensure everything is evenly incorporated. The batter should be smooth and gorgeous — that pink smell practically fills the kitchen!
Step 4: Bake the Cake Layers
Divide the batter evenly between your prepared pans (about 687 grams per pan if you like precision). Pop them into the oven and bake for 33-35 minutes. I usually start checking at 33 minutes with a toothpick to avoid overbaking. When it comes out clean, you’re gold! Let the cakes cool in the pans for 15 minutes, then transfer to wire racks to cool completely — patience here really pays off.
Step 5: Chill the Cakes Before Frosting
This might surprise you, but wrapping each cooled cake layer tightly in plastic wrap and refrigerating for at least 2 hours is a game-changer. I discovered this trick when my frosting would always turn crumbly on warm cake. Chilling firms up the cakes and makes frosting smooth and flawless—totally worth the wait, and it’s easy to plan ahead!
Step 6: Make the Cream Cheese Frosting
While the cakes chill, whisk together the cream cheese, slightly melted butter, and vanilla extract on high speed until silky and combined. Next, add powdered sugar and keep beating until the frosting is smooth and fluffy — about 2 minutes more. This frosting is genuinely my favorite part; it’s rich, tangy, and not too sweet, making every bite addictive.
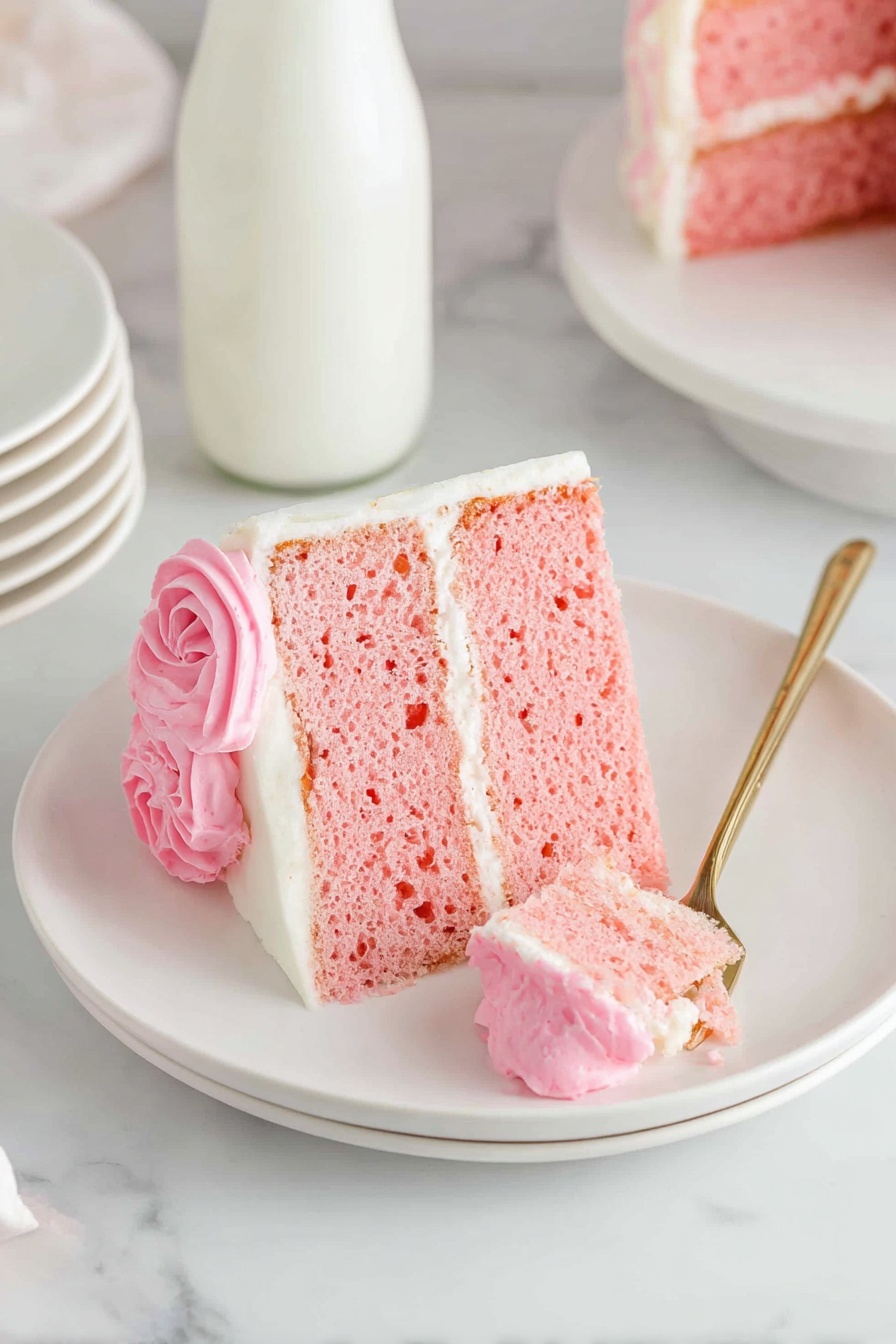
Step 7: Assemble and Decorate Your Cake
Once the cakes have chilled, I take a serrated knife and carefully cut off the dome-shaped tops so I get flat layers that stack evenly (plus, those dome pieces are perfect for a little teatime snack). Secure the first layer on your cake board with a smear of frosting underneath, then frost generously between layers.
After stacking, add a thin crumb coat all around. I never stress if it’s not perfect — its job is to lock in crumbs. Pop the cake in the freezer for 10 minutes to set that crumb coat. Then, for the fun part, I split the remaining frosting into three bowls to create a beautiful ombré effect with darker pink at the bottom, lighter pink in the middle, and white on top.
Pipe these colors around the cake in layers and smooth gently with a cake scraper. Finally, use any leftover frosting tinted to your favorite pink shade and pipe pretty ‘circles’ on top for a professional touch. Chill again for 10 minutes to let the frosting set, and voila — a masterpiece!
Pro Tips for Making Pink Velvet Cake with Cream Cheese Frosting Recipe
- Use Gel Food Coloring: Unlike liquid colors, gel won’t thin your batter and will give you a vibrant pink with much less product.
- Chill for Easy Frosting: Wrapping the layers and refrigerating makes frosting so much easier and less crumbly.
- Don’t Overmix: Mix your batter just until combined to keep the cake light and tender, not dense.
- Even Layers Matter: Weighing your batter ensures the cakes bake evenly and look professional when stacked.
How to Serve Pink Velvet Cake with Cream Cheese Frosting Recipe
Garnishes
I usually keep the toppings simple because the cake is stunning enough on its own, but I love adding fresh raspberries or edible rose petals to give it a natural and elegant touch. A light dusting of edible glitter is also a fun way to add sparkle if you want to make it extra special—my family always asks what the occasion is when I do that!
Side Dishes
Pair this cake with a cup of freshly brewed coffee or a delicate floral tea like chamomile or jasmine. For something more indulgent, a scoop of vanilla bean ice cream or a fresh berry compote works beautifully without overpowering the flavors.
Creative Ways to Present
I once made this Pink Velvet Cake with Cream Cheese Frosting Recipe for a friend’s bridal shower and served it on a vintage cake stand surrounded by mini cupcakes in matching ombré shades. That look totally knocked everyone’s socks off! You can also slice it into pretty wedges and serve with a drizzle of raspberry sauce for an elegant dessert plate.
Make Ahead and Storage
Storing Leftovers
I wrap leftover cake tightly with plastic wrap and keep it in an airtight container in the fridge. It stays moist and fresh for up to 3 days. Sometimes I find that the flavors even deepen a bit after resting overnight!
Freezing
This cake freezes wonderfully. I wrap each cooled, unfrosted layer tightly in plastic wrap, then in foil, and freeze for up to 3 months. When I’m ready to use them, I thaw overnight in the fridge before frosting and assembling. The texture holds up beautifully!
Reheating
Since this is a cake best enjoyed chilled or at room temperature, I usually serve leftovers cold. However, if you want to warm a slice slightly, just let it come to room temp or microwave it for 10-15 seconds—enough to take the chill off without melting the frosting.
FAQs
-
Can I use regular milk instead of buttermilk in this recipe?
While you can substitute regular milk mixed with 1 tablespoon of vinegar or lemon juice per cup to mimic buttermilk, using genuine buttermilk gives your Pink Velvet Cake with Cream Cheese Frosting Recipe the best moisture and subtle tang. The acidity also helps tenderize the gluten and activate the leavening for a lighter cake.
-
How do I get the perfect pink color without making the batter too runny?
The secret is to use gel food coloring rather than liquid. Gel colors are highly concentrated and won’t thin your batter, so you get vibrant color without messing with consistency. Add the gel slowly and mix well to reach your desired shade.
-
My frosting always crumbles when I spread it—what am I doing wrong?
This is usually because the cake is still warm or not chilled. I’ve learned that refrigerating the cooled cake layers for a couple of hours before frosting helps tremendously. Also, make sure your cream cheese and butter are at room temperature for smooth, creamy frosting.
-
Can I make this cake a day ahead?
Absolutely! In fact, making the cake layers a day ahead and storing them wrapped in the fridge makes everything easier. Just bring them to room temperature before frosting, or chill after assembling if you prefer a firmer texture.
Final Thoughts
I absolutely love how this Pink Velvet Cake with Cream Cheese Frosting Recipe turns out every time—it’s like a cozy hug in dessert form. The pink layers are always a hit, and the frosting is just the right amount of tangy and sweet. Whether you’re celebrating a birthday, shower, or just a sweet tooth, I hope you give this recipe a go and enjoy it as much as my family and I do. Seriously, once you’ve nailed this one, you’ll have a new favorite to impress friends and satisfy that cake craving any day of the week!
Print
Pink Velvet Cake with Cream Cheese Frosting Recipe
- Prep Time: 1 hour 10 minutes
- Cook Time: 35 minutes
- Total Time: 4 hours 5 minutes
- Yield: 12 servings 1x
- Category: Dessert
- Method: Baking
- Cuisine: American
Description
This Pink Velvet Cake recipe features moist, tender layers of pink-hued cake, perfectly balanced with a rich and creamy cream cheese frosting. Ideal for celebrations, this delightful cake is stunning in appearance and deliciously flavorful, combining traditional velvet cake elements with vibrant pink coloring and a smooth, tangy frosting that complements the sweet cake layers beautifully.
Ingredients
For the Cake:
- 2½ cups all-purpose flour (350 grams)
- 2 cups granulated sugar (400 grams)
- 1 teaspoon baking soda (6 grams)
- 1 teaspoon baking powder (4 grams)
- ½ teaspoon kosher salt
- 1½ cups buttermilk (341 grams), room temperature
- 3 large eggs (150 grams), room temperature
- ½ cup vegetable oil (100 grams)
- 1 tablespoon white vinegar (14 grams)
- 2 teaspoons pure vanilla extract (8 grams)
- Pink gel food coloring, amount as needed to achieve desired color
For the Cream Cheese Frosting:
- 8 ounces cream cheese (227 grams), room temperature
- ¾ cup unsalted butter (170 grams), slightly melted
- 1 tablespoon pure vanilla extract (12 grams)
- 5 cups powdered sugar (600 grams)
Instructions
- Prepare Cake Pans: Preheat oven to 350°F. Spray two 8-inch round cake pans with nonstick spray and line the bottoms with parchment paper. Set aside.
- Mix Dry Ingredients: In a large bowl, whisk together flour, sugar, baking soda, baking powder, and salt until well combined. Set aside.
- Combine Wet Ingredients: Using a stand mixer fitted with a paddle attachment, beat together buttermilk, eggs, vegetable oil, white vinegar, vanilla extract, and pink gel food coloring on low speed until just combined. Add more coloring to reach desired shade.
- Combine Wet and Dry Mixtures: Pour wet ingredients into dry ingredients and gently beat on low speed just until mixed. Scrape down sides with a spatula, being careful not to overmix to keep the cake tender.
- Divide Batter: Evenly divide batter between the two prepared pans, approximately 687 grams per pan, to ensure even layers.
- Bake: Bake in the preheated oven for 33-35 minutes, or until a toothpick inserted in the center comes out clean.
- Cool Cakes: Allow cakes to cool in pans for 15 minutes, then turn out onto wire racks to cool completely.
- Chill Cakes: Once cooled, wrap each cake layer tightly in food-safe plastic wrap and refrigerate for 2 hours to firm up before frosting.
- Prepare Frosting: With a stand mixer fitted with a whisk attachment, beat cream cheese, butter, and vanilla on high for about 2 minutes until smooth and creamy.
- Add Powdered Sugar: Gradually add powdered sugar and continue beating for an additional 2 minutes until frosting is smooth and fluffy.
- Level Cakes: After chilling, slice the dome tops off each cake layer with a serrated knife for flat, even surfaces. Reserve cut tops for snacking.
- Assemble Base Layer: Spread about 2 tablespoons of frosting on a cake board or plate to secure the first cake layer (cut side facing up) to the base.
- Add Middle Frosting Layer: Spread a generous layer of frosting on the first cake layer, then place the second cake layer on top, flipped bottom side up.
- Apply Crumb Coat: Coat the entire cake lightly with frosting to trap crumbs, smoothing with a cake scraper. It’s okay if the cake is slightly visible.
- Freeze for Firming: Place crumb-coated cake in freezer for 10 minutes to set the frosting.
- Divide and Color Frosting: Separate remaining frosting into three portions. Tint one portion light pink, another dark pink, and leave one white. Place each in separate tipless piping bags.
- Pipe Colored Frosting: Starting at the cake base, pipe the darker pink around the bottom third, lighter pink around the middle, and white around the top third and cake top.
- Smooth Frosting: Gently smooth the frosting layers with a cake scraper, collecting excess frosting in a bowl.
- Combine and Recolor Frosting: Combine all collected frosting, recolor to desired pink shade, and pipe decorative circles around the cake top using a large round tip (Wilton 1A).
- Final Chill: Return cake to freezer for about 10 minutes to firm up the decorative frosting details before serving.
Notes
- Store pink velvet cake in an airtight container in the refrigerator for up to 3 days.
- The cake can be frozen for up to 3 months when wrapped properly to maintain freshness.
- Room temperature ingredients ensure better mixing and texture.
- Do not overmix the batter to avoid a dense cake texture.
- Chilling the cake layers before frosting helps prevent fogging and crumbling during decorating.
Nutrition
- Serving Size: 1 slice (1/12 of cake)
- Calories: 460
- Sugar: 38g
- Sodium: 280mg
- Fat: 22g
- Saturated Fat: 9g
- Unsaturated Fat: 11g
- Trans Fat: 0g
- Carbohydrates: 60g
- Fiber: 1g
- Protein: 4g
- Cholesterol: 65mg


