
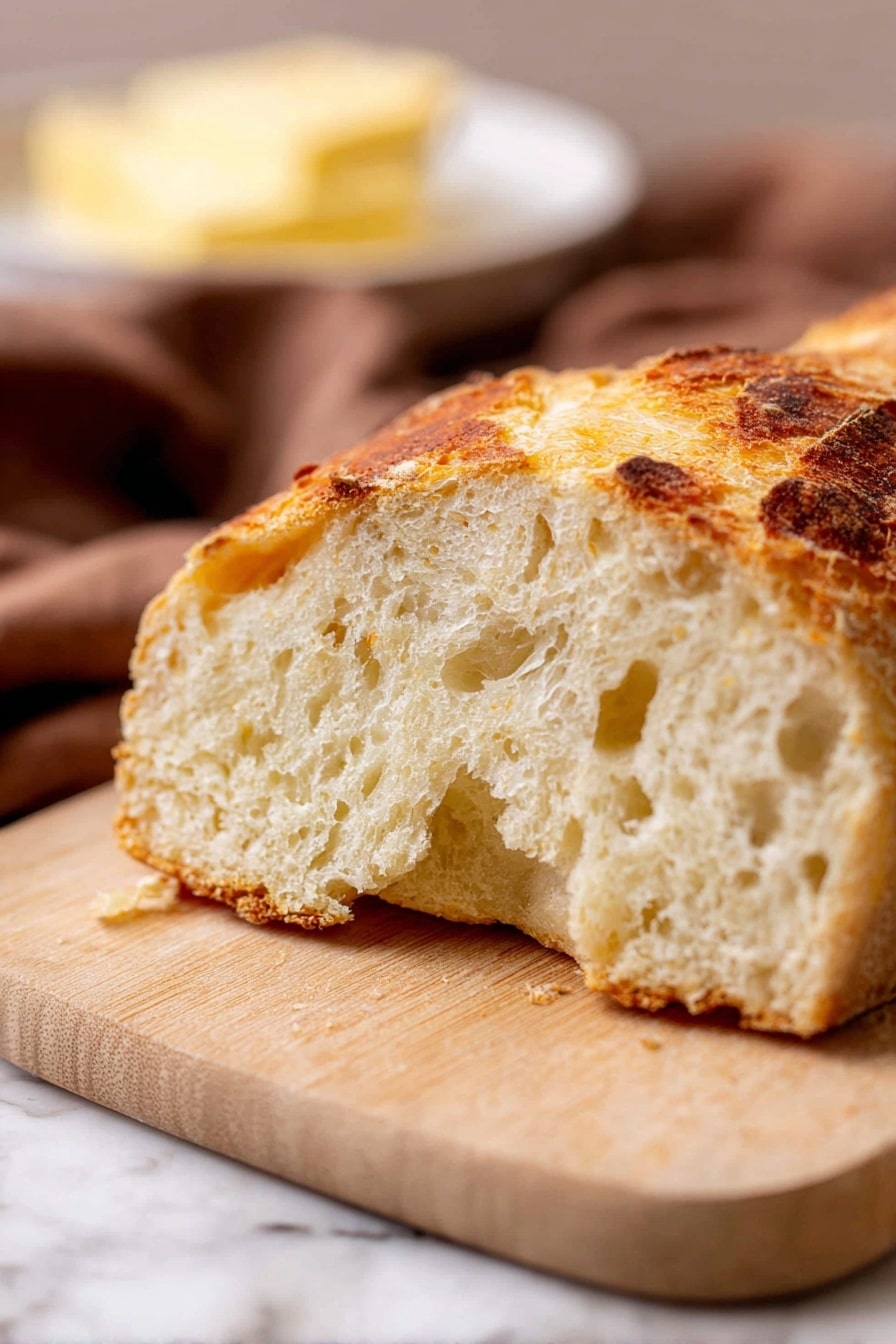
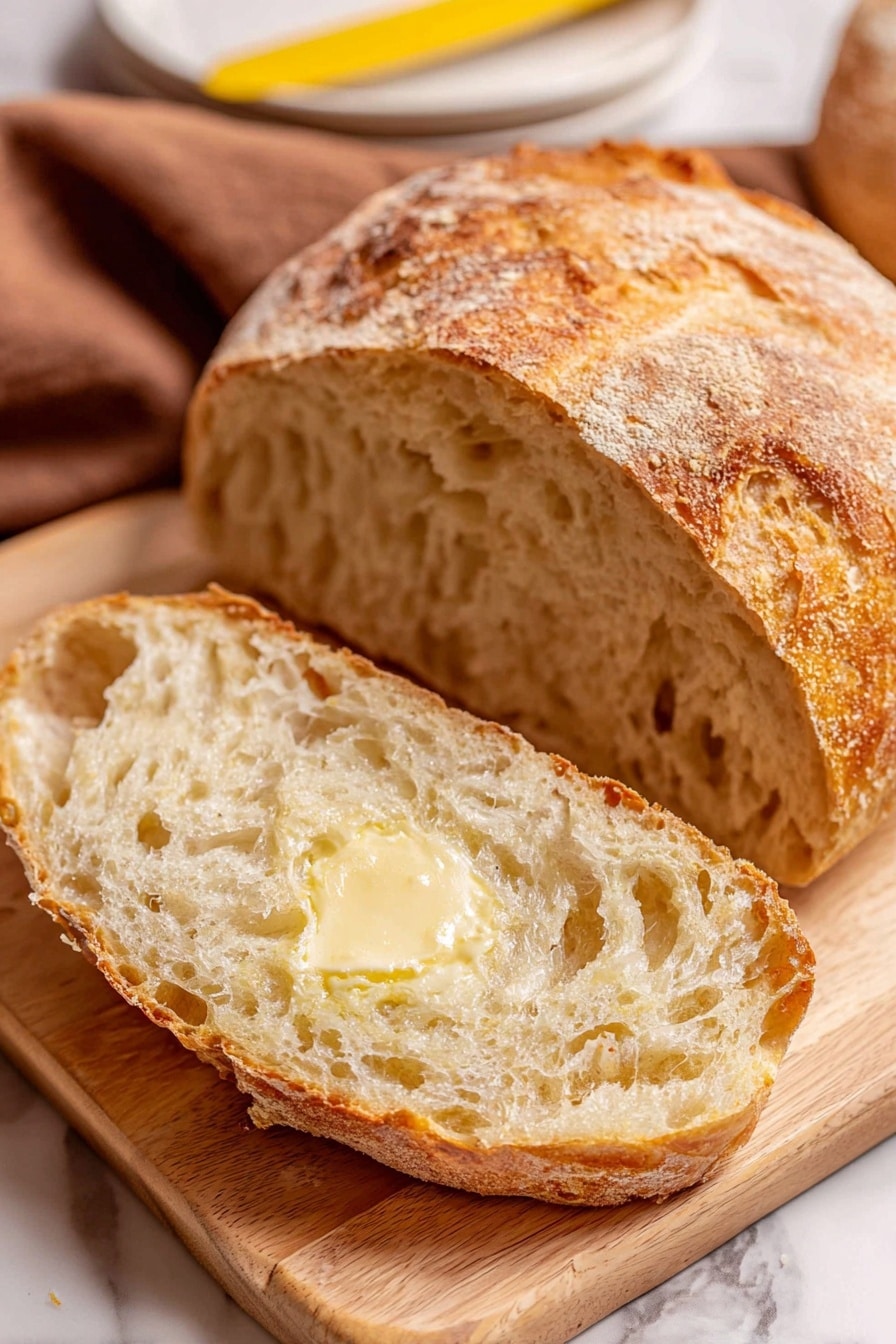
If you’re like me and have always dreamed of making your own perfect crusty bread without the endless kneading, you’re going to love this No Knead Italian Artisan Bread Recipe. It’s incredibly simple, requires just a handful of pantry staples, and the result? A golden, airy loaf with that irresistible rustic charm everyone raves about. Stick with me, and I’ll share tips and tricks I’ve picked up to help you nail this bread every single time!
Why You’ll Love This Recipe
- Effortless Prep: No kneading involved means you save time and energy without sacrificing taste or texture.
- Perfect Crust and Crumb: The slow rise and high-heat bake create an artisan-quality crust with a tender, airy inside.
- Simple Ingredients: Just flour, water, yeast, honey, and salt – all easy to find and budget-friendly.
- Reliable Results: How I tweaked the process to make this foolproof so you can enjoy fresh homemade bread without stress.

Ingredients You’ll Need
This recipe uses classic pantry staples that come together beautifully for that authentic Italian artisan bread flavor and texture. I usually buy good-quality all-purpose flour since it’s versatile and delivers a great rise without complicating things.
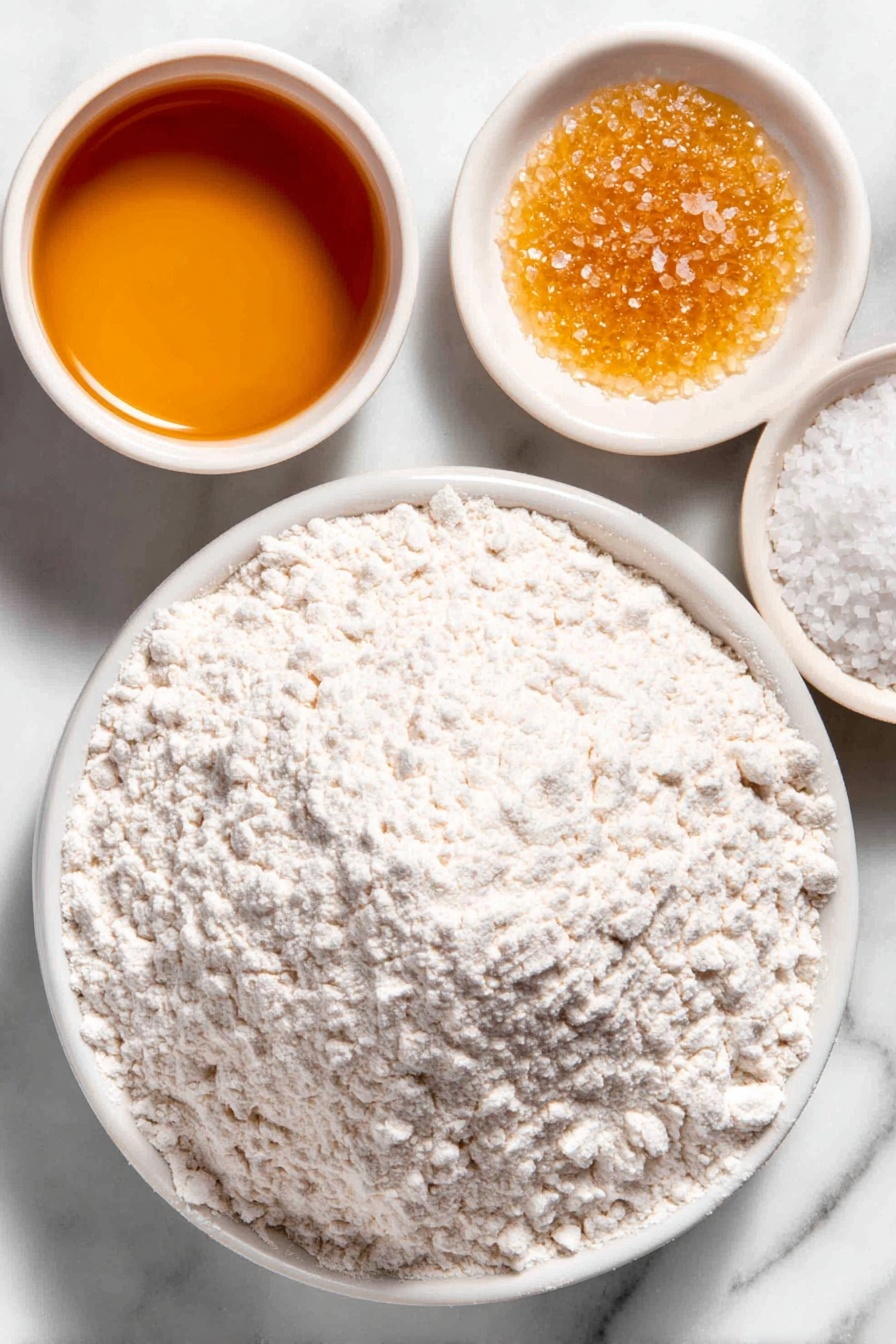
- All-purpose flour: Look for fresh, high-quality flour for the best crumb and flavor; you can also experiment with bread flour for a chewier texture.
- Lukewarm water: Around 100-110°F is key—too hot and you risk killing the yeast; too cold and the dough won’t rise properly.
- Instant dry yeast: This saves time as you don’t need to activate it separately – just dissolve in water with honey for a quick boost.
- Honey: I love that subtle touch of sweetness it adds—it helps the yeast come alive and adds depth to the flavor.
- Salt: Essential for flavor and helps control the yeast activity so your loaf doesn’t rise too fast and collapse.
Variations
One of the things I love most about this no knead Italian artisan bread recipe is how easy it is to personalize. I often switch things up based on what I have on hand or my mood, and you should too! Feel free to experiment – it’s part of the fun.
- Herb Infusion: Adding dried rosemary, thyme, or oregano into the dough gives it an aromatic punch – my family especially loves this for dinner parties.
- Whole Wheat Twist: Swap half the all-purpose flour for whole wheat for a heartier loaf; just expect a denser crumb and a mildly nutty flavor.
- Garlic and Cheese: Mixing in finely chopped garlic and a handful of shredded Parmesan before baking creates a savory explosion that’s perfect for snacking.
- Gluten-Free Adaptation: Although this specific recipe is designed for wheat flours, you can try gluten-free all-purpose flour blends, just be prepared for different texture and rise.
How to Make No Knead Italian Artisan Bread Recipe
Step 1: Activate Your Yeast
This part is crucial for a nice rise! I dissolve the yeast in ¼ cup of lukewarm water with the teaspoon of honey. After about 5 minutes, it should get bubbly and frothy—if it doesn’t, your yeast might be old, so grab a fresh packet before moving on.
Step 2: Mix Your Dough
In a big mixing bowl, combine 2 ¼ cups of flour with the remaining water, then pour in your bubbly yeast mixture. I use a fork for this step — it breaks things up quickly without overworking the dough. Then sprinkle in the salt and stir gently till everything comes together. The dough will be soft and sticky – don’t worry, it’s supposed to be that way. If it feels dry, add a bit more lukewarm water, a teaspoon at a time.
Step 3: Let It Rise
Sprinkle a little flour on top of the dough, cover your bowl tightly with a damp cloth or plastic wrap, and put it somewhere warm. In my kitchen, it usually takes between 45 minutes to 1 hour 30 minutes to nearly double in size. Warmer kitchens speed up this step, so keep an eye but avoid peeking too often!
Step 4: Preheat and Shape
Once your dough has risen, preheat the oven to 425°F (220°C). Then, carefully turn the dough out onto a non-stick baking sheet dusted with flour, making sure the floured side is facing up—that helps create that artisan look and texture. Use a very sharp knife to make a few shallow slashes across the top; this lets the bread expand gracefully in the oven without cracking unevenly.
Step 5: Bake to Golden Perfection
Bake your loaf in the preheated oven for about 25 minutes. Then turn down the temperature to 325°F (160°C) and bake for an additional 10-15 minutes, until your bread is beautifully golden brown with a crust you can hear crackling when you tap it. Letting the heat lower gently finishes the bake inside without burning the crust.
Step 6: Cool Before Slicing
This is a step I used to skip—big mistake! After baking, I let the loaf cool on a wire rack at least 15 minutes before slicing. Cutting too early makes the crumb gummy, so patience really pays off here.
Pro Tips for Making No Knead Italian Artisan Bread Recipe
- Use Fresh Yeast: I learned the hard way that old yeast ruins the rise; always test it first or buy new packets regularly.
- Don’t Skip the Flour Dusting: Sprinkling extra flour prevents sticking and gives your loaf that rustic crackly top I absolutely adore.
- Adjust Rise Time to Your Environment: My kitchen can be chilly, so I sometimes extend rising time; warmer kitchens will need less.
- Sharp Knife Is Key: A dull knife tears the dough—investing in a bread or paring knife made a huge difference for nice, clean scoring.
How to Serve No Knead Italian Artisan Bread Recipe
Garnishes
I usually brush the warm loaf lightly with olive oil and sprinkle some flaky sea salt or cracked black pepper right after baking. It enhances the crust’s flavor and gives that extra bit of pizzazz that keeps everyone asking for more!
Side Dishes
This bread pairs so well with fresh tomato basil soup, classic antipasto platters with olives and cheeses, or simply dipped in balsamic vinegar and olive oil—perfect for dinner or casual entertaining.
Creative Ways to Present
For special occasions, I like to slice the loaf into thick rounds, toast them, and arrange with toppings like fresh mozzarella, basil, and balsamic glaze for a DIY bruschetta board. It never fails to wow guests!
Make Ahead and Storage
Storing Leftovers
After it’s completely cool, I wrap the loaf in a clean kitchen towel and store it in a bread box or sealed container at room temperature – this keeps the crust crisp while the inside stays soft for a day or two.
Freezing
This bread freezes really well. I slice it first and place pieces in a freezer bag, so I can pull out just what I need. When thawed, the texture holds up nicely without turning chewy or dry.
Reheating
To refresh your leftover bread, I heat slices in a 350°F oven for 5-7 minutes or toast them lightly. This brings back the crust’s crunch and warms the crumb perfectly, just like fresh-baked.
FAQs
-
Can I use active dry yeast instead of instant yeast in this No Knead Italian Artisan Bread Recipe?
Absolutely! With active dry yeast, you’ll want to dissolve it in the lukewarm water with honey and let it sit until it’s frothy (about 10 minutes) before mixing it with the flour. This ensures the yeast activates fully, helping your bread to rise nicely.
-
Why is the dough so sticky in the No Knead Italian Artisan Bread Recipe?
The stickiness is actually a good sign. It means the dough is hydrated enough to create an open crumb and chewy texture typical of artisan breads. Resist the urge to add too much flour—sticky dough leads to better texture after baking!
-
How do I know when the bread is done baking?
The loaf should be a rich golden brown color, and if you gently tap the bottom, it should sound hollow. The crust should feel firm and crisp. If unsure, a kitchen thermometer inserted into the center should read around 200°F (93°C).
-
Can I bake this bread in a Dutch oven?
Yes! Baking inside a preheated Dutch oven traps steam and helps create an extra-crispy crust. Just place your dough inside the hot pot, cover it, and bake at 425°F for 25 minutes, then remove the lid and bake for another 10-15 minutes until golden.
Final Thoughts
Making this No Knead Italian Artisan Bread Recipe feels like such a mini kitchen victory every time I do it. The smell that fills the house, the golden crust, and the way it pairs with anything from a simple soup to a fancy cheese board make it truly special. I hope once you try it, it becomes a go-to in your baking routine too—it’s like having your own little artisan bakery at home, minus all the hard work!
Print
No Knead Italian Artisan Bread Recipe
- Prep Time: 1 hour
- Cook Time: 35 minutes
- Total Time: 3 hours 5 minutes
- Yield: 1 loaf (approximately 8 servings) 1x
- Category: Bread
- Method: Baking
- Cuisine: Italian
Description
This No Knead Italian Artisan Bread recipe is a simple and fuss-free method to create a delicious, crusty homemade bread with minimal effort. Using just a handful of basic ingredients and relying on a slow rise instead of kneading, this bread offers a delightful chewy texture and rich flavor, perfect for pairing with your favorite Italian dishes or enjoying on its own.
Ingredients
Dry Ingredients
- 2 ¼ cups all-purpose flour (9 oz), plus extra for topping
- 1 ⅛ teaspoon instant dry yeast (0.20 oz)
- 1 teaspoon salt
Wet Ingredients
- ¾ cups lukewarm water (about 185 ml) at 100-110°F
- 1 teaspoon honey
Instructions
- Dissolve Yeast: Dissolve the yeast in ¼ cup of lukewarm water along with 1 teaspoon of honey. Let it rest for 5 minutes until it becomes bubbly, indicating the yeast is active.
- Mix Dough: In a mixing bowl, combine the flour with the remaining water. Add the dissolved yeast mixture and use a fork to mix quickly until combined.
- Add Salt and Adjust Consistency: Stir in the salt. The dough should be soft and sticky, not smooth. If it feels too dry, add a little more lukewarm water to reach the right consistency.
- First Rise: Sprinkle flour over the dough, cover the bowl with a damp cloth or plastic wrap, and let it rise in a warm spot for 45 minutes to 1 hour 30 minutes until the dough almost doubles in size.
- Preheat Oven: Preheat your oven to 425° F (220° C) to prepare for baking.
- Shape the Dough: Gently transfer the risen dough onto a non-stick baking sheet sprinkled with flour, making sure the floured side is facing upwards.
- Score Bread: Using a very sharp knife, score the surface of the dough without cutting too deeply. This helps control the expansion of the bread while baking.
- Bake: Bake the bread at 425° F (220° C) for about 25 minutes. Then reduce the oven temperature to 325° F (160° C) and continue baking for an additional 10 to 15 minutes, or until the crust turns golden brown.
- Cool: Remove the loaf from the oven and let it cool on a wire rack for at least 15 minutes before slicing to allow the bread to set.
Notes
- Ensure your water is lukewarm, around 100-110°F, to activate the yeast without killing it.
- The rising time may vary depending on room temperature; warmer kitchens will speed up the fermentation.
- Do not skip scoring the dough as it allows the bread to expand properly in the oven.
- Allow the bread to cool completely for better slicing and texture.
- This recipe does not require kneading, making it ideal for beginners or those seeking a low-effort artisan bread.
Nutrition
- Serving Size: 1 slice (1/8 loaf)
- Calories: 150
- Sugar: 1 g
- Sodium: 250 mg
- Fat: 1 g
- Saturated Fat: 0.1 g
- Unsaturated Fat: 0.7 g
- Trans Fat: 0 g
- Carbohydrates: 30 g
- Fiber: 1.5 g
- Protein: 5 g
- Cholesterol: 0 mg


