

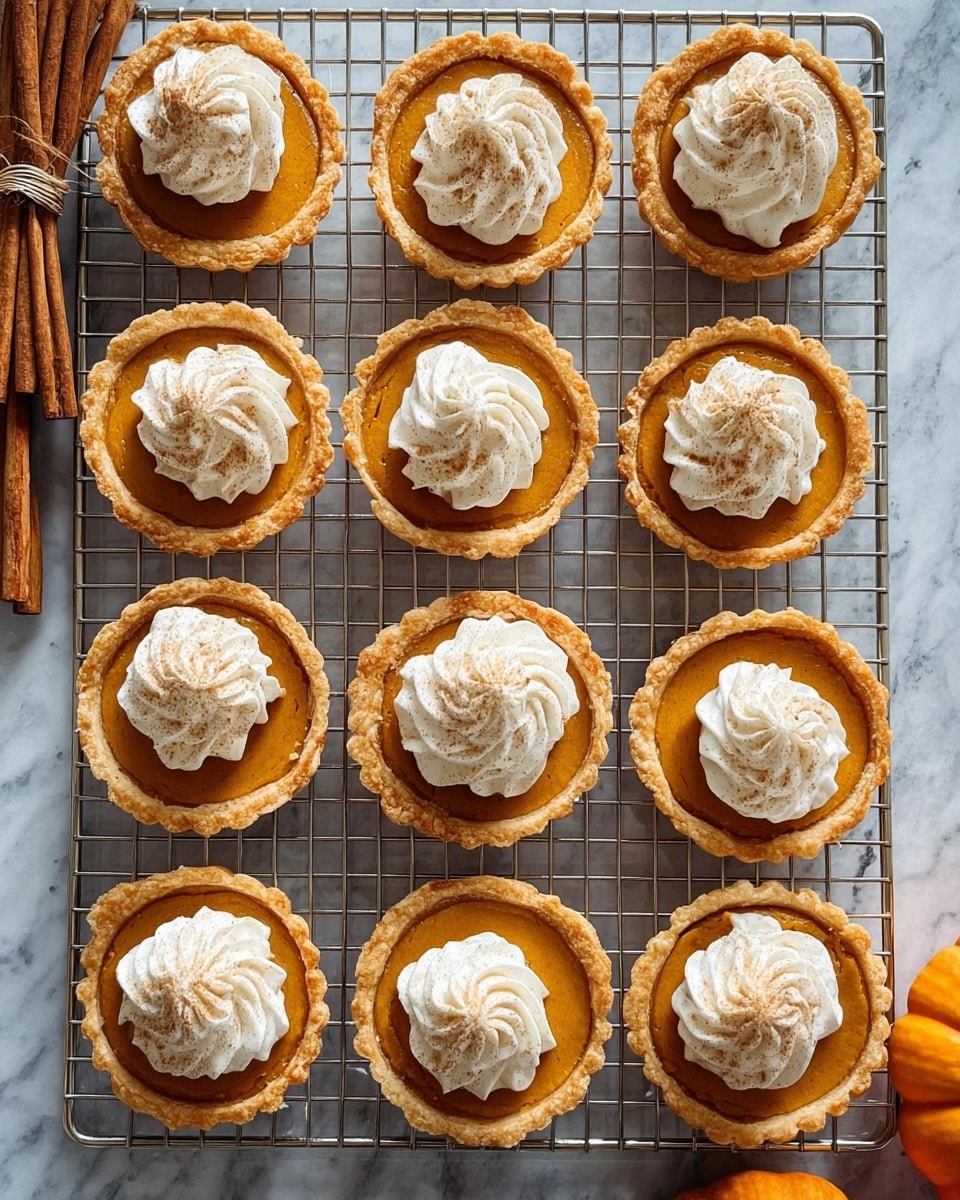
Oh, I absolutely love this Mini Pumpkin Pies Recipe because it takes everything we adore about classic pumpkin pie and packages it into these adorable, bite-sized treats. If you’ve ever had trouble getting a perfectly smooth, well-set pie filling or worried about a soggy crust, these mini pies solve all that with their perfectly portioned size and crisp crust. Whether it’s for a festive gathering or a cozy evening treat, these pies are a guaranteed crowd-pleaser!
When I first tried this Mini Pumpkin Pies Recipe, what really wowed me was how easy the whole process is — plus, the versatility. You can whip these up in under an hour, pop them in the fridge to chill, and have pretty little pies ready whenever hunger strikes. Plus, you don’t need a big family dinner to enjoy a whole pie, so it’s perfect for a smaller dessert craving without waste.
Why You’ll Love This Recipe
- Perfect Portion Control: These mini pies give you just enough — no overeating guilt!
- Easy to Make: The process is straightforward, even for beginner bakers.
- Great for Entertaining: They’re perfect finger-food desserts for holiday parties or casual get-togethers.
- Customizable: You can tweak the spices or toppings to fit your personal taste or dietary needs.

Ingredients You’ll Need
I love how simple and pantry-friendly the ingredients are for this Mini Pumpkin Pies Recipe. Most of them are standard baking staples, and the pumpkin pie spice brings that cozy fall warmth to these little desserts.
- Pie crusts: You can use homemade for that extra flaky touch or store-bought for convenience—either works beautifully.
- Brown sugar: Adds a deep, caramel-like sweetness that balances the pumpkin.
- Granulated sugar: Helps to sweeten evenly and adds a subtle crunch when baked.
- Pumpkin pie spice: A blend of cinnamon, nutmeg, ginger, and clove that defines pumpkin pie flavor.
- Salt: Enhances all the flavors, don’t skip it!
- Canned pumpkin puree: Important to use pure pumpkin, not pumpkin pie filling, for the right texture and taste.
- Evaporated milk: Gives a creamy richness without making the filling too runny.
- Egg: Acts as a binder, helping the filling set perfectly.
- Vanilla extract: Adds a sweet, aromatic depth to the filling.
- Homemade whipped cream: Optional but highly recommended for topping—trust me, it’s the cherry on top!
Variations
I like to play around with this Mini Pumpkin Pies Recipe depending on the season or mood. It’s a great base for making it your own, so don’t hesitate to swap things out or add a little flair.
- Spice it up: Sometimes I add a pinch of cayenne for a subtle heat that pairs surprisingly well with the sweet pumpkin.
- Dairy-free option: Use coconut milk instead of evaporated milk, and top with coconut whipped cream for a dairy-free treat.
- Crust alternatives: For a nutty twist, try a graham cracker crust instead of traditional pie crust.
- Add-ins: A handful of mini chocolate chips or chopped pecans sprinkled on top before baking can add fun texture.
How to Make Mini Pumpkin Pies Recipe
Step 1: Prepare Your Pie Crust Circles
Start by preheating your oven to 400°F—that’s crucial for a nice, even bake. Roll out your pie crusts to about 1/8 inch thickness on a lightly floured surface; this ensures they don’t become too thick or tough after baking. Use a 3 1/2-inch cookie cutter or a cup to cut out 18 circles. If you find yourself with leftover scraps, don’t toss them! Re-roll and cut more circles to avoid waste. Gently press each circle into the muffin pan cavities, making sure they snugly fit without tearing. Pop the pans into the fridge while you whip up the filling—that chill helps keep the crust crisp during baking.
Step 2: Mix the Pumpkin Pie Filling
In a bowl, whisk together the sugars, pumpkin pie spice, and salt until everything is nicely blended. Then add the pumpkin puree, evaporated milk, the lightly beaten egg, and vanilla extract. Give it a good whisk until the filling is smooth and homogenous. This mix has the perfect balance of spice and sweetness—you’ll notice it smells amazing before you bake!
Step 3: Fill and Bake Your Mini Pies
Retrieve your chilled pie crust-lined muffin pans from the fridge. Carefully spoon about two tablespoons of the filling into each crust, spreading evenly without overfilling. Bake for 16 to 20 minutes, but keep a close eye near the end to prevent over-browning—aim for set tops and golden crust edges. Once baked, let them cool in the pans for about 30 minutes before gently removing them onto a wire rack to finish cooling.
Step 4: Chill and Serve
After they reach room temperature, transfer the mini pies to an airtight container and refrigerate for at least 3 hours or overnight. This chilling step is key—it helps the filling firm up beautifully and the flavors meld together. When you’re ready to dig in, you can serve them cold or at room temp, and don’t forget that whipped cream topping for an extra touch of indulgence!
Pro Tips for Making Mini Pumpkin Pies Recipe
- Don’t Overfill the Crusts: More filling doesn’t mean better—overfilling can cause spills and uneven baking.
- Chill the Dough: Keeping the crust cold before baking prevents shrinking and keeps it flaky.
- Watch Your Oven Temperature: Every oven bakes differently—start checking for doneness at 16 minutes to avoid burned pies.
- Use Fresh Spice Mix: Pumpkin pie spice loses potency over time, so fresh spices elevate the flavor immensely.
How to Serve Mini Pumpkin Pies Recipe
Garnishes
My go-to garnish is a dollop of homemade whipped cream — its light sweetness and creaminess perfectly complement the spiced pumpkin filling. Sometimes I sprinkle a little cinnamon or nutmeg on top for added aroma and eye appeal. For a modern twist, a drizzle of caramel sauce or a sprinkling of toasted pecans can elevate these mini pies to next-level deliciousness.
Side Dishes
I like pairing mini pumpkin pies with warm drinks, like spiced chai tea or a hot cup of coffee. For a fall-themed spread, throw in some roasted nuts or even a plate of sharp cheddar cheese slices — that sweet-savory combo is a crowd-pleaser and adds balance to dessert.
Creative Ways to Present
For a holiday party, I arrange these mini pies on a rustic wooden board garnished with cinnamon sticks and fresh rosemary sprigs—it instantly creates a cozy vibe. Another fun idea is to serve them in mini cupcake liners for easy handling and a pop of color. I’ve also seen them stacked on tiered dessert stands that make your table look festive and inviting.
Make Ahead and Storage
Storing Leftovers
After cooling completely, I always store leftover mini pumpkin pies in an airtight container in the fridge. They keep well for about 3 to 4 days. I find that chilling actually improves their flavor, making them even tastier the next day!
Freezing
I’ve frozen these mini pumpkin pies successfully by wrapping each one individually in plastic wrap and then placing them in a freezer-safe bag. They can last up to 2 months this way. When you’re ready to enjoy, just thaw them overnight in the fridge.
Reheating
To reheat, I pop the mini pies into a 325°F oven for about 10 minutes or until warmed through. This way, the crust stays crisp and the filling softens without becoming watery. Avoid microwaving, as that can make the crust soggy.
FAQs
-
Can I use homemade pie crust for this Mini Pumpkin Pies Recipe?
Absolutely! I often use homemade pie crust for the extra buttery flavor and flakiness. Just roll it out evenly to 1/8-inch thickness and make sure it’s well chilled before cutting the circles to get the best results.
-
What’s the difference between canned pumpkin puree and pumpkin pie filling?
Canned pumpkin puree is simply cooked and mashed pumpkin without added spices or sugar, while pumpkin pie filling already has spices and sweeteners mixed in. This recipe calls for the puree so you can control the level of sweetness and spice yourself for perfect balance.
-
Can I make mini pumpkin pies ahead of time?
Yes! One of the best things about this Mini Pumpkin Pies Recipe is that you can bake them ahead and store them in the fridge for several days or freeze them for longer. Just chill or freeze after cooling, and reheat gently before serving.
-
How do I prevent the crust from getting soggy?
Chilling the pie crust in the muffin pans before filling helps keep a firm structure during baking. Also, baking at a higher temperature (400°F) ensures the crust crisps up quickly. Avoid filling them too full to prevent overflow and sogginess.
Final Thoughts
This Mini Pumpkin Pies Recipe holds a special place in my heart because it combines the nostalgia of traditional pumpkin pie with the fun of tiny, portable desserts. I’m confident you’ll enjoy how effortlessly these pies come together and how delightful they taste. Next time you want pumpkin dessert without the fuss or leftovers, give this recipe a try — I really think you’ll love it as much as my family does!
Print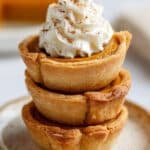
Mini Pumpkin Pies Recipe
- Prep Time: 30 minutes
- Cook Time: 18 minutes
- Total Time: 3 hours 48 minutes
- Yield: 18 mini pies 1x
- Category: Dessert
- Method: Baking
- Cuisine: American
Description
These Mini Pumpkin Pies are perfect bite-sized treats that capture the warm, spiced flavors of traditional pumpkin pie. Made with flaky pie crust and a creamy pumpkin filling spiced with pumpkin pie spice and vanilla, these pies are baked in muffin tins for fun, individual portions. They’re great for fall gatherings, holidays, or anytime you want a cozy seasonal dessert. Serve chilled or at room temperature, topped with homemade whipped cream for an extra indulgent finish.
Ingredients
Pie Crust
- 2 9-inch unbaked pie crusts, homemade or store bought
Filling
- 1/3 cup brown sugar
- 2 tablespoons granulated sugar
- 1 1/2 teaspoons pumpkin pie spice
- 1/4 teaspoon salt
- 1 cup canned pumpkin puree (not pumpkin pie filling)
- 3/4 cup evaporated milk
- 1 large egg, lightly beaten
- 1/2 teaspoon vanilla extract
To Serve
- Homemade whipped cream
Instructions
- Preheat and Prepare Pie Crust: Preheat your oven to 400°F. On a lightly floured surface, roll the pie crusts out to 1/8-inch thickness. Use a 3 1/2-inch cookie cutter or cup to cut out 18 circles from the pie crusts. Re-roll any pie dough scraps to cut out the remaining circles.
- Line Muffin Pans: Place each pie crust circle into the 18 slots of two standard 12-count muffin pans. Gently press the dough down and around the sides ensuring a snug fit. Place the muffin pans in the refrigerator while you prepare the filling.
- Make the Pumpkin Filling: In a mixing bowl, whisk together the brown sugar, granulated sugar, pumpkin pie spice, and salt until well combined. Add pumpkin puree, evaporated milk, beaten egg, and vanilla extract, then whisk until fully blended and smooth.
- Fill the Crusts: Remove muffin pans from the refrigerator. Evenly divide the pumpkin filling among the 18 pie crusts, pouring about 2 tablespoons into each.
- Bake the Mini Pies: Bake for 16-20 minutes, or until the filling is set and crusts turn lightly golden. Keep an eye on them to avoid burning.
- Cool the Pies: Remove from the oven and allow the pies to cool on a wire rack for 30 minutes. Then carefully remove them from the muffin pans and cool completely on the rack.
- Chill Before Serving: Place the cooled mini pies in an airtight container and refrigerate for at least 3 hours or overnight to allow them to set fully.
- Serve: Remove the pies from the pans carefully. Serve chilled or at room temperature, topped with homemade whipped cream if desired.
Notes
- You can use store-bought pie crust for convenience or make your own for a homemade touch.
- Be careful not to overfill the pie crusts to prevent spillage while baking.
- Watching the pies closely at the end of baking time ensures they don’t burn.
- Chilling overnight improves texture and flavor.
- These mini pies can be stored in the fridge for up to 3 days.
Nutrition
- Serving Size: 1 mini pie
- Calories: 150
- Sugar: 10g
- Sodium: 150mg
- Fat: 7g
- Saturated Fat: 3g
- Unsaturated Fat: 3g
- Trans Fat: 0g
- Carbohydrates: 20g
- Fiber: 1g
- Protein: 2g
- Cholesterol: 40mg

