
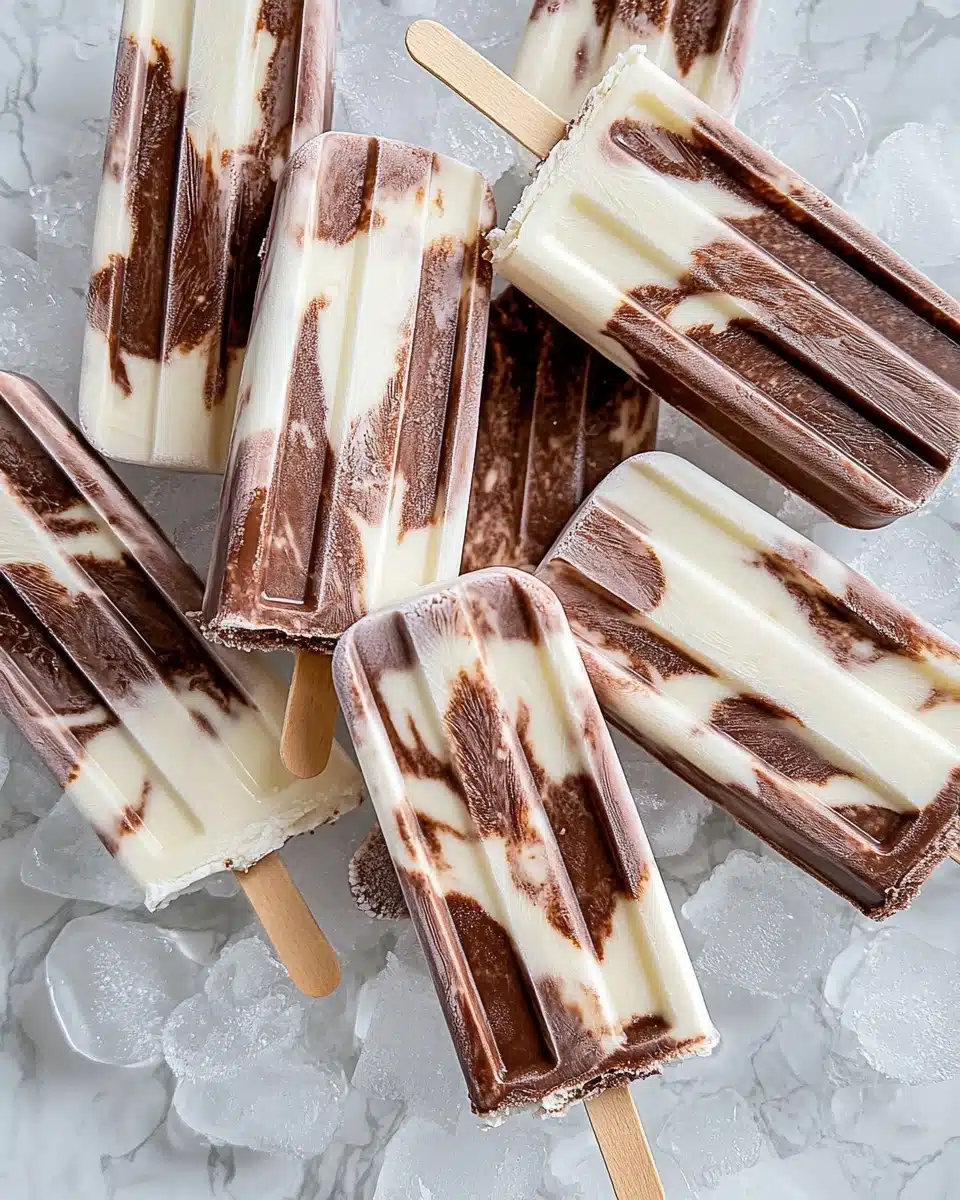
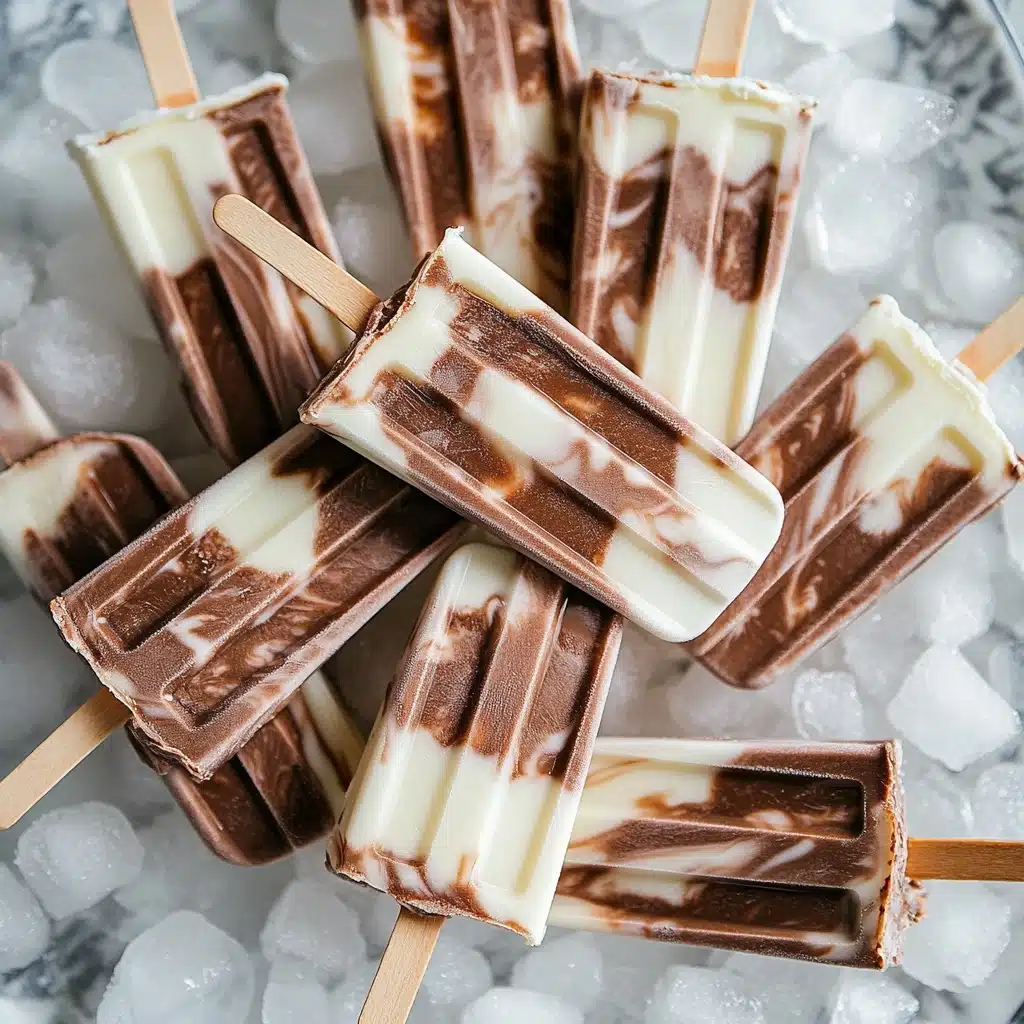
Jello Pudding Pops are the ultimate throwback treat—creamy, swirled, and perfectly chilled for those moments when you crave something fun and nostalgic. With dreamy ribbons of chocolate and white chocolate pudding, these pops are easy to whip up and impossible to resist, making them a favorite for kids and grown-ups alike!
Why You’ll Love This Recipe
- Nostalgic Swirl: These Jello Pudding Pops bring classic childhood dessert memories straight into your kitchen, but with a homemade twist that feels extra special.
- Quick & Easy: No baking, minimal prep time, and just a handful of ingredients — you can have these chilling in the freezer in under 15 minutes!
- Creamy Texture: The combination of instant pudding and whole milk makes for unbelievably silky pops that freeze beautifully but still melt in your mouth.
- Customizable Fun: Swirl the flavors however you like and get the kids involved—these pops are as playful to make as they are to eat.

Ingredients You’ll Need
Making Jello Pudding Pops is as delightfully simple as it gets, but each ingredient really does its part to create that trademark creamy texture and vibrant swirls. You don’t need much, so choose quality and savor the magic of every bite.
- 3.3 oz White Chocolate Instant Jell-O Pudding Mix (or vanilla): This is the base for the lighter swirl—white chocolate adds richness and a gentle sweetness, but vanilla works in a pinch for that classic flavor.
- 3.3 oz Chocolate Instant Jell-O Pudding Mix: For that deep, chocolatey layer everyone fights over. Instant mix ensures the pops set quickly and freeze with a smooth finish.
- 3.5 cups whole milk (divided): Whole milk is key here! It provides just the right amount of creaminess without making the pops too icy.
Variations
The best part about Jello Pudding Pops is how easy they are to customize—let your creativity (and taste buds) run wild! Whether you’re working with dietary restrictions or just love to experiment, these swaps are sure to spark inspiration.
- Dairy-Free Delight: Swap the whole milk for a creamy non-dairy alternative like oat milk or coconut milk to make vegan-friendly pudding pops.
- Mix Up the Flavors: Try pistachio, butterscotch, or banana instant pudding for a colorful twist and fun flavor combinations.
- Pops with Mix-Ins: Stir in mini chocolate chips, crushed cookies, or chopped berries before piping for pops with surprise bites inside.
- Single Flavor Pops: Not a fan of swirls? Go all in with just one pudding flavor throughout for a bolder, monochromatic treat.
How to Make Jello Pudding Pops
Step 1: Prepare the Puddings
Start by grabbing two medium bowls. In the first, whisk together the white chocolate instant pudding mix with 1 3/4 cups of whole milk until completely smooth and beginning to thicken. Repeat in another bowl with the chocolate pudding mix and the remaining 1 3/4 cups milk. Let them sit for a couple minutes until both puddings have just started to set—this will help create those gorgeous swirls inside your popsicles.
Step 2: Fill and Swirl
Once the puddings look thick but still scoopable, grab a gallon-size freezer bag and open it wide. Alternate spoonfuls of the chocolate and white chocolate puddings into the bag—no need to be precise! Seal the bag and snip off a small corner; now you have a handy piping bag. Squeeze the pudding mixture into popsicle molds, allowing the colors to swirl naturally for that signature look.
Step 3: Freeze
Pop the molds into your freezer and let the magic happen. The Jello Pudding Pops need at least 3 hours to freeze completely, but if you have the patience, overnight is even better. The longer they chill, the creamier and more satisfying they’ll be when you finally unmold them.
Step 4: Unmold and Enjoy
When you’re ready to serve, briefly dip the bottoms of the molds in hot water—just 10-20 seconds is enough. This quick trick helps the pudding pops slide right out without any fuss or breakage. Get ready to enjoy every creamy, chilly, marbled bite!
Pro Tips for Making Jello Pudding Pops
- Cool for Swirl Control: Don’t let the pudding set too long before piping—catch it just as it thickens for the prettiest, most distinct swirls in your pops!
- Baggie Piping Magic: Using a freezer bag for piping isn’t just fun—it makes layering and swirling the two flavors a total breeze, with less mess and perfect results.
- Unmolding Like a Pro: A dip in hot water (not boiling!) gently loosens the pops, so they slide out cleanly and keep their beautiful marbled patterns intact.
- Whole Milk Matters: For that melt-in-your-mouth texture, stick with whole milk—lower fat milks can make your pops icy instead of velvety.
How to Serve Jello Pudding Pops
Garnishes
The beauty of Jello Pudding Pops is that they’re gorgeous straight from the mold, but for a little extra flair, try a quick dip in melted chocolate followed by a sprinkle of crushed nuts, rainbow sprinkles, or even a dusting of cocoa powder. A gentle drizzle of caramel or white chocolate can also add that “wow” factor to your platter!
Side Dishes
Make snack time extra special by pairing these pops with bowls of fresh berries, sliced bananas, or even a chilled fruit salad. If you’re going full dessert bar, serve alongside brownies, cookies, or other frozen treats for a cool, crowd-pleasing spread.
Creative Ways to Present
For birthday parties and summer celebrations, line pops on a platter layered with crushed ice and edible flowers. Set up a “pudding pop bar” with toppings for everyone to customize their own. Or, serve them in cups with cute wooden sticks and decorative tissue paper for a retro ice-cream-truck vibe—they’re guaranteed to draw smiles!
Make Ahead and Storage
Storing Leftovers
Jello Pudding Pops store beautifully right in their molds or individually wrapped in plastic wrap. Tuck them into an airtight container or freezer bag to keep freezer odors at bay and maintain their creamy texture for up to a week.
Freezing
Once they’re fully frozen, you can even pop them out of the molds and store them individually for easy snacking at any time. Don’t forget to label—if you’ve made a variety, it’s fun to know which flavor awaits with each pop!
Reheating
While Jello Pudding Pops are meant to be enjoyed frozen, if they’re too solid, just let them sit at room temperature for a minute or two. A quick dip in warm water will also do the trick—no need for reheating in the traditional sense!
FAQs
-
Can I use any flavor of instant pudding for Jello Pudding Pops?
Absolutely! Chocolate and white chocolate (or vanilla) are classic, but feel free to swap in your favorites, like butterscotch, banana, or even pistachio. Just make sure you’re using instant pudding mix, as cook-and-serve won’t set the same way in popsicle molds.
-
What can I use if I don’t have popsicle molds?
No molds? No problem! Use small paper cups or silicone muffin liners, and insert wooden craft sticks after the pops have partially set in the freezer (about 30 minutes). Just peel away the cup or liner when you’re ready to eat.
-
How do I get perfect swirls in my Jello Pudding Pops?
To create those beautiful swirls, spoon alternating dollops of each pudding flavor into your piping bag or freezer bag, then gently squeeze into the molds. Don’t overmix—let the colors blend naturally as you pipe for the prettiest marbled effect!
-
Can Jello Pudding Pops be made ahead of time for a party?
They sure can! Jello Pudding Pops need at least three hours to freeze, but making them a day or two ahead is actually ideal. Just keep them wrapped or in an airtight container until ready to serve—no last-minute stress required.
Final Thoughts
There’s something about a frosty, swirled Jello Pudding Pop that transports you right back to summer afternoons and simple joys. Whether you’re sharing with family or treating yourself after a long day, these are guaranteed to bring smiles all around. Go ahead—give them a try, and let your freezer become the happiest place in the house!
Print
Jello Pudding Pops Recipe
- Prep Time: 15 minutes
- Total Time: 3 hours 15 minutes
- Yield: 12 popsicles 1x
- Category: Dessert
- Method: Freezing
- Cuisine: American
- Diet: Vegetarian
Description
These Jello Pudding Pops are a fun and colorful treat perfect for hot summer days. Made with two layers of creamy pudding swirled together, these popsicles are a nostalgic and delicious dessert the whole family will love.
Ingredients
White Chocolate Pudding:
- 3.3 oz White Chocolate Instant Jell-O Pudding Mix
- 1 3/4 cups whole milk
Chocolate Pudding:
- 3.3 oz Chocolate Instant Jell-O Pudding Mix
- 1 3/4 cups whole milk
Instructions
- Prepare White Chocolate Pudding: In a medium-sized bowl, combine white chocolate pudding mix and 1 3/4 cups of milk. Stir until well mixed.
- Prepare Chocolate Pudding: In another medium-sized bowl, combine chocolate pudding mix and 1 3/4 cups of milk. Mix until smooth.
- Layer and Pipe Pudding: Once the puddings have slightly set, alternate spoonfuls of the two pudding colors into a plastic gallon-sized baggie. Seal the baggie and snip the end to pipe the pudding into popsicle molds, creating a swirl effect.
- Freeze: Place the molds in the freezer for at least 3 hours, or overnight for the best results.
- Unmold: To remove the pudding pops, briefly dip the bottoms of the molds in hot water to help them slide out easily.
Nutrition
- Serving Size: 1 pudding pop
- Calories: 140
- Sugar: 18g
- Sodium: 220mg
- Fat: 4g
- Saturated Fat: 2.5g
- Unsaturated Fat: 1.5g
- Trans Fat: 0g
- Carbohydrates: 24g
- Fiber: 0g
- Protein: 3g
- Cholesterol: 10mg


