

If you’ve ever craved that perfect fall treat, you’re going to absolutely flip for this Homemade Caramel Apples Recipe. It’s the kind of recipe that brings out your inner kid, makes your kitchen smell like a candy shop, and leaves you with apples that are tender, sweet, and gorgeously coated in silky caramel. Trust me, once you try making these at home, you’ll never want to buy the store-bought versions again because this homemade magic tastes just so much better—and is surprisingly simple!
Why You’ll Love This Recipe
- Perfectly Smooth Caramel: This caramel has just the right balance of creamy and sticky, coating each apple flawlessly.
- Simple Ingredients: You only need a handful of pantry staples, no weird additives or processed stuff.
- Customizable Fun: You can add nuts, chocolate drizzle, or whatever toppings you love to make it truly your own.
- Great for Gifting and Parties: These apples are as charming to give as they are to eat.

Ingredients You’ll Need
These ingredients come together beautifully to create that melt-in-your-mouth caramel you’ll want to dip everything in. I always use firm, cold apples; it helps the caramel stick better and keeps that refreshing crunch. And trust me, the dark brown sugar brings a richer taste that you just can’t beat.
- Apples: Firm varieties like Granny Smith or Fuji work best because they hold up under the caramel.
- Heavy cream: Adds the perfect creaminess to the caramel. Don’t substitute with milk—it won’t thicken properly.
- Light corn syrup: Helps prevent the sugar from crystallizing, keeping your caramel silky smooth.
- Light or dark brown sugar: Adds that deep, molasses-y flavor to the caramel that’s irresistible.
- Unsalted butter: Use room temperature for easy melting and a richer texture.
- Salt: Balances sweetness and enhances the caramel flavor.
- Pure vanilla extract: A splash at the end brightens up the caramel beautifully.
Variations
I love how versatile this Homemade Caramel Apples Recipe is. Once you’ve got the basic caramel down, it’s such a fun base for mixing things up—whether you want to dress them up for a party or keep it simple for an after-school treat.
- Nutty Twist: Rolling the caramel apples in chopped pecans or peanuts adds a satisfying crunch that my family goes crazy for.
- Chocolate Drizzle: After the caramel sets, drizzle melted dark or white chocolate over the apples. It turns these into a fancy treat perfect for special occasions.
- Spiced Caramel: Add a pinch of cinnamon or pumpkin spice into your caramel for a cozy seasonal vibe I stumbled on one chilly October night—wow, so good!
- Healthier Option: Using Granny Smith apples with minimal toppings keeps things classic and less sweet if you want.
How to Make Homemade Caramel Apples Recipe
Step 1: Prep Your Apples with Care
Start by rinsing your apples under cold water and drying them completely—that step is super important because the caramel won’t stick if the apples are wet or have a waxy coating. To help the caramel cling better, I usually wipe mine down with a little vinegar on a towel, then dry again. Then, pop out the stems and insert your sticks about three-quarters down the apple—you want them sturdy so the apples won’t wobble when you dip.
Step 2: Make That Dreamy Caramel
This part is pure joy! In a heavy-duty saucepan, combine heavy cream, corn syrup, brown sugar, butter, and salt over medium heat. Stir constantly until the butter melts. Then, use a water-moistened pastry brush to wash down any sugar crystals from the pan sides—trust me, this little trick helps prevent grainy caramel. Attach your candy thermometer, making sure it doesn’t touch the pan’s bottom (an inaccurate reading is the worst!). Now, don’t stir anymore; let the mixture bubble and cook until it hits between 235°F and 240°F. Be patient—it can take 15 to 20 minutes, depending on your stove. When it finally reaches temperature, take it off the heat and stir in the vanilla, gently this time to keep bubbles from forming.
Step 3: Dip and Decorate Your Apples
While your caramel cools and thickens for about 10-15 minutes (it should be thick but still dippable), get your lined baking sheet ready. Holding the stick, dip the apples into that luscious caramel, swirling to coat all over. I like to gently tap the apple on the side of the pot so the excess caramel drips off—otherwise, you’ll end up with a gummy mess at the bottom! Place dipped apples on your prepared pan and, if you’re feeling creative, roll them in nuts, sprinkles, or toffee right away before the caramel sets. It’s all about that timing.
Step 4: Let the Caramel Set
Give your caramel apples about 45-60 minutes to fully set at room temperature. If you’re eager to wrap them for gifts or travel, wait until the caramel hardens completely—otherwise, the caramel could stick and ruin your fancy packaging. Patience is key here, and it’s worth it!
Pro Tips for Making Homemade Caramel Apples Recipe
- Choose the Right Apples: I always go for cold, firm apples like Granny Smith or Fuji for crunch and flavor contrast.
- Use a Candy Thermometer: It’s the game changer! Relying on time alone can lead to under or overcooked caramel.
- Don’t Stir During Cooking: After butter melts, let the caramel bubble undisturbed to avoid grainy texture.
- Perfect Cooling Time: Let your caramel cool until it’s thick but still pourable—this makes dipping cleaner and coats better.
How to Serve Homemade Caramel Apples Recipe

Garnishes
I’m all about adding a little something extra! Chopped toasted pecans or crushed peanuts are my go-to because they add a lovely crunch and contrast. Sometimes, a sprinkle of sea salt right after dipping takes the flavor to the next level. For a festive touch, mini M&Ms or colorful sprinkles make these crowd-pleasers at any party.
Side Dishes
If you’re having a fall gathering, serving these homemade caramel apples alongside warm cinnamon-spiced cider or a chilly vanilla milkshake hits just right. They also pair wonderfully with soft cheeses or a simple nut mix for balance.
Creative Ways to Present
I once arranged a dozen caramel apples on a rustic wooden tray lined with autumn leaves for a Thanksgiving dessert table—it was such a hit! For kids’ birthdays, I set up a dipping station with bowls of toppings so everyone could customize their own. If you’re gifting, wooden crates with shredded paper and tied with a ribbon make the presentation extra special.
Make Ahead and Storage
Storing Leftovers
I like to loosely cover leftover caramel apples with wax paper and store them in the fridge for up to a week. This way, the caramel stays firm but not rock hard, and the apples remain crisp. Just avoid airtight containers—they can trap moisture and make the caramel sticky or soggy.
Freezing
While I don’t usually freeze caramel apples because the texture of the apple changes when frozen, if you must, wrap them tightly in plastic wrap and place in an airtight container. Thaw overnight in the fridge before serving. Keep in mind, the apple may become softer after thawing.
Reheating
If your caramel hardens too much in the fridge and you want that chewy texture back, just let the apples sit at room temp for 20 minutes before eating. You can also gently warm leftover caramel in a microwave-safe bowl for just a few seconds, stirring carefully—don’t overheat or it’ll burn.
FAQs
-
Can I use other types of apples for this Homemade Caramel Apples Recipe?
You absolutely can! Just make sure the apples are firm and not overly ripe—varieties like Honeycrisp, Gala, or Pink Lady also work wonderfully. The key is crispness to contrast the soft caramel.
-
Why is my caramel grainy, and how can I fix it?
Grainy caramel usually happens if sugar crystals form during cooking. To prevent this, brush down the sides of your pan with a wet pastry brush while the caramel heats and avoid stirring after the butter melts. Patience and the right temperature are your friends here.
-
How do I store caramel apples so the caramel doesn’t get sticky?
Store them loosely covered in the fridge on wax or parchment paper. Avoid airtight containers that trap moisture. This keeps the caramel firm without getting sticky or soggy.
-
Can I add other flavors to the caramel?
Definitely! Adding vanilla extract at the end is classic, but you can also stir in spices like cinnamon or pumpkin pie spice once you remove the caramel from heat for a seasonal twist.
-
How do I clean up caramel spills without a sticky mess?
Warm water and vinegar work wonders for wiping down sticky spots. Soak utensils in hot water before scrubbing to make cleanup easier. Always be cautious handling hot caramel to avoid burns!
Final Thoughts
I honestly love how this Homemade Caramel Apples Recipe transforms a humble apple into an indulgent treat that’s both nostalgic and totally crowd-pleasing. Making it in your own kitchen lets you control the sweetness, add your favorite toppings, and share a bit of joy with friends and family. So grab some apples, warm up your saucepan, and give it a go—you’ll find it’s easier than you think and delicious beyond words!
Print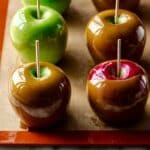
Homemade Caramel Apples Recipe
- Prep Time: 10 minutes
- Cook Time: 15 minutes
- Total Time: 1 hour, 15 minutes
- Yield: 8–9 caramel apples 1x
- Category: Dessert
- Method: Stovetop
- Cuisine: American
Description
This Homemade Caramel Apples recipe offers a perfect balance of crisp, fresh apples coated in a rich, buttery caramel. The caramel is made from heavy cream, corn syrup, brown sugar, butter, and vanilla, cooked to the ideal temperature for the perfect sticky, chewy texture. These classic treats are easy to make at home and can be customized with your favorite toppings like nuts, toffee, or chocolate drizzle, making them perfect for fall celebrations, Halloween, or anytime you crave a sweet, nostalgic dessert.
Ingredients
Apples
- 8–9 cold apples
Caramel
- 1 and 3/4 cups (420ml) heavy cream
- 1 cup (240ml) light corn syrup
- 2 cups (400g) packed light or dark brown sugar
- 1/4 cup (4 Tbsp; 56g) unsalted butter, at room temperature
- 1/2 teaspoon salt
- 1/2 teaspoon pure vanilla extract
Instructions
- Prep the apples: Rinse the apples with water, then wipe completely dry to remove any slippery waxy coating which helps the caramel adhere better. Remove the apple stem and insert a caramel apple stick about 3/4 down into each apple.
- Prepare baking sheet: Line a large baking sheet with a silicone baking mat or grease it with butter, since caramel tends to stick to parchment or wax paper.
- Make the caramel: In a 3-quart heavy-duty saucepan over medium heat, combine heavy cream, corn syrup, brown sugar, butter, and salt. Stir constantly with a wooden spoon until the butter melts. Use a water-moistened pastry brush to clean down the sides of the pan. Attach a candy thermometer ensuring the bulb does not touch the bottom of the pan for accurate measurement.
- Cook the caramel: Without stirring, allow the mixture to cook and bubble until it reaches 235°F to 240°F (113°C to 116°C), which should take approximately 15-20 minutes but depends on your stove. Watch carefully as the temperature will increase slowly then rapidly. Once reached, remove from heat and stir in vanilla extract gently to avoid air bubbles.
- Cool the caramel: Let the caramel cool and thicken for 10-15 minutes. If too thin to coat apples properly, allow an additional 5-10 minutes of cooling.
- Dip the apples: Holding the stick, dip each apple into the warm caramel, tilting the pot to coat all sides evenly. Lift and swirl the apple or gently tap it against the side of the pot to remove excess caramel. Place on the prepared baking sheet.
- Add toppings (optional): Immediately after dipping and before the caramel sets, roll apples in chopped nuts, toffee pieces, mini M&Ms, sprinkles, or coconut, or drizzle with melted chocolate or white chocolate for extra flavor and decoration.
- Set the caramel: Allow the caramel to set at room temperature for 45-60 minutes. For travel or gifting, wait until the caramel is fully set before wrapping in cellophane treat bags.
- Serve: Place on wax paper or a nonstick surface to prevent sticking. Eat by biting directly or slicing around the stick for easier sharing.
- Storage: Loosely cover leftover caramel apples and store them in the refrigerator for up to 1 week.
Notes
- Make sure apples are completely dry to help caramel stick properly.
- Use a candy thermometer for accuracy to reach the perfect caramel temperature.
- Brush down the sides of the pan during cooking to prevent sugar crystals from forming.
- Be patient with cooling caramel to get the right thickness for coating.
- Caramel apples can be customized with your favorite toppings or drizzles.
- Store leftovers loosely covered in the fridge for best freshness.
- Use silicone baking mats to prevent sticking during setting.
Nutrition
- Serving Size: 1 caramel apple
- Calories: 320
- Sugar: 50g
- Sodium: 100mg
- Fat: 10g
- Saturated Fat: 6g
- Unsaturated Fat: 3g
- Trans Fat: 0g
- Carbohydrates: 56g
- Fiber: 3g
- Protein: 1g
- Cholesterol: 30mg


