

If you’ve ever craved something hearty, flavorful, and downright comforting, you’re going to fall in love with this Homemade Arepa with Reina Pepiada Filling Recipe. It’s a classic Venezuelan treat that I’ve made countless times, and every single bite brings that perfect combo of crispy cornmeal bread and creamy, zesty chicken-avocado filling. Trust me, once you try this, your family and friends will be begging you for it too – so keep reading because this recipe is fan-freaking-tastic and surprisingly easy to master!
Why You’ll Love This Recipe
- Authentic Flavor: The Reina Pepiada filling is a classic Venezuelan favorite with creamy avocado, zesty lime, and shredded chicken that bursts with flavor.
- Simple Ingredients: You only need a handful of easy-to-find ingredients, including pre-cooked cornmeal, which makes the process much quicker.
- Versatile and Filling: These arepas make a perfect lunch, dinner, or even party snack that’ll satisfy every craving.
- Crispy Yet Soft: You’ll love the combination of a crispy outside shell with a soft, moist center – I discovered this balance by baking after pan-frying.

Ingredients You’ll Need
Getting your ingredients right makes all the difference in this Homemade Arepa with Reina Pepiada Filling Recipe. The key is using pre-cooked white cornmeal, which gives you that authentic arepa texture without fuss, and a perfectly ripe avocado to make that filling extra creamy and delicious.

- Pre-cooked white cornmeal: Look for brands like P.A.N., which are specifically made for arepas – this saves tons of time and ensures the right texture.
- Warm water: Helps hydrate the cornmeal dough evenly for that perfect consistency.
- Salt: Simple but essential for flavor in the arepas.
- Vegetable oil: Adds moisture to the dough and helps you get a golden crust while cooking.
- Cooked chicken (shredded): I like poaching chicken breasts and shredding them by hand for a tender texture.
- Avocado (ripe): The creaminess here is everything, so make sure it’s ripe but not mushy.
- Mayonnaise: Adds richness and binds the filling nicely.
- Onion (finely chopped): Gives a little crunch and sharpness for balance.
- Cilantro (finely chopped): Freshness that brightens up the filling.
- Jalapeño (optional): If you like a tiny kick, this is your friend—seed it to keep heat moderate.
- Lime juice: Adds the perfect tang and elevates the flavors.
- Salt and pepper: To taste, for both the dough and filling.
Variations
I love customizing this Homemade Arepa with Reina Pepiada Filling Recipe depending on what’s in my fridge or my mood. Whether you want it spicier, lighter, or even vegetarian, there’s a way to make these uniquely yours!
- Spicy Variation: I sometimes add more jalapeño or a dash of hot sauce in the filling when I want a bit more kick—my family digs the extra heat!
- Vegetarian Variation: Replace chicken with chickpeas or sautéed mushrooms for a plant-based twist that still tastes hearty.
- Dairy-Free Option: Swap mayo for vegan mayo or Greek yogurt for a tangier but dairy-free filling.
- Cheesy Twist: Mixing shredded mozzarella or queso fresco into the filling adds a melty surprise in each bite.
How to Make Homemade Arepa with Reina Pepiada Filling Recipe
Step 1: Mix the Dough to Perfect Consistency
Start by combining your pre-cooked white cornmeal with salt and vegetable oil in a large bowl. Slowly pour in warm water while stirring with your hands or a spoon until the dough forms a smooth, slightly firm but pliable mass. Let it rest for about 5 minutes—it helps the cornmeal fully hydrate, making the arepas tender on the inside but easy to shape.
Step 2: Shape and Cook Your Arepas
Divide your dough into six equal pieces, rolling each into a ball before flattening them into discs about 4-5 inches wide and half an inch thick. Heat a skillet over medium heat and coat it lightly with oil. Cook arepas for 6-7 minutes on each side until golden brown. Here’s the trick I learned: after pan-frying, pop them in a 350°F oven for 10-15 minutes to get a crispy crust while keeping the inside soft and moist. It makes all the difference!
Step 3: Prepare the Reina Pepiada Filling
Mix the shredded chicken, chopped onion, cilantro, and jalapeño in one bowl. In another, mash the ripe avocado with mayonnaise and lime juice until smooth and creamy. Combine both mixtures, seasoning with salt and pepper to taste. This creamy and tangy filling is what makes the arepa truly irresistible.
Step 4: Stuff and Serve Your Arepas
Carefully slice each arepa on one side to create a pocket, then scoop in a generous amount of Reina Pepiada filling. Serve immediately for the best experience—you’ll love the way the warm, crisp arepa contrasts with the cool, creamy filling.
Pro Tips for Making Homemade Arepa with Reina Pepiada Filling Recipe
- Correct Dough Texture: The dough should feel like play dough—it shouldn’t crack when formed, so add water or cornmeal in small increments to get there.
- Even Cooking: Don’t rush turning the arepas; letting each side cook fully before flipping ensures that golden crust and prevents them from falling apart.
- Fresh Avocado: Using ripe avocado is key; if it’s underripe, your filling will lose that creamy magic.
- Avoid Overfilling: Be generous but don’t overload the arepas to prevent tearing and mess.
How to Serve Homemade Arepa with Reina Pepiada Filling Recipe

Garnishes
I like adding a sprinkle of fresh cilantro or a tiny drizzle of hot sauce on top for a bit of extra flair. A wedge of lime on the side always brightens things up and lets everyone adjust tanginess to their taste.
Side Dishes
Pair your arepas with a simple salad of lettuce, tomatoes, and avocado, or try fried plantains on the side. If you want to go full Venezuelan, black beans and queso fresco are perfect accompaniments that make it a filling meal.
Creative Ways to Present
For parties, I love making mini arepas by dividing the dough into smaller portions—and stuffing them with the filling served buffet-style. You can also top the Reina Pepiada filling instead of stuffing for a tapas-style presentation that’s sure to impress.
Make Ahead and Storage
Storing Leftovers
If you have leftover arepas, let them cool completely, then store in an airtight container in the fridge for up to 2 days. Keep the filling separate if possible to avoid sogginess. When ready, reheat the arepas gently in a pan or oven to crisp them back up.
Freezing
I’ve frozen uncooked arepa dough balls before, wrapped tightly, for up to a month. When you’re ready, thaw them in the fridge overnight, then shape and cook as usual. For the filling, freezing isn’t ideal due to avocado’s texture change, so prepare fresh when possible.
Reheating
To keep the arepas crispy when reheating, I like to warm them in a skillet over medium heat or in a toaster oven rather than the microwave. Then, add the freshly prepared Reina Pepiada filling just before serving for best taste and texture.
FAQs
-
Can I use regular cornmeal instead of pre-cooked cornmeal for arepas?
Pre-cooked cornmeal is specifically processed to make the dough easier to work with and to achieve the classic arepa texture. Regular cornmeal won’t absorb water the same way and can yield a gritty or crumbly dough, so it’s best to stick with pre-cooked varieties like P.A.N.
-
How do I know when the arepas are done cooking?
Arepas cook best over medium heat until they develop a golden-brown crust on both sides, which usually takes about 6-7 minutes per side. If you finish them in the oven, look for a firm exterior that sounds hollow when tapped.
-
Can I make the Reina Pepiada filling ahead of time?
Yes, you can prepare the filling a few hours ahead and store it in the fridge. However, I recommend mixing in the avocado last and just before serving to keep it fresh and avoid browning.
-
What can I substitute for mayonnaise in the filling?
You can use Greek yogurt or vegan mayo for a lighter or dairy-free option. This will still give the filling creaminess and help hold it together without losing that classic flavor.
-
Are arepas gluten-free?
Yes! Since arepas are made from cornmeal, they’re naturally gluten-free, making this recipe a great option if you’re avoiding gluten or cooking for someone who does.
Final Thoughts
I absolutely love how this Homemade Arepa with Reina Pepiada Filling Recipe brings people together. When I first tried making arepas, I struggled to get that perfect crispy outside with a soft, tasty inside, but once I got the hang of it, this became a weekly favorite for my family. You’ll find it’s not just a recipe but a little celebration on your plate every time you serve it. So go ahead, try it out, have fun with the filling, and enjoy sharing this delicious, authentic Venezuelan gem with your loved ones!
Print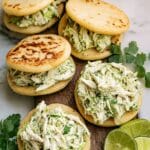
Homemade Arepa with Reina Pepiada Filling Recipe
- Prep Time: 25 minutes
- Cook Time: 40 minutes
- Total Time: 1 hour 5 minutes
- Yield: 6 arepas 1x
- Category: Main Dish
- Method: Frying
- Cuisine: Venezuelan
- Diet: Gluten Free
Description
This Homemade Arepa with Reina Pepiada recipe combines crispy, golden cornmeal patties with a creamy and flavorful shredded chicken and avocado filling. Originating from Venezuela, arepas are a versatile comfort food perfect for breakfast, lunch, or dinner. The Reina Pepiada filling features a delightful blend of avocado, shredded chicken, mayonnaise, lime juice, and fresh herbs, delivering a rich and satisfying taste experience.
Ingredients
For Arepas:
- 2 cups pre-cooked white cornmeal (P.A.N. brand or similar)
- 2½ cups warm water
- 1 teaspoon salt
- 1 tablespoon vegetable oil (plus extra for cooking)
For Reina Pepiada Filling:
- 2 cups cooked chicken (shredded)
- 1 ripe avocado (peeled and pitted)
- ¼ cup mayonnaise
- 1 small onion (finely chopped)
- ¼ cup cilantro (finely chopped)
- 1 jalapeño (seeded and finely chopped) (optional)
- Juice of 1 lime
- Salt and pepper to taste
Instructions
- Prepare the Dough: In a large bowl, mix the cornmeal, salt, and vegetable oil. Gradually add the warm water while stirring until the mixture forms a smooth and homogenous dough. Allow the dough to rest for 5 minutes to hydrate thoroughly.
- Shape the Arepas: Divide the rested dough into six equal portions. Shape each portion into a ball, then flatten it into a disc approximately 4-5 inches in diameter and about ½-inch thick, forming the classic arepa shape.
- Cook the Arepas: Heat a large skillet over medium heat and brush with vegetable oil to prevent sticking. Place the arepas in the skillet and cook for about 6-7 minutes on each side until they develop a golden, crispy crust. For additional crispiness, you can transfer the arepas to a preheated oven at 350°F (175°C) and bake them for 10-15 minutes.
- Prepare the Reina Pepiada Filling: In a mixing bowl, combine shredded chicken, finely chopped onion, cilantro, and optional jalapeño. In a separate bowl, mash the ripe avocado with mayonnaise and lime juice until smooth and creamy. Fold the avocado mixture into the chicken blend until well mixed. Season with salt and pepper according to taste.
- Fill the Arepas: Using a knife, slice an opening along the side of each cooked arepa to create a pocket without cutting all the way through. Generously spoon the Reina Pepiada filling inside each pocket.
- Serve: Serve the filled arepas immediately while warm. Alternatively, keep them covered to maintain warmth until ready to enjoy.
Notes
- Using pre-cooked white cornmeal (such as P.A.N.) is essential for proper dough texture.
- Resting the dough allows better hydration and easier shaping.
- To make the arepas extra crispy, finish by baking them in the oven after pan-frying.
- The jalapeño in the filling is optional; omit for a milder flavor.
- Reina Pepiada is a classic Venezuelan filling named after a beauty queen; avocado and chicken create a rich and creamy texture that pairs perfectly with the crispy arepa.
Nutrition
- Serving Size: 1 arepa with filling
- Calories: 350 kcal
- Sugar: 2 g
- Sodium: 480 mg
- Fat: 18 g
- Saturated Fat: 3.5 g
- Unsaturated Fat: 12 g
- Trans Fat: 0 g
- Carbohydrates: 32 g
- Fiber: 5 g
- Protein: 18 g
- Cholesterol: 60 mg


