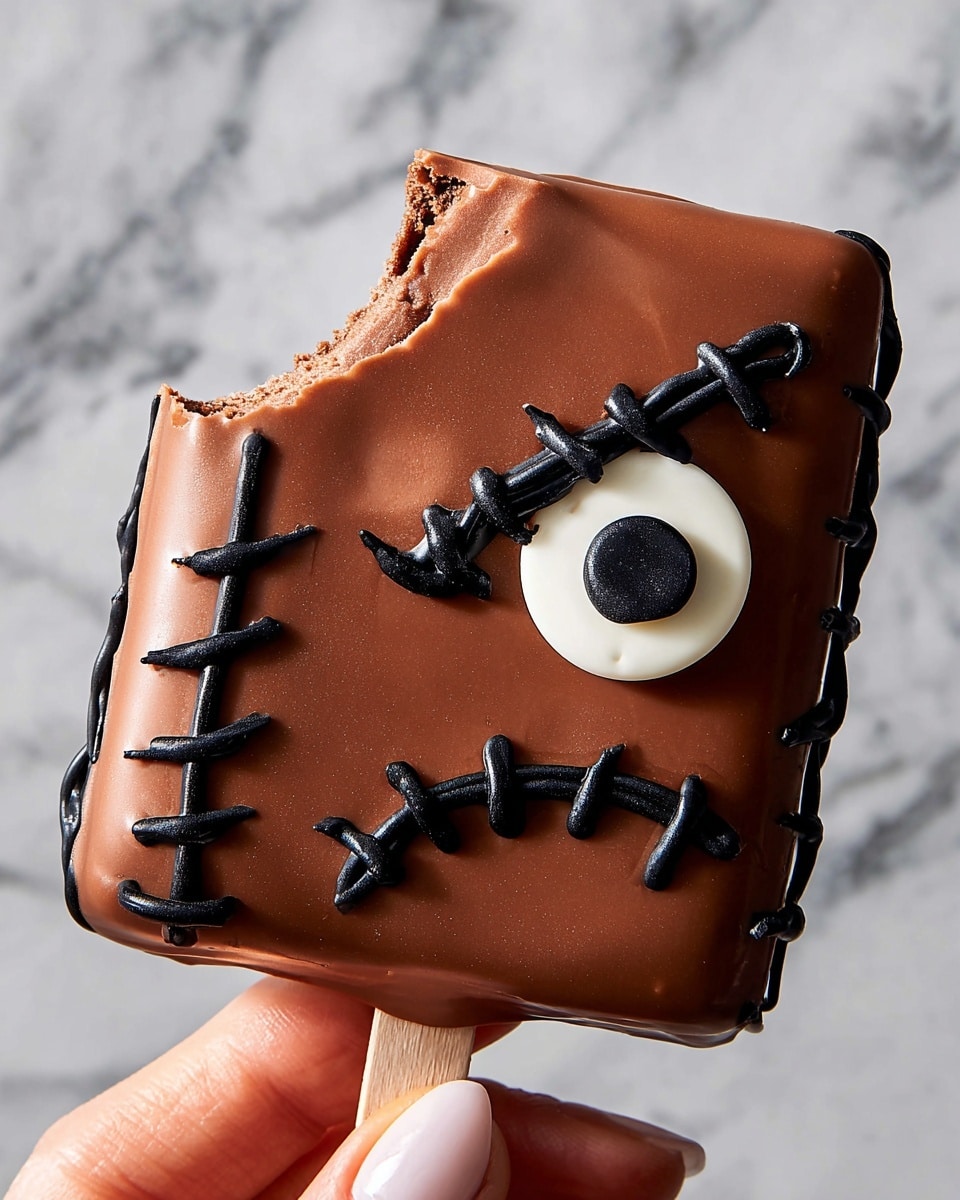
If you’re looking for a fun, spooky treat that’s as adorable as it is delicious, you’re in for a real treat. This Hocus Pocus S’mores Pops Recipe is exactly that—crispy graham crackers, melty marshmallow crème, and rich chocolate come together in a clever popsicle form perfect for Halloween or any magical gathering. Trust me, once you try these, you’ll want to make them for every fall party and cozy night in!
Why You’ll Love This Recipe
- Easy and Quick: You’ll whip these up in no time, with just a few simple ingredients and minimal fuss.
- Perfect for Parties: These s’mores pops are a fun, mess-free treat that kids and adults adore alike.
- Visually Spooky and Cute: The candy eyes and black frosting make these s’mores pop look straight out of a Halloween movie.
- Customizable: You can easily swap out ingredients or decorations to fit any theme or dietary need.
Ingredients You’ll Need
All the ingredients in this Hocus Pocus S’mores Pops Recipe work together to create that classic s’mores flavor with a seasonal twist. From crisp graham crackers to creamy marshmallow crème, these flavors blend perfectly for a treat everyone will rave about.
- Graham crackers: Choosing crispy, fresh crackers ensures your pops have a satisfying snap every bite.
- Marshmallow crème: This spreads easily and melts smoothly, giving you that iconic gooey center without the campfire fuss.
- Semisweet chocolate chips: Opt for good-quality chips; they melt beautifully and balance the sweetness exactly right.
- Coconut oil: Adding this helps your chocolate coating melt silky smooth and harden with a lovely shine.
- Candy eyes: These add the playful witchy vibe, but feel free to grab any Halloween-themed decorations you like!
- Black cookie frosting: You’ll use this to create those perfect spooky details—do not skip!
Variations
I love how easy it is to play around with this Hocus Pocus S’mores Pops Recipe. Whether you’re looking to add your own flair or accommodate dietary preferences, there’s plenty of room to customize and make it your own.
- Veggie-Friendly Swap: Use dairy-free chocolate chips and vegan marshmallow crème to make these perfect for plant-based friends—my family didn’t even notice the difference!
- Seasonal Decorations: Swap candy eyes for colored sprinkles or edible glitter when the mood strikes. I once tried mini candy pumpkins that were a total hit at a fall party.
- Add Nuts or Mini Pretzels: For a salty crunch inside or on top, sprinkle crushed nuts or tiny pretzel pieces before the chocolate sets—it adds a delightful texture contrast.
- Dark Chocolate Variation: If you like your treats with a less sweet, more intense chocolate flavor, swap semisweet chips for dark chocolate—it’s a game changer!
How to Make Hocus Pocus S’mores Pops Recipe
Step 1: Prepare Your S’more Sandwiches
Start by spreading about a tablespoon of marshmallow crème on half of your graham cracker halves. Then place a popsicle stick right in the middle of the crème, pushing it in just enough so it stays snug. Top with the remaining crackers to make little sandwiches. I like to line them up on parchment paper and pop them straight into the freezer for about 10 minutes while I make the chocolate coat—it helps everything hold together better when dipping.
Step 2: Melt the Chocolate Coating
In a medium heatproof bowl, combine your semisweet chocolate chips with the coconut oil. Microwave in 20-second bursts, stirring well each time, until the mixture is smooth and glossy. This usually takes about a minute total. Stirring in between is key—I learned the hard way that skipping this step can lead to lumps or burnt chocolate.
Step 3: Dip and Decorate
Carefully dip each s’mores pop into the melted chocolate, turning to fully coat all sides. Sometimes a butter knife or silicone spatula helps you spread the chocolate evenly on the edges—don’t be shy to use it! Before the chocolate sets, stick one candy eye on each “s’more book” about halfway down on the far right side—they add such a quirky witchy effect.
Step 4: Add Spooky Touches with Frosting
Once your chocolate has hardened in the fridge (about 15 minutes), grab your black cookie frosting for the fun part. Draw a circle around each candy eye to make them pop, add semicircle shapes on the outer corners of the graham crackers, and finish off with little “stitches” on the chocolate surface. These details bring those classic spooky vibes that I just adore.
Step 5: Chill and Set
Pop the decorated pops back in the fridge for at least 15 minutes to firm up the frosting. Once set, your Hocus Pocus S’mores Pops Recipe is ready to serve. These look impressive but are super straightforward, especially if you prep the components ahead of time!
Pro Tips for Making Hocus Pocus S’mores Pops Recipe
- Chill Sandwiches Before Dipping: Freezing the graham cracker sandwiches before dipping helps prevent the marshmallow crème from oozing out under the chocolate.
- Use Coconut Oil for Shine: Adding coconut oil to your melted chocolate gives you a glossy finish and makes the chocolate set with a nice snap.
- Work Quickly When Decorating: The chocolate sets fast in the fridge, so have your candy eyes and frosting ready before dipping to keep things smooth and easy.
- Avoid Overheating Chocolate: Stir frequently and microwave in short bursts to prevent burning the chocolate, which can ruin the texture and flavor.
How to Serve Hocus Pocus S’mores Pops Recipe

Garnishes
I usually keep the garnishes simple because the candy eyes and black frosting speak for themselves. But if you want to amp up the presentation, try adding tiny edible glitter sprinkles or dust with cocoa powder around the serving plate—it creates an extra bit of Halloween magic without overwhelming the looks or taste.
Side Dishes
I love pairing these s’mores pops with warm apple cider or a cozy cup of pumpkin spice latte to complete the autumn vibe. If it’s a kid’s party, some colorful candy corn or pumpkin-shaped cookies make for adorable complementary treats.
Creative Ways to Present
For Halloween parties, I’ve arranged the pops standing up in a styrofoam block wrapped in black paper and sprinkled with fake cobwebs—so cute and keeps them upright for guests to grab easily. Another time, I tied little Halloween ribbons around the sticks which added an extra festive touch. Trust me, these simple tricks make a big impression!
Make Ahead and Storage
Storing Leftovers
If you happen to have leftovers (though I doubt it will happen often!), store your s’mores pops in an airtight container in the refrigerator. Make sure they’re layered between parchment paper to prevent sticking. This keeps them fresh for up to 3 days while maintaining that charming s’mores taste and texture.
Freezing
I personally haven’t frozen these before because they’re best enjoyed fresh for that perfect chocolate snap and marshmallow softness. But if you want to freeze, wrap each pop individually in plastic wrap and place in a freezer-safe container—it’s best to thaw in the fridge overnight before serving.
Reheating
Since these s’mores pops are meant to be enjoyed cold or at room temperature, reheating isn’t usually necessary. If you want the chocolate melty again, a few seconds in the microwave can do the trick, but watch carefully to avoid melting the marshmallow crème entirely or making a mess.
FAQs
-
Can I make Hocus Pocus S’mores Pops Recipe without a microwave?
Absolutely! Melt the chocolate chips and coconut oil using a double boiler on the stovetop, stirring frequently to get a smooth, shiny coating just like you would with the microwave method.
-
What can I use if I don’t have candy eyes?
If candy eyes aren’t available, you can use small M&Ms, white chocolate chips with a dot of black icing for pupils, or even mini chocolate chips to create fun eyes for your s’mores pops.
-
How do I prevent marshmallow crème from leaking out?
Freezing your graham cracker sandwiches before dipping them is key. It firms up the marshmallow layer, making sure it stays put when you coat with chocolate.
-
Can I make this recipe gluten-free?
Yes! Just swap the graham crackers for gluten-free versions, and make sure all other ingredients like chocolate and marshmallow crème are certified gluten-free.
-
How long do Hocus Pocus S’mores Pops last?
Stored in an airtight container in the fridge, they stay fresh and tasty for about 3 days. They’re best enjoyed within this time frame to maintain texture and flavor.
Final Thoughts
I absolutely love how this Hocus Pocus S’mores Pops Recipe turns out every single time. They’re easy to make, wonderfully festive, and a guaranteed crowd-pleaser—especially with kids who adore the Halloween theme. I discovered that chilling the sandwiches before dipping was a game changer for preventing messes, and that little extra step has saved me so much cleanup. Whether you’re making these for a family movie night or a spooky gathering, I promise you’ll have a blast making and sharing them. Give this recipe a try and let me know how your pops come out—I bet your friends will be asking for more!
Print
Hocus Pocus S’mores Pops Recipe
- Prep Time: 15 mins
- Cook Time: 0 mins
- Total Time: 45 mins
- Yield: 6 pops 1x
- Category: Dessert
- Method: No-Cook
- Cuisine: American
Description
These festive Hocus Pocus S’mores Pops are a fun and spooky treat perfect for Halloween. Made with graham crackers, marshmallow crème, and dipped in rich melted chocolate, each pop is decorated with candy eyes and black cookie frosting to resemble little witchy books. Easy to prepare and sure to delight kids and adults alike, these no-bake s’mores pops bring a magical twist to a classic favorite.
Ingredients
Graham Cracker Sandwiches
- 12 graham crackers, halved
- 1/2 cup marshmallow crème
- 6 popsicle sticks
Chocolate Coating
- 2 cups semisweet chocolate chips
- 3 Tbsp. coconut oil
Decorations
- 1 bag candy eyes
- 1 container black cookie frosting
Instructions
- Prepare the Graham Cracker Pops: Spread about 1 tablespoon of marshmallow crème on half of the graham cracker halves. Press a popsicle stick halfway into the marshmallow crème so it sticks out like a handle. Top with the remaining graham cracker halves to make sandwiches. Place the assembled pops on a parchment-lined baking sheet and freeze until firm, while you prepare the chocolate coating.
- Melt the Chocolate: In a medium heatproof bowl, microwave the semisweet chocolate chips and coconut oil in 20-second intervals, stirring well between each, until the mixture is smooth and fully melted, approximately 1 minute in total.
- Dip and Decorate: Dip each frozen graham cracker sandwich into the melted chocolate to coat completely. Use a butter knife or silicone spatula to ensure the sides are well covered. While the chocolate is still wet, place one candy eye on the far right side about halfway down each pop, resembling a spooky eye. Return the pops to the parchment-lined baking sheet and refrigerate until the chocolate hardens, about 15 minutes.
- Add Frosting Details: Using the black cookie frosting, draw a circle around each candy eye, add two semicircles on the outer corners of the graham cracker to mimic eye sockets or decorations, and draw stitches on the chocolate surface to enhance the Halloween look.
- Set and Serve: Refrigerate the decorated pops until the frosting and chocolate set completely, at least 15 minutes, then serve chilled for a spooky and sweet treat.
Notes
- Make sure to freeze the graham cracker sandwiches before dipping to prevent them from falling apart.
- Work quickly when dipping in chocolate, as the cold sandwiches help the chocolate harden fast.
- You can substitute semisweet chocolate chips with milk or dark chocolate depending on your preference.
- These pops are best served chilled but bring to room temperature for a few minutes if the chocolate is too hard to bite.
- Store leftovers in an airtight container in the refrigerator for up to 3 days.
Nutrition
- Serving Size: 1 pop
- Calories: 250
- Sugar: 22g
- Sodium: 110mg
- Fat: 12g
- Saturated Fat: 7g
- Unsaturated Fat: 4g
- Trans Fat: 0g
- Carbohydrates: 32g
- Fiber: 2g
- Protein: 3g
- Cholesterol: 0mg

