
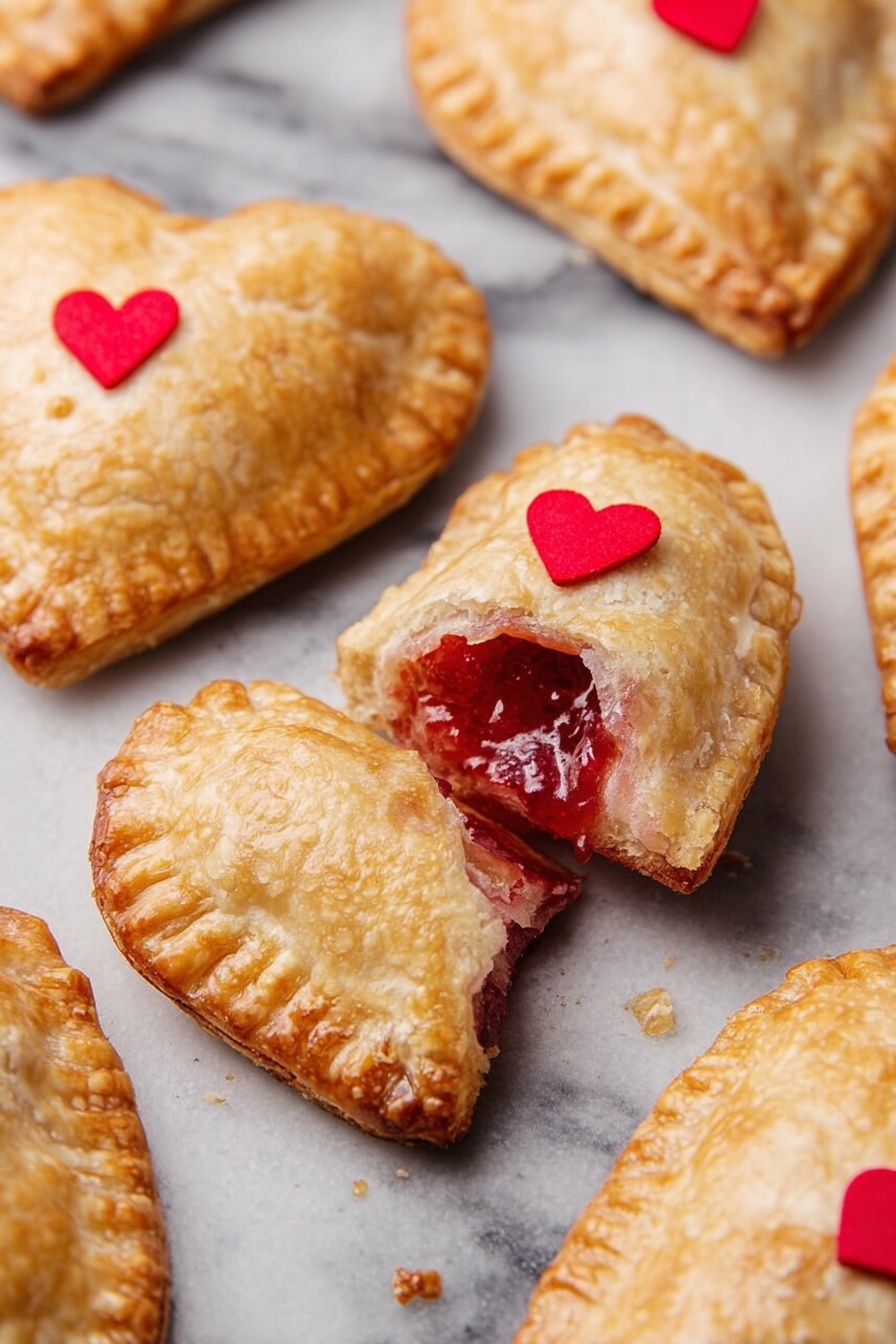
If you’re looking to add a little extra sweetness and charm to your baking, you’ve come to the right spot. I absolutely love making these adorable Heart Shaped Cherry Pie Hand Pies Recipe because they’re not only delicious but make for such a fun, festive treat — perfect for sharing (or not!). Whether it’s Valentine’s Day, a special occasion, or just a craving for something homemade and comforting, these hand pies will win hearts and smiles all around.
Why You’ll Love This Recipe
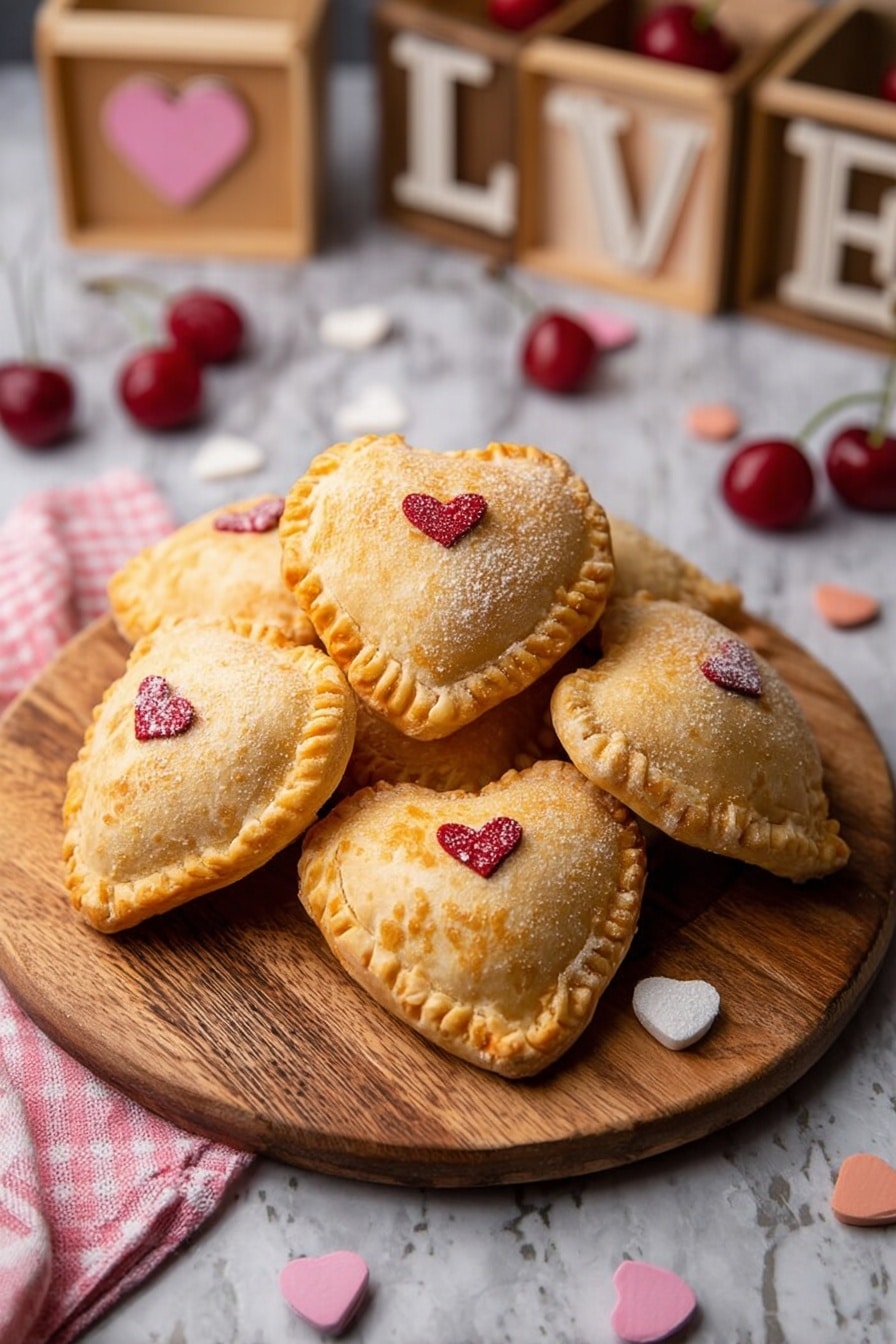
- Cute, charming presentation: The heart shapes aren’t just cute—they bring smiles and make these pies perfect for gifting or celebrations.
- Perfect balance of sweet and tart: The cherry pie filling shines with juicy tartness, nicely balanced by the buttery crust.
- Handheld and portable: These hand pies are perfect for on-the-go snacking, a picnic, or a fun dessert tray.
- Customizable and fun to make: You can play with fillings and decorations to make these your own.

Ingredients You’ll Need
The ingredients here come together to build that perfect flaky crust and luscious cherry filling. I always recommend using cold butter and cold water—it’s a little trick I discovered to help keep the dough tender yet easy to handle.
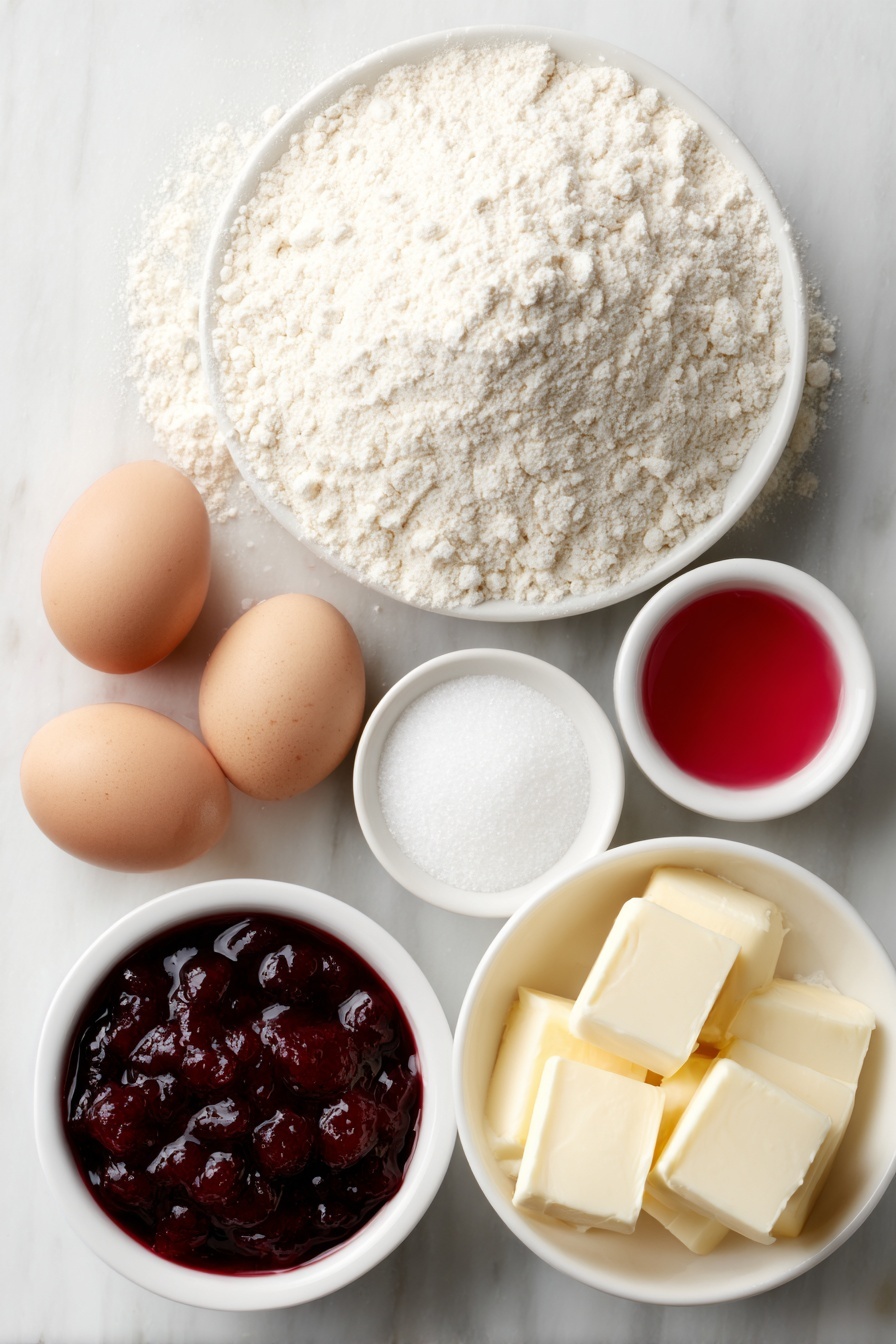
- All Purpose Flour: The base of our dough, providing structure and that perfect tender crumb.
- Salt: Just a touch to enhance all the flavors without overpowering sweetness.
- Unsalted Butter (cold): Cold butter is your secret weapon for flaky crusts—keep it chilled until just before mixing.
- Cold Water: Helps bring the dough together without melting the butter.
- Egg Whites: Used in two ways—one part mixed with sugar and food coloring for decorative brushing, the other adds shine as a glaze.
- Granulated Sugar: Adds sweetness to the egg wash and a bit of sparkle when sprinkled on top.
- Red Food Coloring: Gives the heart accents a vibrant pop that won’t bleed into your dough.
- Cherry Pie Filling: The star of the show, juicy and bursting with cherry flavor.
Variations
I love how versatile this Heart Shaped Cherry Pie Hand Pies Recipe is; you can easily swap out fillings or change up the decorations for different holidays or taste preferences. Play around and make it your own!
- Alternate Fillings: Blueberry, apple cinnamon, or even a cream cheese filling work great if you want a twist.
- Gluten-Free Crust: I’ve tried using gluten-free flour blends and it still turns out beautifully, just be gentle when rolling out the dough.
- Vegan Version: Swap butter for coconut oil and use flax “egg wash” for glazing.
- Food Coloring Alternatives: Natural options like beet juice can tint the egg wash if you prefer avoiding artificial colors.
How to Make Heart Shaped Cherry Pie Hand Pies Recipe
Step 1: Prepare Your Dough
Start by measuring out your ingredients – I find it helps to keep things smooth. Cut your cold butter into small blocks; this makes it easier to incorporate into the flour. Then, mix your flour and salt in a large bowl and cut the butter into the mixture until it looks like pea-sized crumbs. I like to use my fingers for this part—it keeps the texture just right. Slowly add cold water spoon by spoon until the dough just comes together—you might not need all the water depending on humidity, so go slow here. Form the dough into a ball, then roll it into a rough log and cut into four sections. Chill those little dough balls wrapped in plastic for about 10 minutes to rest and make rolling easier.
Step 2: Roll and Cut Out the Hearts
Flour your work surface and roll out one dough ball to about 1/8 inch thick. Use a small heart-shaped cookie cutter or a knife to carefully cut out tiny heart accents to decorate with later—these should be around half an inch big. Set these hearts aside on a plate. For the bigger hand pies, use a heart-shaped dumpling maker or pie press to cut two larger hearts for each pie. This little tool makes filling and sealing your pies a breeze.
Step 3: Mix Your Egg Washes
Mix one egg white with a tablespoon of sugar and the red food coloring for decorating the small hearts. In another bowl, whisk the remaining egg whites with 3 tablespoons sugar—this clear egg wash will give your hand pies that beautiful glossy finish. Brush the red-colored egg wash over the small hearts you cut earlier and let them dry so the color won’t bleed when you bake.
Step 4: Assemble Your Hand Pies
Place one large heart on one side of the pie press and gently press down on the edges to hold. Add about a tablespoon of cherry pie filling in the center, keeping it away from the edges to avoid leaking. Place the second heart on top, brush both sides with clear egg wash, then close the press firmly around the edges to seal. Pop the hand pie out onto a parchment-lined baking sheet. Brush the top again with egg wash, then affix one of your little red heart accents on top for that perfect finishing touch. Repeat until you’ve used all your dough.
Step 5: Bake to Golden Perfection
Preheat your oven to 350°F (175°C) beforehand so it’s ready to go. Bake the hand pies for about 28-30 minutes, or until they’re beautifully golden and the filling is bubbling inside—that’s when you know they’re ready! Let them cool on a wire rack before you dig in. Trust me, it’s worth the wait.
Pro Tips for Making Heart Shaped Cherry Pie Hand Pies Recipe
- Keep Butter Cold: I learned that working quickly with cold butter creates the flakiest pie crust, so chill your butter and water before mixing.
- Don’t Overfill: Overfilling causes leaks—use about one tablespoon of filling and keep it away from edges to keep your pies neat.
- Dry Your Colored Egg Wash: Letting the colored egg wash dry on the tiny heart decorations prevents bleeding into the dough during baking.
- Use a Pie Press or Dumpling Maker: These tools save so much time and ensure perfectly sealed hand pies every time—I never bake without mine now.
How to Serve Heart Shaped Cherry Pie Hand Pies Recipe
Garnishes
I usually dust a little powdered sugar over the hand pies just before serving for a pretty snowy effect, and sometimes add a tiny dollop of whipped cream on the side. The red sugar sprinkled on top of the hearts adds a sparkling touch that really impresses guests.
Side Dishes
These hand pies are naturally sweet and filling, but pairing them with a scoop of vanilla ice cream or a simple mixed berry salad makes for a lovely, balanced dessert experience. For a cozy brunch, serve alongside a hot cup of coffee or tea.
Creative Ways to Present
For special occasions, I like to place these heart-shaped wonders in bakery boxes with clear windows lined with pretty parchment paper—makes gifting them so easy and charming! Adding little handwritten notes or heart-shaped tags completes the look perfectly. You can also arrange them on a tiered dessert tray for a romantic vibe.
Make Ahead and Storage
Storing Leftovers
Leftover hand pies keep beautifully in an airtight container at room temperature for up to 2 days—though honestly, they rarely last that long in my house! If you want to store them longer, refrigeration is your friend.
Freezing
I often freeze extra unbaked pies by placing them on a baking sheet, freezing until solid, then transferring to a freezer bag for up to a month. When I want a treat, I bake them straight from frozen—adding a few extra minutes to the bake time—and they turn out almost as good as fresh.
Reheating
To reheat, I pop the pies in a preheated oven at 325°F for about 10 minutes. This renews the flaky crust and warms the filling nicely without making the crust soggy like a microwave would.
FAQs
-
Can I use fresh cherries instead of canned pie filling?
Absolutely! If you want to use fresh cherries, just pit and roughly chop them, then cook them down with some sugar and cornstarch to thicken before filling your pies. It takes a bit more time, but the flavor is amazing and a fun way to customize.
-
What if I don’t have a heart-shaped pie press?
No worries! You can use a cookie cutter and carefully seal the edges by hand with a fork. Just make sure to press firmly to avoid any filling leaks. It’s a bit more time consuming, but the pies still come out great.
-
Can I make these hand pies vegan?
Yes! Use a plant-based butter substitute for the crust and a flaxseed egg (1 tbsp flaxseed meal + 3 tbsp water, mixed and chilled) for egg wash. You might want to brush with a little maple syrup for shine instead of egg wash.
-
How do I prevent the red food coloring from bleeding onto the dough?
Brush the colored egg wash on the small heart accents first, then let them fully dry before baking or attaching to the pies. This little step keeps the color crisp and prevents any unwanted bleeding.
-
What’s the best way to serve these hand pies warm?
Reheat in the oven for a few minutes until warm to enjoy that melty, juicy filling and flaky crust experience—perfect with a scoop of vanilla ice cream or a dusting of powdered sugar.
Final Thoughts
This Heart Shaped Cherry Pie Hand Pies Recipe holds a special place in my kitchen and heart. It’s one of those recipes that’s equal parts fun to make and truly satisfying to eat. I’ve found that the little homemade touches make such a difference, especially when you share them with family or friends. If you want a delicious, eye-catching dessert that’s easy to transport and impossible not to love, grab your rolling pin and pie press and give this recipe a shot—I promise you won’t regret it!
Print
Heart Shaped Cherry Pie Hand Pies Recipe
- Prep Time: 45 minutes
- Cook Time: 30 minutes
- Total Time: 1 hour 15 minutes
- Yield: 26 hand pies 1x
- Category: Dessert
- Method: Baking
- Cuisine: American
- Diet: Vegetarian
Description
These charming Heart Shaped Hand Pies are a delightful treat featuring a tender, buttery crust filled with sweet cherry pie filling. Perfectly sized for snacking or gifting, they are accented with a splash of red food coloring on tiny heart decorations and finished with a sparkling sugar sprinkle. Ideal for special occasions or everyday indulgence, these hand pies combine classic flavors with a fun, festive presentation.
Ingredients
Dough
- 4 cups All Purpose Flour
- 2 teaspoons Salt
- 1 ½ cups Unsalted Butter, cold
- ¾ cup Cold Water
Egg Wash and Decoration
- 3 large Egg Whites
- 4 tablespoons Granulated Sugar + extra for sprinkling
- 1 teaspoon Red Food Coloring
Filling
- 1 can Cherry Pie Filling
Instructions
- Measure Ingredients: Gather and measure all ingredients accurately to ensure the dough and filling come together perfectly.
- Prepare Butter: Cut cold unsalted butter into small blocks to help incorporate it evenly into the flour mixture.
- Mix Dry Ingredients: In a large mixing bowl, combine the all-purpose flour and salt thoroughly.
- Cut Butter into Flour: Add the butter chunks to the flour mixture and cut them in using a pastry cutter or your fingers until the mixture resembles small pea-sized pieces or coarse breadcrumbs.
- Add Water Gradually: Slowly pour in about half of the cold water, mixing well, then continue adding spoonfuls until the dough forms a workable consistency — adjust based on humidity and flour absorption.
- Form Dough Ball: Once combined, gather the dough into a ball for easier handling.
- Shape and Section Dough: Roll the dough ball into a rough log shape and divide it into four equal portions.
- Chill Dough: Roll each piece into a ball, place into plastic bags, and refrigerate for about 10 minutes to firm up the dough.
- Roll Out Dough: On a floured surface, roll one dough ball until approximately ⅛ inch thick for shaping hand pie crusts.
- Create Mini Hearts: Using a small knife or a tiny heart-shaped cookie cutter, cut out small ½ inch hearts. Place these on a plate for coloring.
- Make Red Egg Wash: In a small bowl, combine one egg white, 1 tablespoon sugar, and red food coloring to create a colored glaze.
- Prepare Clear Egg Wash: In another bowl, mix the remaining two egg whites with 3 tablespoons sugar for a clear glaze.
- Color Mini Hearts: Brush the red egg wash onto the small hearts carefully and set aside to dry, preventing bleeding into the rest of the dough.
- Preheat Oven: Set the oven to 350°F (175°C) to preheat while assembling the hand pies.
- Cut Pie Crust Hearts: Using a heart-shaped dumpling maker or pie press, cut out pairs of heart shapes from rolled dough for each pie.
- Prepare Dumpling Press: Place one heart in the pie press on one side and press edges gently to secure in place.
- Add Filling: Spoon about 1 tablespoon of cherry pie filling onto one dough heart, keeping filling away from edges.
- Seal Pies: Place the second heart on top within the press and close firmly, sealing edges around the filling.
- Remove Pie: Open the press and gently release the formed hand pie onto a parchment-lined baking sheet.
- Repeat Assembly: Continue cutting, filling, sealing, and placing pies until dough is used up.
- Brush with Egg Wash: Lightly brush each pie with the clear egg white glaze for a glossy finish.
- Attach Decorative Hearts: Affix one red-dyed mini heart onto the top of each hand pie for a festive touch.
- Add Sugar Sprinkle: Generously sprinkle additional granulated sugar on top for sparkle and sweetness.
- Bake: Place the baking sheet in the preheated oven and bake for 28–30 minutes until the crust turns golden brown.
- Cool: Remove pies from the oven and let cool on a rack to firm up before handling or serving.
- Serve and Enjoy: Present the heart-shaped hand pies warm or at room temperature, perfect for sharing or gifting.
- Packaging (Optional): For gifting, place pies inside bakery boxes with windows, seal and decorate with stickers if desired.
Notes
- Make sure the butter and water are very cold to achieve a flaky dough texture.
- Adjust water quantity as needed depending on your kitchen’s humidity.
- Allow the red-colored egg wash on mini hearts to dry fully to prevent color bleeding during baking.
- If you don’t have a heart-shaped dumpling maker, use two heart-shaped cookie cutters or a knife to shape pies manually.
- Let the pies cool completely before packing them to prevent condensation inside boxes.
- Extra sugar on top adds a lovely crunch and shine to the crust.
- These pies freeze well before baking; thaw and bake as instructed.
Nutrition
- Serving Size: 1 hand pie
- Calories: 210
- Sugar: 14g
- Sodium: 120mg
- Fat: 11g
- Saturated Fat: 7g
- Unsaturated Fat: 3g
- Trans Fat: 0g
- Carbohydrates: 26g
- Fiber: 1g
- Protein: 3g
- Cholesterol: 25mg

