

Get ready to bring a taste of the Hawaiian islands straight to your kitchen with this incredibly easy, flavor-packed Hawaiian Garlic Shrimp recipe. In less than 30 minutes, you’ll be serving up buttery, garlicky shrimp that are crispy on the outside and juicy inside, just like the beloved food truck classic. With just a handful of simple ingredients and minimal prep, this dish is perfect for those busy weeknights when you crave something both special and effortless.
Why You’ll Love This Recipe
- Speedy & Simple: Seriously, this dish comes together faster than takeout—with only around 20 minutes of prep and 7 minutes of cook time, your weeknight dinner is saved.
- Flavor Bomb: The combination of golden-browned garlic, rich butter, and a hint of zingy lemon creates an unbelievable aroma and flavor. If you love garlicky dishes, this might become your new go-to.
- Big on Texture: Thanks to a light dredge of cornstarch and flour, the shrimp get this irresistibly crisp exterior that seals in all the juicy goodness.
- Restaurant Quality, Home Simplicity: No special equipment, no fancy techniques, and still, you end up with the kind of meal you’d hunt for on a Hawaiian getaway.

Ingredients You’ll Need
- Garlic: Loads of fresh garlic (seriously, don’t skimp!)—the star that infuses the butter and brings bold, punchy flavor.
- Salted Butter: Adds richness and makes the base for golden garlic butter.
- Corn Starch: Key for getting that light, crispy coating—way better than all flour alone.
- All-Purpose Flour: Combines with cornstarch for perfect texture; use just a bit so the shrimp aren’t heavy.
- Paprika: Brings a touch of color and a subtle depth—smoked paprika works too if you love an earthy note.
- Salt: Enhances every flavor and keeps things lively.
- Black Pepper: For a gentle kick without overpowering the garlic.
- Jumbo Shrimp (with shell on): The shells help lock in flavor and moisture—if you prefer, peeled works too, but the classic keeps the shells!
- Olive Oil: For pan-frying; helps get that crisp finish.
- Lemon Juice: Squeezed fresh over the shrimp for brightness and a little zing.
- Note: Serving over white rice is traditional and makes the perfect canvas for soaking up that garlic butter.
Note: You’ll find the complete list of ingredients, along with their exact measurements, in the printable recipe card at the bottom of this post.
Variations
- Add Heat: Love a kick? Sprinkle in crushed red pepper flakes or cayenne with the flour mixture.
- Herb It Up: Toss in chopped parsley or chives at the end for a fresh, vibrant touch.
- Butter Swap: Use unsalted butter and adjust the seasoning to your taste, or try ghee for a nuttier depth.
- Citrus Twist: Try lime juice instead of lemon for a tropical change, or serve with orange wedges on the side.
- Shell-Off Option: If eating with shells isn’t your thing, use peeled shrimp for easy eating—still delicious!
How to Make Hawaiian Garlic Shrimp
Step 1: Make the Garlic Butter
Set your pan over medium heat and add the butter and all that minced garlic. Let it gently sizzle and turn golden brown—don’t rush it or burn the garlic! Once fragrant and colored, scrape the garlic butter into a small bowl to keep all those yummy bits.
Step 2: Prepare the Shrimp
In a big bowl, mix together cornstarch, flour, paprika, salt, and black pepper. Pat the shrimp dry (extra moisture = less crispiness), then toss them into the flour mix until every shrimp is thoroughly coated. This light dredge is crucial for that classic food truck texture.
Step 3: Crisp the Shrimp
Add olive oil to your skillet (no need to wipe the pan after the butter—more flavor!). Arrange the shrimp in a single layer and sear for about 2–3 minutes per side, until they turn pink and get that gorgeous crispy coating.
Step 4: Finish with Garlic Butter and Lemon
Pour the reserved garlic butter back into the skillet, add the fresh lemon juice, and toss everything so the shrimp are coated in luscious, aromatic butter.
Step 5: Serve
Pile the shrimp onto fluffy hot rice and serve right away with lemon wedges. Don’t be shy with the sauce—pour it over the rice for the full experience.
Pro Tips for Making the Recipe
- Dry Shrimp = Crispiness: Really pat the shrimp dry before dredging; wet shrimp get soggy, not crispy.
- Don’t Burn the Garlic: Keep an eye on the butter—garlic goes from golden to burnt very quickly.
- Single Layer Cooking: Cook the shrimp in a single layer for even browning. If your pan is on the smaller side, work in batches.
- Fresh Lemon Only: Bottle lemon juice just won’t do this dish justice—the freshness brightens everything up.
How to Serve

Hawaiian Garlic Shrimp is all about generous helpings served over a big pile of steamed white rice—the rice soaks up every drop of garlicky, buttery sauce. Add a wedge of lemon for squeezing on top, and if you’re feeling festive, serve with a side of tangy coleslaw, cucumber salad, or even grilled pineapple for extra island vibes.
Make Ahead and Storage
Storing Leftovers
If you have any shrimp left (unlikely), let them cool to room temperature, then store covered in the fridge for up to two days. The garlic butter keeps the shrimp moist, but the coating will lose crispness.
Freezing
While best fresh, cooked shrimp can be frozen in an airtight container. If freezing, do so as soon as they’re cool. Thaw in the fridge before reheating. The texture will soften but flavor will stick around.
Reheating
For best results, reheat gently in a skillet over low heat with a splash of water or more butter. The microwave works too—just cover them to avoid drying out.
FAQs
-
Can I use frozen shrimp?
Absolutely! Just thaw them completely and pat dry before coating with the flour mix—removing excess moisture is key for crispiness.
-
Do I have to leave the shells on?
Not at all. Leaving them on is classic for extra flavor, but peeled shrimp work perfectly if you want hassle-free eating.
-
Is this dish spicy?
The base recipe isn’t spicy, but you can easily turn up the heat with a pinch of cayenne or chili flakes in the coating.
-
Can I make this dairy-free?
Definitely—swap butter with a quality plant-based butter (something that browns well) and the flavor will still sing.
Final Thoughts
There’s something magical about how quickly this Hawaiian Garlic Shrimp comes together, filling your kitchen with irresistible aromas and delivering all that buttery, garlicky goodness. Whether you’re craving a little taste of the tropics or just want a fast, show-stopping meal, this recipe will make dinner exciting again. Don’t hesitate—try it, experiment with your favorite twists, and let yourself savor every bite!
Print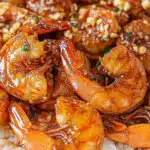
Hawaiian Garlic Shrimp Recipe
- Prep Time: 20 minutes
- Cook Time: 7 minutes
- Total Time: 27 minutes
- Yield: 4 Servings 1x
- Category: Main-course
- Method: Stovetop
- Cuisine: Hawaiian
- Diet: Halal
Description
Indulge in Hawaiian Garlic Shrimp, a mouthwatering main course inspired by classic Hawaiian food trucks. Jumbo shrimp are tossed in a seasoned flour-cornstarch coating, pan-fried until crispy and pink, then drenched in rich garlic butter and a fresh squeeze of lemon. Quick, easy, and bursting with garlicky flavor, this dish is perfect served over rice.
Ingredients
For the Garlic Butter
- 6 tablespoons (85 g) salted butter
- 1 large head garlic, minced (about 10–12 cloves)
For the Shrimp Coating
- 2 tablespoons (16 g) corn starch
- 1 tablespoon (8 g) all-purpose flour
- 1 tablespoon paprika
- 1/2 teaspoon salt
- 1/2 teaspoon ground black pepper
For the Shrimp
- 16 ounces (450 g) jumbo shrimp, deveined, peels left on
- 2 tablespoons (30 ml) olive oil
For Serving
- 1 lemon, juiced (about 2 tablespoons)
Instructions
- Prepare the Garlic Butter: In a large skillet over medium heat, add the butter and minced garlic. Cook for 2 to 3 minutes, stirring constantly, until the garlic turns golden brown and fragrant. Immediately transfer the garlic butter to a small bowl and set aside to prevent burning.
- Coat the Shrimp: In a large mixing bowl, whisk together the corn starch, flour, paprika, salt, and black pepper. Pat the shrimp dry thoroughly with paper towels, then add them to the bowl. Toss the shrimp in the seasoned flour mixture until they are evenly coated on all sides.
- Cook the Shrimp: Heat the olive oil in the same skillet over medium heat. Arrange the coated shrimp in a single layer and cook for 2 to 3 minutes per side. The shrimp should turn pink and the coating should look crisp and golden brown.
- Add Garlic Butter and Finish: Return the prepared garlic butter to the skillet with the shrimp, then add the lemon juice. Gently toss everything together so the shrimp are evenly coated in the buttery, garlicky sauce. Remove from heat as soon as the shrimp are fully glazed.
- Serve: Serve the Hawaiian Garlic Shrimp hot over steamed white rice with lemon wedges on the side for extra brightness. Enjoy immediately for best flavor and texture.
Notes
- For authentic Hawaiian flavor, use jumbo shrimp and keep the shells on for extra juiciness.
- Be careful not to burn the garlic; remove it from the skillet as soon as it’s golden.
- Serve immediately, as the coating can soften if left to sit.
- Try garnishing with fresh parsley for color and added freshness.
Nutrition
- Serving Size: 1/4 of recipe (about 4 oz shrimp + sauce)
- Calories: 340
- Sugar: 1g
- Sodium: 750mg
- Fat: 20g
- Saturated Fat: 9g
- Unsaturated Fat: 10g
- Trans Fat: 0g
- Carbohydrates: 11g
- Fiber: 1g
- Protein: 28g
- Cholesterol: 175mg


