
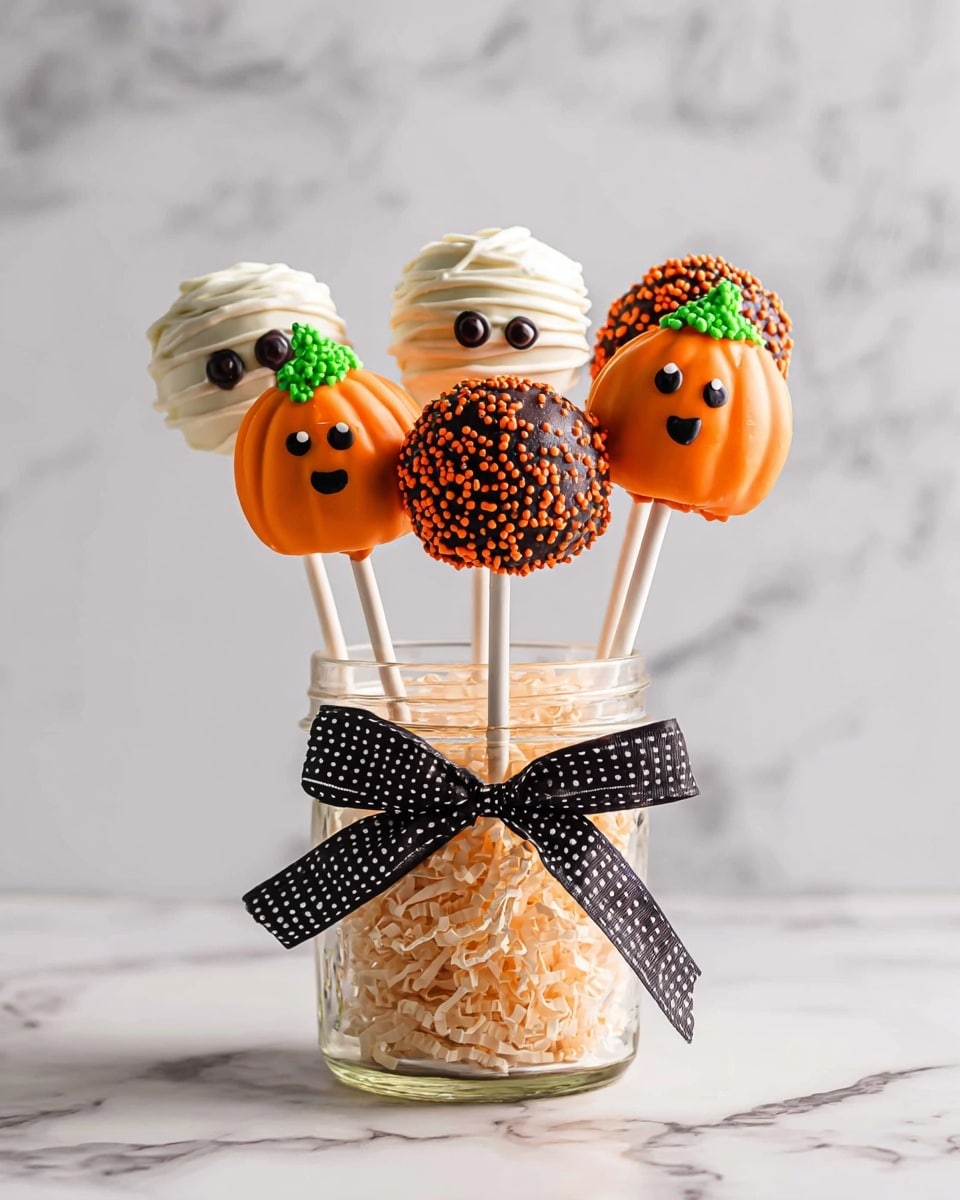
If you’re looking for a fun, festive treat that’s as adorable as it is delicious, I absolutely love sharing this Halloween Cake Pops Recipe with friends and family. These little cake balls on sticks are perfect for parties, trick-or-treaters, or even just a cozy night in. They’re cute, customizable, and trust me, once you try them, you’ll find yourself making them all year round, not just for Halloween!
Why You’ll Love This Recipe
- Easy to Make: Even if you’re new to cake pops, this recipe breaks it down step-by-step for perfect results.
- Customization Galore: You can decorate these pops a million ways, from spooky pumpkins to cute mummies.
- Kid-Friendly Fun: Your family will love joining in to dip and decorate — it’s a great activity for all ages.
- Perfect Make-Ahead Treats: These cake pops store well, so you can prep early and have party-ready snacks whenever you want.

Ingredients You’ll Need
The magic behind these Halloween cake pops is blending moist cake crumbs with creamy frosting, then dipping everything in melty chocolate for that irresistible finish. I like to use quality melting wafers because they give a smooth, glossy coating that’s easy to decorate and holds up nicely.
- White Cake Mix: Choose a classic flavor you love; this is the base, so its flavor really shines through once combined with frosting.
- Chocolate Melting Wafers (Dark and White): These melt easily and cover your cake pops beautifully—Ghirardelli white wafers are my go-to!
- Buttercream Frosting: Homemade buttercream keeps the cake moist and helps the pops hold together just right.
- Orange Melting Wafers: Perfect for creating those cute pumpkin cake pops.
- Green Frosting: Adds a cute pumpkin “stem” detail.
- Black Edible Ink Pen: Great for drawing faces and spooky designs on your pops.
- Optional Decorations (Sprinkles, Jimmies): Adds extra personality and fun to each pop.
Variations
I love that this Halloween cake pops recipe is a blank canvas. You can keep it simple or go wild with your decorations and flavors — the sky’s the limit! Here are some fun twists I’ve personally tried.
- Chocolate Cake Base: I swapped white cake for chocolate one once, and it was a hit! Dark coating on chocolate cake adds a rich, decadent flavor.
- Dairy-Free Version: I used vegan butter and dairy-free melting wafers for a friend with allergies, and they turned out just as tasty.
- Spooky Mix-Ins: Sometimes, I add mini chocolate chips or crushed candy corn into the frosting-cake mixture for a surprise crunch.
- Colorful Coatings: Using colored melting wafers makes decorating easier and really festive without extra effort.
How to Make Halloween Cake Pops Recipe
Step 1: Whip Up That Buttercream
Start by making your buttercream frosting—it’s the secret binder that helps turn cake crumbs into perfect pops. Whip softened butter until fluffy, then gradually add powdered sugar and vanilla. Stir in a splash of heavy cream to get that silky consistency. Aim for a frosting thick enough to hold a point without being overly sugary—this balance is so crucial because it keeps your cake pops moist but sturdy.
Step 2: Bake and Crumble Your Cake
Follow your cake mix package instructions and bake it in a 9×13″ pan. I recommend letting the cake cool completely because warm crumbs make your mixture too sticky. Once cooled, crumble the cake into fine crumbs—this is where patience pays off because smaller crumbs make smoother, better-shaped pops.
Step 3: Combine Cake and Frosting
Mix in your buttercream frosting, starting with a couple of spoonfuls. Use your hands or a spoon to mix until the crumbs hold together when squeezed. Add frosting slowly—you want the right texture so the cake pop shape won’t fall apart but still feels soft and moist. I learned this trick after too many crumbly batches!
Step 4: Form Your Cake Balls and Chill
Scoop or roll the mixture into balls about 1 inch in diameter—using a cake pop press or cookie scoop makes this so much easier. Place them on a plate and pop them into the freezer for about 10 minutes. This quick chill firms them up for dipping, helping you avoid crumbly disasters later.
Step 5: Dip and Decorate
Melt your chocolate wafers in microwave-safe bowls, heating in 30-second bursts and stirring well between to avoid burning. Dip the lollipop stick into melted chocolate first—that acts like glue—then insert it gently into each cake ball. Chill again to secure sticks.
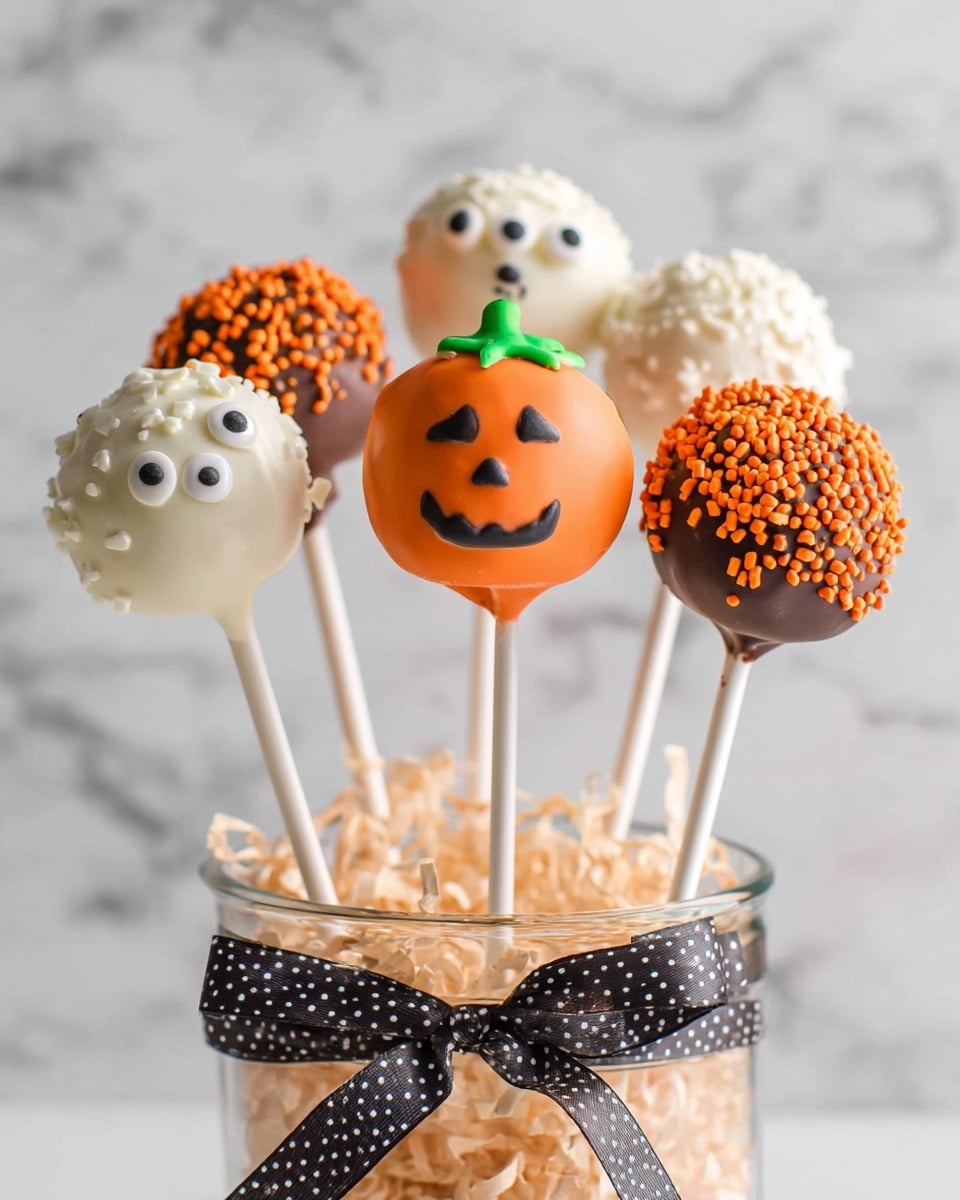
Next, dip each cake pop into the chocolate, tap off excess, and decorate while the coating is still wet. I like to use Halloween sprinkles and edible pens for faces. For pumpkins, dip in orange wafers, wait for it to set, add green frosting stems, and draw faces with your edible pen. For mummy pops, wait for coating to firm and then drizzle white chocolate for that spooky wrap look.
Step 6: Set and Store
Stand your pops up in a styrofoam block or a glass filled with rice so they dry evenly and don’t lose their shape. After about an hour, the chocolate should be fully set, and your cake pops are party-ready! Store them in an airtight container in a cool place for up to 3-4 days.
Pro Tips for Making Halloween Cake Pops Recipe
- Freeze Before Dipping: This stops your cake balls from crumbling and makes dipping smoother.
- Use Quality Melting Wafers: They melt evenly and give a nice glossy finish that’s easier to decorate.
- Don’t Overdo the Frosting: Too much frosting makes your pops greasy and prone to falling apart.
- Hold Pops Upright to Dry: Use a foam block or rice in a tall glass to keep your pops standing and perfectly shaped.
How to Serve Halloween Cake Pops Recipe
Garnishes
I love topping my cake pops with festive sprinkles that match the Halloween theme—orange and black jimmies, edible glitter, or even tiny candy eyeballs make them extra fun. The edible ink pen lets me add silly or spooky faces, which kids adore. For pumpkin pops, a little green frosting “stem” just ties the whole look together perfectly.
Side Dishes
These pops pair beautifully with a warm drink like hot chocolate or apple cider—perfect for a chilly October night. I’ve also served them alongside simple snacks like popcorn or candy corn for a fun Halloween spread.
Creative Ways to Present
For parties, I’ve arranged my cake pops in a decorated pumpkin-shaped container or stuck them popping out of a Halloween-themed Styrofoam block wrapped in festive paper. Mason jars filled with colored sand or rice also work wonders to keep them upright and looking party-ready. Kids especially love it when I mix the pops with themed napkins and tableware—such a simple way to amp up the fun!
Make Ahead and Storage
Storing Leftovers
I store leftover cake pops in an airtight container in a cool, dry place. The chocolate coating protects the cake inside, so they stay moist and fresh for 3-4 days. Avoid refrigeration unless it’s really warm, or the chocolate may sweat.
Freezing
If you want to freeze your cake pops, wrap them individually in plastic wrap, then place in an airtight container or zip-top bag. When you’re ready to enjoy, just thaw them in the fridge overnight. I’ve found freezing helps preserve the texture without losing flavor or appearance.
Reheating
Since cake pops are best served chilled or at room temperature, reheating isn’t usually needed. But if you want to warm them slightly, let them sit at room temp for 10-15 minutes—you’ll avoid melting the chocolate coating that way, and they taste just perfect.
FAQs
-
Can I use any cake flavor for the Halloween cake pops recipe?
Absolutely! While I often use white cake for a nice neutral base, chocolate, red velvet, or even spice cake work wonderfully. The key is to mix the cake crumbs with frosting so they hold together well, regardless of flavor.
-
How do I prevent cake pops from falling apart?
Make sure your cake is fully cooled before crumbling and add frosting gradually until the mixture sticks when squeezed. Also, chilling the formed balls before dipping stabilizes them so they keep their shape.
-
What if I don’t have edible ink pens?
No worries! You can use black melted chocolate in a piping bag or a toothpick to draw faces instead. Alternatively, mini chocolate chips or candies make fun eyes and mouths.
-
Can I make Halloween cake pops ahead of time?
Yes! These are great make-ahead treats. Just store them in an airtight container at room temperature or in the fridge for up to 3-4 days. Just bring them to room temperature before serving so the chocolate isn’t too hard.
Final Thoughts
When I first made this Halloween cake pops recipe, I was amazed at how easy it was to turn simple cake and frosting into such festive little works of art. They’re fun to create, fun to eat, and perfect for sharing a little seasonal joy. If you’re looking for a sweet project that will wow your family or party guests, I can’t recommend these cake pops enough. Give them a try—you might just find a new favorite Halloween tradition!
Print
Halloween Cake Pops Recipe
- Prep Time: 40 minutes
- Cook Time: 20 minutes (cake baking) + 10 minutes freezing
- Total Time: 1 hour
- Yield: 24 cake pops 1x
- Category: Dessert
- Method: No-Cook
- Cuisine: American
Description
These festive Halloween Cake Pops are a fun and delicious treat featuring moist white cake balls covered in smooth chocolate and decorated with Halloween-themed designs like pumpkins and mummies. Perfect for parties or spooky celebrations, these bite-sized delights combine rich flavors and creative decorations using orange and white chocolate, buttercream frosting, and edible accents.
Ingredients
Cake and Coating
- 15 ounce box white cake mix (prepared according to package directions in a 9×13″ pan)
- 5 ounce chocolate melting wafers
- 10 ounce package white chocolate melting wafers (preferably Ghirardelli)
- 10 ounces orange melting wafers (for pumpkins)
Buttercream Frosting
- 1 stick salted butter, softened
- 2 to 2 ½ cups powdered sugar
- 1 teaspoon vanilla extract
- 1 Tablespoon heavy cream or milk
Decorations
- Green frosting (for pumpkin stems)
- Black edible ink pen (for pumpkin faces)
- Optional: Halloween sprinkles, jimmies, or other desired decorations
Instructions
- Make Buttercream Frosting: In a medium bowl, whip the softened butter until creamy. Add 1 cup of powdered sugar and mix until combined. Stir in 1 teaspoon vanilla extract. Gradually add 1 ½ cups powdered sugar, a little at a time, mixing thoroughly after each addition. Add 1 tablespoon of heavy cream or milk to achieve a thick, creamy consistency that will hold its shape.
- Prepare the Cake Pops: Once the cake has cooled slightly, crumble it into a large bowl until fine crumbs form. Add 2 spoonfuls of the prepared buttercream frosting and mix using your hands or a spoon. Add more frosting gradually as needed until the mixture holds together firmly when squeezed, but is not too wet.
- Shape Cake Balls: Using a cake pop press or medium cookie scoop, scoop portions of the mixture and roll them into balls by hand. Place the cake balls onto a plate and freeze for about 10 minutes to firm up.
- Melt Chocolate Coatings: Just before removing the cake balls from the freezer, melt the dark chocolate wafers and white chocolate wafers in separate microwave-safe bowls. Heat in 30-second intervals, stirring between each until smooth.
- Insert Lollipop Sticks: Dip one end of each lollipop stick into the melted dark chocolate, then insert it into the center of the corresponding cake pop. Place the pops back into the refrigerator or freezer until the chocolate sets to secure the sticks.
- Dip Cake Pops in Chocolate: Pour the melted chocolate into a glass or narrow container for easy dipping. Dip each cake pop carefully into the chocolate, gently tapping or spinning the stick to remove any excess coating. Immediately decorate with Halloween sprinkles or other decorations before the chocolate sets. For designs that require extra chocolate, allow the first layer to harden before adding additional drizzles or decorations.
- Decorate as Pumpkins: For pumpkin-shaped cake pops, dip them in orange chocolate and allow to harden. Use green frosting to create a stem on top and black edible ink pen to draw pumpkin faces.
- Decorate as Mummies: For mummy designs, wait for the first chocolate layer to harden, then drizzle additional white chocolate using a ziplock bag to create the mummy wrap effect.
- Set and Store: Insert the finished cake pops into a styrofoam block or a glass filled with rice to keep upright while the chocolate sets, which takes about an hour. Store the cake pops in an airtight container in a cool place for 3 to 4 days.
Notes
- Ensure the cake is slightly cooled before crumbling to avoid melting the frosting.
- The amount of buttercream used can be adjusted; just add enough to make the cake mixture hold together.
- Use a styrofoam block or glass with rice to dry cake pops upright and prevent smudging.
- Decorate quickly after dipping before the chocolate hardens to add sprinkles or designs.
- Store cake pops in a cool, airtight container to maintain freshness for up to 4 days.
- For easier chocolate melting, heat in short 30-second bursts and stir well to prevent burning.
Nutrition
- Serving Size: 1 cake pop
- Calories: 180
- Sugar: 22g
- Sodium: 100mg
- Fat: 8g
- Saturated Fat: 5g
- Unsaturated Fat: 2g
- Trans Fat: 0g
- Carbohydrates: 27g
- Fiber: 1g
- Protein: 2g
- Cholesterol: 20mg

