

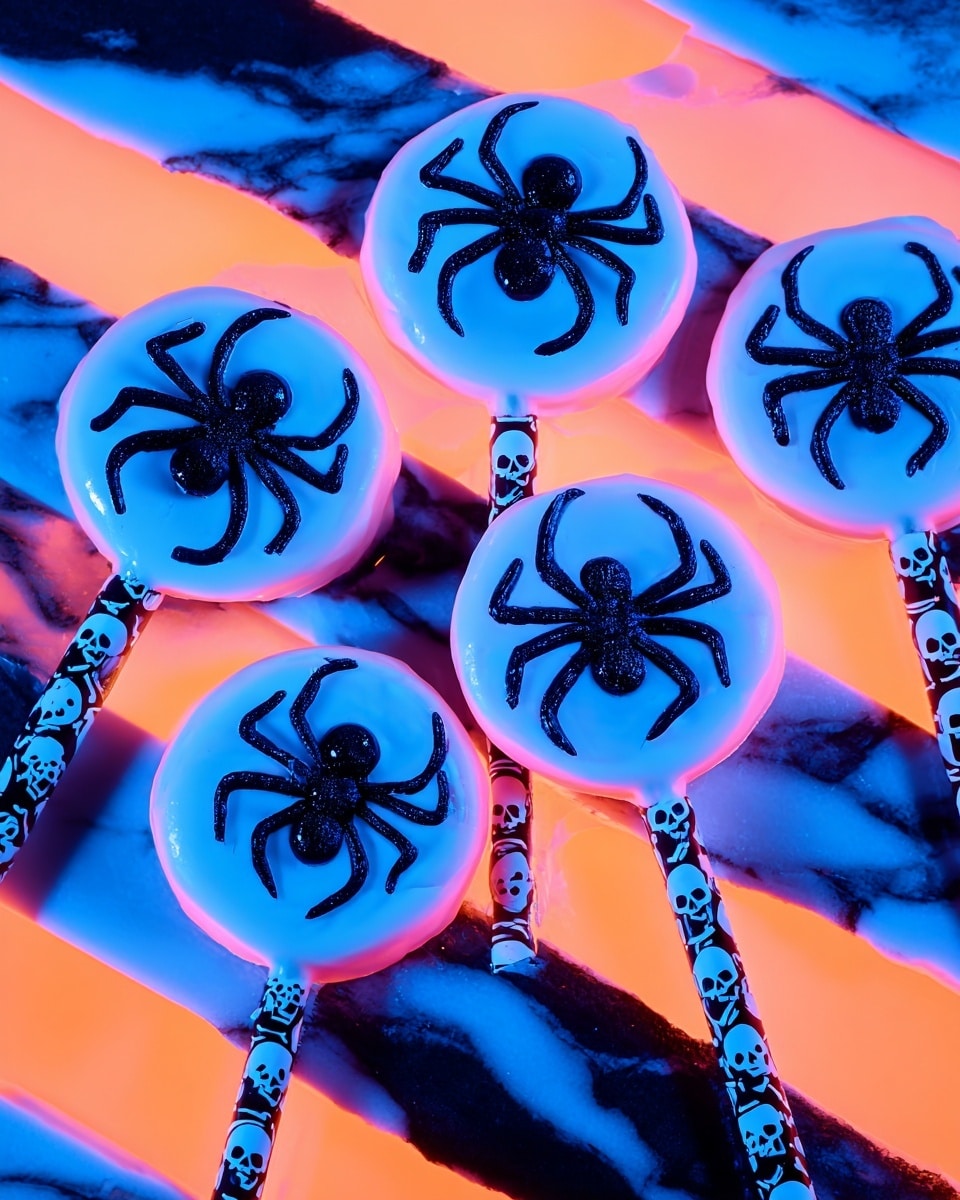
If you’re looking for a super fun and spooky treat that glows under black light, you’ve got to try my Glowing Black Widow Oreo Pops Recipe. These Oreo pops aren’t just charming—they’re a hit at parties and easy enough to whip up even if you’re short on time. Plus, the glow effect comes from the cool addition of tonic water, which I discovered is a game-changer. Stick around, and I’ll walk you through everything you need to know to make these spooky delights a total success.
Why You’ll Love This Recipe
- Simple Ingredients: You only need a few staples, and you probably already have most of them in your pantry.
- Fun & Unique Glow: The tonic water adds that fascinating glowing effect under black light that makes these pops party-ready.
- Kid & Adult Friendly: My family and friends all go crazy for these treats—they’re great for Halloween or any themed event.
- Easy Assembly: You don’t need fancy equipment or baking skills to pull these off flawlessly.

Ingredients You’ll Need
This recipe is as straightforward as it gets, but each ingredient plays a crucial role in the final taste and that amazing glow effect. Grab the best white chocolate you can find, and don’t skip the tonic water—it’s an unexpected ingredient that makes all the difference.
- White Chocolate Chips: Use good-quality chips for a creamy texture and smooth melting.
- Tonic Water: This ingredient contains quinine, which gives the white chocolate its glowing effect—trust me, it’s worth it!
- Oreos: Your classic sandwich cookie, perfect for the base of the pops.
- Paper Straws or Popsicle Sticks: Choose sturdy ones to support the weight of the Oreo pops comfortably.
Variations
I love that this Glowing Black Widow Oreo Pops Recipe is pretty versatile—feel free to customize it depending on your mood or the occasion. I often play around with toppings or the kind of Oreo cookie I use.
- Spooky Sprinkles: Once, I added edible glitter and tiny spider sprinkles on top for a Halloween party, and my guests couldn’t stop talking about them!
- Flavor Twists: Swap in mint or golden Oreos for a different flavor profile that keeps things interesting.
- Dairy-Free Options: Use dairy-free white chocolate to make it vegan-friendly without losing any glow or taste.
- Non-Alcoholic Glow: If tonic water isn’t your thing, you can try other quinine-containing mixers, but tonic water works best for that signature effect.
How to Make Glowing Black Widow Oreo Pops Recipe
Step 1: Melt the White Chocolate with Tonic Water
Start by melting the white chocolate chips in a microwave-safe bowl. I like microwaving them in 20-second bursts, stirring in between, so the chocolate doesn’t burn or seize. Once melted, stir in the tonic water—this is the secret! You’ll want the mixture to be about the thickness of chocolate syrup—if it’s too stiff, add a tiny splash more tonic water. The magic of the glow really comes from this blend.
Step 2: Assemble Your Oreo Pops
Carefully twist apart each Oreo cookie. Take one half and flatten one end of your paper straw. Dip the flattened end into the melted white chocolate, then press it gently but firmly into that Oreo half. Next, sandwich the other half of the Oreo back on top, making sure the straw is secure. This is where a little patience pays off—give the chocolate a moment to set before moving on, or you might end up with wobbly pops.
Step 3: Dip and Decorate the Pops
Now for the fun part—dip each fully assembled Oreo pop into your white chocolate mixture. Hold it over the bowl for a second or two so excess chocolate drips off before placing it on a parchment-lined baking sheet. If you love a themed look, top each pop with tiny candy spiders or edible glitter before the chocolate sets.
Step 4: Chill and Serve
Pop your Oreo pops into the fridge for at least 20 minutes until the white chocolate coating hardens. When they’re set, you’ll have glowing, spooky pops ready to dazzle your guests. I like to keep them chilled until serving so they don’t get too soft.
Pro Tips for Making Glowing Black Widow Oreo Pops Recipe
- Chocolate Consistency Matters: I learned that too-thick white chocolate won’t coat the Oreos evenly, so thin it with tonic water carefully.
- Use Paper Straws for Safety: When I first tried wooden sticks, the chocolate cracked more often—paper straws provide sturdiness with a cleaner finish.
- Work Quickly but Gently: The white chocolate sets fast once chilled, so dip and decorate swiftly to avoid clumps or thick spots.
- Avoid Overheating Chocolate: Microwave in short intervals and stir well—I once scorched my chocolate and it became grainy, so patience really pays off here.
How to Serve Glowing Black Widow Oreo Pops Recipe
Garnishes
I personally love adding tiny candy spiders or edible glitter on top of each pop—it amps up the Halloween vibes and adds a little sparkle in regular light as well. If you’re serving these in a dim room with a black light, the glow combined with the sparkle is just mesmerizing.
Side Dishes
Since these are sweet treats, I like pairing the Glowing Black Widow Oreo Pops Recipe with savory snacks like popcorn or mixed nuts to balance out the sugar rush. For parties, a themed punch or a simple fruit tray also complement them beautifully.
Creative Ways to Present
For a Halloween bash, I set my Oreo pops upright in a foam block wrapped with black velvet cloth, which makes the glowing stand out even more. Another fun idea I tried was placing each pop inside a tiny clear treat bag tied with a spider-web patterned ribbon—super cute and gift-worthy!
Make Ahead and Storage
Storing Leftovers
I store leftover Oreo pops in an airtight container in the fridge. They keep well for up to 5 days, but honestly, they rarely last that long in my house! Just make sure they’re chilled so the chocolate coating stays firm and shiny.
Freezing
If you want to freeze these pops, wrap each one individually in plastic wrap and put them in a freezer-safe bag. From my experience, they freeze nicely for about 2 weeks without losing the glow or texture. Just thaw them in the fridge before serving to avoid condensation on the chocolate.
Reheating
You don’t really want to reheat these pops since the white chocolate might melt unevenly. Instead, I find bringing them to room temperature gradually (about 20 minutes out of the fridge) works best to maintain their shine and glow.
FAQs
-
What causes the glowing effect in the Glowing Black Widow Oreo Pops Recipe?
The glowing effect comes from the quinine in the tonic water mixed into the melted white chocolate. Under black light, quinine fluoresces, making the Oreo pops appear to glow.
-
Can I use regular water instead of tonic water?
Regular water won’t create the glow effect because it lacks quinine. Tonic water is essential for that unique glow, so I recommend sticking to it for this recipe.
-
How do I prevent the white chocolate from seizing when melting?
Melting white chocolate in short microwave bursts and stirring often helps a lot. Also, avoid exposing it to any moisture, except the tonic water splash which works as part of the recipe.
-
Can I use other cookies besides Oreos for this recipe?
Definitely! While Oreos are classic and hold together well, sandwich cookies with a similar size and texture will work just fine.
Final Thoughts
I absolutely love how this Glowing Black Widow Oreo Pops Recipe turns out every time—there’s something so magical about seeing those treats light up under black light while tasting delicious. When I first tried this, it was a total hit at my family’s Halloween party, and since then, it’s become a go-to recipe whenever I want to impress guests without breaking a sweat. I hope you enjoy making and sharing these as much as we do. Go ahead, give it a try—you’ll find that the glow, the taste, and the fun all come together in the best way possible!
Print
Glowing Black Widow Oreo Pops Recipe
- Prep Time: 15 mins
- Cook Time: 0 mins
- Total Time: 35 mins
- Yield: 12 Oreo Pops 1x
- Category: Dessert
- Method: No-Cook
- Cuisine: American
- Diet: Vegetarian
Description
These Glowing Black Widow Oreo Pops are a fun and spooky treat perfect for Halloween or any themed party. Using white chocolate mixed with tonic water gives them a slight glow effect under blacklight, while the Oreo cookies provide a deliciously familiar crunch and creaminess. Easy to make with minimal ingredients, these pops are sure to impress guests with their eerie glow and tasty chocolate coating.
Ingredients
Chocolate Coating
- 2 cups white chocolate chips
- 2 Tbsp tonic water
Other
- 1 package Oreo cookies (about 12 cookies)
- 1 package paper straws or popsicle sticks
- Optional: decorative spiders for topping
Instructions
- Melt the White Chocolate: Microwave the white chocolate chips in 20-second intervals, stirring between each, until fully melted and smooth. Stir in 2 tablespoons of tonic water to thin the chocolate to a consistency similar to chocolate syrup. If it remains too thick, add a little more tonic water, stirring well to combine.
- Assemble the Oreo Pops: Carefully twist apart the Oreo cookies to separate the halves. Flatten one end of a paper straw or popsicle stick, dip the flattened end into the melted white chocolate, and press it onto one Oreo half. Then press the other Oreo half on top to reassemble the cookie sandwich, securely holding the stick in place.
- Dip the Oreo Pops: Dip each assembled Oreo pop into the melted white chocolate, coating completely. Allow any excess chocolate to drip off before placing the pops on a parchment-lined baking sheet. Optionally, decorate the top with a small spider or other themed candy decorations.
- Chill to Set: Place the baking sheet with the dipped Oreo pops in the refrigerator for about 20 minutes, or until the white chocolate hardens and sets completely.
- Serve and Enjoy: Once the coating is firm, the Oreo pops are ready to serve. Enjoy your glowing, spooky treats!
Notes
- Tonic water contains quinine, which fluoresces under blacklight, giving the white chocolate a glowing effect.
- Be sure not to overheat the white chocolate to avoid burning or seizing.
- If white chocolate is too thick after melting, add tonic water gradually to reach the right consistency.
- Use paper straws for easy food-safe sticks and to avoid melting like plastic might.
- Decorative spiders or edible glitter can be added for extra spooky flair.
- Store leftover Oreo pops in an airtight container in the fridge for up to 3 days.
Nutrition
- Serving Size: 1 pop
- Calories: 180
- Sugar: 16g
- Sodium: 90mg
- Fat: 10g
- Saturated Fat: 6g
- Unsaturated Fat: 3g
- Trans Fat: 0g
- Carbohydrates: 22g
- Fiber: 1g
- Protein: 2g
- Cholesterol: 5mg


