

If you’ve ever dreamed of baking your own crusty, bakery-style bread without having to wrestle with the dough, you’re in luck. This Easy No-Knead Artisan Yeast Bread Recipe is a total game-changer. I absolutely love how it turns out: a golden, crackly crust with a soft, airy crumb inside—and the best part? Zero kneading! Stick with me here, and I’ll show you how simple it really is to make artisan bread right in your kitchen with minimal effort.
Why You’ll Love This Recipe
- Super Simple: It requires almost no active work—just mix, wait, shape, and bake.
- No Kneading Required: You get that artisan crumb without the arm workout.
- Minimal Ingredients: Only pantry staples with no fancy equipment needed (though a Dutch oven helps!).
- Great Flavor and Texture: Long fermentation and steam baking yield a perfect crust and airy interior every time.

Ingredients You’ll Need
The beauty of this Easy No-Knead Artisan Yeast Bread Recipe lies in how simple the ingredients are—and how perfectly they come together to create bakery-worthy bread at home. I always recommend using bread flour if you can for that chewy, airy texture, but all-purpose flour works beautifully too.

- Flour: Bread flour is ideal for chewiness, but plain or all-purpose flour works fine; whole wheat can be used but may need slight adjustments.
- Instant or Rapid Rise Yeast: Makes things easy with no proofing required; if you use active dry yeast, see my notes below.
- Kosher or Cooking Salt: Avoid table salt—it can make the bread too salty with its fine grains.
- Warm Water: Not boiling hot—about 55°C/130°F is perfect to activate yeast without killing it.
- Flour for Dusting: A little extra to help you shape the dough without sticking.
Variations
I love mixing things up with this Easy No-Knead Artisan Yeast Bread Recipe by adding small tweaks to fit the mood or what’s in my pantry. The forgiving nature of the dough means you can experiment without fear!
- Whole Wheat Addition: I sometimes swap out about ¼ cup of the white flour for whole wheat for a nuttier flavor—just reduce other flour a bit to maintain consistency.
- Herbs and Garlic: Toss in some dried rosemary or garlic powder into the dry ingredients for a fragrant twist that my family can’t get enough of.
- Seeded Crust: Before baking, sprinkle sesame or poppy seeds on top for a crunchy, eye-catching finish.
- Gluten-Free Experiment: I haven’t perfected this one yet, but using gluten-free all-purpose flour blends with xanthan gum might get you close; let me know if you try!
How to Make Easy No-Knead Artisan Yeast Bread Recipe
Step 1: Mix the Dough and Let it Rise
Start by combining your flour, yeast, and salt right in a large bowl. Then add the warm water and stir everything together with the handle of a wooden spoon. The dough will be wet and sticky—more jelly-like than the typical stiff bread dough you might be used to. Don’t stress! That’s exactly how it should be. If it seems too thick or dry, add a splash more water; if way too wet, sprinkle a little flour in. Cover the bowl loosely with plastic wrap or a plate, then let it sit at room temperature for 2 to 3 hours. You’ll know it’s ready when it doubles in size, gets bubbly on top, and jiggles like jelly when you shake the bowl gently.
Step 2: Shape Your Dough Gently
Once your dough has risen, sprinkle some flour on your work surface and on top of the dough to prevent sticking. Using a dough scraper or even a sturdy spatula, fold the edges of the dough inward about six times to form a loose round shape. This step gently knocks out some of the big gas bubbles, but you want to keep most of the airy texture intact. Then, carefully flip the dough upside down onto a piece of parchment paper—seam side down—to prepare it for baking. Don’t obsess over perfect shaping; the rustic, imperfect look adds character and lots of crunch!
Step 3: Preheat Your Oven and Dutch Oven
Pop your Dutch oven with the lid on into the oven and preheat it to 230°C (450°F) about 30 minutes before you plan to bake. Heating the pot in advance is key—it creates the steamy environment that gives the crust its signature crackle. If you don’t have a Dutch oven, don’t worry! I’ll share a workaround in the pro tips below.
Step 4: Bake the Bread to Golden Perfection
Carefully remove the hot Dutch oven from the oven (use oven mitts—you don’t want to burn yourself!) and lift the parchment paper with the dough into the pot. Place the lid on and bake for 30 minutes, then remove the lid and bake uncovered for another 12 minutes. The bread should turn deep golden brown with a crunchy crust. After baking, let the bread cool on a wire rack for at least 10 minutes before slicing—it’s tempting, but waiting really helps the crumb finish setting up!
Pro Tips for Making Easy No-Knead Artisan Yeast Bread Recipe
- Water Temperature Matters: I discovered that if your water is too hot, it kills the yeast. Aim for warm water you could comfortably touch—around 55°C (130°F).
- Don’t Skip the Rest Time: Patience really pays off. The 2-3 hour rise or overnight in the fridge develops flavor and texture that blow store-bought bread out of the water.
- Using a Dutch Oven Is Key: That steamy, enclosed environment makes a crusty exterior. But if you don’t have one, a roasting pan filled with boiling water during baking works in a pinch!
- Handle Dough Gently: When shaping, resist the urge to punch or knead—it’s wet and delicate, and handling gently keeps all those lovely bubbles intact.
How to Serve Easy No-Knead Artisan Yeast Bread Recipe

Garnishes
I like to brush the freshly baked loaf with a bit of olive oil or garlic-infused oil to enhance its aroma and flavor. A sprinkle of flaky sea salt on top just before baking adds a wonderful finishing touch that makes every bite pop.
Side Dishes
This bread pairs beautifully with simple spreads like creamy butter, tangy cheese, or my favorite tomato bruschetta. I often serve it alongside a hearty soup or a fresh salad for a comforting meal that feels extra special.
Creative Ways to Present
For gatherings, I love turning this bread into a centerpiece: slice it thickly, place it in a rustic basket, and surround it with cheese, olives, and fresh grapes. It always draws people in and makes the table look inviting. Even slicing it into mini loaves or rolls ups the wow factor!
Make Ahead and Storage
Storing Leftovers
I always wrap leftover bread tightly in a clean tea towel or store in a paper bag at room temperature to keep the crust from getting soggy. It usually stays fresh and delicious for 2-3 days this way—just avoid plastic bags unless you want a soft crust.
Freezing
If I’m not going to eat it quickly, I slice the bread and freeze it in a zip-top bag with parchment paper between slices to prevent sticking. It freezes beautifully and lets me toast just what I need later.
Reheating
To refresh the crust on leftover bread, I pop the slices or whole loaf in a preheated 175°C (350°F) oven for 5-10 minutes. It comes out warm and crispy again, almost like fresh-baked!
FAQs
-
Can I use active dry yeast instead of instant yeast in this recipe?
Absolutely! Just dissolve the active dry yeast in the warm water first and let it sit for about 5-10 minutes until it becomes foamy before mixing it with the flour and salt. This helps ‘wake up’ the yeast and ensures good rise.
-
What if my dough isn’t rising?
This can happen if your kitchen is cool or the water was too hot and killed the yeast. Try placing the covered bowl in a warm spot—like near a radiator or inside an oven with just the light on. Also, double-check your yeast’s freshness; expired yeast may not work well.
-
Can I make this bread without a Dutch oven?
Yes! Use a roasting pan or metal baking pan placed on an oven rack with a tray of boiling water underneath to create steam. This mimics the moist environment of a Dutch oven, helping form a great crust.
-
How long does the bread keep?
Stored properly at room temperature in a paper bag or wrapped in a tea towel, the bread is best eaten within 2-3 days. Beyond that, it tends to dry out, but freezing can extend its life.
Final Thoughts
This Easy No-Knead Artisan Yeast Bread Recipe has become my go-to when I want that bakery-quality loaf with minimal fuss. It’s reliable, forgiving, and yields consistently fantastic bread that’s perfect for lunches, dinners, or just snacking with butter and jam. I can’t recommend it enough to anyone who’s ever felt intimidated by bread baking—you’ve got this, and soon enough, you’ll be sharing warm, crusty loaves with your friends and family just like I do.
Print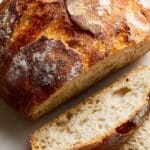
Easy No-Knead Artisan Yeast Bread Recipe
- Prep Time: 5 minutes
- Cook Time: 40 minutes
- Total Time: 2 hours 45 minutes to 3 hours 45 minutes (including rise time)
- Yield: 1 loaf (about 10 servings) 1x
- Category: Bread
- Method: Baking
- Cuisine: Artisan/Western
Description
This artisan no-knead yeast bread recipe offers a simple and forgiving approach to homemade bread, requiring minimal effort yet delivering a crusty, golden loaf with a chewy, fluffy crumb. Perfect for beginners and busy bakers alike, it uses a slow rise method and baking in a Dutch oven to create professional-quality bread without kneading.
Ingredients
Main Dough Ingredients
- 3 cups (450g) bread or plain/all purpose flour
- 2 tsp instant or rapid rise yeast
- 2 tsp cooking or kosher salt (not table salt)
- 1 1/2 cups (375 ml) very warm tap water (up to 55°C/130°F)
Dough Shaping
- 1 1/2 tbsp flour, for dusting
Instructions
- Mix Dough: In a large bowl, combine flour, yeast, and salt. Add the warm water and mix thoroughly using the handle of a wooden spoon until all the flour is incorporated into a wet, sticky dough. It should be wet and sloppy but not runny; adjust water or flour slightly if necessary.
- Rise: Cover the bowl with cling wrap or a plate and leave it on the counter at room temperature for 2 to 3 hours until the dough doubles in volume, becomes bubbly on top, and has a wobbly, jelly-like consistency. If no rise is seen after 1 hour, move the dough to a warmer spot.
- Optional Refrigeration for Flavor: At this point, you can either proceed to bake immediately or refrigerate the dough for up to 3 days to develop deeper flavor.
- Bring Dough to Room Temperature: If refrigerated, allow the dough to come to room temperature for 45 to 60 minutes while preheating the oven to ensure optimal rise and texture during baking.
- Preheat Oven and Dutch Oven: Place a Dutch oven with its lid inside the oven (at least 26cm/10″ diameter) and preheat to 230°C/450°F (220°C fan) for 30 minutes prior to baking to ensure even heat distribution and steam effect.
- Shape Dough: Lightly dust your work surface with 1 tablespoon of flour. Scrape the dough out of the bowl and dust the top with 1/2 tablespoon flour. Fold the dough inward about six times using a dough scraper or a similar tool to deflate bubbles and shape it roughly into a round.
- Transfer to Parchment Paper: Place a large piece of parchment paper next to the dough, flip the dough seam-side down onto the paper, then gently push it towards the center and reshape it into a loose round shape. Imperfect shapes result in more crusty, crunchy ridges.
- Load Dough into Dutch Oven: Carefully remove the hot Dutch oven from the oven and transfer the dough along with the parchment paper into the pot. Cover with the lid immediately.
- Bake Covered and Uncovered: Bake the bread covered for 30 minutes, then remove the lid and bake uncovered for an additional 12 minutes or until the crust is deep golden and crisp.
- Cool Before Slicing: Remove the bread from the oven and cool on a wire rack for at least 10 minutes before slicing to allow the crumb to set properly.
Notes
- Use bread flour for a chewier, fluffier crumb and longer freshness; all-purpose flour also works but texture differs slightly.
- Wholemeal flour can be used by starting with 30g less and adjusting as needed to maintain dough consistency.
- If using table salt instead of kosher salt, reduce amount to 1 1/4 tsp to avoid overly salty bread.
- Water temperature is critical; it should be warm enough to sit in comfortably but not hot enough to kill yeast (up to 55°C/130°F).
- Dough consistency can vary based on flour brand and humidity; adjust with small amounts of flour or water to achieve a sufficiently wet but not runny dough.
- Rising time will vary with room temperature; if dough is not rising at 1 hour, move it to a warmer place to encourage yeast activity.
- Preheat the oven while dough is rising or resting after chilling. A hot Dutch oven creates steam for a crispy crust.
- If no Dutch oven, use a metal baking pan and create steam by adding boiling water to the pan placed beneath the dough during baking.
- The recipe is adapted and halved from the New York Times no-knead bread recipe with added tips for ease and reliability.
- Bread slices yield about 10 servings per batch.
Nutrition
- Serving Size: 1 slice (approx. 1/10th of loaf)
- Calories: 160
- Sugar: 0.1g
- Sodium: 380mg
- Fat: 1g
- Saturated Fat: 0.2g
- Unsaturated Fat: 0.8g
- Trans Fat: 0g
- Carbohydrates: 33g
- Fiber: 1g
- Protein: 5g
- Cholesterol: 0mg


