

If you’re looking to wow your friends and family this spooky season, you’re going to love this Easy Decorated Halloween Cupcakes Recipe. It’s seriously one of my all-time favorites because not only do these cupcakes taste amazing, but the decorations are super fun and perfect for any Halloween party or casual treat night. I remember the first time I made these, and the joy of seeing those little monster eyes and jack-o’-lantern faces made me feel like a kitchen wizard – I just had to share the magic with you!
Why You’ll Love This Recipe
- Simple Yet Stunning: These cupcakes are easy to make but decorate like a pro, making your Halloween party unforgettable.
- Customizable Fun: You can mix and match designs—monsters, jack-o’-lanterns, or spiders—for a festive variety.
- Delicious Flavor: The vanilla buttercream pairs beautifully with pumpkin cupcakes for a perfect balance of sweet and spice.
- Kid-Friendly and Crowd-Pleasing: My family goes crazy for these, and kids love helping with the decorating!

Ingredients You’ll Need
This recipe works best with fresh, quality ingredients that really bring out those cozy fall flavors. Having the right tools and colors on hand makes decorating a breeze, too.
- Pumpkin cupcakes: You can use your favorite recipe or store-bought to save time; pumpkin adds a lovely autumnal touch.
- Unsalted butter: Softened to room temperature for smooth, creamy frosting without any salty overtones.
- Confectioners’ sugar: Essential for a silky sweet buttercream texture.
- Heavy cream (or half-and-half/whole milk): Adds the perfect richness and helps you adjust the frosting consistency.
- Pure vanilla extract: Brings depth and warmth to the frosting flavor.
- Gel food coloring: Leaf Green, Fuchsia + Violet, Orange, Super Black – these concentrated colors give you vivid, sharp hues for decorating.
- Piping bags and tips: Small star tips, petal tips, and round tips let you create distinct textures and shapes for monsters, pumpkins, and spiders.
- Candy eyeballs and Oreo mini cookies: These little accents bring your creatures to life with spooky charm.
- Sprinkles (optional): Adds that extra festive sparkle if you want to jazz things up.
Variations
I love how this recipe is a great base for your own creative flair—don’t be shy about switching up colors or adding your own spooky touches. It’s fun to tailor it to your Halloween vibe!
- Use a chocolate cupcake base: For a richer, more decadent option, I swapped in chocolate cupcakes once, and it turned out amazing with the vanilla buttercream decorations.
- Dairy-free frosting: You can easily swap butter for vegan alternatives and use coconut cream instead of heavy cream if you want a dairy-free version.
- Glow-in-the-dark sprinkles: My nieces loved the extra eerie glow effect these added under blacklight—it’s perfect for Halloween parties late into the night.
- Adjust the spice level: Add a pinch of cinnamon or pumpkin pie spice to your cupcake batter for an extra seasonal kick.
How to Make Easy Decorated Halloween Cupcakes Recipe
Step 1: Whip Up the Smooth Vanilla Buttercream
Start by beating softened unsalted butter on medium speed until it’s beautifully creamy — about 2 minutes. Then, gradually add the confectioners’ sugar (about 5 and 1/2 cups out of the 6 total), heavy cream, and vanilla extract. Beat on low to combine, then crank up to medium-high for a good 2 minutes. This makes your frosting extra luscious and velvety. If the frosting tastes a little too sweet, add a tiny pinch of salt — I usually add 1/8 teaspoon, and it balances everything perfectly. If you notice too many air bubbles, here’s a cool trick: stir gently with a spatula or wooden spoon for a minute or two to pop them — it takes some muscle but it’s worth it for smooth, polished frosting.
Step 2: Divide and Tint Your Frosting Colors
Separate the frosting into small bowls for each color you’ll need—green, purple, orange, black, and leave some white for the spider cupcakes. Use gel food coloring because it won’t thin out your frosting. Add a few drops at a time until you get the shade you want; remember the colors deepen as the frosting sets. A quick tip: if a color is a bit too bright, adding a tiny dot of black gel coloring with a toothpick tones it down beautifully.
Step 3: Pipe Your Creatures with Flair
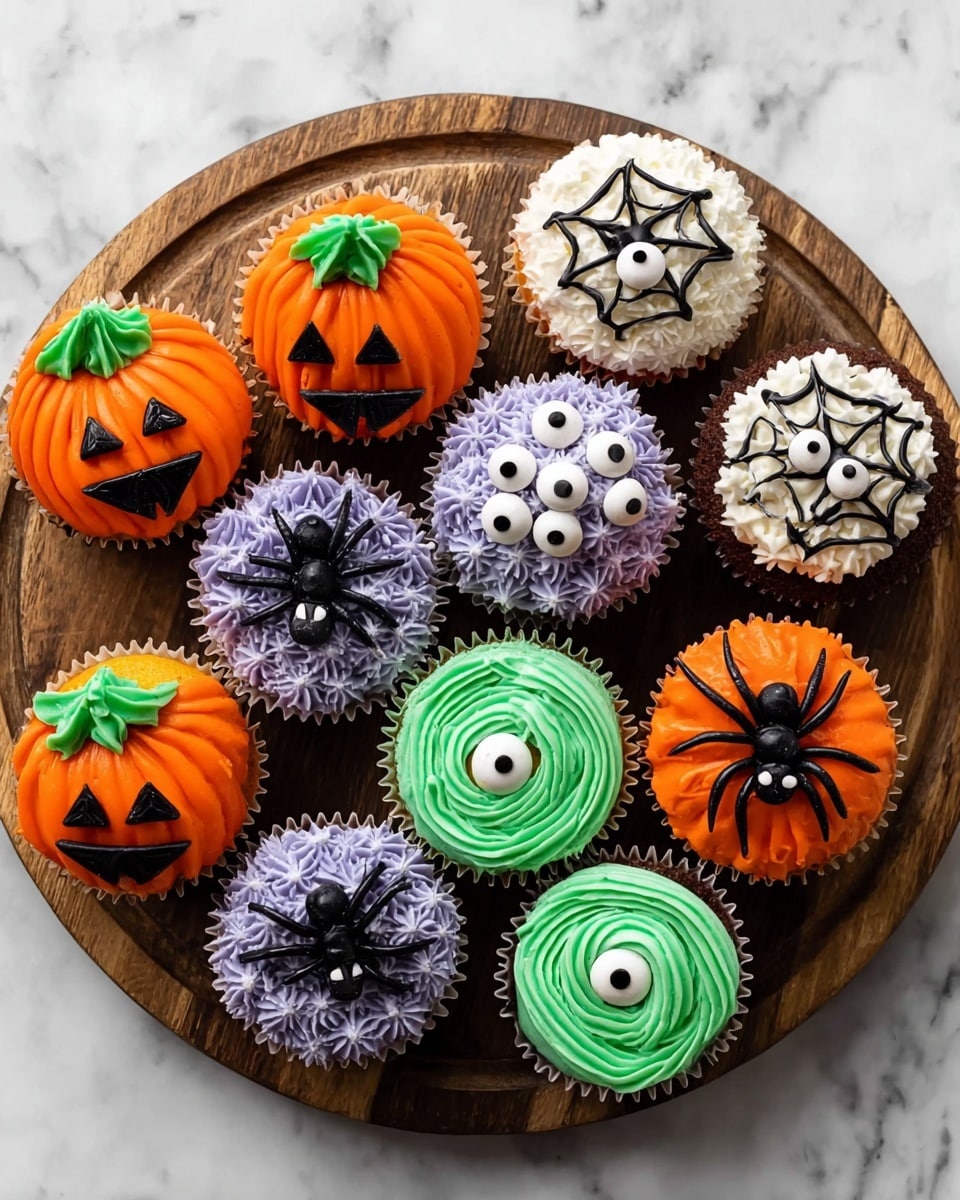
Here’s the fun part! For green monster cupcakes, use a small open star tip (I love Wilton #21). Pipe a spiral from the outside in, then top with a large candy eyeball. Purple monsters get piped stars all over for a textured look, then add small eyeballs and a few sprinkles if you like. Jack-o’-lantern cupcakes get their grooves with an orange petal tip (Wilton #125) in vertical lines, a green star-tipped stem, and black eyes, nose, and mouth piped on with a small round tip. Spider cupcakes use white frosting smoothed on top, then black frosting piped for the web design, with half an Oreo cookie in the center as the spider’s body, and little candy eyeballs and black lines for the legs.
Step 4: Let Them Set and Serve
Once decorated, it’s best to keep these cupcakes at room temperature uncovered for a few hours. If you need to store them longer, cover and refrigerate—they’ll keep fresh for up to 5 days in a cupcake carrier. Just bring them back to room temp before serving for the best taste and texture.
Pro Tips for Making Easy Decorated Halloween Cupcakes Recipe
- Use Room Temperature Ingredients: I learned that starting with room-temp butter and cream makes your frosting so much smoother and easier to pipe.
- Don’t Overfill Piping Bags: I found it easier to handle smaller amounts in the bags to avoid mess and maintain control while piping detailed designs.
- Practice Your Piping Technique: Try piping a few test swirls or stars on parchment paper before decorating cupcakes; it really builds confidence.
- Avoid Air Bubbles: That stirring tip after mixing helps keep your frosting perfect—air bubbles can throw off your decorating precision.
How to Serve Easy Decorated Halloween Cupcakes Recipe
Garnishes
I love adding a few extra candy eyeballs and sprinkles just before serving for that festive pop. Sometimes I add edible glitter on the spider webs for an extra spooky shimmer—kids go wild for that little touch!
Side Dishes
Pair these cupcakes with a classic hot apple cider or a fun Halloween punch. For savory balance, I like serving some roasted pumpkin seeds or mini cheese boards alongside—it rounds out the party perfectly.
Creative Ways to Present
I once displayed these cupcakes on a tiered stand draped with black lace, surrounded by mini pumpkins and some faux spider webs, which made for a super dramatic Halloween centerpiece. You can also present them in pretty Halloween-themed cupcake liners or place them inside a decorated box with a “spooky” window to gift to friends!
Make Ahead and Storage
Storing Leftovers
After your party, store leftover cupcakes in an airtight container or cupcake carrier in the refrigerator. I’ve found they stay fresh and tasty for up to 5 days. Let them come back to room temperature before eating for the best flavor and softness.
Freezing
You can freeze undecorated cupcakes wrapped tightly in plastic wrap and then foil. I don’t recommend freezing decorated cupcakes because buttercream textures can shift, but if you must, freeze them uncovered until solid, then cover gently to protect the frosting.
Reheating
For frozen cupcakes, thaw them overnight in the fridge, then bring to room temperature before serving. Avoid microwaving decorated cupcakes—you’ll lose the beautiful frosting details and texture.
FAQs
-
Can I use store-bought cupcakes for this Easy Decorated Halloween Cupcakes Recipe?
Absolutely! Using store-bought cupcakes is a great shortcut, especially if you’re short on time. Just make sure they’re fresh and sturdy enough to hold the frosting designs without collapsing.
-
How do I prevent my frosting from being too runny or too stiff?
If your frosting is too runny, add a bit more confectioners’ sugar a tablespoon at a time. If it’s too stiff, stir in small amounts of heavy cream or milk until it reaches a smooth, pipeable consistency. It’s all about balancing!
-
What tips do you have for decorating cupcakes if I’m a beginner?
Start by practicing piping on parchment paper to get comfortable with the pressure and motion. Keep your piping bags slightly angled and steady your hand by resting your elbow on the counter. And remember, it’s Halloween—imperfect decorations can look delightfully spooky!
-
Can I make these cupcakes gluten-free?
Yes! Substitute your cupcake base with a gluten-free pumpkin cupcake recipe or mix. Just double-check that all your decorations and sprinkles are gluten-free too to keep it safe.
-
How can I keep the candy eyeballs from sliding off the frosting?
If the frosting is freshly piped, gently press the candy eyeball down into the frosting so it sticks well. If needed, you can add a little dot of frosting underneath the eyeball as a glue to hold it in place better.
Final Thoughts
I absolutely love how this Easy Decorated Halloween Cupcakes Recipe brings joy and creativity into the kitchen. Every year, pulling out the gel colors and candy eyeballs feels like opening a treasure trove of fun, and seeing the smiles it brings is honestly priceless. Whether you’re baking for kids, a party, or just to treat yourself on a cozy evening, these cupcakes are an easy, playful way to celebrate Halloween. I hope you give it a try and enjoy every spooky, sweet bite as much as my family does!
Print
Easy Decorated Halloween Cupcakes Recipe
- Prep Time: 45 minutes
- Cook Time: 0 minutes
- Total Time: 45 minutes
- Yield: 12 cupcakes 1x
- Category: Dessert, Baking
- Method: Baking
- Cuisine: American
- Diet: Vegetarian
Description
Celebrate Halloween with these fun and easy decorated cupcakes featuring four spooky designs: Green Monster, Purple Monster, Jack-o’-Lantern, and Spider. Using a classic pumpkin cupcake base topped with creamy vanilla buttercream, these cupcakes are perfect for parties or festive treats with detailed piping techniques and colorful gel food coloring.
Ingredients
Pumpkin Cupcakes
- 12 pumpkin cupcakes or your favorite cupcake recipe
Vanilla Buttercream
- 1 and 1/2 cups (340g) unsalted butter, softened to room temperature
- 6 cups (720g) confectioners’ sugar (see note)
- 6 Tablespoons (60ml) heavy cream, half-and-half, or whole milk, at room temperature
- 2 teaspoons pure vanilla extract
- salt, to taste
Coloring & Decoration Supplies
- Gel food coloring: Leaf Green, Fuchsia + Violet, Orange, Super Black
- 2 to 3 piping bags and couplers
- Piping tips: small open star tip (Wilton #21), large petal tip (Wilton #125), small round tip (Wilton #4)
- Small candy eyeballs
- Large candy eyeballs
- Mini candy eyeballs
- Optional: sprinkles
- Oreo Mini cookies for spider cupcakes
Instructions
- Make the vanilla buttercream: Using a handheld or stand mixer with paddle attachment, beat softened butter on medium speed until creamy, about 2 minutes. Add 5 and 1/2 cups (660g) confectioners’ sugar, heavy cream, and vanilla extract. Beat on low for 30 seconds, then increase to medium-high for 2 minutes. Add salt as needed, about 1/8 teaspoon. To remove air bubbles, stir by hand with a spatula pressing frosting against bowl sides until bubbles diminish, about 1–2 minutes.
- Adjust consistency: If frosting is too thin, add up to 1/2 cup more confectioners’ sugar. If too thick, add heavy cream, 1 tablespoon at a time, mixing and tasting until desired consistency is reached.
- Tint the frosting: Divide frosting into bowls for each color needed. Tint with gel food coloring (use a toothpick of black gel to tone down bright colors if desired). Keep one bowl white for spider cupcakes. For purple monster, combine Fuchsia and Violet to create pinkish purple shade. Remember colors darken as frosting sits.
- Green Monster Cupcakes: Fit piping bag with small open star tip (Wilton #21). Fill with green frosting. Pipe a spiral from outside to center on each cupcake. Press a large candy eyeball into the center gently.
- Purple Monster Cupcakes: Fit piping bag with small open star tip (Wilton #21). Fill with purple frosting. Pipe stars all over cupcake surface. Press small candy eyeballs into the frosting. Add sprinkles if desired.
- Jack-o’-Lantern Cupcakes: Fit three piping bags with large petal tip (Wilton #125) for orange, small open star tip (Wilton #21) for green, and small round tip (Wilton #4) for black frosting. Pipe rounded vertical lines with orange frosting to simulate pumpkin ridges. Pipe green pumpkin stem. Use black frosting to pipe eyes, nose, and mouth in goofy or spooky shapes.
- Spider Cupcakes: Spread white frosting smoothly on cupcake with offset spatula or knife. Use black frosting in a piping bag with small round tip (Wilton #4) to pipe three criss-cross lines forming six triangular web sections, then connect with curved lines for the web. Place half of a mini Oreo cookie on the web as the spider’s body. Pipe two small black dots for eyes and stick two mini candy eyeballs on them. Pipe eight legs, four on each side.
- Storage: Store decorated cupcakes uncovered at room temperature for a few hours before serving. Cover and refrigerate leftovers up to 5 days. Use a cupcake carrier for safe transport.
Notes
- If making fewer cupcakes or fewer designs, scale down buttercream quantity accordingly.
- To reduce air bubbles in buttercream, hand stir frosting against bowl sides after mixing.
- Gel food colorings provide vibrant color with minimal frosting thinning.
- Adjust frosting consistency with confectioners’ sugar or cream for optimal piping texture.
- Use cupcake carriers for traveling or storing to maintain decoration integrity.
- Buttercream can be tinted ahead and refrigerated briefly; bring to room temperature before piping.
Nutrition
- Serving Size: 1 cupcake
- Calories: 350
- Sugar: 32g
- Sodium: 90mg
- Fat: 20g
- Saturated Fat: 12g
- Unsaturated Fat: 7g
- Trans Fat: 0g
- Carbohydrates: 40g
- Fiber: 1g
- Protein: 3g
- Cholesterol: 50mg
