

If you’re a chocoholic like me, you’re going to flip for this Decadent Chocolate Gooey Butter Cake Recipe. Imagine a luscious, fudgy layer of cream cheese and cocoa gooeyness nestled atop a rich, moist chocolate cake — all crowned with a silky chocolate ganache. It’s one of those desserts that’s as delightful to make as it is to eat, and I promise you’ll want to keep this recipe close to your heart (and kitchen!). So, let’s dive in and I’ll show you everything you need to know to bake this fan-freaking-tastic treat that’ll make your family go crazy.
Why You’ll Love This Recipe
- Gooey, Velvety Texture: The cream cheese layer melts into the chocolate cake, creating a perfect gooey center that’s just irresistible.
- Simple Ingredients, Big Impact: With everyday baking staples and a few tricks, you get a dessert that looks and tastes like something fancy from a bakery.
- Perfect for Sharing: Whether it’s a family gathering or a casual get-together, this cake makes everyone ask for seconds (and thirds!).
- No Fuss Assembly: Layer and bake — I love how straightforward this process is, even if you’re newer to baking.

Ingredients You’ll Need
Each element of this Decadent Chocolate Gooey Butter Cake Recipe plays a role in building layers of flavor and texture. You’ll use both Dutch process and regular cocoa powders for depth, and the secret weapon—hot coffee—to bring out that rich chocolatey kick.

- Cream Cheese: Make sure it’s at room temperature for smooth mixing and that creamy gooey finish.
- Eggs: Room temp eggs blend better and give a fluffier batter and filling.
- Powdered Sugar: The fine texture helps the gooey layer stay smooth and sweet.
- Cocoa Powder: Both Dutch process (for the cake) and regular unsweetened (for the filling) add layers of chocolate complexity.
- All-Purpose Flour: Use spooned and leveled for accurate measuring; it ensures the cake rises just right.
- Baking Powder & Baking Soda: These leavening agents help the cake rise and stay tender.
- Salt: A pinch to balance sweetness and bring out chocolate flavor.
- Granulated Sugar: Gives body and sweetness to the cake layer—don’t skimp!
- Unsalted Butter: Softened is key — creaming it well with sugar traps air, making the texture lighter.
- Vanilla Extract: A little boost of warmth and flavor magic.
- Buttermilk: Adds tang and moisture; room temperature is best to avoid curdling.
- Hot Coffee: Don’t worry about the coffee flavor being strong — it sharpens the chocolate taste beautifully.
- Semi-Sweet Chocolate: For the ganache topping that’s smooth, rich, and perfectly balanced with cream.
- Heavy Cream: It’s what makes the ganache glossy and dreamy.
Variations
I love playing around with this Decadent Chocolate Gooey Butter Cake Recipe, especially because it’s such a crowd-pleaser. Adding your own twist makes it extra special—and I’ve got a few recommendations based on what’s worked for me.
- Nutty Delight: I once stirred in chopped toasted pecans into the cake batter—added an amazing crunch that contrasted perfectly with the gooey center.
- Spicy Kick: A pinch of cinnamon or cayenne in the batter gave it a subtle warmth, making it unexpected and memorable.
- Gluten-Free Version: Swapped the all-purpose flour for a 1:1 gluten-free blend and it came out surprisingly well—I just reduced baking powder slightly to avoid over-rise.
- Dairy-Free Adaptation: Using dairy-free cream cheese and butter substitutes works, but I recommend keeping the cream high-fat coconut milk for a luscious ganache alternative.
How to Make Decadent Chocolate Gooey Butter Cake Recipe
Step 1: Whip Up the Gooey Chocolate Filling
Start by softening your cream cheese to room temperature—this is crucial for smooth mixing. I like to beat it on medium-high speed until it’s silky, about 1-2 minutes. Then, add in your egg and egg yolk one at a time, mixing until just combined. Here’s a trick I discovered: sift the powdered sugar and cocoa powder slowly into the bowl to avoid lumps and keep the filling extra smooth. Mix on low at first, then medium speed until it forms that velvety luscious batter you want. Set it aside and resist the urge to sneak spoonfuls just yet!
Step 2: Prepare the Rich Chocolate Cake Batter
Preheat your oven to 350°F (175°C). Grease a 9-inch springform pan and line the bottom with parchment paper for an easy release later. Whisk together the dry ingredients—flour, cocoa powder, baking powder, baking soda, and salt—in a bowl so they’re well combined and even. In a separate large bowl, cream your softened butter and granulated sugar on high speed until fluffy and pale, about 1-2 minutes. This step really aerates the batter, so don’t rush. Add eggs and vanilla extract, then mix until smooth. Alternate adding the dry ingredients with the buttermilk, mixing on low to keep the batter light and prevent overworking the flour. Lastly, the magic touch: pour in hot coffee and combine gently—it intensifies the chocolate flavor and keeps the cake super moist.
Step 3: Layer and Bake for Gooey Perfection
Pour the cake batter into your prepared pan and smooth it out. Now, gently pour the cream cheese filling over the top and spread it as evenly as possible with a mini offset spatula—I love using one here because it glides perfectly without disturbing the cake layer too much. Bake for 38-42 minutes; you’ll know it’s done when the center still jiggles slightly but the edges are set. Trust me, that jiggle means gooey perfection when cooled. Let it cool on a wire rack for 45 minutes, then pop it into the fridge for at least 2 hours to let the layers set. Patience here totally pays off.
Step 4: Make the Silky Chocolate Ganache
Chop your semi-sweet chocolate into small pieces and place them in a heatproof bowl. Heat the heavy cream over medium heat until steaming but not boiling—watch it closely to avoid a skin forming. Pour the hot cream over the chocolate and let it sit for 2 minutes before stirring gently until smooth and glossy. Let the ganache cool about 10 minutes so it thickens just enough to spread without running off the cake.
Step 5: Assemble and Chill Before Serving
Once the cake has fully cooled and chilled, carefully remove the springform pan sides, transferring your masterpiece onto a serving plate. Pour the ganache over the top, spreading evenly with an offset spatula. I like to let it set in the fridge for about 10 minutes before adding a finishing touch of chocolate shavings and a sprinkle of flaky sea salt—those little touches bring this cake to the next level. Serve at room temperature for that perfect gooey texture, especially if you’re prepping ahead; just bring it out about an hour before enjoying.
Pro Tips for Making Decadent Chocolate Gooey Butter Cake Recipe
- Room Temperature is Key: Bringing eggs, cream cheese, and buttermilk to room temp guarantees smoother mixing and better texture.
- Don’t Overbake the Cake: Slight jiggle in the center means it’s perfectly gooey—overbaking dries it out, so trust your eyes.
- Use Quality Cocoa: I recommend Dutch-process cocoa for the cake for a rich, mellow chocolate flavor that stands out.
- Chill Before Ganache: Cooling the cake completely before pouring the ganache prevents it from sliding off and helps it set beautifully.
How to Serve Decadent Chocolate Gooey Butter Cake Recipe

Garnishes
I always finish this cake with flaky sea salt and a handful of homemade chocolate shavings because the salt enhances the chocolate and the shavings add texture and elegance. Sometimes, I like to scatter a few crushed toasted nuts or even some fresh raspberries for a pop of tart contrast—my guests love the fruitiness against the rich chocolate.
Side Dishes
This cake is rich, so I enjoy serving it alongside lighter sides like freshly brewed coffee or a scoop of vanilla ice cream to balance the decadence. A chilled glass of milk or a robust red wine can also turn this dessert into a full-on celebration.
Creative Ways to Present
For birthdays or special occasions, I’ve dressed up the cake by layering it with fresh berries between slices or piping dollops of whipped cream and garnishing with edible gold leaf for a fancy touch. Wrapping the springform pan with a pretty ribbon before presenting elevates the gift vibe if you’re taking it to a friend’s house.
Make Ahead and Storage
Storing Leftovers
I keep leftovers covered tightly with plastic wrap or in an airtight container in the fridge. The cake holds up beautifully for 3-4 days, and the gooey center stays just as indulgent. Just remember to let it come to room temperature before serving for the best texture.
Freezing
Freezing works great if you want to prep ahead. I slice the cake before freezing so I can thaw individual pieces as needed. Wrap each slice tightly in plastic wrap and foil for best results. When ready, thaw in the fridge overnight and then bring to room temperature before enjoying.
Reheating
To reheat leftovers, I pop a slice in the microwave for about 15-20 seconds just until warm (not hot!) to revive that gooey feel without melting it down. If you refrigerated the cake, letting it rest out for 30 minutes first helps too. The ganache stays glossy and luscious even after reheating.
FAQs
-
Can I make the Decadent Chocolate Gooey Butter Cake Recipe without a springform pan?
Yes! While I recommend a springform pan for easy removal, you can use a regular 9-inch cake pan. Just make sure to line it well with parchment paper and allow the cake to cool completely before attempting to remove it, or simply serve it directly from the pan.
-
Is it necessary to use hot coffee in the cake batter?
While it might sound odd, hot coffee really amplifies the chocolate flavor without making the cake taste like coffee. If you prefer, you could substitute with hot water, but I’ve found coffee gives a richer, deeper chocolate taste.
-
Can I prepare this cake a day ahead?
Absolutely! In fact, this cake benefits from chilling overnight as it gives the gooey layer time to set perfectly. Just bring the cake to room temperature before serving and add the ganache just before serving if you want the freshest shine.
-
Will the gooey layer melt during baking?
It might jiggle when the cake is done, but that’s exactly what you want. The gooey layer sets as it cools and chills, giving this cake its signature melting-in-your-mouth texture without running off.
-
Can this recipe be made gluten-free?
Yes! I’ve tested using a 1:1 gluten-free flour blend with great results. Just make sure your blend includes xanthan gum or a binder for structure. Adjust baking time slightly and watch for doneness.
Final Thoughts
This Decadent Chocolate Gooey Butter Cake Recipe has truly become a staple in my kitchen for when I want to impress with minimal fuss. There’s something utterly joyful about pulling this cake from the oven, seeing that gooey layer peek through, and knowing how those rich flavors will melt on your first bite. If you’re craving a chocolate dessert that’s both comforting and impressive, give this one a try—you’ll thank me later, I promise!
Print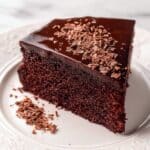
Decadent Chocolate Gooey Butter Cake Recipe
- Prep Time: 30 minutes
- Cook Time: 40 minutes
- Total Time: 3 hours 55 minutes
- Yield: 8 servings 1x
- Category: Dessert
- Method: Baking
- Cuisine: American
Description
This decadent Chocolate Gooey Butter Cake features a rich, fudgy chocolate cake base topped with a creamy, velvety chocolate cream cheese layer, finished with a smooth chocolate ganache. Perfect for chocolate lovers looking for a luscious dessert with a gooey center and a silky finish.
Ingredients
For the Gooey Chocolate Layer:
- 8 oz (226 g) cream cheese, at room temperature
- 1 egg, at room temperature
- 1 egg yolk, at room temperature
- 2 1/2 cups (325 g) powdered sugar
- 1/2 cup (40 g) cocoa powder
For the Chocolate Cake:
- 1 cup (125 g) all-purpose flour, spooned and leveled
- 6 tbsp (30 g) Dutch process cocoa powder
- 3/4 tsp baking powder
- 1/8 tsp baking soda
- 1/4 tsp salt
- 1 cup (200 g) granulated white sugar
- 6 tbsp (84 g) unsalted butter, softened
- 1/2 tsp vanilla extract
- 2/3 cup (160 ml) buttermilk, at room temperature
- 1/4 cup (60 ml) hot coffee
For the Chocolate Ganache:
- 3 oz (85 g) semi-sweet chocolate, chopped
- 1/2 cup (120 ml) heavy cream
Instructions
- Prepare the Gooey Chocolate Layer: In a large mixing bowl, beat the cream cheese on medium-high speed until smooth, about 1-2 minutes. Add the egg and egg yolk and blend on medium speed until fully combined. Gradually sift in the powdered sugar and cocoa powder, mixing first on low speed then medium speed until the mixture is smooth and set it aside.
- Preheat the Oven and Prepare Pan: Preheat oven to 350°F (175°C). Grease a 9-inch springform pan and line the bottom with parchment paper to prevent sticking.
- Mix Dry Ingredients for Cake: In a small bowl, whisk together the all-purpose flour, Dutch process cocoa powder, baking powder, baking soda, and salt. Set this dry mixture aside.
- Cream Butter and Sugar: In a large bowl, using an electric mixer on high speed, cream together the granulated sugar and softened unsalted butter until the mixture is light, fluffy, and pale in color, about 1-2 minutes.
- Add Eggs and Vanilla: Beat in the egg, egg yolk, and vanilla extract on medium-high speed until smooth and well combined, scraping the sides of the bowl as necessary.
- Combine Wet and Dry Ingredients: Gradually add the flour mixture and buttermilk alternately into the wet ingredients, mixing on low speed after each addition until smooth.
- Add Hot Coffee: Pour in the hot coffee and mix on low speed until evenly incorporated, which enhances the chocolate flavor and smoothness of the batter.
- Assemble Cake Layers: Pour the chocolate cake batter evenly into the prepared springform pan. Carefully pour the cream cheese mixture over the cake batter and spread it evenly with a mini offset spatula.
- Bake the Cake: Bake in the preheated oven for 38 to 42 minutes. The center should still jiggle slightly when the cake is shaken gently, indicating a gooey center.
- Cool the Cake: Remove the cake from the oven and allow it to cool on a wire rack for 45 minutes. Then refrigerate the cake for at least 2 hours to set.
- Prepare the Chocolate Ganache: Place the chopped semi-sweet chocolate in a small bowl. Heat the heavy cream in a small saucepan over medium heat until it just starts steaming. Pour the hot cream over the chopped chocolate and let it sit for 2 minutes, then stir gently until smooth. Allow the ganache to cool for 10 minutes to thicken slightly.
- Assemble and Chill: Remove the chilled cake from the springform pan and place it on a serving plate. Pour the ganache over the top and spread evenly with an offset spatula. Chill the cake for 10 minutes to allow the ganache to set.
- Garnish and Serve: Sprinkle chocolate shavings and flaky sea salt on top for a finishing touch. Serve at room temperature for the best flavor and texture. If made ahead, let the cake sit at room temperature for about an hour before serving after removing from the fridge.
Notes
- Use room temperature ingredients to ensure smooth, even mixing.
- Make sure not to overbake; the center should remain slightly jiggly for the gooey texture.
- Using hot coffee in the batter enhances the chocolate flavor without making the cake taste like coffee.
- For best results, chill the cake before adding ganache and serving.
- This cake keeps well refrigerated for up to 3 days; bring to room temperature before serving.
Nutrition
- Serving Size: 1 slice (approx. 1/8th cake)
- Calories: 450 kcal
- Sugar: 45 g
- Sodium: 220 mg
- Fat: 25 g
- Saturated Fat: 15 g
- Unsaturated Fat: 8 g
- Trans Fat: 0.5 g
- Carbohydrates: 55 g
- Fiber: 4 g
- Protein: 6 g
- Cholesterol: 115 mg


