

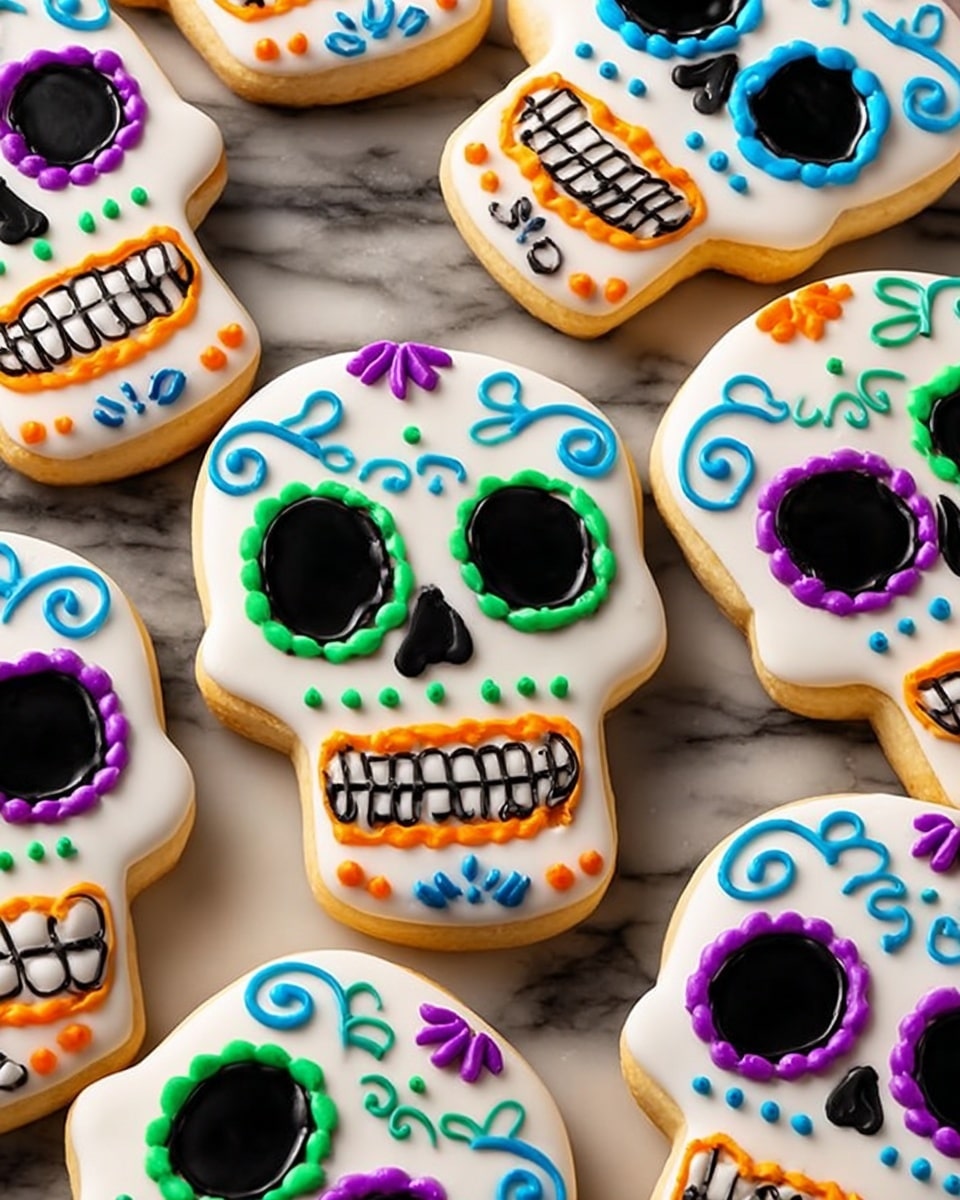
If you’re looking to bring a fun and festive twist to your baking, this Day of the Dead Cookies Recipe is an absolute winner. These skull-shaped cookies are not only delicious but also offer the perfect canvas to get creative with colorful icing—making them ideal for celebrating Día de los Muertos or just impressing your friends at your next party. Trust me, once you try these, you’ll find the process as enjoyable as the sweet and vibrant outcome.
Why You’ll Love This Recipe
- Vibrant and Festive: The multi-colored icing really brings these cookies to life, perfect for celebrating.
- Simple Ingredients: Uses pantry staples that you probably already have at home.
- Fun for All Skill Levels: Whether you’re a decorating newbie or a cookie pro, you’ll enjoy the process.
- Great Make-Ahead Treat: Dough and decorated cookies store well, letting you prep in advance.

Ingredients You’ll Need
The combination of classic cookie ingredients and bright royal icing colors works wonderfully to create the perfect texture and look for your Day of the Dead celebration. I recommend using high-quality vanilla extract—the flavor really shines through! Also, if you’re hunting for food coloring, gel colors work best to keep those icing hues vivid.
- All-purpose flour: Essential for a tender cookie base; dust your surface lightly to avoid sticking.
- Baking powder: Helps give a slight lift, making the cookies just enough soft without losing shape.
- Kosher salt: Balances sweetness and enhances flavor.
- Butter: Using softened, real butter adds richness and beautiful flavor that margarine can’t match.
- Granulated sugar: Provides the perfect sweetness and helps the cookies brown slightly.
- Egg: Binds everything together and contributes to moisture.
- Milk: A splash keeps the dough tender and icy smooth.
- Vanilla extract: Adds that warm, comforting flavor to the dough and icing alike.
- Powdered sugar: For a silky smooth, sweet icing perfect for decorating.
- Light corn syrup: Gives the icing a lovely shine and please-your-eye smoothness.
- Food coloring (black, teal, orange, green, purple, yellow): Key for those vibrant decorative faces!
Variations
I love how customizable this Day of the Dead Cookies Recipe is! Depending on the occasion or your mood, you can switch up the colors or add extra flavors to the dough or icing. Don’t hesitate to make it your own—the more personal, the better!
- Spiced Dough: I sometimes add a pinch of cinnamon or ground cloves to the cookie dough for a warm, aromatic twist that reminds me of autumn.
- Gluten-Free Version: Swapping all-purpose flour for a gluten-free blend works well if you’re catering to dietary needs—just chill the dough a bit longer before rolling.
- Different Icing Flavors: Try adding orange or almond extracts to your icing for a subtle flavor boost; your guests might notice and love the surprise.
- Chocolate Base: For a richer cookie, replace some flour with cocoa powder—perfect for a more decadent twist on the traditional recipe.
How to Make Day of the Dead Cookies Recipe
Step 1: Mix the Dry Ingredients
Start by whisking together the flour, baking powder, and kosher salt in a large bowl. This is a simple step but crucial because you want those ingredients evenly distributed for a consistent texture and rise in your cookies. I usually do this while the butter is softening to keep things moving.
Step 2: Cream Butter and Sugar
Using a hand mixer or stand mixer, beat your softened butter with the granulated sugar until the mixture is fluffy and pale. This takes around 3-5 minutes and is the secret to tender, melt-in-your-mouth cookies. Then add in the egg, milk, and vanilla extract, mixing until combined.
Step 3: Combine Wet and Dry
Gradually add the flour mixture to the wet ingredients, mixing gently until everything comes together. Don’t overmix here — you want the dough just combined to keep your cookies tender but still easy to roll out later.
Step 4: Chill the Dough
Once the dough is formed, shape it into a disk and wrap it tightly in plastic wrap. Pop it in the fridge for about an hour. This step is my lifesaver because chilled dough is way easier to roll out and helps the cookies keep their skull shape during baking.
Step 5: Roll, Cut, and Freeze Shapes
Preheat your oven to 350°F and line baking sheets with parchment paper. Lightly flour your surface and roll the dough out to about 1/8 inch thick—thin enough for crisp edges but not so thin that the cookies break. Use a skull-shaped cookie cutter to cut out shapes, then transfer them to your baking sheets. I discovered that freezing the cut shapes for 10 minutes before baking helps maintain those crisp, clean edges—a total game changer.
Step 6: Bake the Cookies
Bake your cookies for 10 to 12 minutes until the edges turn just lightly golden. Watch them carefully—the golden edges mean they’re perfectly baked but still soft inside. Let them cool completely before you start decorating; warm cookies can cause your icing to melt and spread.
Step 7: Make the Icing
While you wait for the cookies to cool, mix together the powdered sugar, milk, corn syrup, and vanilla extract for your icing. This icing dries with that classic shiny finish and is perfect for both outlining and flooding your cookies. I like to keep some extra milk handy to thin the icing as needed for the right consistency.
Step 8: Outline and Flood the Cookies
Scoop about a quarter of the icing into a piping bag with a small round tip—this will be your outlining icing. Pipe the edges of each cookie, then take half of the remaining icing and thin it slowly with milk until it flows smoothly but not too runny. Pipe it inside the outlines to flood the cookie surfaces completely. This two-step method gives you neat, defined edges with a smooth, glossy finish inside.
Step 9: Color and Decorate
Divide the remaining icing among six bowls and color each with one of the vibrant shades: black, teal, orange, green, purple, and yellow. Filling separate piping bags with these colors, you can now pipe fun and spooky faces, flowers, and dots to bring each skull cookie to life. This part is my favorite because I get to be playful—and it’s always a hit with the family and friends who come over!
Pro Tips for Making Day of the Dead Cookies Recipe
- Chill Your Dough Properly: If the dough warms up while rolling, it gets sticky and difficult, so keep it cool and floured.
- Freezing Shapes Before Baking: I learned that freezing the cut cookies for 10 minutes makes all the difference in crisp detail.
- Thin Icing Gradually: Add milk little by little when thinning icing to avoid it getting too runny, which can lead to messy flooding.
- Use Small Tips for Detail Work: For piping faces and décor, smaller tips give you better control and prettier designs.
How to Serve Day of the Dead Cookies Recipe
Garnishes
I usually keep the cookies simple with their brightly colored icing, but throwing on tiny edible glitter or a dash of decorative sugar sparkles adds a subtle “wow” factor for parties. Sometimes a sprinkling of edible gold dust on the forehead or eyes makes them pop without overpowering the look.
Side Dishes
These cookies pair wonderfully with a warm cup of Mexican hot chocolate or cinnamon-spiced coffee. For a full festive spread, I like serving them alongside pan dulce and fresh fruit, which balances the sweetness perfectly.
Creative Ways to Present
For a party, I arrange them on a large platter lined with colorful papel picado-style paper and scatter marigold petals around to echo traditional Day of the Dead altars. If you want to get fancy, stacking them like a mini sweet tower or tying individual cookies with ribbons as take-home gifts always impresses guests.
Make Ahead and Storage
Storing Leftovers
After decorating, I let the icing dry completely—this can take a few hours or overnight—before storing cookies in an airtight container. They keep beautifully at room temperature for up to a week, which means you can enjoy them over several days or prep for a gathering ahead of time.
Freezing
I’ve frozen both the baked cookies (without icing) and the decorated ones. For plain cookies, freeze in a single layer on a baking sheet, then transfer to a freezer bag for up to 3 months. Decorated cookies freeze best if the icing is fully set—wrap individually in parchment to protect designs.
Reheating
Since these are cookies, reheating usually isn’t necessary, but if you want that fresh-baked warmth, give them a quick 5-7 second zap in the microwave. Just be careful not to overheat or the icing might soften too much or melt.
FAQs
-
Can I use a different cookie cutter if I don’t have a skull shape?
Absolutely! While skull-shaped cutters are traditional and fun for this recipe, you can use any shape you like. Just keep the thickness consistent so the baking time remains similar, ensuring your cookies cook evenly.
-
How long can I store these cookies after decorating?
When stored in an airtight container at room temperature and once the icing is fully dry, they should last about a week. For best flavor and texture, consuming them within 4-5 days is ideal.
-
What if my icing is too thick or too runny?
If your icing is too thick, thin it carefully with small amounts of milk until it flows smoothly. If it’s too runny, add more powdered sugar a tablespoon at a time. Achieving the right consistency is key for neat decorating.
-
Can I make the dough ahead of time?
Yes! You can prepare the dough and refrigerate it for up to 2 days or freeze it for up to 3 months. Just bring it to room temperature and roll it out as usual when you’re ready to bake.
Final Thoughts
I absolutely love how this Day of the Dead Cookies Recipe comes together — it’s a perfect blend of tradition, creativity, and deliciousness all wrapped into one. Baking and decorating these cookies feels like a mini celebration in my kitchen, and sharing them with family and friends always brings so much joy. If you’re looking for a recipe that’s as fun to make as it is to eat, give these a try. I promise, your kitchen will smell amazing and your guests will be asking for the recipe!
Print
Day of the Dead Cookies Recipe
- Prep Time: 20 mins
- Cook Time: 12 mins
- Total Time: 3 hrs
- Yield: 30 cookies 1x
- Category: Dessert
- Method: Baking
- Cuisine: Mexican
- Diet: Vegetarian
Description
Celebrate the vibrant spirit of Day of the Dead with these festive sugar cookies. Perfectly soft and buttery, these skull-shaped cookies are adorned with colorful royal icing in a variety of bright hues for a fun and traditional treat that’s as delightful to decorate as it is to eat.
Ingredients
For the Cookies:
- 3 cups all-purpose flour, plus more for surface
- 1 tsp baking powder
- 1/2 tsp kosher salt
- 1 cup (2 sticks) butter, softened
- 1 cup granulated sugar
- 1 large egg
- 1 Tbsp milk
- 1 tsp pure vanilla extract
For the Icing:
- 5 cups powdered sugar
- 6 Tbsp milk, plus more for thinning
- 1/4 cup light corn syrup
- 1/4 tsp pure vanilla extract
- Black food coloring
- Teal food coloring
- Orange food coloring
- Green food coloring
- Purple food coloring
- Yellow food coloring
Instructions
- Mix Dry Ingredients: In a large bowl, whisk together the all-purpose flour, baking powder, and kosher salt until combined well. Set this mixture aside for later use.
- Cream Butter and Sugar: In another large bowl, beat the softened butter with granulated sugar until the mixture is fluffy and pale in color. This process usually takes a few minutes with an electric mixer.
- Add Wet Ingredients: To the fluffy butter mixture, add the egg, milk, and vanilla extract. Beat until fully incorporated and smooth.
- Combine Dough: Gradually add the dry flour mixture to the wet ingredients, mixing until the dough is completely combined and forms a cohesive mass.
- Chill Dough: Shape the dough into a flat disk, wrap it tightly in plastic wrap, and refrigerate for 1 hour to firm up for easier rolling and cutting.
- Prepare for Baking: Preheat your oven to 350ºF (175ºC). Line two baking sheets with parchment paper. Lightly flour your clean work surface.
- Roll and Cut Shapes: Roll out the chilled dough to approximately 1/8-inch thickness. Use a skull-shaped cookie cutter to cut out shapes. Transfer cookies to the prepared baking sheets, then freeze for 10 minutes to help them hold their shape while baking.
- Bake Cookies: Bake cookies in the preheated oven for 10 to 12 minutes or until the edges turn lightly golden. Remove from oven and allow cookies to cool completely on a wire rack.
- Make Icing: While cookies bake and cool, mix powdered sugar, 6 tablespoons of milk, light corn syrup, and vanilla extract in a medium bowl until smooth. Transfer about a quarter of this icing to a piping bag fitted with a small round tip for outlining.
- Outline Cookies: Pipe outlines around the edges of the cooled cookies using the prepared icing.
- Flood Cookies: Pour about half of the remaining icing into another bowl and thin with additional milk, one teaspoon at a time, until it reaches a good flooding consistency. Transfer to another piping bag with a small round tip and fill in the centers of the cookies completely.
- Color Icing: Divide the remaining icing into six small bowls. Tint each portion with a different food coloring: black, teal, orange, green, purple, and yellow.
- Decorate: Fill piping bags fitted with small round tips with each colored icing. Pipe decorative skull faces and details onto the flooded cookies for a festive Day of the Dead look.
Notes
- Freezing the cut-out cookies before baking helps maintain their shape and prevents spreading.
- Use gel or paste food coloring for more vibrant icing colors without thinning the consistency.
- Adjust the milk quantity carefully when thinning icing to avoid it becoming too runny.
- Store decorated cookies in an airtight container at room temperature for up to 5 days.
- Allow icing to fully set before stacking cookies to avoid smudging decorations.
Nutrition
- Serving Size: 1 cookie
- Calories: 180
- Sugar: 15g
- Sodium: 80mg
- Fat: 9g
- Saturated Fat: 5g
- Unsaturated Fat: 3g
- Trans Fat: 0g
- Carbohydrates: 23g
- Fiber: 0.5g
- Protein: 2g
- Cholesterol: 30mg


