

This incredibly simple Crispy Homemade Potato Chips recipe transforms ordinary russet potatoes into restaurant-quality, perfectly crunchy chips with just three ingredients. Better than anything from a bag, these homemade chips deliver that satisfying crunch and fresh potato flavor that will make you wonder why you ever bought the pre-packaged version. Ready in under 30 minutes of active time, these chips are perfect for snacking, parties, or alongside your favorite sandwich!
Why You’ll Love This Recipe
- Superior Taste: Nothing compares to the fresh, pure potato flavor of homemade chips—you’ll taste the difference immediately.
- Customizable: Create your own flavor combinations with different seasonings to suit your exact preferences.
- Budget-Friendly: Make a generous batch of gourmet chips for a fraction of what specialty chips cost at the store.
- Surprisingly Easy: While they might seem intimidating, homemade potato chips are actually quite simple to make with just a few key techniques.
- Impressive: Watch your friends’ faces light up when you casually mention these crispy, golden beauties are homemade.

Ingredients You’ll Need
- Russet Potatoes: The starch content in russets makes them perfect for chips, creating that ideal crispy texture. Their larger, uniform size also makes slicing easier.
- Canola Oil: With its high smoke point and neutral flavor, canola oil is ideal for frying without overpowering the potato taste. It creates that perfect golden crispiness without burning.
- Kosher Salt: The larger flakes adhere better to the chips and provide that satisfying salty crunch. The coarser texture also gives you more control over seasoning.
Note: You’ll find the complete list of ingredients, along with their exact measurements, in the printable recipe card at the bottom of this post.
Variations
Make these chips truly your own with these delicious variations:
Flavor Twists
- Ranch Style: Sprinkle with dried dill, garlic powder, and a touch of buttermilk powder
- BBQ Chips: Mix paprika, brown sugar, garlic powder, and a pinch of cayenne
- Salt and Vinegar: Sprinkle chips with malt vinegar powder after frying
- Truffle Parmesan: Dust with grated parmesan and a tiny sprinkle of truffle salt
Different Potatoes
Try sweet potatoes, Yukon golds, or purple potatoes for colorful and flavorful alternatives.
Baked Version
If you prefer to avoid frying, toss thinly sliced potatoes with a small amount of oil and bake at 400°F until crispy, turning halfway through.
How to Make Crispy Homemade Potato Chips
Step 1: Slice and Soak
Using a mandoline on the thinnest setting, carefully slice your washed and scrubbed russet potatoes. Immediately place the slices in a large bowl of cold water and refrigerate for one hour. This critical soaking step removes excess starch for maximum crispiness.
Step 2: Prepare for Frying
Fill a heavy-bottomed skillet with canola oil to about 1-2 inches deep (or use an electric deep fryer if you have one). Heat the oil to 375°F over medium heat. While the oil heats, remove a small batch of potato slices from the water and thoroughly pat them dry with paper towels.
Step 3: Fry in Batches
Working with about 12 slices at a time, carefully drop the dried potato slices into the hot oil. Watch them closely as they cook quickly! Use tongs to flip them as soon as you see browning beginning—this happens in seconds, not minutes.
Step 4: Drain and Season
Remove the golden chips with tongs and transfer to paper towels to drain excess oil. Immediately sprinkle with kosher salt while they’re still hot—this is when the salt adheres best. Repeat the process with remaining potato slices until all chips are cooked.
Pro Tips for Making the Recipe
- Uniform Slicing: For even cooking, aim for consistent thickness—a mandoline is truly your best friend here.
- Ice Water Soak: For extra crispiness, use ice water for the soaking step to help remove more starch.
- Temperature Control: Maintain 375°F oil temperature throughout cooking—too cool makes greasy chips, too hot risks burning.
- Proper Drying: Take time to thoroughly dry potato slices before frying to prevent dangerous oil splatter and ensure crispy results.
- Work in Small Batches: Overcrowding the pan lowers oil temperature and results in soggy chips.
- Season Immediately: Add salt or seasonings right after removing from oil while the chips are still hot and have a light sheen of oil to help flavors stick.
How to Serve

Homemade potato chips shine in so many settings:
Perfect Pairings
- Serve alongside sandwiches instead of store-bought chips
- Create a gourmet chips and dip platter with homemade French onion dip, guacamole, or salsa
- Use as a base for quick loaded nachos with cheese, bacon bits, and green onions
Presentation Ideas
Display in a large bowl lined with parchment paper for casual snacking, or arrange in individual paper cones for a fun party presentation.
Make Ahead and Storage
Storing Leftovers
Store completely cooled chips in an airtight container at room temperature with a paper towel to absorb moisture. For best crispness, consume within 2-3 days.
Freezing
Unfortunately, potato chips don’t freeze well as they become soggy upon thawing.
Reheating
If chips lose their crispness, place them on a baking sheet in a single layer and warm in a 350°F oven for about 5 minutes.
FAQs
-
Why do my homemade potato chips turn brown?
Browning occurs when the natural sugars in potatoes caramelize during frying. For lighter colored chips, soak the sliced potatoes longer (up to 3 hours), changing the water once or twice to remove more sugars.
-
Can I make these potato chips ahead for a party?
Yes! Make them up to a day ahead, but wait until they’re completely cool before storing in an airtight container. If they lose some crispness, refresh them in a 350°F oven for about 5 minutes before serving.
-
Is it necessary to use a mandoline slicer?
While not absolutely necessary, a mandoline slicer gives you the ultra-thin, uniform slices that are key to perfectly crispy chips. If using a knife, practice getting very thin, consistent slices, though it’s significantly more challenging.
-
What’s the best oil for frying potato chips?
Canola oil is ideal with its high smoke point and neutral flavor, but peanut oil also works excellently. Avoid olive oil, which has too low a smoke point and a strong flavor that can overpower the potatoes.
Final Thoughts
These Crispy Homemade Potato Chips truly bring the humble potato to spectacular heights. There’s something deeply satisfying about transforming a few simple ingredients into something so delicious with your own hands. Whether you’re making them for a special gathering or just treating yourself to an elevated snack, these chips deliver that perfect crunch and fresh potato flavor that store-bought versions can only dream of achieving. Give them a try—I promise the extra effort is worth every crispy, golden bite!
Print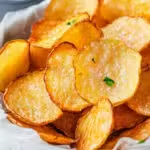
Crispy Homemade Potato Chips Recipe
- Prep Time: 15 minutes
- Cook Time: 8 minutes
- Total Time: 23 minutes
- Yield: 4 servings 1x
- Category: Side-dishes
- Method: Frying
- Cuisine: American
Description
These crispy homemade potato chips are the perfect snack for any occasion! Thinly sliced russet potatoes are soaked, fried to golden perfection, and sprinkled with kosher salt for that classic crunch we all love. With just a few simple ingredients, you can prepare these addictive chips in no time. Great for parties, family snacks, or just indulging in something fresh and homemade.
Ingredients
Potatoes
- 2 pounds medium-sized russet potatoes, washed and scrubbed
Frying
- Canola oil for frying
Seasoning
- Kosher salt, to taste
Instructions
- Slice the potatoes
About an hour before cooking, take a mandoline on the thinnest setting and carefully slice the washed and scrubbed russet potatoes. Aim for even slices to ensure they cook evenly. - Soak the slices
Immediately place the thinly sliced potato rounds into a cold water-filled bowl. Let the bowl sit in the refrigerator for one hour. This step helps remove excess starch and ensures a crispier result. - Heat the oil
Pour canola oil into a heavy-bottom skillet or an electric deep fryer until it’s about 1-2 inches deep. Heat the oil over medium heat until it reaches 375°F (use a kitchen thermometer for accuracy). - Fry the chips
Remove about a dozen potato slices from the water and pat them dry thoroughly with a paper towel. Carefully and quickly place the slices into the hot oil. These cook within seconds, so use tongs to flip each chip as soon as it starts to brown. - Drain and season
With tongs, remove the chips when golden and let them drain on paper towels. Immediately sprinkle them lightly with kosher salt for the best flavor. Repeat the frying process with the remaining slices. - Serve and enjoy
Transfer the chips to a serving bowl, allow them to cool slightly, and enjoy your crispy homemade treat!
Notes
- Feel free to experiment with different potato chip seasonings—paprika, garlic powder, or chili powder work great!
- Always use Russet or baking potatoes for the best texture and flavor.
- Soaking the potatoes for at least 1 hour is crucial to achieve ultimate crispiness.
- A mandoline slicer is highly recommended for thin, even slices.
- Ensure the slices are well dried before frying to prevent oil splatter.
- You can easily double the recipe for larger gatherings or to save some for later.
Nutrition
- Serving Size: 1 Serving
- Calories: 200kcal
- Sugar: 0g
- Sodium: 300mg
- Fat: 9g
- Saturated Fat: 1g
- Unsaturated Fat: 8g
- Trans Fat: 0g
- Carbohydrates: 28g
- Fiber: 2g
- Protein: 3g
- Cholesterol: 0mg


