
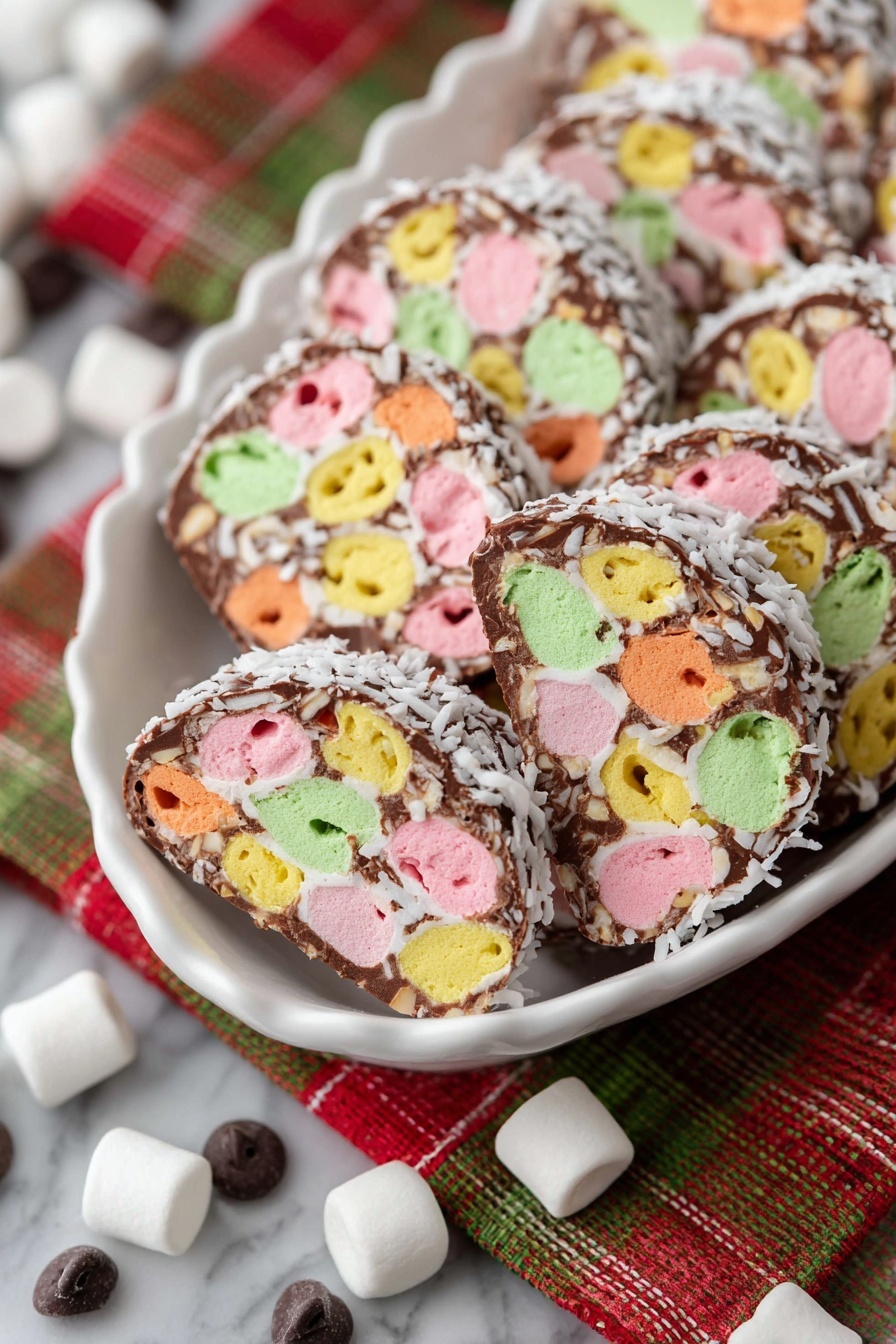
If you’ve never had the joy of biting into a colorful, chewy, and chocolaty Church Window Cookies Recipe, you’re in for a treat today! Church Window Cookies Recipe brings together melty chocolate, vibrant mini marshmallows, toasted coconut, and crunchy walnuts for a nostalgic bite that feels like a warm hug from the holidays. Trust me, once you try this, you’ll want to make it all year round.
Why You’ll Love This Recipe
- No-Bake Ease: You won’t need the oven, which means it’s a perfect last-minute crowd-pleaser.
- Bright & Festive: Those mini marshmallows are like little stained-glass windows that brighten every bite.
- Perfect Make-Ahead Treat: These cookies keep well in the fridge or freezer, making prep super convenient.
- Crunch and Chew Harmony: The combo of walnuts, coconut, and marshmallows creates a delightful texture you’ll want again and again.

Ingredients You’ll Need
The magic here is in the mix of textures and flavors: creamy chocolate, toasty nuts, chewy marshmallows, and sweet coconut. I like to pick good quality chocolate chips because they really shine in this recipe.
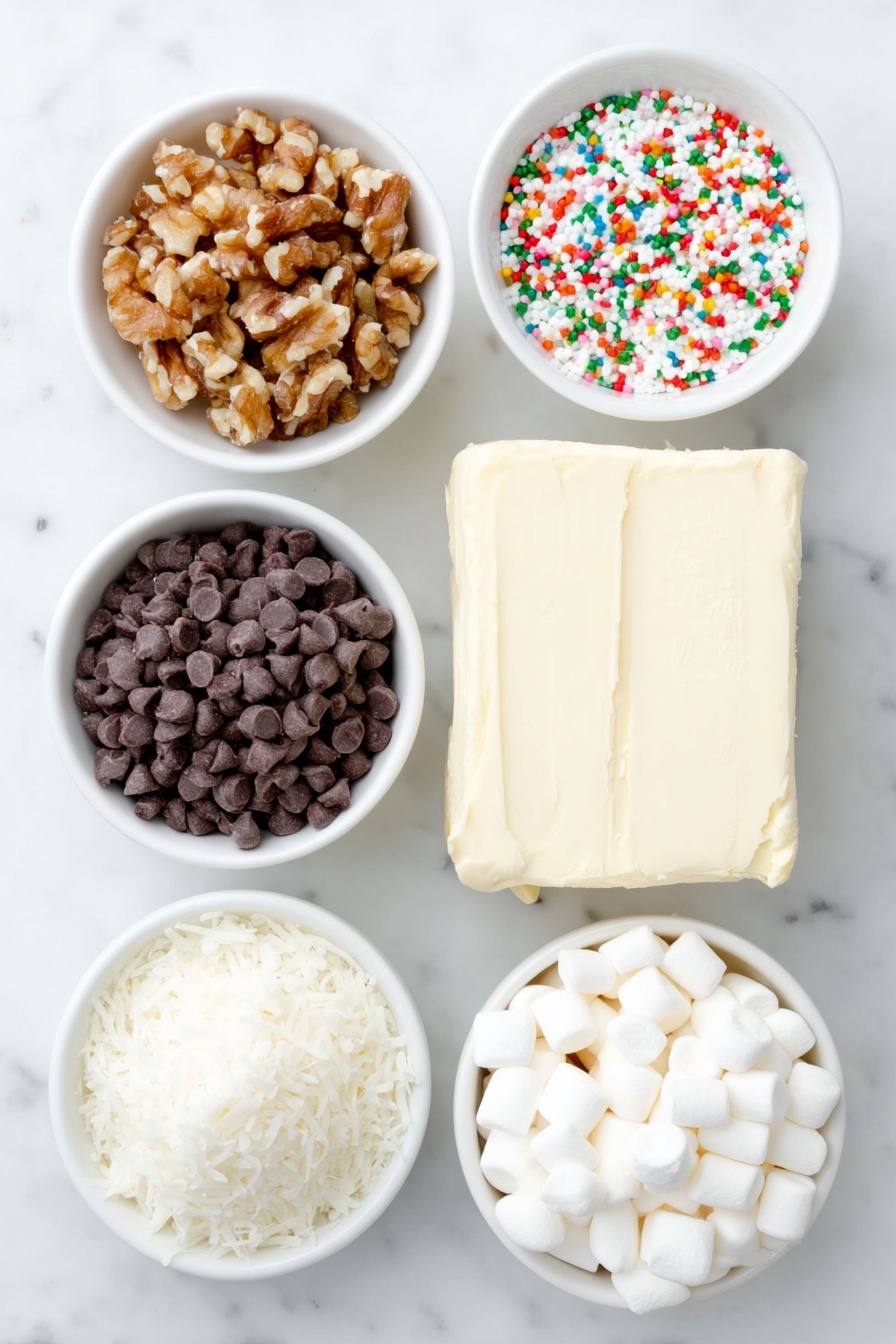
- Unsalted butter: Using unsalted butter lets you control the salt balance perfectly.
- Semi-sweet chocolate chips: These melt beautifully and give just the right sweetness without overpowering.
- Finely diced walnuts: I recommend chopping them small so they incorporate evenly and provide pleasant crunch.
- Sweetened shredded coconut: Adds chewiness and a tropical hint that balances the chocolate nicely.
- Mini multi-colored marshmallows: These are the stars here for the classic “church window” look and extra fun texture.
Variations
One of the reasons I keep coming back to this Church Window Cookies Recipe is how easy it is to customize. Feel free to swap or add nuts, change up the chocolate, or even adapt it for different occasions.
- Nut-Free Variation: When my nephew came to visit with a nut allergy, I swapped walnuts for toasted sunflower seeds, and it still had that wonderful crunch.
- Dark Chocolate Lover’s Version: Using bittersweet or dark chocolate chips ups the richness and makes the sweetness of marshmallows pop even more.
- Add a Citrus Twist: Zesting a little orange or lemon peel into the marshmallow mixture adds a lovely fresh note that pairs beautifully with the coconut.
How to Make Church Window Cookies Recipe
Step 1: Melt the Chocolate and Butter Gently
Start by melting your butter and chocolate chips together in a small pot over low heat. Stir constantly to keep the mixture smooth and to avoid any burning. I learned the hard way that rushing this step can ruin the glossy finish of your logs. Once melted, let it cool for about 5 minutes—too hot and it will melt your marshmallows on contact!
Step 2: Prep Your Rolling Station
While the chocolate cools, set up your workspace by laying two long pieces of plastic wrap on the counter. Sprinkle each generously with shredded coconut. This will keep your logs from sticking and add a great finishing touch. Trust me, this little tip makes rolling much easier!
Step 3: Mix Marshmallows, Walnuts, and Chocolate
Dump the mini marshmallows and chopped walnuts into a large bowl. Pour the cooled chocolate mixture over and stir gently but thoroughly until every marshmallow is deliciously coated. You’ll notice the colors really pop in this step—that’s the “church window” magic coming to life.
Step 4: Shape Into Logs and Chill
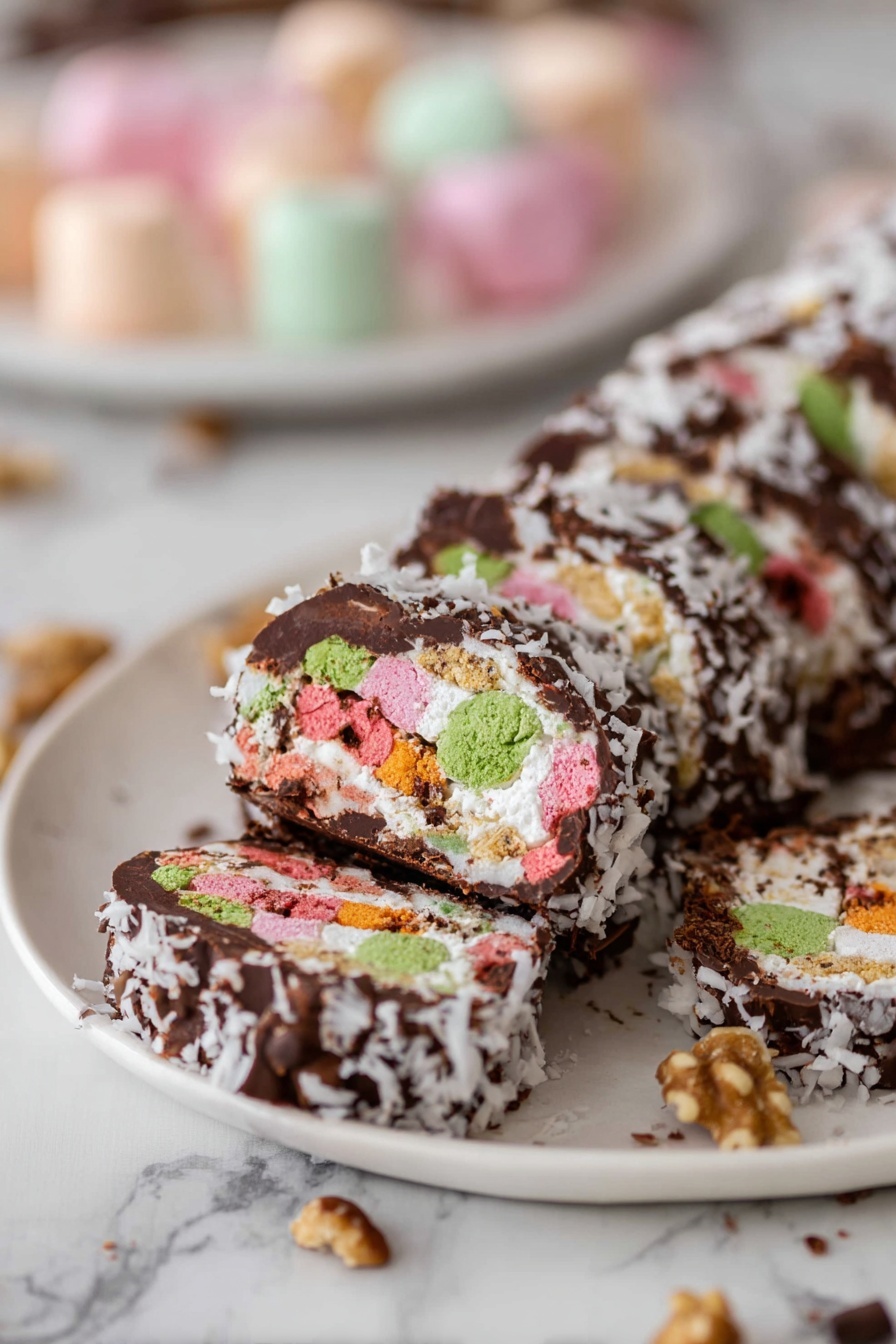
Divide the marshmallow mixture in half, placing each half on the prepared plastic wrap with coconut underneath. Sprinkle a bit more coconut on top before carefully rolling each into a tight, uniform log. Twist the ends of the wrap and secure with tape if needed. Pop these logs into the refrigerator for at least an hour to firm up. This chilling step is key for neat slices later on!
Step 5: Slice and Serve
After chilling, use a serrated knife to slice each log into pretty round cookies. I like cutting them about a half-inch thick, but you can go thinner or thicker depending on your preference. These cookies hold up beautifully and look so festive laid out on a plate.
Pro Tips for Making Church Window Cookies Recipe
- Keep Heat Low When Melting: High heat burns chocolate fast; low and slow is the game-changer here.
- Don’t Skip Cooling Time: Letting the chocolate cool prevents marshmallows from melting prematurely, keeping the texture perfect.
- Divide and Conquer: Splitting the mixture into two logs is easier to handle and creates perfect serving sizes.
- Use Serrated Knife for Clean Cuts: This helps you slice without squashing the logs or making uneven edges.
How to Serve Church Window Cookies Recipe
Garnishes
I like to sprinkle a tiny bit of flaky sea salt on top just before serving—it enhances the chocolate and balances out the sweetness beautifully. Sometimes, a light dusting of powdered sugar adds a snowy festive touch that kids especially adore.
Side Dishes
Church Window Cookies pair wonderfully with a hot cup of coffee or a creamy mug of hot cocoa. They’re also fantastic alongside holiday fruitcake or a platter of fresh berries to cut through the richness.
Creative Ways to Present
For special occasions, I like to slice the logs and arrange the cookies in a circular wreath shape on a festive plate, adding sprigs of fresh rosemary or holly for color and aroma. Another fun trick is to stack a few with a scoop of vanilla ice cream for an indulgent dessert treat!
Make Ahead and Storage
Storing Leftovers
I usually wrap the whole log tightly in plastic wrap and stash it in the fridge—it keeps nicely for up to a week. I recommend slicing only when you’re ready to serve, so the marshmallow stays perfectly chewy and fresh.
Freezing
If you want to keep these treats around longer, freezing works great too! I wrap the whole log in plastic and pop it in a freezer bag. When ready, just thaw it overnight in the fridge. Alternatively, slice the cookies first, wrap small batches, and freeze individual cookies for convenient snacking later on.
Reheating
Since these cookies are no-bake, reheating isn’t really necessary. But if the chocolate firms up too much in the fridge, letting the cookies sit at room temperature for 10 minutes softens them back up nicely before serving.
FAQs
-
Can I use other nuts instead of walnuts in the Church Window Cookies Recipe?
Absolutely! Pecans, almonds, or even hazelnuts work wonderfully and just shift the flavor slightly. If you want to avoid nuts altogether, sunflower seeds or pumpkin seeds are good crunchy alternatives.
-
What’s the best way to melt the chocolate and butter without burning?
Use a small saucepan over the lowest heat setting and stir constantly. You can also melt the mixture in short bursts in the microwave, stirring every 20 seconds. Patience is key to keeping the chocolate smooth and glossy.
-
How long do Church Window Cookies last?
Once chilled and stored properly wrapped in the fridge, these cookies last about one week. For longer storage, keep them frozen for up to a month and thaw before serving.
-
Can I use different marshmallows or colors?
Definitely! Mini marshmallows in any color or mix will work, so feel free to customize for holidays or themes. Just make sure they’re mini sized for the classic look and texture.
-
Is this recipe kid-friendly for helpers?
Yes! Kids love stirring the marshmallows with chocolate and rolling the logs. Just handle the melting step yourself, and then let the little ones help with mixing and shaping.
Final Thoughts
I absolutely love how this Church Window Cookies Recipe brings me back to cozy family gatherings and festive vibes. It’s one of those recipes that’s easy enough for a weeknight snack but special enough to impress guests. Give this a try—you’re going to adore the sweet, chewy, crunchy mix and those pops of colorful marshmallow. Trust me, once you make these, they become a go-to favorite in your cookie rotation too!
Print
Church Window Cookies Recipe
- Prep Time: 10 minutes
- Cook Time: 5 minutes
- Total Time: 1 hour 15 minutes
- Yield: 24 cookies 1x
- Category: Dessert
- Method: No-Cook
- Cuisine: American
- Diet: Vegetarian
Description
Church Window Cookies are a delightful no-bake treat combining melted chocolate, mini marshmallows, walnuts, and shredded coconut, rolled into festive logs and sliced into colorful, chewy cookies. These easy-to-make cookies are perfect for holiday gatherings or anytime you want a fun and quick dessert.
Ingredients
Chocolate Mixture
- ½ cup (113g) unsalted butter, 1 stick
- 12 oz (340g) semi-sweet chocolate chips, 2 cups
Mix-ins
- 1 cup (113g) finely diced walnuts
- 1 bag (287g) mini multi colored marshmallows, 10 oz
Rolling Station
- 1 ½ cups (128g) sweetened shredded coconut (divided)
Instructions
- Melt Chocolate and Butter: In a small pot over low heat on the stove, melt the butter and semi-sweet chocolate chips together, stirring frequently until the mixture is smooth and fully melted. Remove from heat and allow the chocolate to cool for 5 minutes before proceeding.
- Prepare Rolling Station: Lay two long pieces of plastic wrap or wax paper flat on your countertop. Sprinkle each piece generously with shredded coconut, reserving some coconut for later use.
- Mix Ingredients: In a large mixing bowl, combine the mini marshmallows and finely diced walnuts. Pour the slightly cooled melted chocolate over this mixture and stir well to evenly coat everything.
- Form Logs: Divide the marshmallow mixture in half and place each half onto the coconut-covered plastic wrap pieces, shaping them into rough log shapes.
- Roll and Wrap: Sprinkle the reserved shredded coconut on top of each log. Using the plastic wrap, carefully roll each log into a uniform, tightly wrapped cylinder. Twist the ends of the plastic wrap and secure with small pieces of tape to keep the logs sealed.
- Chill and Slice: Refrigerate the wrapped logs for at least 1 hour to firm up. When firm, unwrap and use a serrated knife to cut the logs into individual cookie slices. Serve and enjoy!
Notes
- Use low heat when melting the chocolate and butter, stirring frequently to prevent burning.
- Allow the melted chocolate to cool slightly before mixing with marshmallows to avoid melting them.
- Dividing the mixture into two logs makes it easier to roll and handle.
- Wrap the logs tightly with plastic wrap or wax paper to maintain shape during chilling.
- Storage: Wrap the entire log in plastic wrap and refrigerate for up to 1 week. Do not pre-slice until ready to serve.
- Freezing Logs: Wrap tightly and freeze for up to 1 month; thaw overnight in the refrigerator.
- Freezing Cookies Slices: Slice the cookies, bundle 3-4 cookies together, wrap in plastic wrap, and freeze in a ziplock bag for up to 1 month. Thaw in the fridge overnight before serving.
Nutrition
- Serving Size: 1 cookie
- Calories: 150
- Sugar: 15g
- Sodium: 30mg
- Fat: 9g
- Saturated Fat: 5g
- Unsaturated Fat: 3g
- Trans Fat: 0g
- Carbohydrates: 18g
- Fiber: 2g
- Protein: 2g
- Cholesterol: 20mg


