
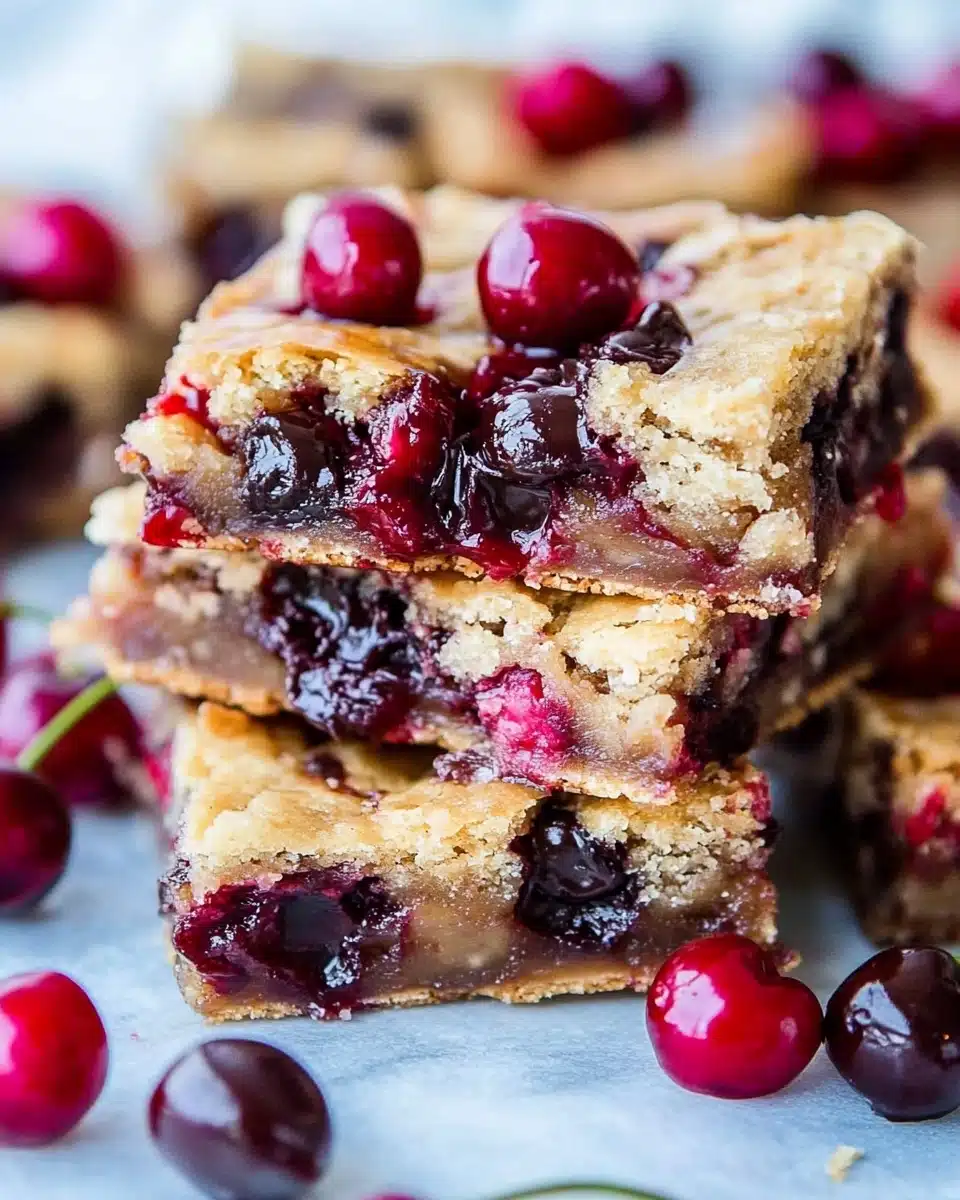
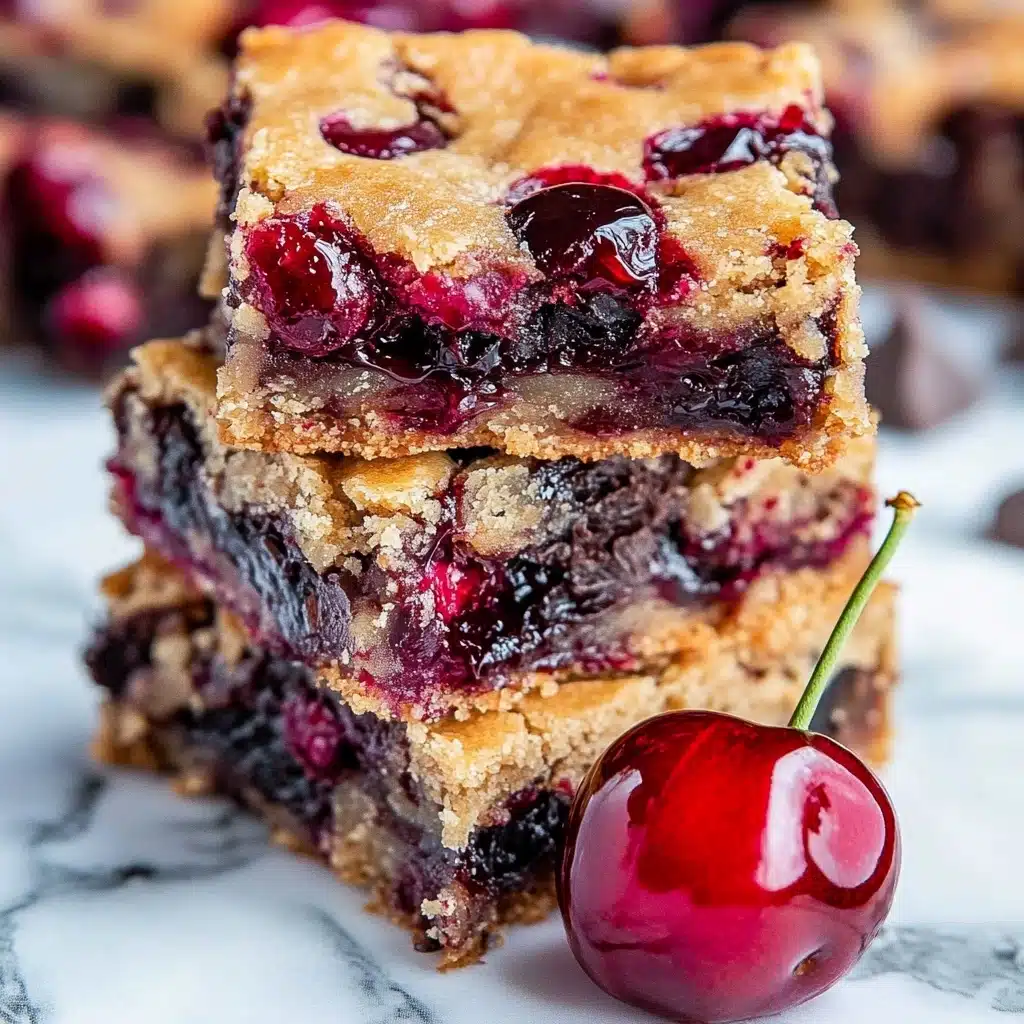
If you love the combination of rich chocolate and juicy fruit, you’re about to fall head over heels for these Chocolate Chip Cherry Bars! Imagine soft, buttery bars studded with pockets of melted chocolate chips and sweet, plump cherries—a treat that is every bit as delightful to make as it is to devour.
Why You’ll Love This Recipe
- Unbeatable Flavor Combo: The bursts of cherry and melty chocolate chips make these bars completely irresistible—each bite is a blend of fruity and chocolatey heaven!
- Ridiculously Easy: No mixer required, just one bowl and a spatula stand between you and a tray of warm, chewy Chocolate Chip Cherry Bars.
- Perfect for Any Occasion: Whether you want a packed lunch treat, a picnic dessert, or a sweet ending to family dinner, these bars are always a crowd-pleaser.
- Customizable and Versatile: This recipe adapts wonderfully to your favorite chocolate chips, cherry varieties, or even fun add-ins for your own signature twist.

Ingredients You’ll Need
There’s something magical about how just a handful of pantry staples turn into something so indulgent and beautiful. Each ingredient in these Chocolate Chip Cherry Bars brings its own little bit of magic—enhancing texture, flavor, and the irresistible gooeyness factor.
- Unsalted Butter (½ cup, melted): Melted butter guarantees a moist, tender crumb and rich flavor in each bite.
- Light Brown Sugar (1 cup, packed): Adds caramel notes and chewiness, making every bar taste like a bakery treat.
- Large Egg (1): Gives the bars structure and helps them hold together without being dry.
- Vanilla Extract (2 teaspoons): That deep, warm vanilla aroma lifts and enhances the chocolate-cherry duo.
- All-Purpose Flour (1 cup): The base that ties it all together, just enough to keep things cakey but never dense.
- Salt (¼ teaspoon, optional): Just a pinch really brings out the chocolate and cherry flavors—don’t skip it if you enjoy a bit of contrast!
- Semi-Sweet Chocolate Chips (¾ to 1 cup): Rich, melty chocolate in every single bite—use the full cup if you love lots of gooeyness.
- Cherries (1 cup, fresh or frozen): The star ingredient! Use what you have on hand; no need to halve, just toss them in for juicy pops of color and flavor.
Variations
The best part about making Chocolate Chip Cherry Bars at home is how easily you can adjust them for your mood, available ingredients, or dietary needs. Get creative and make them your own—because sometimes, the best treats are the ones with a personal twist!
- White Chocolate Cherry Bars: Swap the semi-sweet chocolate chips for white chocolate chips for a creamy, dreamy flavor contrast.
- Nutty Crunch: Fold in a handful of chopped pecans or walnuts for extra texture and nutty depth.
- Gluten-Free Version: Use a cup-for-cup gluten-free flour blend to keep things friendly for everyone at the table.
- Dried Fruit Swap: If cherries aren’t in season, try dried cherries or even cranberries for a sweet-tart twist.
How to Make Chocolate Chip Cherry Bars
Step 1: Prepare Your Pan
Start by preheating your oven to 350°F. Line an 8-by-8-inch baking pan with aluminum foil and give it a quick spray with cooking spray. This makes removal (and cleanup!) a breeze later on—plus, you’ll get those gorgeous clean edges when you slice your bars.
Step 2: Melt and Mix
Pop your butter into a microwave-safe bowl and melt it (about 60 seconds is all it takes). Stir in the light brown sugar while the butter is still warm—this helps it dissolve and creates that signature caramelized flavor base.
Step 3: Build the Batter
Add the egg and vanilla extract to your buttery sugar blend, gently stirring until smooth. Then add your flour and salt, folding just until everything is barely combined—don’t over-mix or your bars may turn out tough instead of chewy.
Step 4: Fold In the Good Stuff
Here’s where the magic happens: fold in the chocolate chips and those plump, gorgeous cherries. Leave the cherries whole for big, juicy bites in every bar. Carefully spread your thick batter into the prepared pan, smoothing the top if needed.
Step 5: Bake and Cool
Bake for 27 to 32 minutes, or until the center is set and the edges just begin to pull away from the pan. Patience is key—let the bars cool for about an hour before slicing. This sets the texture and keeps everything fudgy and perfect.
Pro Tips for Making Chocolate Chip Cherry Bars
- Chill Out for Perfect Slices: Letting the bars cool completely before cutting is crucial for clean, bakery-worthy edges—if you slice too soon, they’ll be gooey (delicious, but tricky to serve!).
- Fresh vs. Frozen Cherries: If using frozen cherries, don’t thaw—toss them in straight from the freezer to avoid extra moisture turning your bars soggy.
- Gentle Mixing is Key: Over-mixing the batter creates tough bars. Stir just until the flour disappears for a soft, melt-in-your-mouth texture.
- Go All-Out With Add-Ins: For extra fun, sprinkle a few extra chocolate chips and cherries on top before baking for an even more tempting presentation.
How to Serve Chocolate Chip Cherry Bars
Garnishes
For the prettiest bars, dust them lightly with powdered sugar once cooled, or drizzle a little melted chocolate over the top. Adding a sprinkle of flake sea salt before baking also makes those chocolate and cherry flavors pop even more!
Side Dishes
Chocolate Chip Cherry Bars shine most when paired with creamy vanilla ice cream or a dollop of whipped cream. If you’re serving these at a brunch, set out fresh berries or a fruit salad for a lovely, fresh contrast.
Creative Ways to Present
Cut the bars into bite-size squares and thread them onto skewers with fresh cherries for a playful dessert platter. Or, serve larger bars warm in a bowl and top with a scoop of your favorite ice cream for a decadent sundae-style treat. Stack them high on a pretty cake stand for bake sale bliss!
Make Ahead and Storage
Storing Leftovers
Store your leftover bars in an airtight container either at room temperature or in the fridge—they’ll stay perfectly fresh and soft for up to a week. If stacking, place parchment between layers to keep them looking bakery-fresh.
Freezing
Chocolate Chip Cherry Bars freeze beautifully! Wrap each bar tightly in plastic or stack with parchment in a freezer bag. They’ll stay delicious for up to three months—ideal for impromptu snack cravings.
Reheating
To enjoy bars warm, simply pop one into the microwave for about 10-15 seconds. If you’ve frozen them, let the bars thaw at room temperature or gently warm in a low oven for that just-baked feeling.
FAQs
-
Do I need to thaw frozen cherries before adding them to the batter?
No need to thaw! Add frozen cherries directly to the batter—this keeps them juicy but prevents any excess liquid from making your bars soggy.
-
Can I double the recipe for a 9×13-inch pan?
Absolutely! Double all the ingredients and bake in a 9×13-inch pan. Keep an eye on the baking time—start checking around the 35-minute mark for doneness.
-
Can I substitute other fruits for cherries in these bars?
Yes! Blueberries, raspberries, or even diced strawberries can be wonderful substitutes. Just be mindful that juicier fruits may change the texture a bit.
-
Why did my Chocolate Chip Cherry Bars turn out cakey instead of chewy?
This usually means the batter was over-mixed or baked for too long. Next time, mix just until combined and pull them out of the oven as soon as the center is set for that perfect chewy texture.
Final Thoughts
I truly hope you’ll give these Chocolate Chip Cherry Bars a try soon—there’s nothing quite as comforting as the scent of cherries and chocolate baking together. Whether you’re sharing, gifting, or keeping them all to yourself, these bars promise a little bite of happiness in every square. Happy baking!
Print
Chocolate Chip Cherry Bars Recipe
- Prep Time: 10 minutes
- Cook Time: 30 minutes
- Total Time: 1 hour
- Yield: 9 bars 1x
- Category: Dessert
- Method: Baking
- Cuisine: American
- Diet: Vegetarian
Description
Indulge in these decadent Chocolate Chip Cherry Bars, a delightful combination of sweet cherries and rich chocolate chips in a buttery blondie base. Perfect for any occasion!
Ingredients
For the Bars:
- 1/2 cup unsalted butter, melted (1 stick)
- 1 cup light brown sugar, packed
- 1 large egg
- 2 teaspoons vanilla extract
- 1 cup all-purpose flour
- 1/4 teaspoon salt (optional)
- 3/4 to 1 cup semi-sweet chocolate chips
- 1 cup cherries, fresh or frozen*
Instructions
- Preheat the oven: Preheat the oven to 350°F. Line an 8-by-8-inch pan with aluminum foil and spray with cooking spray; set aside.
- Melt the butter: In a medium microwave-safe bowl, melt the butter for about 60 seconds.
- Mix the ingredients: Add the brown sugar to the melted butter and stir to combine. Add the egg and vanilla, mix well. Stir in the flour and salt until just combined.
- Add the mix-ins: Fold in the chocolate chips and cherries. Pour the batter into the prepared pan, smoothing the top.
- Bake: Bake for 27 to 32 minutes, until the edges pull away slightly and the center is set.
- Cool and serve: Let the bars cool for at least 1 hour before slicing. Store in an airtight container or freeze for later enjoyment.
Notes
- You can use either fresh or frozen cherries for this recipe.
- Do not overmix the batter to keep the blondies tender.
Nutrition
- Serving Size: 1 bar
- Calories: 290
- Sugar: 24g
- Sodium: 115mg
- Fat: 15g
- Saturated Fat: 9g
- Unsaturated Fat: 5g
- Trans Fat: 0g
- Carbohydrates: 37g
- Fiber: 1g
- Protein: 3g
- Cholesterol: 44mg

