
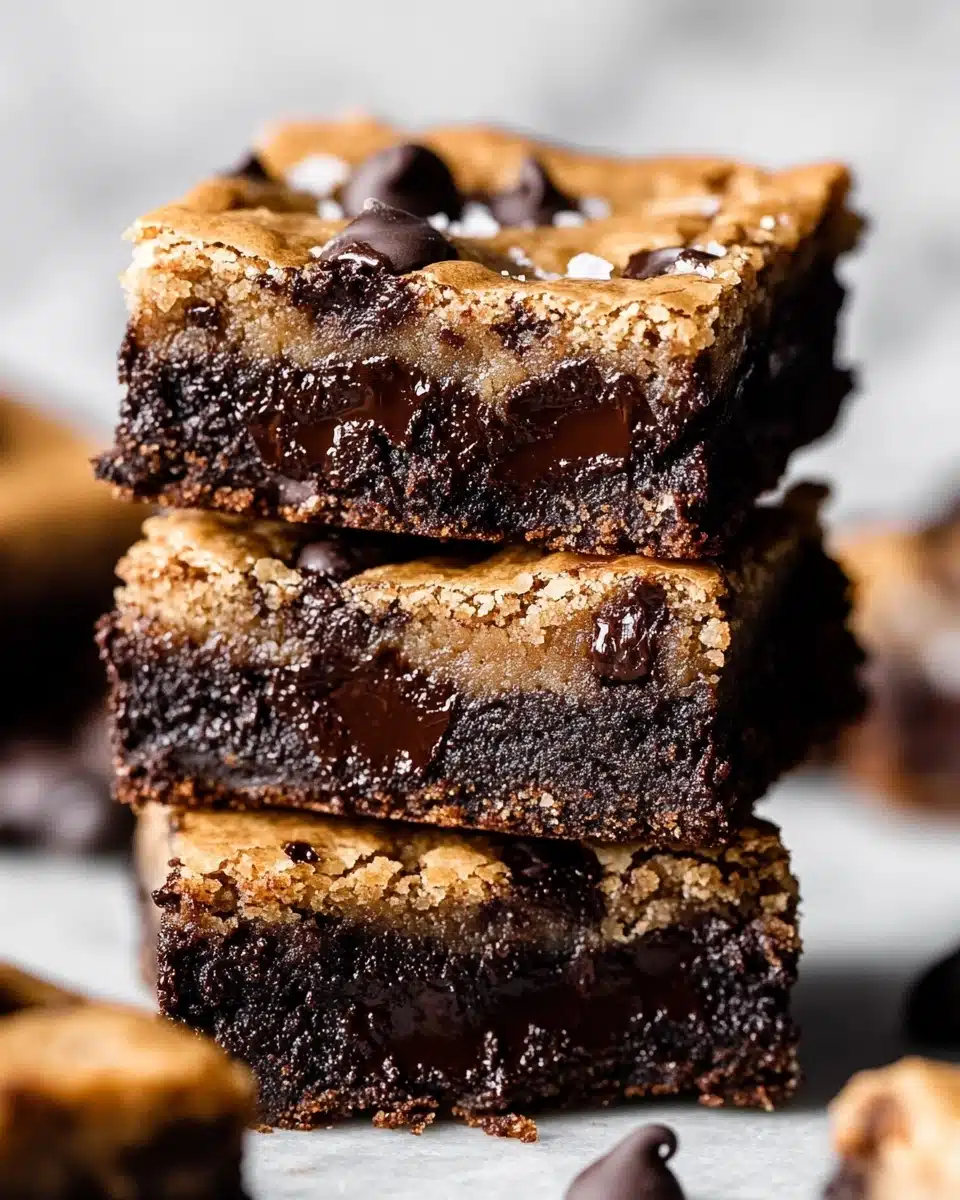
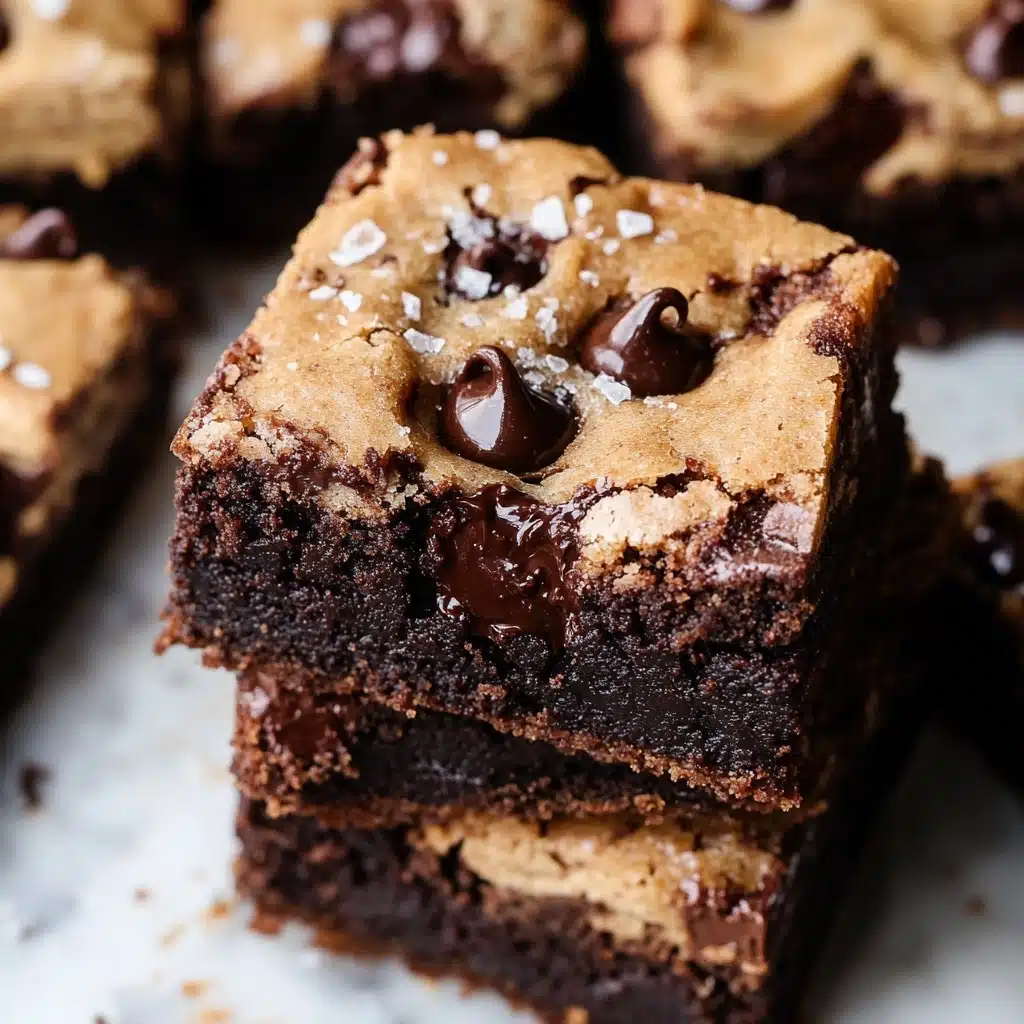
If you’ve ever faced the impossible choice between fudgy brownies and chewy chocolate chip cookies, these Brown Butter Brookies are your heavenly solution. Marrying the nutty richness of browned butter with two classic treats, this bar dessert offers the best of both worlds in every bite—crisp edges, melt-in-your-mouth centers, and swirls of chocolate. Trust me, you’ll want to make a double batch!
Why You’ll Love This Recipe
- A Two-in-One Treat: Why choose between brownies or cookies when you can have both in every spectacular bite?
- Deep, Nutty Flavor: Brown butter amplifies everything, crafting a truly unforgettable, rich flavor you’ll crave again and again.
- That Perfect Texture: The combo of fudgy brownies and chewy cookies means edges are crunchy, and centers are irresistibly soft and melty.
- Crowd-Pleasing (& Make-Ahead Friendly!): Brown Butter Brookies slice beautifully for parties, lunches, or late-night snacking, and store incredibly well.

Ingredients You’ll Need
The ingredient list for Brown Butter Brookies may look a little longer at first glance, but every staple here works overtime—giving us that irresistible chewy bite, melting pockets of chocolate, and deep caramel notes. Each addition brings its own magic, so don’t skip the details!
- Salted Butter: Used in both layers—brown it for the brownies and melt it for the cookies to add nutty, toasty undertones you just can’t fake.
- Dark Brown Sugar: For the cookies, this gives extra moisture and caramel flavor that keeps them chewy.
- Granulated Sugar: Essential for both softness and getting that signature shiny brownie top.
- Eggs & Egg Yolk: Help everything bind together and create tender, rich results; don’t skip bringing them to room temperature!
- Vanilla Extract: Heightens all the flavors, tying together the chocolate, butter, and sugar into a harmonious bite.
- All-Purpose Flour: Provides structure to both doughs—be sure to measure it carefully for the perfect texture.
- Baking Soda & Baking Powder: Added to the cookies for just the right lift and chewiness.
- Salt: Don’t underestimate what a little bit of salt does—it keeps things from tasting flat!
- Chocolate Chips & Chopped Chocolate: Mix of chips and chunks melts in different ways so every bite is a surprise of gooey chocolate.
- Semi-Sweet Chocolate: For melting into the brownies, delivers that classic, rich chocolate flavor.
- Vegetable Oil: Helps brownies stay extra fudgy and soft even after cooling.
- Cocoa Powder: Intensifies the brownie’s chocolate punch—use a good quality, unsweetened powder for best results.
- Powdered Sugar: Creates extra tender brownies with that melt-in-your-mouth crumb.
- Espresso Powder (Optional): Just a pinch wakes up the chocolate and enhances depth, but it’s subtle—not coffee-flavored.
- Flaky Sea Salt (Optional): Sprinkled on top takes the whole pan to gourmet bakery status.
Variations
One of the things I adore most about Brown Butter Brookies is how easily they bend to your cravings or pantry surprises—feel free to get creative! Whether you need to go gluten-free or want to toss in extra mix-ins, there are loads of ways to make this treat your own.
- Peanut Butter Twist: Swirl a few tablespoons of peanut butter between the layers or add peanut butter chips for that classic brookie upgrade.
- Gluten-Free Makeover: Substitute a quality 1:1 gluten-free baking flour for the all-purpose and enjoy with zero compromise on texture.
- All the Add-Ins: Stir in white chocolate chips, chopped nuts, or even toffee bits for crunch and extra flavor bursts.
- Vegan Adaptation: Use your favorite vegan butter, plant-based egg replacement, and dairy-free chocolate to craft an indulgent vegan treat.
How to Make Brown Butter Brookies
Step 1: Prep Your Pan and Oven
Get started by preheating your oven to 350°F (175°C), then giving a sturdy 9×13 metal pan a good spray of nonstick spray. Line it with parchment paper, leaving an overhang on the sides—it makes lifting out and slicing your brookies later an absolute breeze.
Step 2: Make the Chocolate Chip Cookie Dough
Melt your butter and whisk it with both sugars to combine. Add the eggs and vanilla, mixing until smooth. Then, gently stir in the dry ingredients until just combined, followed by plenty of chocolate chips. Divide the dough in half—one half will form a perfect chewy layer, the other gets dolloped on top for those irresistible cookie islands.
Step 3: Brown the Butter for Brownies
In a saucepan over medium heat, brown your butter. Watch closely as it sizzles, foams, and finally turns a gorgeous golden color, releasing a nutty, irresistible aroma. This step is what really sets Brown Butter Brookies apart—don’t rush it! Let it cool just slightly so you don’t scramble the eggs later.
Step 4: Whip Up Fudgy Brownie Batter
Stir the warm brown butter into your chopped chocolate until melted, then whisk in oil and cocoa powder. In a separate bowl, whip eggs and sugars till the mixture is glossy and the sugar is dissolved. Blend the two together, then fold in flour, optional espresso powder, and more chocolate chips for pools of melted goodness. Your batter will be thick and decadent!
Step 5: Assemble the Layers
Layer a generous amount of brownie batter in the pan first. Next, place the pressed-out sheet of cookie dough over the brownie layer. Top with the rest of the brownie batter, then add thick discs of remaining cookie dough, leaving some brownie peeking through for maximum marbled effect. For extra wow-factor, press extra chocolate chips into any cookie-dough bare spots.
Step 6: Bake to Perfection
Slide the pan into the oven and bake for 38–44 minutes. Keep an eye out—the brownies should have shiny, crackly tops and the cookies should look golden. A toothpick inserted into a brownie spot should come out with moist crumbs, not liquid batter. Let your Brown Butter Brookies cool in the pan for at least an hour before slicing (torturous, I know, but so worth it!).
Pro Tips for Making Brown Butter Brookies
- Master Your Brown Butter: Keep a close watch when browning butter; swirl the pan and remove from heat as soon as you smell a toasted, nutty aroma, as it can go from golden to burned quickly.
- Don’t Overmix: When combining the dry ingredients and chocolate chips, fold gently—overmixing can lead to tough cookies and brownies.
- Chill Time for Ultra-Clean Slices: Letting your Brown Butter Brookies cool completely (even popping in the fridge for 30 minutes) makes for picture-perfect bars that don’t fall apart.
- Underbake for Magic: Pull the pan when edges are set but centers are just slightly gooey—brookies firm as they cool, giving you that dreamy, fudge-meets-cookie bite.
How to Serve Brown Butter Brookies
Garnishes
A light sprinkle of flaky sea salt makes the chocolate flavors in your Brown Butter Brookies pop, adding a little sparkle and intrigue to every bite. For even more wow, dust with a touch of powdered sugar once cooled or drizzle with warm melted chocolate right before serving.
Side Dishes
For a truly decadent dessert plate, serve these brookies with a scoop of vanilla or caramel ice cream—cold and creamy against warm, gooey bars is pure bliss! They’re also dreamy alongside fresh berries or a mug of hot cocoa for an ultimate treat-yourself moment.
Creative Ways to Present
Turn your Brown Butter Brookies into instant party stars by stacking sliced bars on a cake stand for a rustic, bakery-style display. For special occasions, cut into mini squares and tuck into gift boxes lined with parchment, or use cookie cutters to make heart or star shapes for fun celebrations!
Make Ahead and Storage
Storing Leftovers
Brookie leftovers stay fabulous for days! Once fully cooled, store your bars in an airtight container at room temperature—they’ll be chewy and delicious for 3–4 days (if they last that long!).
Freezing
Want to stash some for future cravings or easy entertaining? Brown Butter Brookies freeze beautifully. Wrap cooled bars individually in plastic wrap, then pop into a freezer bag for up to 2 months. Thaw at room temp or microwave for a warm, gooey treat on demand.
Reheating
Absolutely heat them up for that fresh-from-the-oven effect! Pop a bar into the microwave for 10–15 seconds for reclaimed gooeyness and melty chocolate, or warm in a low oven for a few minutes if treating a crowd.
FAQs
-
Can I make Brown Butter Brookies without nuts or with different kinds of chips?
Absolutely! This recipe is completely nut-free as written, but feel free to swap in white chocolate, milk chocolate, or even butterscotch chips to mix up the flavor profile—or toss in pecans or walnuts for a classic twist.
-
Why do my brookies turn out dry or crumbly?
This usually means they’ve been overbaked or had too much flour added. Make sure to measure flour with the spoon-and-level method or by weight, and pull the brookies from the oven when a toothpick comes out with moist crumbs (not dry!).
-
Do I need to chill the dough or batter before baking?
No chilling required! You can go straight from mixing to assembling to baking, which makes these Brown Butter Brookies a perfect last-minute treat when you need something impressive without the wait.
-
What if I don’t have espresso powder—do I need it?
Espresso powder is totally optional. It won’t make your brookies taste like coffee, but it does boost the chocolate notes. If you don’t have any, just skip it—your bars will still be decadent and irresistible!
Final Thoughts
Once you’ve tried these Brown Butter Brookies, don’t be surprised if you start inventing reasons to bake a batch—just to share a sweet moment with friends, or sneak an extra bar for yourself. They’re playful, wildly delicious, and downright impossible to resist. Give them a try and get ready to fall in love with your new favorite treat!
Print
Brown Butter Brookies Recipe
- Prep Time: 35 minutes
- Cook Time: 40 minutes
- Total Time: 1 hour 15 minutes
- Yield: 16 to 24 bars 1x
- Category: Baking
- Method: Oven
Description
Brown Butter Brookies are the ultimate dessert mashup combining the best of both worlds – chocolate chip cookies and brownies. These decadent bars feature layers of chewy chocolate chip cookie dough sandwiched between rich, fudgy brownies, creating a delightful treat for any occasion.
Ingredients
For the Chocolate Chip Cookies:
- 14.5 tbsp salted butter (206 grams)
- 3/4 cup dark brown sugar, packed (163 grams)
- 3/4 cup granulated sugar (156 grams)
- 2 large eggs, at room temperature
- 1 and 1/2 tsp vanilla extract
- 3 cups all-purpose flour, spooned & leveled or weighed out (390 grams)
- 1 tsp baking soda
- 1 tsp baking powder
- 1/2 tsp salt
- 1 and 1/2 cups chocolate chips
For the Brownies:
- 3/4 cup salted butter, cubed (170 grams before browning, 140 grams after)
- 4 ounces semi-sweet chocolate, chopped
- 1/4 cup vegetable oil (56 mL)
- 3/4 cup cocoa powder (63 grams)
- 3 large eggs, at room temperature
- 1 large egg yolk, at room temperature
- 3/4 cup granulated sugar (158 grams)
- 1 and 1/2 cups powdered sugar (174 grams)
- 2 tsp vanilla extract
- 1/4 tsp salt
- 1/2 cup all-purpose flour (65 grams)
- pinch of espresso powder (optional)
- 1 cup semi-sweet chocolate chips
For Topping:
- flaky sea salt (optional)
Instructions
- Prep: Preheat your oven to 350℉. Spray a 9×13 metal pan with nonstick spray and line with parchment paper (this makes for easy removal & slicing later).
- Make the Chocolate Chip Cookie Dough: Melt the butter in a large mixing bowl. Whisk in the sugars. Add the eggs and vanilla, and whisk until smooth and combined, about 30-45 seconds. Stir in the dry ingredients, then the chocolate chips or chunks last. Divide the dough into two equal halves (about 640 grams each). Press half of the dough into the prepared pan, then lift out that piece of parchment paper and replace with a new piece. Set your layer of cookie dough aside and leave the rest in the bowl for later.
- Brown the Butter: Add cubed butter to a medium saucepan over medium heat. Melt the butter, stirring occasionally. Once it’s melted, turn the heat to medium-low, and continue cooking the butter, stirring frequently. The butter will get foamy and bubbly, then turn a deep golden shade with a nutty, caramely aroma. (This will take about 3-6 minutes once the butter has melted.)
- Make the Brownie Batter: Once the butter is browned, stir in your semi-sweet chocolate until completely melted, then whisk in the vegetable oil and cocoa powder. Set aside to cool slightly. In a large mixing bowl, add the eggs, egg yolk, and granulated sugar. Whisk for about 1-2 minutes, until the sugar is fully dissolved. Next, whisk in the powdered sugar, vanilla, and salt. Then, check that the chocolate mixture is no longer piping hot (it will be quite warm, though), and whisk it into the bowl of eggs/sugar/. Fold in the flour & espresso powder, then the chocolate chips.
- Assemble: Spread slightly more than half the brownie batter in the bottom of your lined 9×13 pan. Lay the sheet of cookie dough on top of this, removing that extra piece of parchment paper. Spread the remaining brownie batter on top. Form large, thick discs with the remaining cookie dough and set on top of the batter. Press extra chocolate chips into any bare spots on the cookie dough if desired.
- Bake: Bake the assembled brookies for 38 to 44 minutes. The cookies will be golden and the brownies will have a shiny top. A toothpick inserted into the center of a brownie spot will have some moist crumbs, but not wet batter. Do not over bake!
- Serve & Store: Allow bars to cool in the pan on a wire rack for about 1 – 2 hours before slicing and serving. Sprinkle with flaky sea salt, if desired! Store leftover bars, cooled, in an airtight container at room temperature for 3-4 days. I highlyyy recommend warming leftover slices back up in the microwave.
Nutrition
- Serving Size: 1 bar
- Calories: Approximately 350 kcal
- Sugar: Approximately 20g
- Sodium: Approximately 200mg
- Fat: Approximately 18g
- Saturated Fat: Approximately 9g
- Unsaturated Fat: Approximately 7g
- Trans Fat: 0g
- Carbohydrates: Approximately 45g
- Fiber: Approximately 2g
- Protein: Approximately 5g
- Cholesterol: Approximately 60mg

