
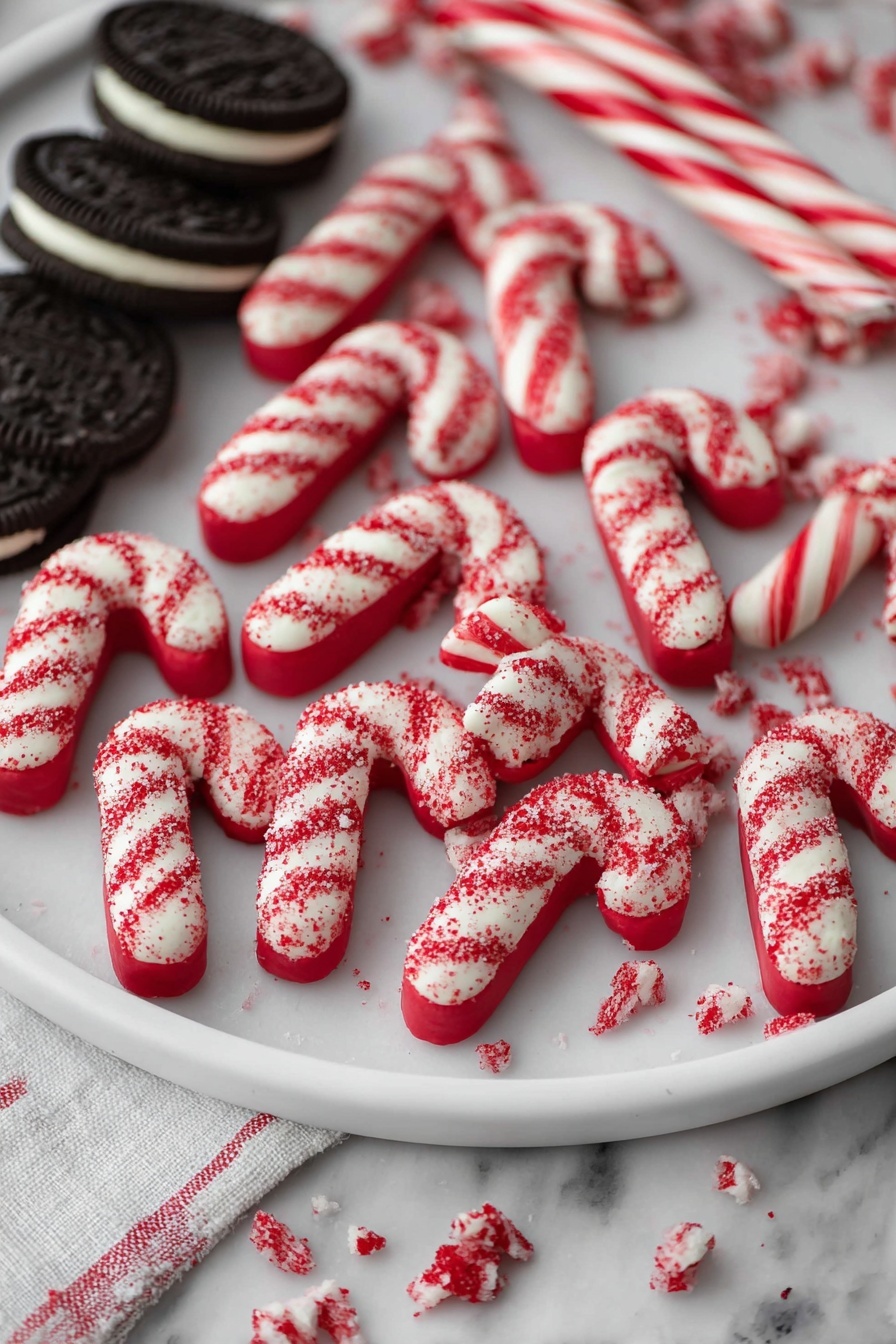
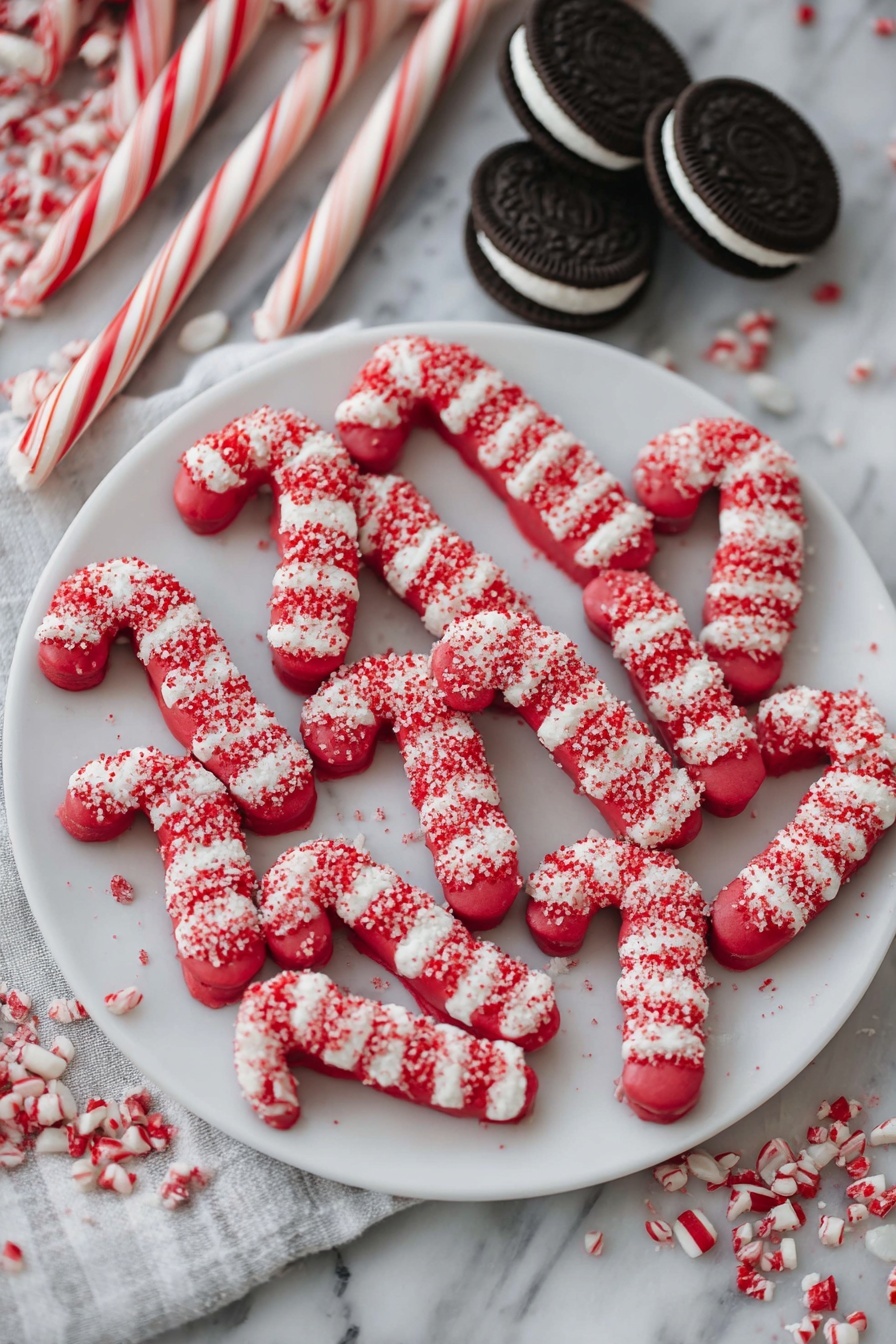
If you’re on the hunt for a festive, melt-in-your-mouth treat, this Candy Cane Oreo Balls Recipe is absolutely worth making. I love this because it’s super fun to make, kid-friendly, and makes an eye-catching holiday dessert that everyone raves about. Stick around—I’ll walk you through everything so your Candy Cane Oreo Balls turn out perfect every time!
Why You’ll Love This Recipe
- Easy & Quick: You just need a few simple ingredients and basic kitchen tools to whip these up.
- Festive & Fun: The candy cane shape and red coating scream holiday cheer and brighten any dessert table.
- Perfectly Balanced Flavors: The chocolatey Oreo crumbs and creamy frosting center combine beautifully with the sweet, crisp candy coating.
- Great Make-Ahead Treat: You can prep these a day or two ahead and keep them chilled until party time.

Ingredients You’ll Need
I love how uncomplicated the ingredients are here—you likely have most of these on hand, especially if you keep Oreos stocked during the holidays. The cream cheese adds that luscious richness, and the red candy melts make these look super festive without much effort.
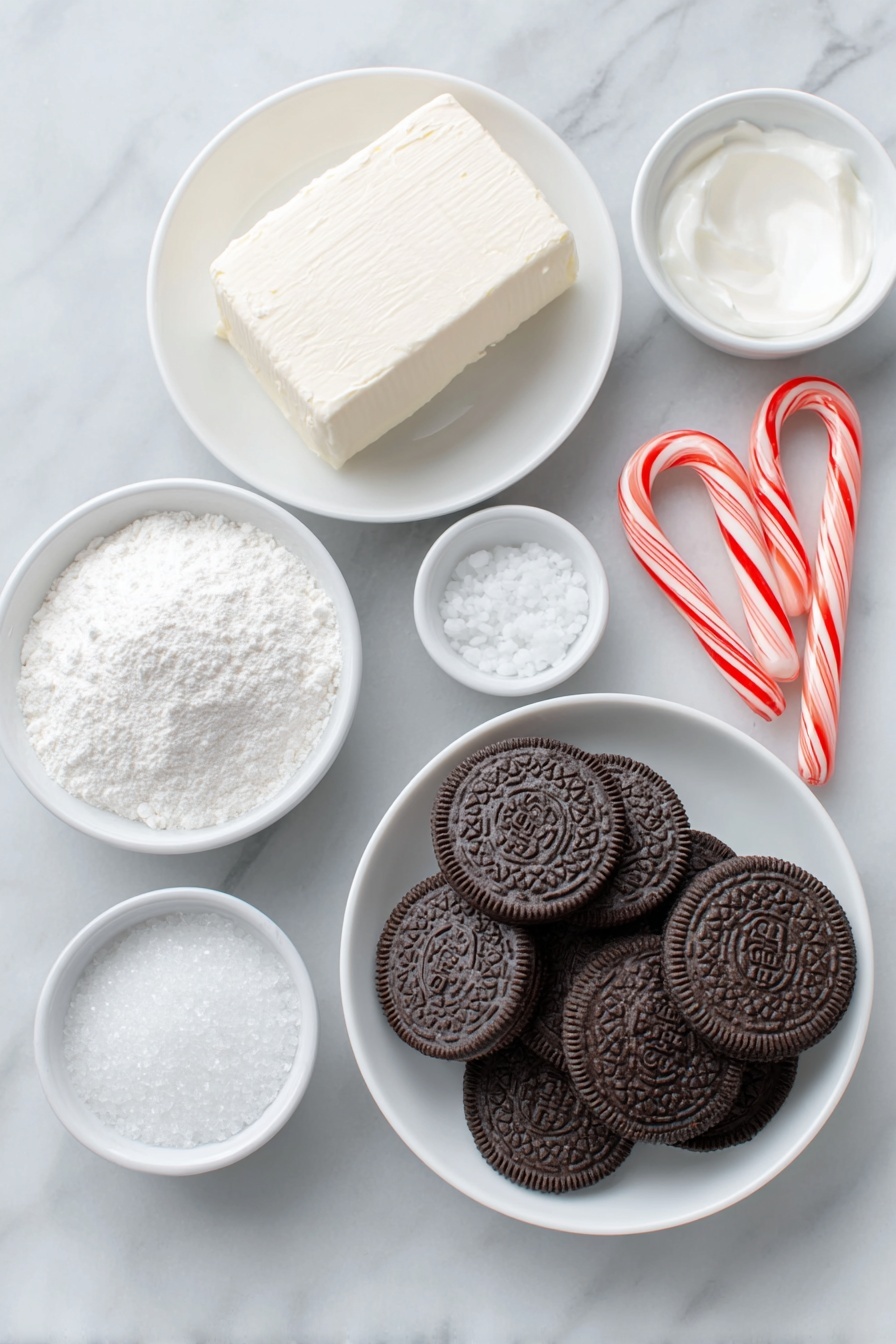
- Oreos: The beloved chocolate sandwich cookies are the star here—crushed into fine crumbs they form the base of our dough.
- Cream Cheese: Softened and creamy, this helps bind the Oreo crumbs into a moldable dough and adds a lovely tang.
- Red Candy Melts: These melt smoothly and harden with that bright holiday red shine, perfect for the candy cane look.
- Vegetable Shortening or Oil: Just a little helps thin out the candy melts for smooth dipping.
- White Sanding Sugar: Sprinkled on for some sparkle and extra sweetness on the stripes.
- Candy Cane Cookie Cutter: To shape your Oreo mixture into adorable candy canes for that seasonal vibe.
- Powdered Sugar, Meringue Powder, and Water: For making the small batch royal icing that decorates your candy canes with those classic stripes.
Variations
One thing I love about the Candy Cane Oreo Balls Recipe is how easy it is to tweak it to your personal taste or dietary needs. Feel free to switch things up and make it your own!
- Chocolate Variation: Swap out the red candy melts for white or dark chocolate melts, then tint white melts with food coloring to match your theme.
- Gluten-Free: Use gluten-free sandwich cookies in place of Oreos that suit your dietary needs.
- Mint Boost: Add a teaspoon of peppermint extract to the cream cheese mix for an extra minty punch that screams holiday spirit.
- Shape Switch-Up: Don’t have a candy cane cutter? No worries—roll the mixture into balls and decorate with drizzled candy melts or sprinkles.
How to Make Candy Cane Oreo Balls Recipe
Step 1: Crush the Oreos into Fine Crumbs
Pop the entire package of Oreos into a blender or food processor and pulse until you get fine, sand-like crumbs. I learned the hard way that big chunks won’t bind well with the cream cheese, so don’t rush this step. If you don’t have a blender, you can place the Oreos in a zip-top bag and crush with a rolling pin, but it takes a bit more elbow grease!
Step 2: Mix in Cream Cheese Until Fully Combined
Transfer your Oreo crumbs to a mixing bowl and add the softened cream cheese. Using an electric mixer, blend until it’s well combined and sticks together like dough. This is that perfect chocolatey, creamy base that makes these so irresistible. If your cream cheese is too cold, it won’t mix properly, so plan for it to sit on the counter to soften a bit beforehand.
Step 3: Press and Chill the Mixture
Press the Oreo mixture evenly onto a small baking sheet—something like a quarter sheet pan works great. I find this step easier than rolling sticky dough into balls. Pop it into the freezer for 15 minutes to firm up, which is crucial for clean cuts next.
Step 4: Cut Out Candy Cane Shapes
Once chilled, use your candy cane cookie cutter to press shapes into the Oreo slab. Wiggle gently to loosen, then carefully remove the cutter. Use your fingers to pop out each shape. This part’s fun—kids especially love helping here! Place your candy canes on another baking sheet and freeze again for 10 minutes to keep their shape nice and firm for dipping.
Step 5: Prep for Dipping
Line a large baking sheet with parchment paper or a silicone mat—this makes cleanup a breeze. Melt your red candy melts over low heat, stirring often. If they seem thick, add a teaspoon or so of vegetable shortening or vegetable oil to thin them out for smoother coating.
Step 6: Dip Candy Canes and Decorate
Work with a few candy canes at a time—dip each into the melted candy until fully coated, tapping off any excess chocolate on the fork before gently sliding it onto your lined baking sheet. Don’t rush this or try to do them all at once from the freezer; you want to keep the shapes intact and prevent melting. Pop the sheet into the fridge to set.
Step 7: Make and Pipe the Royal Icing
While the candy coating sets, mix up a small batch of royal icing. Beat powdered sugar, meringue powder, and water for 5-7 minutes until smooth. You want it thick enough to hold shape but still pipe-able, so add water teaspoon by teaspoon if needed. Transfer to a squeeze bottle and carefully draw white stripes on the cooled candy canes. Don’t forget the white sanding sugar for that perfect frosty sparkle!
Step 8: Let Icing Set and Serve
Allow your royal icing stripes to dry completely—either at room temp or in the fridge. Once set, gently tap off any extra sprinkles, arrange on a pretty platter, and get ready for compliments. These taste best kept refrigerated until serving, so store them chilled for maximum freshness.
Pro Tips for Making Candy Cane Oreo Balls Recipe
- Freeze Before Cutting: Freezing the Oreo cream cheese slab makes it way easier to cut clean candy cane shapes without squishing.
- Thin Out Candy Melts: Adding a touch of oil or shortening helps the candy melts coat smoothly without being clumpy or thick.
- Work in Batches: Don’t take all your candy canes out of the freezer at once to avoid melting or losing shape during dipping.
- Perfect Royal Icing Consistency: Beat for full time and add water gradually until you can pipe stripes easily without dripping.
How to Serve Candy Cane Oreo Balls Recipe
Garnishes
I typically stick with the white sanding sugar sprinkled over the royal icing stripes—it adds just the right sparkle and a little crunch. Sometimes, a tiny pinch of crushed candy cane sprinkled right after piping looks beautiful too and adds a subtle mint kick.
Side Dishes
I love pairing these candy cane Oreo balls with a warm cup of hot cocoa or a steaming mug of peppermint mocha. If you’re planning a holiday dessert tray, these go great alongside classic sugar cookies and chocolate-dipped pretzels.
Creative Ways to Present
For parties, I’ve arranged these on red and white striped trays or nestled them in mini cupcake liners to look like festive candies. You could also tie a small festive ribbon around each candy cane shape for gifting. Presentation really amps up the fun and makes them look bakery-level fancy!
Make Ahead and Storage
Storing Leftovers
I keep leftover Candy Cane Oreo Balls stored in an airtight container in the fridge—they stay fresh and maintain their shape for up to a week. Just be sure to keep them chilled until ready to serve so they don’t get too soft.
Freezing
These freeze beautifully! I wrap each candy cane ball individually in plastic wrap and pop them in a freezer-safe container. When I want a treat, I thaw them in the fridge overnight. The texture holds up really well, and it’s a lifesaver for prepping early during holiday craziness.
Reheating
Since these are no-bake, reheating isn’t necessary. Just let frozen or refrigerated balls sit at room temperature for 10-15 minutes before serving if you want them a little less chilled but still firm.
FAQs
-
Can I use a different cookie besides Oreos for this Candy Cane Oreo Balls Recipe?
Absolutely! While Oreos are classic for their chocolate and cream combo, you can experiment with other sandwich cookies or similar chocolate biscuits. Just make sure the cookies are finely crushed and that the flavors complement cream cheese well.
-
How do I get the candy melts to be smooth and shiny?
Melting candy melts over very low heat and stirring often is key. Adding a tablespoon of vegetable shortening or oil can thin the melted chocolate and give you that glossy, smooth finish perfect for dipping.
-
Can I make these ahead of time for a party?
Yes! You can prepare the candy cane Oreo balls up to 2 days ahead. Store them in an airtight container in the fridge and decorate with royal icing just before serving for the freshest look. They keep well chilled and still taste amazing.
-
What if I don’t have a candy cane cookie cutter?
No worries! You can form the Oreo mixture into small balls or other holiday-themed shapes by hand. Then dip and decorate as usual. It won’t have the candy cane shape but will still be delicious and festive.
-
How long do the Candy Cane Oreo Balls last?
When stored in the refrigerator in an airtight container, these treats stay fresh for about 5 to 7 days. Make sure to keep them chilled to maintain their texture and flavor.
Final Thoughts
This Candy Cane Oreo Balls Recipe has quickly become one of my go-to holiday treats—it’s easy, festive, and tastes like a little slice of joy. Whether you’re making these for your family, gifting to friends, or bringing them to a party, they never fail to impress. I can’t wait for you to try this recipe and see just how fun and rewarding it is to make these adorable, delicious treats yourself!
Print
Candy Cane Oreo Balls Recipe
- Prep Time: 20 minutes
- Cook Time: 20 minutes
- Total Time: 40 minutes
- Yield: 20 servings 1x
- Category: Dessert
- Method: No-Cook
- Cuisine: American
Description
This festive Candy Cane Oreo Balls recipe combines the rich creaminess of Oreo crumbs blended with cream cheese, shaped into candy cane forms, and dipped in vibrant red candy melts. Finished with delicate white royal icing stripes and sparkling sanding sugar, these delightful treats are perfect for holiday celebrations, offering a fun and easy no-bake dessert that dazzles both in appearance and taste.
Ingredients
Oreo Mixture
- 1 package Oreos (14.3 oz)
- 8 oz (226g) cream cheese, room temperature
Coating
- 1 bag red candy melts
- Vegetable shortening or vegetable oil (for thinning candy melts, as needed)
Decoration
- White sanding sugar
- Candy cane-shaped cookie cutter
Small Batch Royal Icing
- 1 cup (113g) powdered sugar
- ½ tablespoon meringue powder
- 1½ tablespoons water (plus more as needed)
Instructions
- Create Oreo Crumbs: Place the entire package of Oreos into a blender or food processor. Pulse until the Oreos are finely ground into crumbs.
- Mix with Cream Cheese: Transfer the Oreo crumbs to a mixing bowl. Add the softened cream cheese and mix using an electric mixer until the mixture is thoroughly combined and sticks together.
- Press Mixture and Freeze: Evenly spread the Oreo mixture onto a small baking sheet (a quarter sheet pan of approximately 12.75 x 8.75 inches works well). Place the sheet pan in the freezer for 15 minutes to firm up.
- Cut Candy Cane Shapes: Remove from freezer. Use the candy cane-shaped cookie cutter to press shapes into the Oreo mixture. Wiggle the cutter slightly before lifting, then remove the inside excess mixture from the cutter by hand. Arrange the cut candy cane shapes on a separate small baking sheet. Repeat until all mixture has been shaped.
- Freeze Candy Canes: Freeze the cut candy cane shapes for another 10 minutes to solidify.
- Prepare Dipping Station: Line a larger baking sheet with a silicone baking mat or parchment paper and set aside for placing dipped candy canes.
- Melt Red Candy Melts: Gently melt the red candy melts over low heat. If the melted chocolate is too thick, stir in about one tablespoon of vegetable shortening or vegetable oil to thin it.
- Dip Candy Canes: Remove a few candy cane shapes at a time from the freezer (do not remove all at once). Dip each candy cane fully into the melted red candy, coating it evenly. Lift with a fork, tapping off excess chocolate. Use a toothpick to gently slide the candy cane off the fork onto the prepared baking sheet. Repeat for all shapes.
- Chill to Set Chocolate: Place the baking sheet with dipped candy canes in the refrigerator to allow the coating to harden.
- Make Royal Icing: In a small bowl, combine powdered sugar, meringue powder, and water. Beat with an electric mixer for 5-7 minutes until smooth and fluffy. If too thick, add water one teaspoon at a time to reach desired icing consistency.
- Decorate Candy Canes: Transfer the royal icing to a small squeeze bottle. Pipe white stripes over the hardened red chocolate candy canes.
- Add Sanding Sugar: Sprinkle white sanding sugar over the royal icing stripes. Let the icing set at room temperature or refrigerate until firm. Once set, gently tap off excess sanding sugar.
- Serve and Store: Arrange the finished Candy Cane Oreo Balls on a platter and serve. Keep any leftovers refrigerated to maintain freshness and texture.
Notes
- Use a quarter sheet pan or similar size for easier handling and freezing.
- Don’t remove all candy canes from the freezer at once to prevent melting while dipping.
- Add vegetable shortening or oil sparingly to the melted candy melts to ensure smooth coating.
- Keep the finished Oreo balls refrigerated until serving as cream cheese can soften at room temperature.
- The candy cane cookie cutter defines the shape; ensure it is sturdy and the right size for bite-sized treats.
Nutrition
- Serving Size: 1 ball
- Calories: 110
- Sugar: 12g
- Sodium: 90mg
- Fat: 6g
- Saturated Fat: 3.5g
- Unsaturated Fat: 2g
- Trans Fat: 0g
- Carbohydrates: 14g
- Fiber: 0.5g
- Protein: 1g
- Cholesterol: 10mg


