

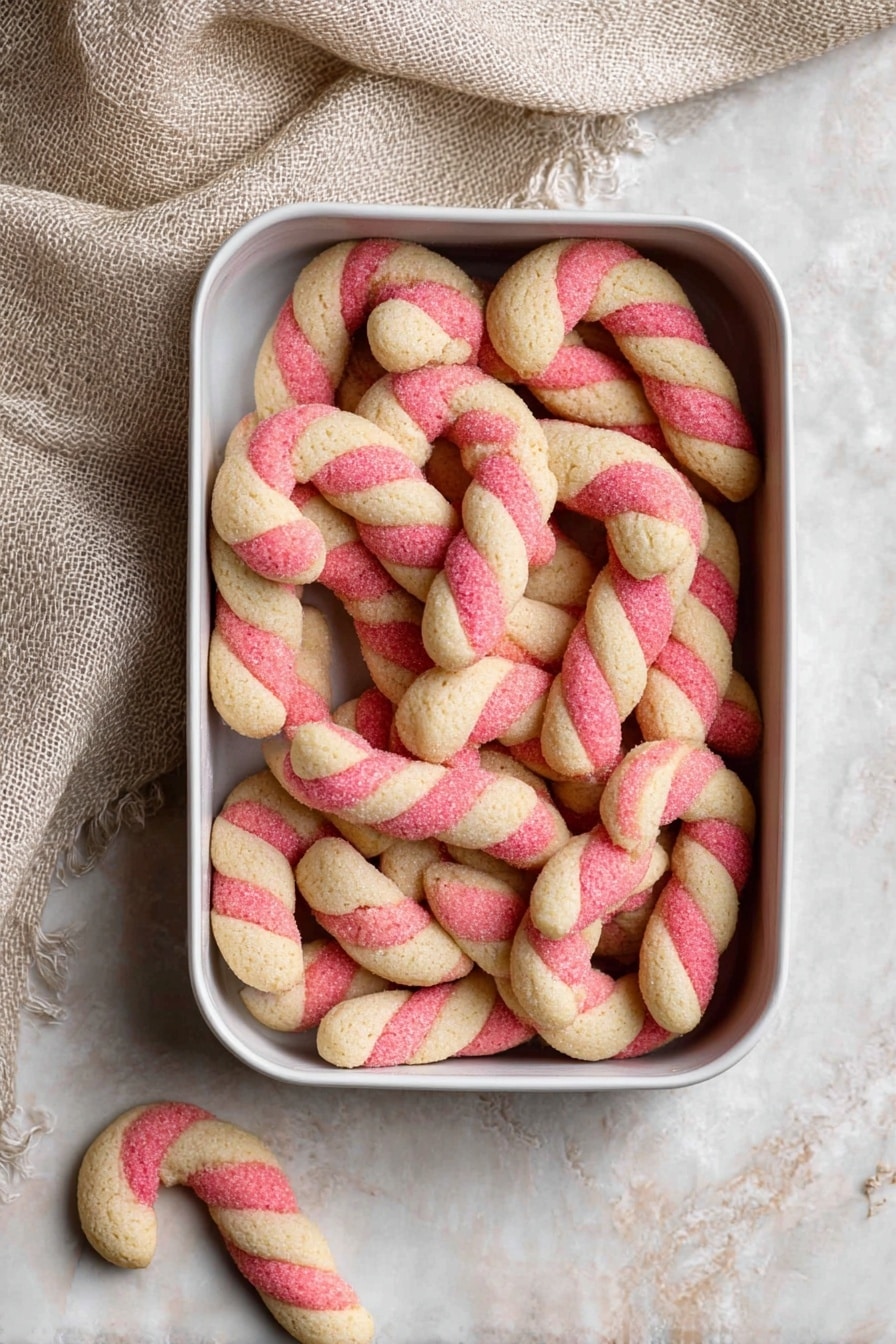
If you’re craving a cheerful, melt-in-your-mouth holiday treat, I can’t wait for you to try this Candy Cane Cookies with Peppermint Flavor Recipe. These cookies capture all the festive vibes with their sweet peppermint taste, pretty red and white swirls, and that iconic candy cane shape. I absolutely love how these come out tender, lightly crisp at the edges, and bursting with holiday cheer—you’ll find they’re the perfect companion to your winter hot cocoa or a thoughtful homemade gift. Keep reading because I’ll share all my little tricks to help you get them just right.
Why You’ll Love This Recipe
- Perfect Peppermint Punch: The peppermint extract is just enough to brighten without overpowering, making every bite festive and refreshing.
- Fun and Festive Presentation: That classic candy cane twist is easier to achieve than you think and will impress everyone at your holiday gathering.
- Simple Ingredients & Easy Steps: You probably already have most of these pantry staples, and the process is straightforward for bakers of all levels.
- Versatile & Freezable: Make a batch ahead, freeze, or tweak the colors and flavors to suit your holiday mood.

Ingredients You’ll Need
The magic of this Candy Cane Cookies with Peppermint Flavor Recipe lies in its simple but well-balanced ingredients. I love that the peppermint and vanilla extracts create this lovely aroma while the confectioners’ sugar keeps the dough silky smooth. Here’s what you’ll want to grab before starting.
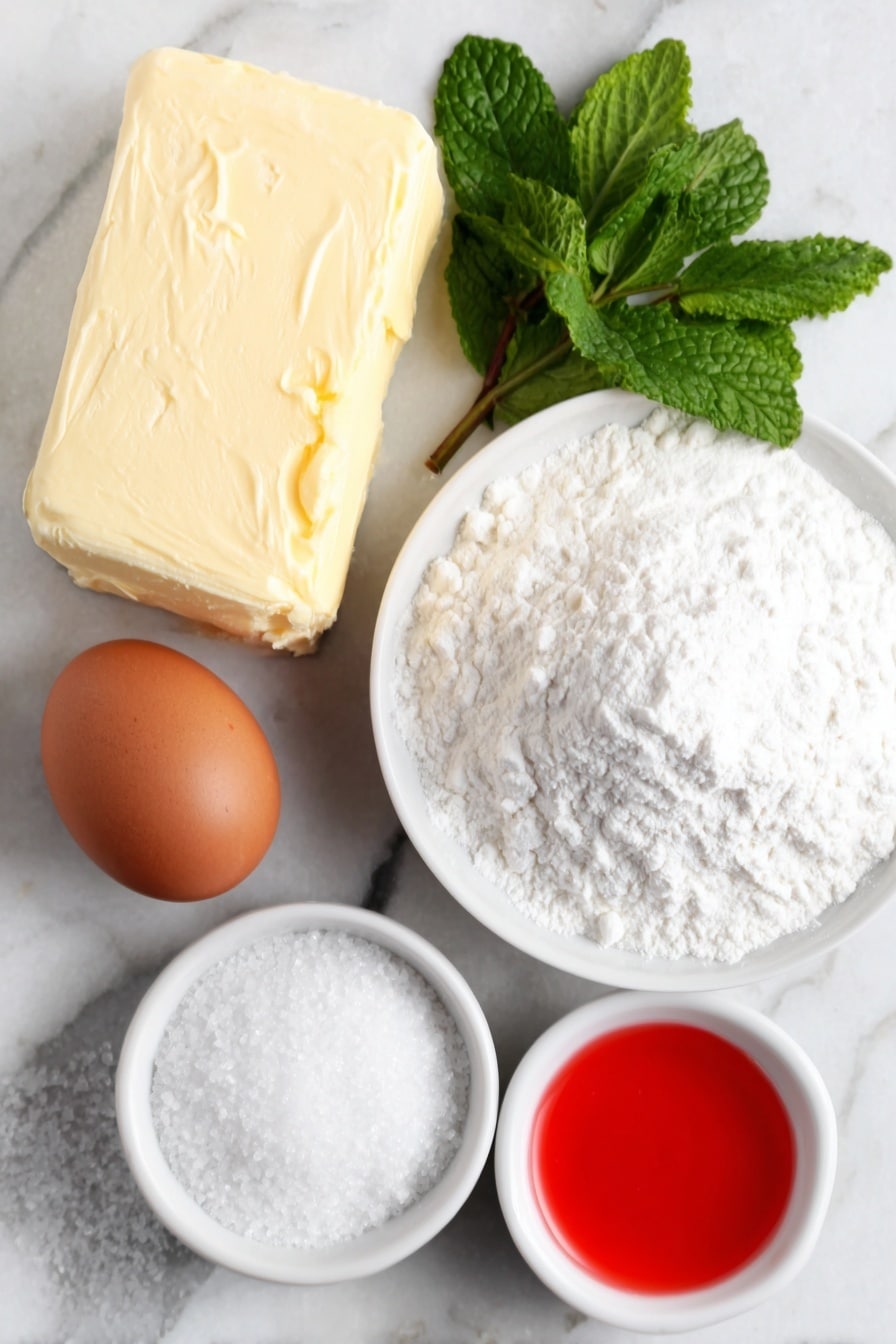
- Unsalted butter: Use softened butter at room temperature for easier creaming and a tender crumb in the cookies.
- Confectioners’ sugar: This helps keep the dough smooth and results in a delicate sweetness that’s perfect with peppermint.
- Egg: Acts as a binder and adds richness; make sure it’s at room temperature for better mixing.
- Peppermint extract: The star of the show for that refreshing, seasonal flavor—don’t skip it!
- Vanilla extract: Adds warmth and depth to balance the peppermint’s brightness.
- Salt: Just a pinch to enhance all the flavors without making it salty.
- All-purpose flour: Provides structure; measure it properly to avoid dry or dense cookies.
- Red food coloring: For that classic candy cane look—gel or liquid both work, just add gradually.
- Granulated sugar (optional): For sprinkling on top to add some sparkle and crunch.
Variations
I love putting my own spin on this recipe for different occasions—it’s already so fun and festive, but a few tweaks here and there keep it interesting. Feel free to play around with colors, flavors, or even add mix-ins to make it just yours!
- Chocolate Peppermint Twist: I’ve added a little cocoa powder to half the dough to deepen the flavor profile, and it pairs so well with the peppermint.
- Natural Coloring: If you prefer to avoid artificial dyes, try beet juice powder for red coloring—it gives a subtle hue while keeping things natural.
- Gluten-Free Option: Swap in a gluten-free all-purpose flour blend, but keep an eye on dough consistency—it might need a touch more moisture.
- Extra Crunch: Sprinkle crushed candy canes on top before baking for an extra festive crunch that everyone notices.
How to Make Candy Cane Cookies with Peppermint Flavor Recipe
Step 1: Cream the butter and sugar to fluffy perfection
Start by beating the softened butter and confectioners’ sugar together in your mixer at medium speed for about two minutes. You want this mixture light and fluffy—this aeration is what gives you those tender, melt-in-your-mouth cookies. I learned this after my first batch turned out dense, and upping the creaming time made all the difference!
Step 2: Add the egg and extracts, then slowly mix in the flour
Beat in the egg, peppermint extract, and vanilla until everything’s well incorporated. Then, on a low speed, gradually add the flour. This way you avoid overworking the dough, which can make your cookies tough. You’ll know it’s ready when there are no visible dry spots but the dough still feels soft and pliable.
Step 3: Separate, color, and chill your dough discs
I like to divide the dough in half at this point. Shape one half into a disc and wrap it tightly. For the other half, add red food coloring and beat slowly until the color is consistent. Then wrap it too. Chilling the dough for at least two hours is crucial—it helps the dough firm up so you can roll and twist without it being sticky or falling apart.
Step 4: Roll, twist, and shape into candy canes
After chilling, take one tablespoon from each dough, roll each into a 4-inch strip, then press them side by side and twist gently. Transferring to your lined baking sheet, curve one end to form that classic candy cane hook. I’ve found that this isn’t as tricky as it looks once you get the hang of the twisting—just be gentle so the dough strips stick together without cracking.
Step 5: Bake and add a sparkling finish
Bake these beauties at 375°F for 7-9 minutes. You’ll see the edges start to set but not brown too much—watch carefully because they can overbake quickly. While still warm, sprinkle on some granulated sugar for just a hint of crunch and sparkle. Let them rest on the baking sheet for 5 minutes before moving to a wire rack to cool completely.
Pro Tips for Making Candy Cane Cookies with Peppermint Flavor Recipe
- Don’t Skip the Chill: Chilling the dough discs for at least two hours prevents spreading and helps with clean, defined twist shapes.
- Use a Silicone Mat: Baking on a silicone mat keeps cookies from sticking and makes cleanup a breeze.
- Add Color Gradually: With red food coloring, start with a small amount and increase slowly to get your desired shade without overdoing it.
- Watch the Baking Time: Slightly underbake if you want softer cookies—they firm up as they cool!
How to Serve Candy Cane Cookies with Peppermint Flavor Recipe
Garnishes
I usually keep the garnish simple with a quick sprinkle of granulated sugar right after baking—it gives a pretty sparkle and just a tiny bit of crunch that pairs wonderfully with the soft cookie texture. For special occasions, crushed peppermint candies scattered on top add a fun texture and look fantastic.
Side Dishes
These cookies are incredible alongside a warm mug of spiced hot chocolate or classic eggnog—trust me, my family goes crazy for this combo every holiday season. They also pair nicely with a cheese plate if you want an unexpected sweet twist after a savory appetizer.
Creative Ways to Present
One holiday, I arranged a platter with these candy cane cookies nestled around a centerpiece pinecone and fairy lights—it made for an Instagram-worthy dessert table! Or try tying a set of three with a festive ribbon as delightful gifts. Presentation really brings the festive spirit to life and makes your baking extra memorable.
Make Ahead and Storage
Storing Leftovers
I store leftover candy cane cookies in an airtight container at room temperature—this keeps them fresh and chewy for about a week. If you want to stretch that, refrigerate them for up to 10 days. Just bring them to room temp before serving so that peppermint flavor shines through nicely.
Freezing
These cookies freeze really well, which is great for making batches ahead of time. I layer them between parchment paper in an airtight container and freeze for up to 3 months. When you’re ready, just thaw at room temperature—they taste just as fresh as the day you baked them!
Reheating
If you want to enjoy them warm, I pop a few on a baking sheet and heat in a 300°F oven for about 5 minutes. This refreshes their texture and releases that lovely peppermint aroma—just don’t overheat or they’ll harden too much.
FAQs
-
Can I use peppermint oil instead of peppermint extract in this Candy Cane Cookies with Peppermint Flavor Recipe?
Peppermint oil is much stronger than peppermint extract, so you’ll want to use it sparingly—start with a small drop and be cautious, as a little goes a long way and can easily overpower the cookie flavor.
-
Is it necessary to chill the dough for making candy cane shapes?
Absolutely! Chilling firms up the dough so it’s easier to roll and twist without sticking or breaking. I don’t recommend skipping this step if you want neat, defined candy cane shapes.
-
Can I make these cookies without food coloring?
You can, but the classic candy cane look comes from the red and white contrast. Alternatively, you could use natural colorings like beet powder for red or matcha for green to keep them festive yet dye-free.
-
How long do these Candy Cane Cookies with Peppermint Flavor last?
Stored properly in an airtight container, they last about a week at room temperature and up to 10 days refrigerated. They also freeze well for up to 3 months!
Final Thoughts
This Candy Cane Cookies with Peppermint Flavor Recipe has become a staple in my holiday baking lineup because it’s just so joyful to make and share. Every year, I can’t help but smile watching my family’s faces light up when they see those little twists of red and white. You’ll really appreciate how approachable this recipe is, even if you’re not a baking pro—I promise it’s well worth the few extra steps to chill and twist the dough. Give it a try, and I bet these cookies are going to be your new holiday favorite too!
Print
Candy Cane Cookies with Peppermint Flavor Recipe
- Prep Time: 15 minutes
- Cook Time: 8 minutes
- Total Time: 2 hours 23 minutes
- Yield: 24 cookies 1x
- Category: Dessert
- Method: Baking
- Cuisine: American
- Diet: Vegetarian
Description
These Candy Cane Cookies are festive, buttery, and tender treats with a delightful peppermint twist. Featuring a charming red and white swirl shaped like classic candy canes, they are perfect to bake for the holidays or any special occasion. The recipe uses simple ingredients and straightforward steps to create beautiful, flavorful cookies that melt in your mouth.
Ingredients
Cookie Dough
- ½ cup unsalted butter, softened to room temperature
- ½ cup confectioners’ sugar
- 1 small egg
- ½ teaspoon peppermint extract
- ½ teaspoon vanilla extract
- ¼ teaspoon salt
- 1¼ cups all-purpose flour
Additional Ingredients
- Red food coloring
- Granulated sugar, optional for sprinkling on top
Instructions
- Cream Butter and Sugar: Using a stand mixer fitted with the paddle attachment or a hand mixer in a large bowl, cream together the softened butter and confectioners’ sugar on medium speed until the mixture is light and fluffy, about 2 minutes.
- Add Egg and Extracts: Beat in the small egg, peppermint extract, and vanilla extract until everything is well incorporated.
- Add Flour: Gradually add the all-purpose flour and salt, beating on low speed until combined and no dry flour particles remain.
- Divide and Color Dough: Shape the dough into a ball and divide it in half. Form one half into a disc and wrap tightly in plastic cling wrap. Add red food coloring to the other half, beat slowly until evenly colored, then shape into a disc and wrap tightly.
- Chill Dough: Refrigerate the two dough discs for at least 2 hours or up to overnight to firm up for easier handling.
- Preheat Oven and Prepare Pan: Preheat your oven to 375°F (190°C) and line a large half-sheet baking pan with a silicone baking mat.
- Shape Candy Cane Cookies: Remove dough from fridge. Take one tablespoon from each dough color and roll each into a 4-inch long strip. Place the two strips side by side and slightly press together. Twist them gently, then curve one end to form a candy cane shape. Transfer to the prepared baking sheet.
- Bake Cookies: Bake the shaped cookies for 7 to 9 minutes, until the edges begin to set but the cookies remain soft.
- Add Sugar Topping: Immediately after removing from the oven, sprinkle granulated sugar on the cookies if desired.
- Cool: Let the cookies sit on the baking sheet for 5 minutes before transferring to a wire rack to cool completely.
Notes
- Storage: Store cookies in an airtight container or cookie tin at room temperature for up to 1 week. Refrigeration extends shelf life to 10 days.
- Freezing Cookies: Freeze cookies layered with parchment paper in an airtight container for up to 3 months.
- Storing Dough: Dough discs can be refrigerated for up to 3 days before baking. Allow dough to soften on the counter for 5-10 minutes before rolling.
Nutrition
- Serving Size: 1 cookie
- Calories: 90
- Sugar: 5g
- Sodium: 45mg
- Fat: 4.5g
- Saturated Fat: 2.8g
- Unsaturated Fat: 1.5g
- Trans Fat: 0g
- Carbohydrates: 12g
- Fiber: 0.3g
- Protein: 1g
- Cholesterol: 15mg


