

If you’re on the hunt for a classic, melt-in-your-mouth cookie that combines peanut butter goodness with a chocolatey surprise, you’re in the right place! This Peanut Butter Blossom Cookies Recipe is absolutely fan-freaking-tastic, and I can’t wait to share every sweet detail with you. These cookies have that perfect soft but slightly chewy texture, with a kiss of chocolate right in the center that just makes you smile. Let’s dive in, and I promise you’ll soon be making them on repeat!
Why You’ll Love This Recipe
- Classic Flavor Combo: Peanut butter and Hershey’s kisses are a nostalgic duo that never gets old.
- Simple Ingredients: Uses pantry staples with straightforward steps, perfect for even casual bakers.
- Perfect Texture: Soft, chewy edges with a lightly crisp exterior – just the way I love them.
- Kid-Approved & Crowd Pleaser: My family goes crazy for these, and they’re always the first to disappear at parties.

Ingredients You’ll Need
Each ingredient in this Peanut Butter Blossom Cookies Recipe plays its part to create that perfect texture and flavor. I’ve found that using creamy peanut butter (not natural) gives the right balance of taste and consistency. Also, using both brown and granulated sugar adds depth and just the right chewiness.
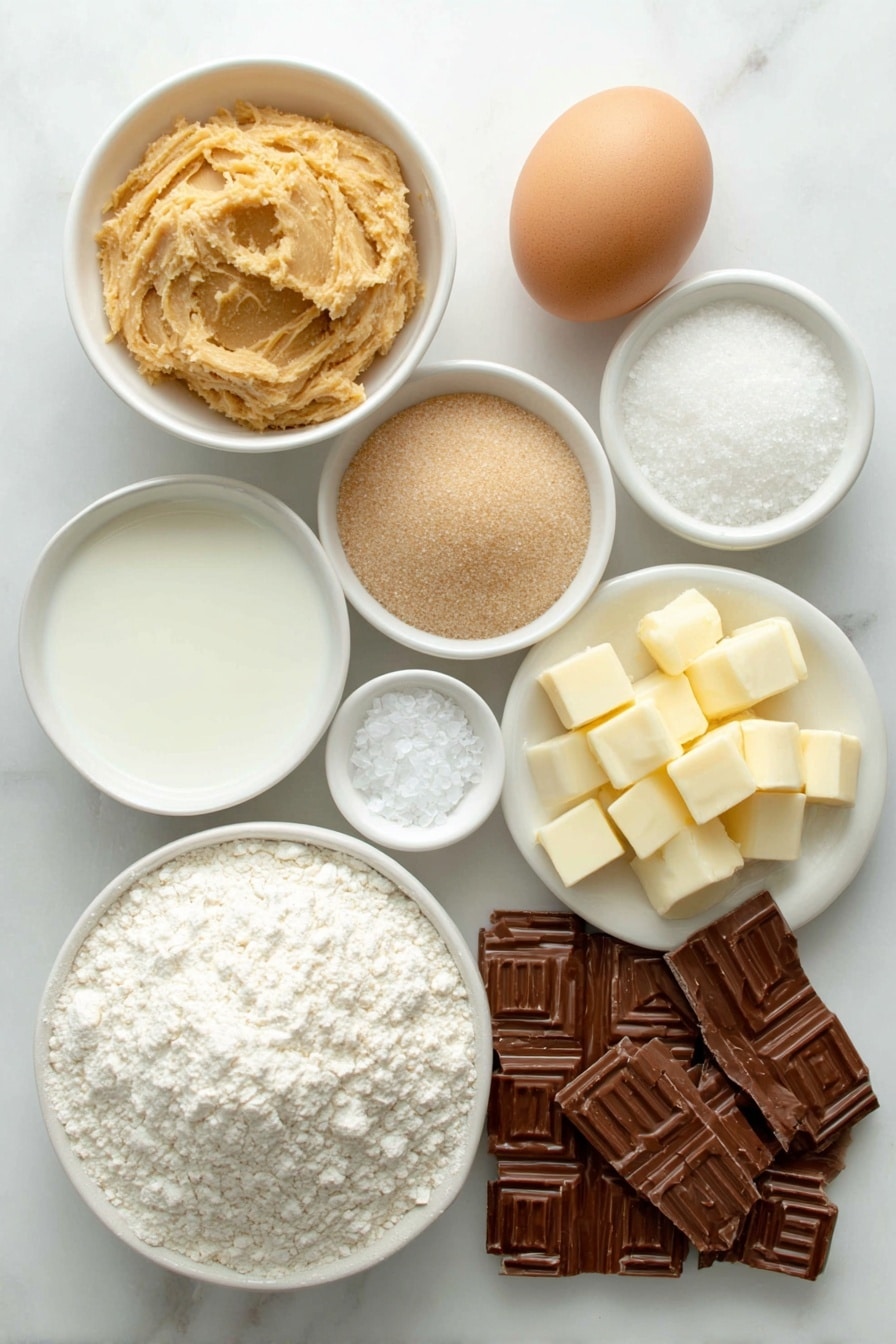
- Shortening: Adds tenderness and keeps the cookies soft—you can’t quite get the same texture with butter here.
- Brown Sugar: Gives moisture and a rich, caramel flavor to the dough.
- Granulated Sugar: Used twice—in the dough and for rolling—to add a pleasant crunch and sweetness.
- Creamy Peanut Butter (not natural): The non-natural kind has a better spread and consistency for this recipe.
- Egg: Helps bind everything together perfectly—make sure it’s at room temperature.
- Milk: Adds just a touch of moisture to keep the dough smooth and tender.
- Vanilla Extract: Enhances the flavor, giving a subtle sweetness that complements the peanut butter.
- Baking Soda: Helps these cookies puff up just right.
- Salt: Balances the sweetness and enhances the peanut butter flavor.
- All-Purpose Flour: The base for structure—measure lightly to avoid dense cookies.
- Flaked Sea Salt: A sprinkle on top for that extra little pop of flavor.
- Hershey’s Kisses (unwrapped): The iconic chocolate center—classic milk chocolate works best.
Variations
One of the things I love about this Peanut Butter Blossom Cookies Recipe is how easy it is to make your own. Whether you want to add a festive twist or adjust for allergies, these cookies are super adaptable.
- Different Hershey’s Kiss Flavors: I’ve tried caramel-filled and peppermint kisses, and they add a fun seasonal touch without changing the base cookie.
- Crunchy Peanut Butter: For a little extra texture, swap creamy for crunchy peanut butter.
- Gluten-Free Flour Blend: I tested this once with a 1:1 gluten-free blend and it worked great—just be gentle when mixing.
- Vegan Version: Replace shortening with coconut oil and use a flaxseed “egg” for an egg substitute; results are tasty and dairy-free.
How to Make Peanut Butter Blossom Cookies Recipe
Step 1: Prep Your Ingredients and Oven
Start by preheating your oven to 375°F (190°C). Line two baking sheets with parchment paper—trust me, this makes cleanup so much easier! Set them aside, so everything’s ready once the dough is mixed. Make sure your egg and milk are at room temperature to help everything blend together smoothly.
Step 2: Cream the Fat and Sugars
In a medium bowl, combine the shortening, brown sugar, and granulated sugar. I use a hand mixer here because it gets everything silky and smooth fast. When I first tried this, I thought I could skip this step and mix everything all at once—but creaming makes such a difference in cookie texture!
Step 3: Add Peanut Butter, Egg, Milk, and Vanilla
Next, mix in the creamy peanut butter until fully combined. Then add the egg, milk, and vanilla extract. Stir everything together until you have a beautiful, uniform dough. Don’t rush this part—you want that silky batter before adding dry ingredients.
Step 4: Mix in Dry Ingredients
Sift in your baking soda, salt, and flour, then gently fold the mixture just until combined. I have learned the hard way that overmixing here creates tougher cookies, so stop as soon as you see no flour streaks. The dough will be soft but firm enough to scoop.
Step 5: Scoop, Roll, and Sprinkle
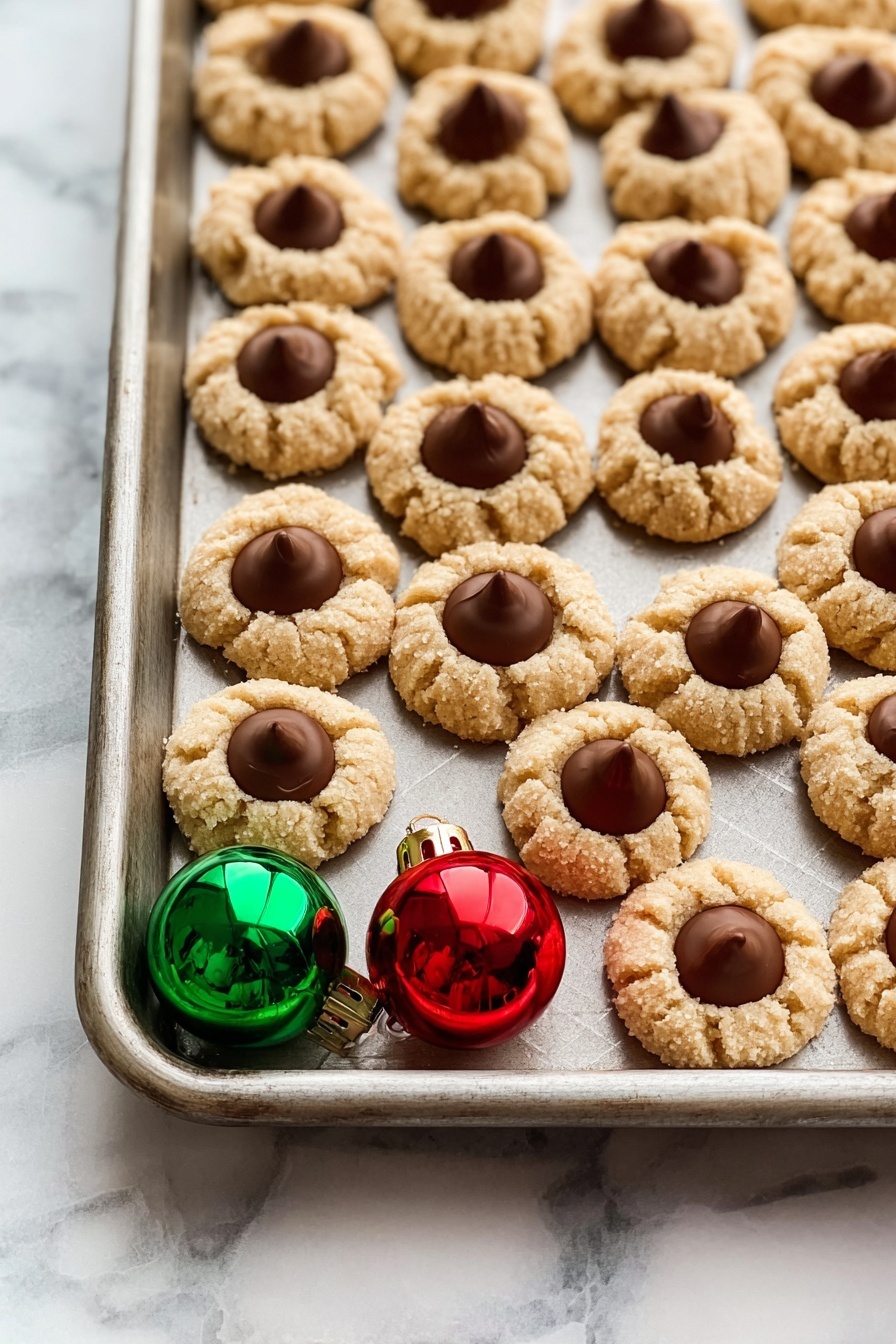
Using a 2 teaspoon cookie scoop—or a spoon if you don’t have one—form dough balls. Roll each ball in granulated sugar (this adds a tiny crunchy shell) and place them spaced well on your baked sheets (about 20 per pan). Before popping them in the oven, sprinkle each one lightly with flaked sea salt. This little salty sprinkle brings out the peanut butter flavor in a way that your taste buds will thank you for.
Step 6: Bake and Press the Kiss
Bake for 8 to 10 minutes. You’re looking for the cookies to start crinkling and puffing up just a bit. The timing is key because you want them soft, not crispy. As soon as they come out, gently press a Hershey’s Kiss into the center of each cookie. Let them cool on the baking sheet for a minute, then transfer to the fridge for 10-15 minutes so the chocolate sets firm and glossy. It’s such a satisfying step!
Pro Tips for Making Peanut Butter Blossom Cookies Recipe
- Use Room Temperature Ingredients: This helps everything blend wonderfully and prevents your dough from curdling or separating.
- Don’t Overmix the Flour: Overworking the dough creates tougher cookies, so fold in dry ingredients gently.
- Choose Your Peanut Butter Wisely: I stick with creamy, classic peanut butter, not natural, to get perfect texture and flavor.
- Cool Cookies Before Storing: Let cookies cool completely so they don’t get soggy in the container.
How to Serve Peanut Butter Blossom Cookies Recipe
Garnishes
I’m a huge fan of that little sprinkle of flaked sea salt on top—it adds just a subtle salty crunch that makes the peanut butter pop. If you want to get fancy, you can drizzle a little melted dark chocolate on top for extra chocolatey drama. But honestly, these cookies shine just as they are.
Side Dishes
These cookies go perfectly with a cold glass of milk or a hot cup of coffee or tea. When we have movie nights, I’ll sometimes serve them alongside some caramel popcorn or a bowl of fresh strawberries—sweet and salty in perfect harmony.
Creative Ways to Present
At holiday parties, I love arranging these cookies on a pretty platter with little festive napkins and a sign saying “Peanut Butter Blossoms.” Another time, I packaged them in clear cellophane bags tied with a rustic twine bow for neighbor gifts. They’re great individually wrapped with a Kiss on top—it’s like a little treat bouquet!
Make Ahead and Storage
Storing Leftovers
Once fully cooled, I store these cookies in an airtight container at room temperature. They stay soft and tasty for 2-3 days, which is perfect for sharing with friends or just enjoying slowly. If you spot them disappearing too fast, no worries—they’re worth every bite!
Freezing
I sometimes freeze leftover dough balls before baking—just roll and sugar them, then freeze on a tray before transferring to an airtight bag. When ready, bake straight from frozen, adding a minute or two to the bake time. This trick saves me when I’m craving fresh cookies on a weeknight!
Reheating
To reheat baked cookies, pop them in the microwave for about 10 seconds or warm in a 300°F oven for 3-4 minutes. This refreshes the soft texture and melts the chocolate slightly, making the cookies taste like they just came out of the oven.
FAQs
-
Can I use natural peanut butter in this recipe?
Natural peanut butter has more oil separation and a runnier texture, which can affect the dough consistency. I recommend using creamy, non-natural peanut butter for the best texture and results in this Peanut Butter Blossom Cookies Recipe.
-
How do I prevent my cookies from spreading too much?
Using shortening instead of butter helps keep the cookies from spreading excessively. Also, chilling the dough balls briefly before baking can minimize spreading, but these cookies naturally hold their shape well.
-
Can I make these cookies without shortening?
While shortening gives the best texture for these cookies, you can substitute an equal amount of softened butter. Expect a slightly different texture and flavor but still delicious.
-
Why do I need to press the Hershey’s Kiss after baking?
Pressing the Kiss into the warm cookie allows it to gently soften and stick, creating that iconic peanut butter and chocolate bloom. If you press the Kiss too early, it might melt too much; doing it right after baking is perfect!
Final Thoughts
Honestly, I absolutely love how this Peanut Butter Blossom Cookies Recipe brings back happy memories and creates new ones with just a handful of simple ingredients. It’s one of those recipes that feels like a warm hug, with the perfect mix of salty, sweet, soft, and chocolatey. If you’re looking for a go-to cookie that’s easy to make but sure to impress, give these a try and watch how quickly your family falls in love. Trust me—once you make these, you won’t want to stop!
Print
Peanut Butter Blossom Cookies Recipe
- Prep Time: 15 minutes
- Cook Time: 8-10 minutes
- Total Time: 25-27 minutes
- Yield: 42 cookies 1x
- Category: Dessert
- Method: Baking
- Cuisine: American
Description
Peanut Butter Blossom Cookies are soft, chewy peanut butter treats topped with a classic Hershey’s Kiss. These cookies combine the rich flavor of creamy peanut butter with a hint of sweetness from both brown and granulated sugars, finished with a touch of sea salt for balance. Perfect for holiday gatherings or everyday snacking, this recipe yields about 42 irresistible cookies with a crisp sugar coating and melty chocolate center.
Ingredients
Cookie Dough
- ½ cup (102.5 g) shortening
- ½ cup (110 g) brown sugar
- ½ cup (100 g) granulated sugar
- ½ cup (129 g) creamy peanut butter (not natural)
- 1 large egg, room temperature
- 2 tablespoons milk, room temperature
- 1½ teaspoons vanilla extract
- 1 teaspoon baking soda
- ½ teaspoon salt
- 1¾ cups (245 g) all-purpose flour
Coating and Topping
- ½ cup (100 g) granulated sugar for rolling cookies
- Flaked sea salt for sprinkling on top
- 10 oz (283.5 g) bag Hershey’s Kisses, unwrapped
Instructions
- Preheat and Prepare Pans: Preheat your oven to 375°F (190°C). Line two baking sheets with parchment paper and set them aside to keep the cookies from sticking and ensure even baking.
- Cream Shortening and Sugars: In a medium mixing bowl, cream together the shortening, brown sugar, and granulated sugar until the mixture is smooth and fluffy, ensuring an even sweetness throughout the dough.
- Add Peanut Butter and Wet Ingredients: Stir in the creamy peanut butter until well mixed. Then add the egg, milk, and vanilla extract, mixing thoroughly until all wet ingredients are fully incorporated.
- Combine Dry Ingredients: Add the baking soda, salt, and flour to the wet ingredients. Mix gently until just combined to avoid overworking the dough which can lead to tough cookies.
- Shape and Roll Cookies: Using a 2 teaspoon cookie scoop, scoop balls of dough and roll each in granulated sugar to coat. Place the sugared dough balls onto the prepared baking sheets, spacing about 20 per sheet as these cookies spread minimally. Sprinkle a small amount of flaked sea salt on top of each cookie for contrast.
- Bake Cookies: Bake in the preheated oven for 8 to 10 minutes. The cookies should start to crinkle and puff up slightly but remain soft.
- Add Hershey’s Kisses: Immediately after removing the cookies from the oven, press one unwrapped Hershey’s Kiss into the center of each cookie, allowing the warmth to slightly melt the base and secure it.
- Chill to Set: Transfer the cookies to the refrigerator for 10 to 15 minutes so the chocolate can firm up, making them easier to handle and enhancing their texture.
Notes
- Store cookies in an airtight container for 2-3 days or freeze for up to 2-3 months to maintain freshness.
- These cookies pair wonderfully with various Hershey’s Kiss flavors like plain chocolate, caramel-filled, or peppermint for seasonal varieties.
- Using room temperature ingredients helps the dough mix properly, resulting in a smooth and consistent batter.
- For accuracy, weigh ingredients using grams, especially flour; if you don’t have a scale, spoon flour lightly into measuring cups to avoid packing.
Nutrition
- Serving Size: 1 cookie
- Calories: 110
- Sugar: 8 g
- Sodium: 95 mg
- Fat: 6 g
- Saturated Fat: 2 g
- Unsaturated Fat: 3.5 g
- Trans Fat: 0 g
- Carbohydrates: 12 g
- Fiber: 1 g
- Protein: 2 g
- Cholesterol: 15 mg


