
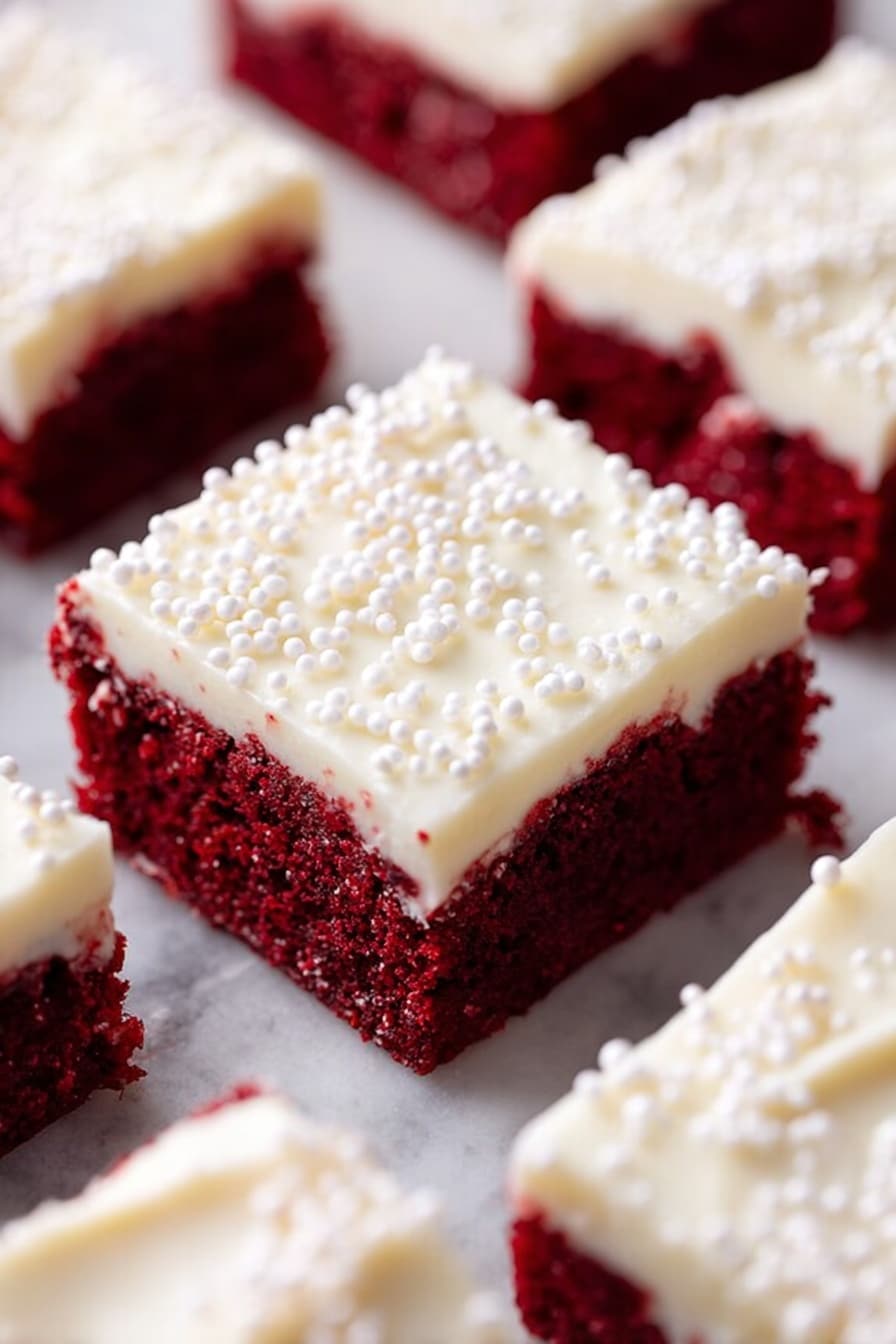
If you’re anything like me, you know the magic of red velvet combined with the creamy dreaminess of cream cheese frosting is just irresistible. That’s why I’m super excited to share this Red Velvet Cookie Bars with Cream Cheese Frosting Recipe that’s become an absolute favorite in my kitchen. It’s like the perfect marriage between a cookie and a cake, all in a convenient bar form — so much easier to make than cupcakes but just as indulgent. Stick with me, and I’ll walk you through everything you need to know to make these a slam dunk in your home too!
Why You’ll Love This Recipe
- Simple Ingredients: Most of these pantry staples are probably already in your kitchen, making this recipe very accessible.
- Perfect Texture: These bars come out soft and chewy, striking the best balance between cookie and cake.
- Cream Cheese Frosting Magic: The tangy frosting cuts through the sweetness beautifully, and it’s so easy to make.
- Great for Gifting or Parties: They slice neatly and travel well, so they’re a crowd-pleaser anytime.

Ingredients You’ll Need
I love how the ingredients here work together to give you that classic red velvet flavor and texture. From the cocoa powder to the red food coloring, each plays a vital role, and I’ll share a few tips so you get the best results.
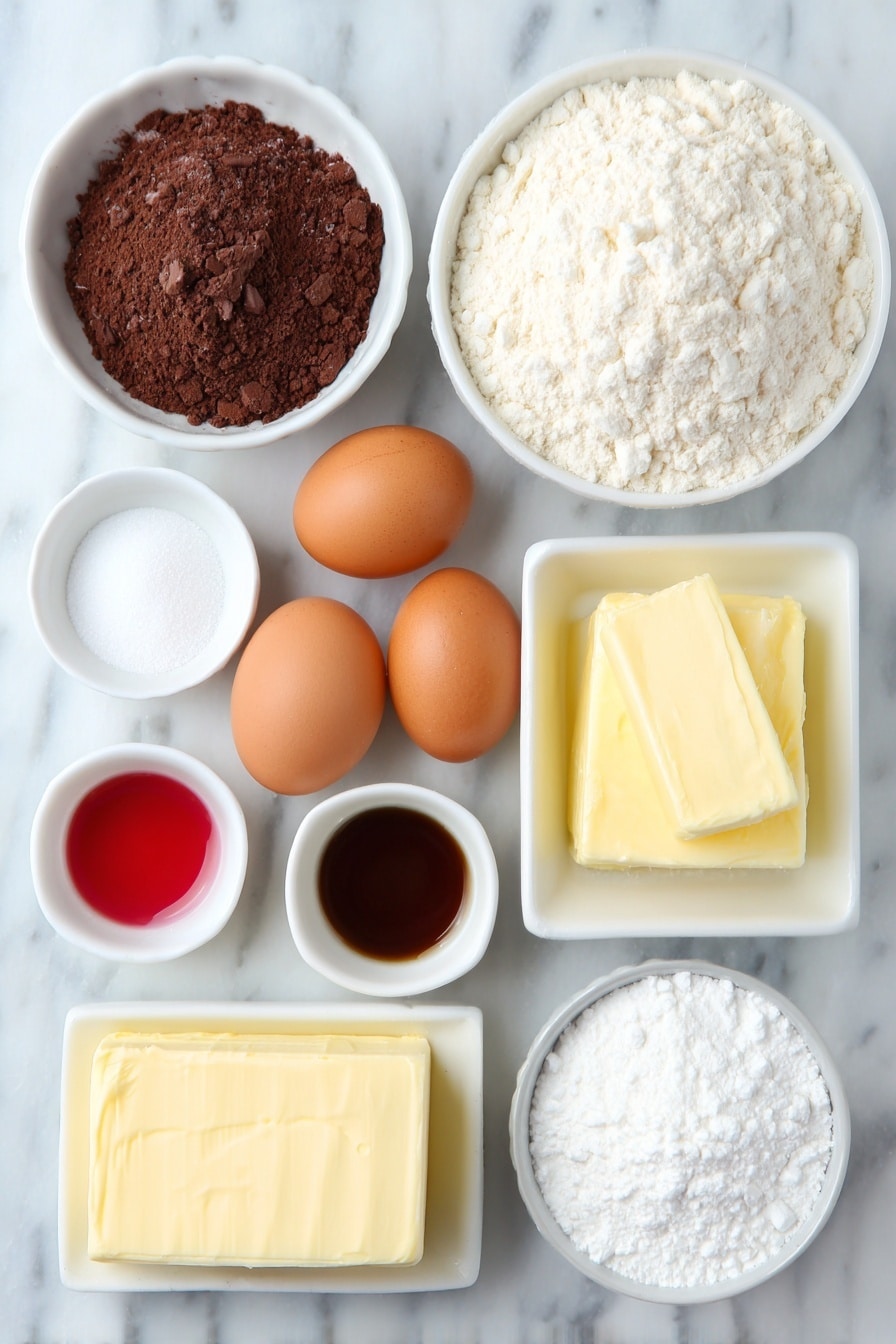
- Flour: Use all-purpose flour for the perfect structure; don’t skip sifting if you can—it helps avoid clumps.
- Unsweetened cocoa powder: This gives just a hint of chocolate flavor essential for red velvet’s unique taste.
- Salt: Balances the sweetness and enhances the flavors.
- Baking powder: Helps give the bars a light, tender crumb—don’t substitute with baking soda here.
- Butter (softened): Using room-temperature butter is key for a creamy batter and delicious richness.
- Sugar: Regular granulated sugar works perfectly to sweeten and give that classic cookie bar texture.
- Eggs: Adds moisture and structure; make sure they’re at room temperature for best mixing.
- Vanilla extract: Pure vanilla elevates the depth of the flavors—don’t skimp on this!
- Red food coloring: This is what gives red velvet its signature look; gel or liquid both work fine, but I prefer gel for vibrant color without thinning the batter.
- Cream cheese (softened): Essential for that tangy and creamy frosting; full-fat always tastes better.
- Powdered sugar: Give it a good sift or use pre-sifted to avoid any gritty frosting.
Variations
Sometimes I like to shake things up with this red velvet cookie bars recipe — whether it’s to suit a dietary need or just to add a little twist — and you’ll find it’s very adaptable.
- Gluten-Free Version: I swapped the flour once for a gluten-free blend, and it worked beautifully without sacrificing texture.
- Vegan Adaptation: Using vegan butter and a flax egg, plus vegan cream cheese, gives this a whole new vibe that’s just as tasty.
- Chocolate Chip Addition: I occasionally mix in white chocolate chips before baking for an extra layer of sweetness and texture.
- Spiced Up: Adding a pinch of cinnamon or espresso powder can deepen the flavor if you’re feeling adventurous.
How to Make Red Velvet Cookie Bars with Cream Cheese Frosting Recipe
Step 1: Prep Your Pan and Oven
Start by preheating your oven to 350°F (175°C). I always line my 9×13 inch pan with aluminum foil or parchment paper — this little step makes it so easy to lift the whole batch out once baked, and trust me, it saves a lot of messy scraping and guesswork when cutting.
Step 2: Mix Your Dry Ingredients
In a medium bowl, whisk together the flour, cocoa powder, salt, and baking powder really well. This helps distribute everything evenly, so your bars have just the right balance of flavor and texture.
Step 3: Cream Butter and Sugar, Then Add the Rest
In your mixer or a large bowl, beat the softened butter and sugar until the mixture is light and fluffy—usually about 2 to 3 minutes. This is the secret to a tender bar. Then beat in the eggs, vanilla, and red food coloring until everything is combined and that vibrant red color shines through.
Step 4: Combine Wet and Dry for Dough
Add your dry ingredient mix to the wet ingredients and stir just until you get a soft dough. Don’t overmix here; you want the bars tender, not tough. Once combined, press the dough evenly into your prepared pan.
Step 5: Bake and Cool Completely
Bake for about 20 minutes, but keep an eye on them—when the edges start pulling away from the pan and a toothpick inserted in the middle comes out clean, you’re golden. Cooling fully before frosting is critical; I resist the urge every time because the frosting spreads so much better on cool bars and won’t melt into a mess.
Step 6: Whip Up the Cream Cheese Frosting
Beat together the softened cream cheese and butter until smooth. Then add the powdered sugar and vanilla and mix until silky and creamy. Spread generously over the cooled bars—you’ll find the tangy frosting cuts through the sweetness just perfectly.
Step 7: Slice and Enjoy!
Once frosted, I like to chill the bars for about 30 minutes—this firms up the frosting so your cuts are nice and clean. Use a sharp, serrated knife for cutting to avoid crumbling. Then dig in and enjoy the magic of this Red Velvet Cookie Bars with Cream Cheese Frosting Recipe!
Pro Tips for Making Red Velvet Cookie Bars with Cream Cheese Frosting Recipe
- Use Gel Food Coloring: I discovered gel coloring delivers the most vibrant hue without altering batter consistency—it’s a game changer.
- Room Temperature Ingredients: This makes mixing easier and results in a smoother batter and frosting every time.
- Don’t Overbake: Those edges pulling away are your cue—the bars should be soft but set, not dry or crumbly.
- Chill Before Frosting: I learned this trick the hard way—warm bars make the frosting runny, so patience pays off!
How to Serve Red Velvet Cookie Bars with Cream Cheese Frosting Recipe

Garnishes
I usually keep it simple with a light dusting of cocoa powder or decorating with a few fresh raspberries on top. Sometimes, I sprinkle toasted white chocolate shavings for a festive touch. These small additions always get compliments and look great for sharing.
Side Dishes
These bars pair wonderfully with a hot cup of coffee or a cold glass of milk, which balances out the richness. For a party spread, I like to serve them alongside fresh fruit or a light salad to balance the indulgence.
Creative Ways to Present
For birthdays or holidays, I’ve layered these bars with some extra frosting and edible glitter in a glass trifle dish, making it look stunning. You can also cut into mini squares and serve on decorative platters with small forks for an elegant finger food option at gatherings.
Make Ahead and Storage
Storing Leftovers
Once frosted, I store leftover bars in an airtight container in the fridge to keep the cream cheese frosting fresh. They usually last 4-5 days this way. Warming a piece slightly before serving brings back that fresh-from-the-oven feel.
Freezing
I sometimes freeze the bars before frosting—once the baked bars are fully cooled, I wrap them tightly in plastic wrap and foil. They freeze beautifully for up to 3 months. When ready, thaw overnight in the fridge and then add the frosting fresh.
Reheating
To reheat, I recommend warming an individual slice in the microwave for about 10-15 seconds (if unfrosted or after removing the frosting), or just enjoy chilled if preferred. The bars stay moist and tasty with this gentle reheating.
FAQs
-
Can I use a different pan size for these cookie bars?
You can use a slightly smaller or larger pan, but keep in mind it will affect the baking time and thickness of the bars. If you use a smaller pan, bars will be thicker and require more baking time—check with a toothpick. Larger pans yield thinner bars and shorter bake times, so keep an eye on them to avoid overbaking.
-
What can I substitute if I don’t have cream cheese for the frosting?
While cream cheese is classic for that tangy richness, you can try using mascarpone cheese for a milder flavor or Greek yogurt mixed with butter and powdered sugar as a lighter option, though consistency and tang will differ.
-
Is there a way to make these bars less sweet?
You can reduce the sugar slightly in the dough or frosting. I usually reduce powdered sugar in the frosting by about a quarter cup if I want a less sweet taste, but be careful as it affects the texture too. Another trick is pairing the bars with unsweetened whipped cream to balance sweetness.
-
Can I make this recipe ahead of time for a party?
Absolutely! Bake and cool the bars a day ahead, keep them wrapped tightly, and frost them the morning of your event. This keeps the frosting fresh and the bars moist—just like homemade!
Final Thoughts
This Red Velvet Cookie Bars with Cream Cheese Frosting Recipe is one of those gems that keeps everyone coming back for more. I love how effortlessly it brings classic flavors together with minimal fuss. Whether it’s a holiday gathering, a birthday, or just because the craving hits, these bars feel special yet perfectly approachable. I really encourage you to give this recipe a whirl—it’s the kind of baking that makes your kitchen smell amazing and your loved ones smile big. Happy baking, friend!
Print
Red Velvet Cookie Bars with Cream Cheese Frosting Recipe
- Prep Time: 15 minutes
- Cook Time: 20 minutes
- Total Time: 35 minutes
- Yield: 16 bars 1x
- Category: Dessert
- Method: Baking
- Cuisine: American
Description
These Red Velvet Sugar Cookie Bars combine the rich, velvety flavor of red velvet with the classic sweetness of sugar cookies, topped with a smooth cream cheese frosting. Perfectly soft and chewy, these bars make a delightful treat for any occasion, offering a visually stunning and delicious dessert that’s easy to prepare in just over half an hour.
Ingredients
Cookie Bars
- 2 1/2 cups flour
- 1/4 cup unsweetened cocoa powder
- 1/2 teaspoon salt
- 1 teaspoon baking powder
- 1 cup butter, softened
- 1 1/2 cups sugar
- 2 eggs
- 2 teaspoons vanilla extract
- 2 tablespoons red food coloring
Cream Cheese Frosting
- 8 ounces cream cheese, softened
- 1/2 cup butter, softened
- 2 cups sifted powdered sugar
- 1 teaspoon vanilla extract
Instructions
- Preheat and Prepare Pan: Preheat your oven to 350 degrees Fahrenheit. Prepare a 9×13 inch baking pan by lining it with aluminum foil or parchment paper and spraying it with cooking spray to ensure easy removal and cutting of the bars.
- Mix Dry Ingredients: In a medium bowl, whisk together the flour, unsweetened cocoa powder, salt, and baking powder. Set this mixture aside for later use.
- Cream Butter and Sugar: In a separate mixing bowl, cream the softened butter and sugar together until the mixture is light and creamy, which usually takes about 2 to 3 minutes. This step ensures the cookies will have a tender and airy texture.
- Add Eggs and Flavoring: Beat in the eggs, vanilla extract, and red food coloring until everything is fully combined, giving the dough its iconic red velvet color.
- Combine Dry and Wet Ingredients: Gradually add the flour mixture to the wet ingredients, stirring until a soft cookie dough forms.
- Shape and Bake: Press the dough evenly into the bottom of the prepared 9×13 inch pan. Bake in the preheated oven for about 20 minutes, or until the edges start to pull away from the sides and a toothpick inserted into the center comes out clean.
- Cool: Remove the bars from the oven and allow them to cool completely in the pan before frosting. Cooling is important so the frosting does not melt.
- Prepare Frosting: In a mixing bowl, beat together the softened cream cheese and butter until smooth. Gradually add the sifted powdered sugar and vanilla extract and beat until the frosting is creamy and smooth.
- Frost the Bars: Spread the cream cheese frosting evenly over the cooled cookie bars.
- Serve and Enjoy: Once frosted, slice into 16 bars and serve. These bars are perfect for parties, holidays, or as a special treat anytime.
Notes
- Lining the pan with foil or parchment helps to easily lift the bars out for clean cuts.
- Ensure the bars are fully cooled before frosting to prevent the frosting from melting.
- Use good quality red food coloring for the best vibrant color.
- For an extra festive touch, consider sprinkling white chocolate chips or decorative sprinkles on top of the frosting before it sets.
- Store leftover bars in an airtight container in the refrigerator for up to 5 days.
Nutrition
- Serving Size: 1 bar
- Calories: 280 kcal
- Sugar: 22 g
- Sodium: 150 mg
- Fat: 15 g
- Saturated Fat: 9 g
- Unsaturated Fat: 5 g
- Trans Fat: 0.2 g
- Carbohydrates: 32 g
- Fiber: 1 g
- Protein: 3 g
- Cholesterol: 55 mg


