

If you’re anything like me, there’s something truly magical about fresh, soft, just-out-of-the-oven rolls that instantly elevate any meal. That’s why I’m excited to share this Homemade Honey Dinner Rolls Recipe that’s become a staple in my kitchen. They’re irresistibly fluffy, gently sweetened with honey, and have that perfect golden crust that makes you want to eat them warm, right away. Trust me, once you try this recipe, you’ll understand why my family goes crazy for these rolls—and why I keep coming back to it for every gathering or cozy dinner.
Why You’ll Love This Recipe
- Super Soft & Fluffy: The honey and butter combo keep these rolls tender and melt-in-your-mouth fresh.
- Simple Ingredients: You probably already have everything in your pantry, making this an easy kitchen win.
- Quick Rise Time: With just two short rises, you’ll have hot rolls ready in about an hour total.
- Perfect for Any Occasion: Whether it’s dinner on a weeknight or a holiday feast, these rolls fit right in.

Ingredients You’ll Need
Every ingredient in this Homemade Honey Dinner Rolls Recipe works in harmony to create the perfect balance of sweetness, richness, and tender crumb. Let’s chat about these basics to help you shop smart and prepare well.
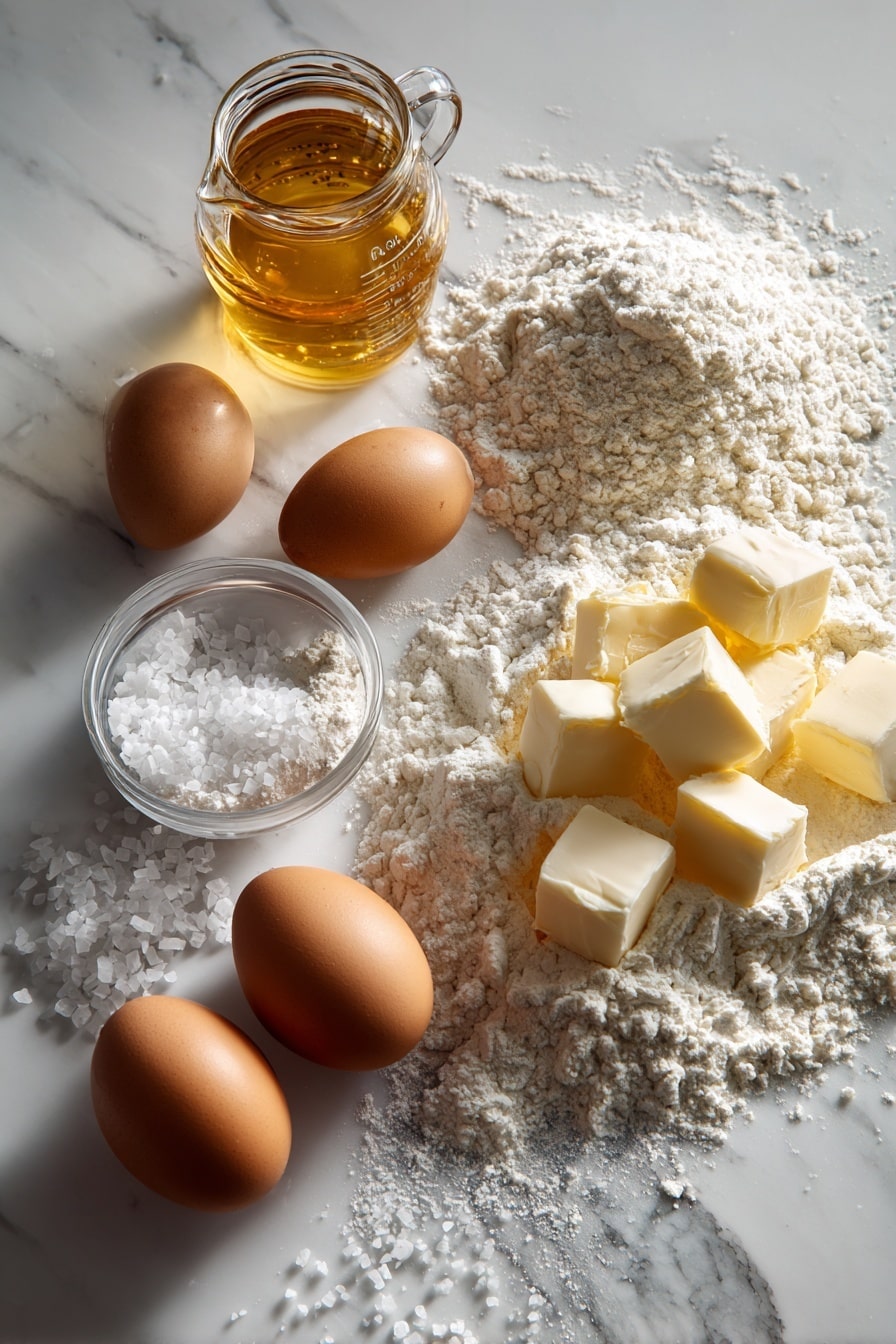
- Honey: The star sweetener here—choose raw or mild-flavored honey for the best subtle sweetness.
- Water (at 110°F): This warm temperature activates your yeast perfectly, so don’t skip using a thermometer if you have one.
- All-purpose flour: Versatile and reliable, all-purpose flour gives these rolls their soft yet sturdy texture.
- Unsalted butter: Room temperature and cubed, it melts into the dough for rich flavor and tenderness.
- Eggs: Divided usage adds moisture and helps with the shiny golden top after baking.
- Instant yeast: Fast-rising and easy to work with — helps these rolls puff up beautifully.
- Kosher salt: Just enough to balance the sweetness and enhance the overall flavor.
- Flaky salt (Maldon or fleur de sel): An optional sprinkle on top adds that extra crunch and gourmet touch.
Variations
I love tweaking my Homemade Honey Dinner Rolls Recipe depending on the season or what pantry staples I want to feature. Feel free to make these rolls your own and experiment—there’s plenty of room for creativity here.
- Whole Wheat Twist: Substitute half the flour with whole wheat for a nuttier flavor and heartier texture; my family surprisingly enjoyed this healthier tweak!
- Herb Infusion: Add fresh rosemary or thyme into the dough for a fragrant, savory note that pairs beautifully with dinner.
- Dairy-Free Version: Swap butter for coconut oil and use an egg substitute; it still yields soft, flavorful rolls.
- Extra Sweet: Drizzle a little honey butter on top right out of the oven for that irresistible glaze.
How to Make Homemade Honey Dinner Rolls Recipe
Step 1: Activating the Honey and Yeast
Start by warming your honey just enough to loosen it—you can microwave it for about 15 seconds. Mixing it with warm water (110°F is ideal) helps dissolve the honey and wake up your yeast. I always check the water temp with my instant-read thermometer. Too hot and you’ll kill the yeast, too cold and it won’t wake up enough. This little step makes a world of difference in dough rise.
Step 2: Mixing Your Dough
Once your honey and water are combined, add in the flour, butter cubes, one egg, yeast, and kosher salt. Whether you’re using a stand mixer with a dough hook or kneading by hand, mix until you have a soft, smooth dough that just starts pulling away from the sides of your bowl or surface. You might need a little extra flour—about a quarter cup is usually perfect—but watch that dough; you want it a bit tacky, not sticky. This balance is something I learned the hard way, and it really pays off.
Step 3: First Rise
Place your dough ball into a lightly greased bowl, cover with a towel, and find a warm spot for about 15 minutes. You don’t need to wait for a full double rise here—just until it looks puffy and a bit buoyant. The quicker rise helps keep the rolls ultra-soft and tender instead of overly dense.
Step 4: Shaping the Rolls
Give the dough a gentle punch to release the air and then divide into 12 equal pieces. Rolling each piece into a tight ball might feel a little tedious at first but it pays off by giving you beautifully rounded, evenly baked rolls. I use one hand to roll in a circular motion on my work surface until the dough feels smooth and taut. This trick is my favorite way to ensure every roll has that gorgeous shape.
Step 5: Second Rise and Prep for Baking
Place your perfectly rounded dough balls into the greased baking dish, cover them again, and let them puff up for another 15 minutes. Meanwhile, preheat your oven to 400°F. This second quick rise gives you rolls that almost bounce back when gently poked—perfectly proofed and ready to bake.
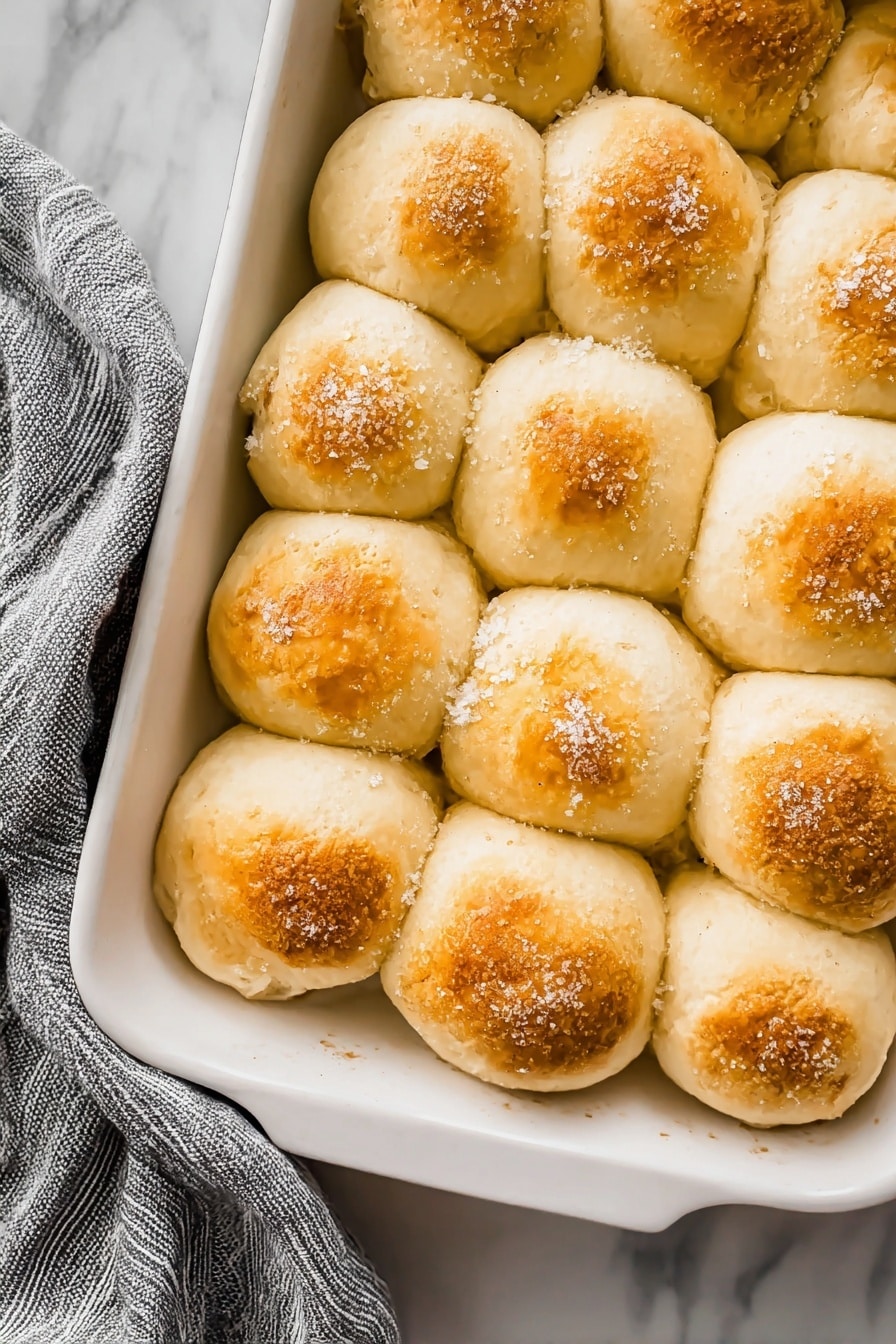
Step 6: Egg Wash and Baking
Before baking, brush the rolls with the beaten remaining egg for that glossy, golden finish. Don’t forget the flaky salt sprinkle — it adds that delightful contrast in texture and flavor on top. Bake for 15 to 20 minutes until they’re a warm golden brown and you can smell that heavenly honey aroma wafting through your kitchen. Let them cool in the pan for about 10 minutes before serving, or if you’re anything like me, go ahead and dive in while they’re still warm!
Pro Tips for Making Homemade Honey Dinner Rolls Recipe
- Temperature Check: Always measure your water temperature—it’s the most crucial step for yeast success.
- Butter Cubes: Using cold butter chunks mixed into the dough creates little pockets of richness that make each bite extra special.
- Shaping Technique: Rolling dough into tight balls not only shapes them beautifully but also helps with a fluffier texture.
- Proofing Time: Don’t rush your rises—even 15 minutes makes a big difference; watch for puffiness, not time alone.
How to Serve Homemade Honey Dinner Rolls Recipe
Garnishes
I usually top these rolls with flaky sea salt before baking, but sometimes I like to brush them with a little extra honey butter right after they come out of the oven for a glossy, sweet finish. A sprinkle of fresh chopped herbs like parsley can also bring a lovely pop of color and freshness.
Side Dishes
These rolls pair beautifully with almost anything — creamy soups, roasted chicken, or a hearty stew. For holidays, I love them alongside mashed potatoes and green beans, while on an easy weeknight, they’re perfect with a simple salad and grilled veggies.
Creative Ways to Present
One fun idea I tried was baking the rolls in a bundt pan, which made this beautiful pull-apart bread perfect for sharing at family brunches. You could also place mini rolls in cute ramekins or wicker baskets lined with a cloth napkin for a rustic, inviting look.
Make Ahead and Storage
Storing Leftovers
If you’re lucky enough to have leftover rolls (they tend to disappear fast at my house), store them in an airtight container at room temperature. They stay soft for up to 2 days. If they start to feel dry, just pop them in the microwave for a few seconds with a damp paper towel, and they’ll soften right back up.
Freezing
I freeze unbaked dough balls individually on a baking sheet, then transfer them to a freezer bag. When I want fresh rolls, I thaw and proof them a bit longer before baking. You can also freeze baked rolls in an airtight bag for up to 3 months—just be sure to thaw before reheating.
Reheating
For reheating, I prefer the oven over the microwave for that crisp crust. Wrap rolls in foil and warm at 350°F for about 10 minutes. If you’re in a hurry, a quick zap in the microwave with a teaspoon of water nearby can help retain moisture but might soften the crust.
FAQs
-
Can I make these rolls without a stand mixer?
Absolutely! While a stand mixer makes kneading easier and quicker, you can knead by hand on a clean surface. Just mix the ingredients until combined, then knead the dough by folding and pressing for about 8-10 minutes until smooth and elastic. It’s a rewarding process and helps you connect with your dough.
-
What is the best way to ensure soft rolls?
Using room temperature ingredients, especially eggs and butter, helps the dough come together smoothly. Also, don’t rush the proofing—letting the dough rise until puffy is key to that soft and airy texture. Finally, brushing the rolls with egg wash locks in moisture and creates a tender crust.
-
Can I substitute active dry yeast for instant yeast?
You can, but you’ll need to activate active dry yeast in warm water before adding it to your dough. Use the same warm water and honey mixture to dissolve the yeast, then let it sit for 5-10 minutes until foamy before mixing with the other ingredients.
-
Why do the rolls need an egg wash?
The egg wash not only gives the rolls a beautiful shiny, golden-brown finish but also helps any toppings like flaky salt adhere better. It’s one of those small steps that add a professional touch to homemade rolls.
-
How long can I keep these rolls fresh?
Stored in an airtight container at room temperature, these rolls stay fresh and soft for about 2 days. Beyond that, freezing is your best bet for maintaining quality.
Final Thoughts
I absolutely love how this Homemade Honey Dinner Rolls Recipe turns out every single time—soft, slightly sweet, and full of buttery goodness that feels like a warm hug from the kitchen. When I first tried it, I was amazed at how quickly and easily I could make bakery-level rolls at home. Whether you’re serving them at a family dinner, holiday meal, or just because, these rolls make everything feel extra special. I hope you enjoy making (and eating!) them as much as I do—once you try this recipe, it’s sure to earn a permanent spot in your homemade baking lineup.
Print
Homemade Honey Dinner Rolls Recipe
- Prep Time: 10 minutes
- Cook Time: 20 minutes
- Total Time: 1 hour
- Yield: 12 rolls 1x
- Category: Bread
- Method: Baking
- Cuisine: American
Description
These homemade dinner rolls are soft, fluffy, and slightly sweetened with honey. Perfect as a side for any meal, they are enriched with butter and eggs and brushed with an egg wash for a beautiful golden crust. Easy to prepare with simple ingredients and quick rising times, these rolls bake up light and tender, finishing with a sprinkle of flaky sea salt for a touch of gourmet flavor.
Ingredients
Liquid Ingredients
- 3 tablespoons honey
- 1 cup water at 110°F
- 2 large eggs at room temperature, divided
Dry Ingredients
- 3 ½ to 4 cups all-purpose flour
- 1 tablespoon instant yeast
- 1 teaspoon kosher salt
Fats and Seasoning
- 5 tablespoons unsalted butter at room temperature, cut into ¼-inch cubes
- Flaky salt such as Maldon or fleur de sel, for sprinkling
Instructions
- Prepare the baking dish: Grease a 9×13-inch baking dish with nonstick spray to prevent the rolls from sticking during baking.
- Warm the honey: Place the honey in a microwave-safe bowl and heat for 15 seconds until warm and loosened, which helps it dissolve evenly.
- Mix wet ingredients and start dough: In a stand mixer bowl fitted with a dough hook or a large mixing bowl, combine the warm honey and water (checking the temperature is around 110°F). Stir to dissolve the honey completely.
- Add dough ingredients: Add 3½ cups of flour, cubed butter, 1 egg, instant yeast, and kosher salt to the liquid mixture.
- Knead the dough: Using a stand mixer on medium-low speed, knead the dough for about 3 minutes until it is smooth, soft, and pulls away from the sides of the bowl. Add additional flour in small increments (about ¼ cup) if the dough feels too sticky. If kneading by hand, turn out the dough onto a floured surface and knead until smooth and no longer sticky, about 8-10 minutes.
- First rise: Place the dough into a clean, greased bowl. Cover with a dish towel and let it rise in a warm spot for 15 minutes until puffy.
- Shape the rolls: Punch down the dough gently to deflate it. Divide into 12 equal portions (approximately 2.7 ounces each). Roll each piece into a smooth, tight ball using your palm and arrange them evenly in the prepared baking dish.
- Second rise: Cover the rolls with a clean dish towel and let them rise again in a warm place for about 15 minutes until they puff up noticeably.
- Prepare the egg wash: Beat the remaining egg in a small bowl until smooth. Brush the tops of the rolls with the egg wash and sprinkle with flaky sea salt for enhanced flavor and a glossy finish.
- Bake the rolls: Preheat the oven to 400°F (204°C). Bake the rolls for 15 to 20 minutes or until they turn golden brown and are cooked through.
- Cool and serve: Remove the baking dish from the oven and place it on a wire rack. Let the rolls cool in the dish for 10 minutes before serving for optimal texture and flavor.
Notes
- Ensure the water is warm but not hot to activate the yeast properly without killing it.
- If the dough is too sticky during kneading, add flour in small amounts until it reaches a soft yet manageable consistency.
- Using flaky salt adds a nice crunchy texture and visual appeal to the rolls.
- These rolls are best enjoyed fresh but can be stored in an airtight container for up to 2 days and reheated gently.
Nutrition
- Serving Size: 1 roll
- Calories: 160
- Sugar: 3g
- Sodium: 210mg
- Fat: 6g
- Saturated Fat: 3.5g
- Unsaturated Fat: 2g
- Trans Fat: 0g
- Carbohydrates: 22g
- Fiber: 1g
- Protein: 4g
- Cholesterol: 35mg


