

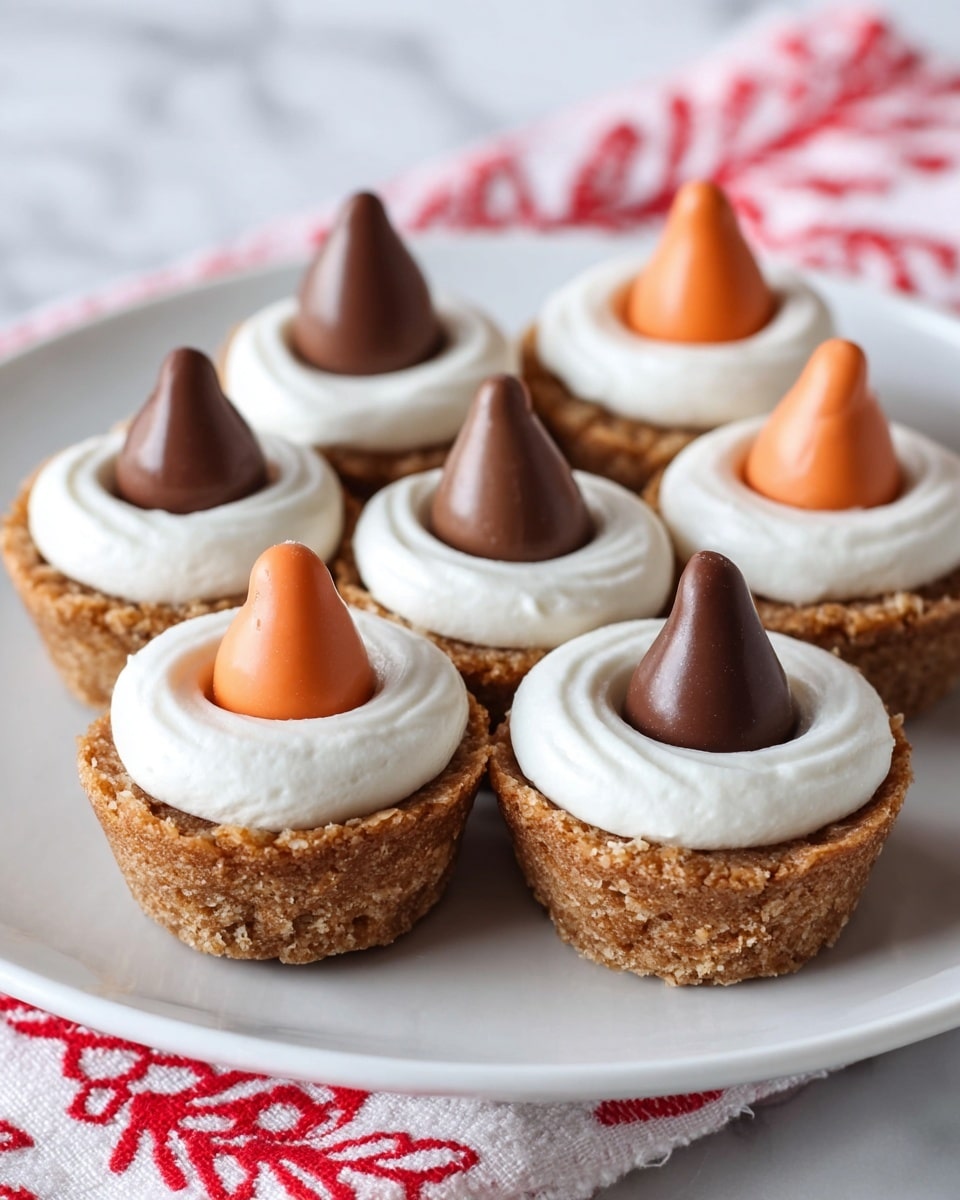
If you’re anything like me and love everything about campfire s’mores but want a more manageable, less messy version, you’re going to adore this S’mores Cookie Cups Recipe. These little bites are like a mini party in your mouth: buttery graham cracker cookie base, a soft puff of marshmallow, and that melty, irresistible chocolate on top. Seriously, once I made these, my family goes crazy for them every time. Stick with me, and I’ll share all the tips to make yours perfect every time.
Why You’ll Love This Recipe
- Perfect Crowd-Pleaser: Everyone from kids to adults can’t get enough of these bite-sized treats.
- Quick & Easy: Less than 40 minutes from start to finish with simple ingredients you probably already have.
- No Campfire Needed: You get that classic s’mores flavor without setting up a fire or dealing with sticky fingers.
- Customizable: Swap chocolates and marshmallows easily to suit your taste or occasion.

Ingredients You’ll Need
The balance between the graham cracker crumbs and the flour creates a tender, buttery cookie that holds its shape beautifully in mini muffin tins. Plus, using jumbo marshmallows cut in half gives the perfect gooey topping every time. Let me walk you through why these ingredients come together so well.
- All-Purpose Flour: Helps keep the cookie cups tender but sturdy enough to hold marshmallows and chocolate.
- Graham Cracker Crumbs: Adds that unmistakable s’mores crunch and flavor; make sure they’re finely crushed for even texture.
- Baking Powder & Baking Soda: Both leaveners keep the dough light—don’t skip or reduce these, they make a big difference.
- Salt: Just a pinch to balance the sweetness and enhance flavors.
- Unsalted Butter: Softened to room temp for easy creaming—this is key for that light, fluffy dough texture.
- Sugar & Light Brown Sugar: The combo adds sweetness plus moisture and a touch of caramel flavor from the brown sugar.
- Eggs: Bind everything together and bring richness.
- Vanilla Extract: Amplifies all the flavors with a warm, comforting note.
- Large Marshmallows: Cut in half so they melt perfectly in the cookie cup’s center.
- Chocolate Candies: Kisses, pumpkin Kisses, or mini Reese’s cups all work beautifully melted on top.
Variations
I love how easy this S’mores Cookie Cups Recipe is to tailor for whatever you’ve got on hand or want to try. Play around with the toppings or even the cookie base if you want to mix things up while keeping that iconic s’mores vibe intact.
- Peanut Butter Twist: Swap the chocolate candies for mini peanut butter cups—I’ve done this for a crowd, and it’s a total hit with peanut butter lovers.
- Seasonal Flavors: Add a sprinkle of cinnamon or pumpkin spice to the dough during fall and watch these cups take on cozy vibes perfectly.
- Vegan/Dairy-Free: Use dairy-free butter and vegan marshmallows for a sweet treat everyone can enjoy—I substituted these once and honestly didn’t miss the dairy at all.
- Chocolate Chip Cookie Base: If you want an even more classic cookie feel, switch the base to your favorite chocolate chip cookie dough recipe instead of graham crumbs.
How to Make S’mores Cookie Cups Recipe
Step 1: Prep Your Oven and Dry Ingredients
Start by preheating your oven to 350°F (175°C). Then in a large bowl, whisk together the flour, graham cracker crumbs, baking powder, baking soda, and salt. This ensures all the dry elements are evenly distributed so your cookie cups bake evenly—no surprises here!
Step 2: Cream Butter and Sugars
Using a mixer, beat the softened butter with both sugars on medium-high for about 3-4 minutes until the mixture is light and fluffy. I once skipped to just mixing quickly, but this step really makes your dough airy and helps the cookies bake with the perfect texture. Then add eggs and vanilla extract, mixing again until combined.
Step 3: Combine Wet and Dry Ingredients
Reduce the mixer speed to low and gradually add the dry ingredients into the wet. Mix just until everything comes together—overmixing can make your cookies tough, so watch for those streaks of flour to disappear and then stop.
Step 4: Shape Cookie Cups in Mini Muffin Tin
Scoop about half a tablespoon of dough into each cup of a nonstick mini-muffin pan. Then use your thumb (or the back of a small spoon) to press a deep indent in the center—this is where your marshmallow will sit later. Trust me, creating this space is the key to that classic s’mores look and texture.
Step 5: Bake and Add Marshmallows
Bake the cookie cups for 8 minutes, just enough to set the base but not fully brown. Then remove the pan from the oven and press a half marshmallow, cut side down, into each indentation. Pop the pan back in for 2 more minutes until the marshmallows swell slightly and get that soft, pillowy look.
Step 6: Add Chocolate and Cool
Right away, press a chocolate candy (a Kiss or mini Reese’s) into each marshmallow while they’re still warm so the chocolate melts perfectly on contact. Let the cookie cups cool in the pan for about 15 minutes before gently removing them. This resting time helps them hold their shape perfectly.
Pro Tips for Making S’mores Cookie Cups Recipe
- Room Temperature Butter: Using softened butter makes creaming easier and ensures smooth dough without lumps.
- Indent Deep Enough: Don’t be shy when pressing the dough down—this helps prevent marshmallows from spilling over.
- Press Chocolate While Warm: The warm marshmallow melts the chocolate just enough for that ooey-gooey texture we all crave.
- Cool Before Removing: Try not to rush the cooling step; the cookie cups firm up and come out cleanly from the pan.
How to Serve S’mores Cookie Cups Recipe
Garnishes
I usually keep these simple, but sometimes I sprinkle a little toasted graham cracker crumbs or flaky sea salt on top to add a touch more texture and flavor contrast. A quick dust of powdered sugar works too if you want a prettier presentation for guests.
Side Dishes
Since these are pretty rich and sweet, I like pairing them with a cup of strong coffee or a tall glass of cold milk. For parties, a fresh fruit platter balances the sweetness nicely without overwhelming.
Creative Ways to Present
For special occasions, I arrange the cookie cups on a rustic wooden board surrounded by small bowls of extra chocolate candies and mini marshmallows so people can make them even more decadent if they like. They also make adorable party favors when wrapped individually in clear cellophane tied with a ribbon.
Make Ahead and Storage
Storing Leftovers
I store leftover cookie cups in an airtight container at room temperature. They stay fresh and chewy for about 3 days—and honestly, they rarely last that long in my house!
Freezing
You can freeze these cookie cups by placing them in a single layer on a baking sheet first, then transferring to a freezer-safe container. They keep well for up to 2 months, which is great for meal prepping or saving for last-minute guests.
Reheating
To reheat, I pop a few cookie cups in a preheated 300°F oven for 5-7 minutes, just until the chocolate is soft and the marshmallow slightly melty again—avoid microwaving or they get rubbery fast.
FAQs
-
Can I use regular-sized marshmallows instead of large ones for this recipe?
Using large marshmallows cut in half works best so that the marshmallow fits nicely in the cookie cup without overflowing too much. If you only have regular marshmallows, you can try using two per cup or cutting some smaller, but be mindful they might melt differently and create less of that signature toasted look.
-
Can I make the cookie cups ahead and refrigerate before baking?
Absolutely! You can scoop the dough into the mini muffin tin, create the indentations, then cover and refrigerate for up to 24 hours before baking. This actually firms up the dough making it easier to handle and can improve the flavor as the ingredients meld.
-
What’s the best chocolate to use for these cookie cups?
I recommend using chocolate candies like Hershey’s Kisses, seasonal pumpkin Kisses, or mini Reese’s cups because they melt evenly but keep their shape while cooling, giving you that perfect gooey top without puddles of melted chocolate.
-
Can I make these gluten-free?
Yes! Substitute the all-purpose flour with your favorite gluten-free flour blend. Make sure your graham cracker crumbs are also gluten-free, and the recipe will turn out just as delicious.
Final Thoughts
Every time I make this S’mores Cookie Cups Recipe, it reminds me why comfort food classics never go out of style. This recipe brings together the nostalgic flavors of campfire s’mores with the convenience of the oven, plus the cuteness of bite-sized cookies. If you’ve been on the fence about giving it a try, consider this me nudging you to go for it — you’ll be rewarded with easy, crowd-pleasing treats that everyone will love.
Print
S’mores Cookie Cups Recipe
- Prep Time: 30 minutes
- Cook Time: 10 minutes
- Total Time: 40 minutes
- Yield: 72 cookie cups 1x
- Category: Dessert
- Method: Baking
- Cuisine: American
Description
Delight in these irresistible S’mores Cookie Cups, a fun twist on the classic campfire treat. Mini cookie cups made from a graham cracker-infused dough are baked to perfection, then topped with toasted marshmallow halves and melty chocolate candies for a gooey, nostalgic dessert everyone will love.
Ingredients
Dry Ingredients
- 2 cups all-purpose flour
- 2 1/2 cups graham cracker crumbs
- 1/2 teaspoon baking powder
- 1/2 teaspoon baking soda
- 1/2 teaspoon salt
Wet Ingredients
- 1 cup unsalted butter, softened
- 1 cup sugar
- 1 cup light brown sugar, lightly packed
- 2 large eggs
- 1 teaspoon vanilla extract
Toppings
- 36 large marshmallows, cut in half
- 72 chocolate candies (Kisses, pumpkin Kisses, or mini Reese’s cups)
Instructions
- Preheat Oven: Preheat your oven to 350 degrees F (175 degrees C) to prepare for baking the cookie cups.
- Mix Dry Ingredients: In a large bowl, whisk together the all-purpose flour, graham cracker crumbs, baking powder, baking soda, and salt to ensure they are evenly combined.
- Cream Butter and Sugars: In a separate bowl, use a stand mixer or portable electric mixer to beat the softened butter, sugar, and brown sugar on medium-high speed for 3 to 4 minutes until the mixture becomes light and fluffy.
- Add Eggs and Vanilla: Beat in the eggs one at a time, followed by the vanilla extract, mixing well after each addition for a smooth batter.
- Combine Mixtures: Reduce the mixer speed to low and gradually add the dry flour mixture to the wet ingredients. Mix just until combined to avoid overworking the dough.
- Scoop Dough: Using a small spoon, scoop about 1/2 tablespoon of dough into each cup of a nonstick mini-muffin pan. Use your thumb to gently create an indentation in the center of each dough ball to form a cup shape.
- Bake Initial Cookies: Bake the dough in the preheated oven for 8 minutes, allowing the cookies to set but remain soft.
- Add Marshmallows: Remove the pan from the oven and place a half marshmallow, cut side down, into the indentation of each cookie cup.
- Toast Marshmallows: Return the pan to the oven and bake for an additional 2 minutes, until the marshmallows are slightly puffed and toasted.
- Add Chocolate: Remove the pan from the oven and while the marshmallows are still warm, press a chocolate candy into each marshmallow to melt slightly and create the classic s’mores flavor.
- Cool and Store: Allow the cookie cups to cool in the pan for about 15 minutes before gently removing them. Store in an airtight container to maintain freshness.
Notes
- You can substitute different types of chocolate candies based on preference or availability.
- Ensure marshmallows are placed cut-side down to maximize contact and melting.
- Use a nonstick mini-muffin pan for easy removal of cookie cups.
- These cookie cups can be stored at room temperature for up to 3 days or frozen for longer storage.
- For an extra touch, sprinkle a tiny pinch of sea salt on the chocolate before it sets to enhance flavor contrast.
Nutrition
- Serving Size: 1 cookie cup
- Calories: 110
- Sugar: 8g
- Sodium: 70mg
- Fat: 5g
- Saturated Fat: 3g
- Unsaturated Fat: 2g
- Trans Fat: 0g
- Carbohydrates: 15g
- Fiber: 0.5g
- Protein: 1.3g
- Cholesterol: 15mg
