

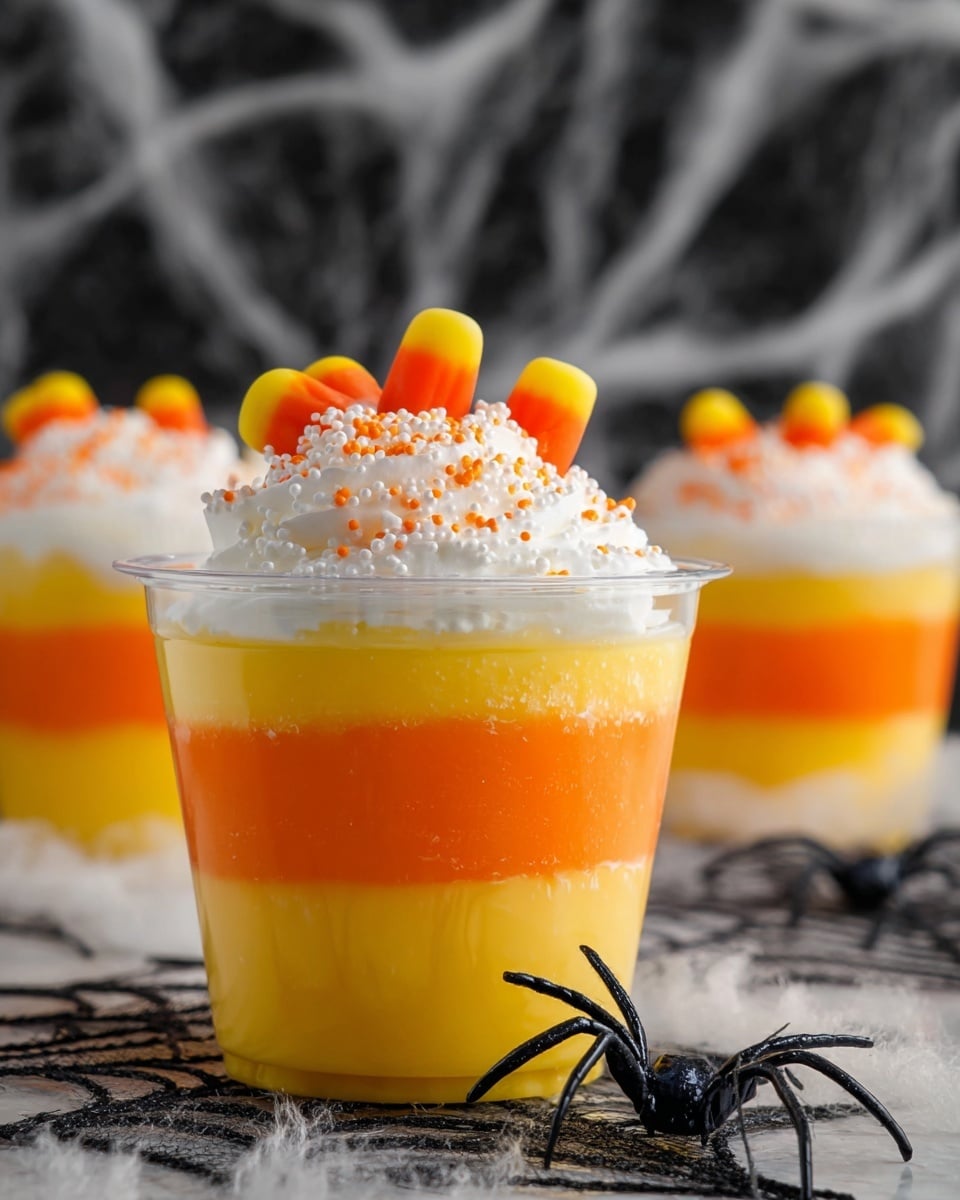
If you’re anything like me, you absolutely adore fun seasonal treats that are as charming to look at as they are delicious to eat. That’s why this Candy Corn Layered Pudding Dessert Cups Recipe quickly became a favorite in my house—not just because it tastes amazing, but also because it’s super easy and totally festive. Picture creamy layers of vanilla pudding, a pop of orange, and a whipped topping crowned with candy corn—each bite feels like a little party in your mouth. Trust me, once you try this, you’ll be making it for every Halloween get-together or whenever you want a sweet, colorful pick-me-up!
Why You’ll Love This Recipe
- Festive and Fun: It perfectly captures the colors and spirit of candy corn without any complicated steps.
- Quick and Easy: Ready in under 30 minutes, it’s a no-fuss dessert that’s big on impact.
- Kid-Approved: My kids go crazy for these pudding cups, and it’s a great way to get them involved in the kitchen.
- Customizable: You can tweak the colors, toppings, or pudding flavors to suit your taste or occasion.

Ingredients You’ll Need
The magic of this Candy Corn Layered Pudding Dessert Cups Recipe lies in the simple ingredients that come together effortlessly to create such a festive treat. You’ll want to pick good-quality vanilla pudding mix and fresh Cool Whip (or homemade whipped cream for an extra touch), plus your favorite candy corn and colored sugars for that perfect finishing plate.
- Vanilla Instant Pudding and Pie Filling Boxes: I always choose the ones labeled for pudding, not the pie filling option, to get that perfect creamy texture.
- Cold Milk: Using cold milk straight from the fridge helps the pudding set nicely and tastes fresher.
- Orange Food Coloring: Add just a little at a time — I usually start with around five drops to get a nice bright orange layer.
- Cool Whip: Thawed and fluffy, Cool Whip gives the dessert a lovely creamy top, but whipped cream works just as well and tastes fresh.
- Candy Corn: The star decoration! Be sure to grab a fresh bag for the crunchy sweetness and classic look.
- Orange and Yellow Colored Sugars: These add sparkle and extra fun — I find them at most baking aisles during fall.
Variations
I love how easily you can customize this Candy Corn Layered Pudding Dessert Cups Recipe. Whether you want to switch things up with flavors or make it work for dietary preferences, small changes can make a big difference in your kitchen fun.
- Use Pumpkin Spice Pudding: I once swapped the orange layer for pumpkin spice pudding, and my family totally went nuts for that cozy fall vibe.
- Make it Dairy-Free: Try coconut milk pudding and dairy-free whipped topping to keep it vegan-friendly without losing creaminess.
- Add Crunch: Sprinkle crushed graham crackers or festive sprinkles between layers for extra texture.
- Change the Colors: Use different food coloring to match other holidays—reds and greens for Christmas, pastels for Easter—and make it your own.
How to Make Candy Corn Layered Pudding Dessert Cups Recipe
Step 1: Mix Your Pudding Layers
Start by whisking together two boxes of vanilla instant pudding with six cups of cold milk in a large bowl. Follow the instructions on the pudding box—that’s usually about 2 minutes of whisking until it thickens. This is the base for both your yellow and orange layers, so get a nice, smooth consistency.
Step 2: Divide and Color
Now, split your pudding so about one-third goes into a separate bowl (this will be your “yellow” layer). In the larger portion (two-thirds), add orange food coloring—about five drops, one at a time, mixing well in between until you get that vibrant orange hue you want. This layering is what really mimics the candy corn look.
Step 3: Layer Your Dessert Cups
Grab 10 plastic or glass dessert cups and spoon in the vanilla pudding until each is about a third full. Then gently add the orange pudding on top so it makes up the other two-thirds of the cup. Leave a little room at the top for the whipped topping—this layering is the key to that eye-catching candy corn silhouette.
Step 4: Top it Off and Decorate
Finish by adding a dollop of Cool Whip on each cup. I love how it adds a creamy contrast and softens the sweetness. Then go wild with topping them off—candy corn pieces, orange and yellow colored sugars, or even your favorite fall sprinkles. It’s such a fun moment, especially if you have kids helping!
Pro Tips for Making Candy Corn Layered Pudding Dessert Cups Recipe
- Slow and Steady Coloring: Add orange food coloring drop by drop to avoid overdoing it and ending up with a neon mess.
- Thorough Mixing: Whisk pudding thoroughly to prevent lumps, especially when adding food coloring for an even shade.
- Layer Gently: Pour the orange pudding slowly over the back of a spoon to keep the layers neat and separate.
- Chilling Helps Set: Let the pudding cups chill in the fridge for at least 15 minutes before topping with Cool Whip—this helps maintain structure.
How to Serve Candy Corn Layered Pudding Dessert Cups Recipe
Garnishes
For garnishes, I swear by classic candy corn—because it matches the theme perfectly—but I also love sprinkling on a little crushed pretzels or autumnal colored sugar for a tiny crunch and sparkle. If you prefer a bit of freshness, a mint leaf or two can contrast nicely with the sweet flavors. The key is to keep it fun and colorful!
Side Dishes
I usually serve these pudding cups at casual gatherings alongside simple snacks like roasted pumpkin seeds, caramel popcorn, or spiced apple cider. They balance out heavy fall appetizers with a light and creamy sweetness that everyone appreciates.
Creative Ways to Present
For parties, I like to serve these in mini mason jars or clear mini trifle bowls to really showcase the beautiful layers. Adding seasonal decorations like tiny pumpkins or themed picks around the cups adds that extra festive flair that guests can’t help but admire. I’ve even turned this into a fun party activity by letting guests decorate their own cups!
Make Ahead and Storage
Storing Leftovers
I keep leftovers covered tightly with plastic wrap in the fridge and they stay fresh for up to 2 days. Just be sure to add any crunchy toppings right before serving since they can get soggy if left on too long.
Freezing
Freezing pudding cups isn’t my go-to because the texture changes once thawed, often becoming a bit watery. If you try it, do so without the whipped topping and garnish, then thaw gently in the fridge, but honestly, I recommend enjoying these fresh!
Reheating
This dessert is meant to be served chilled, so reheating is not necessary. If it’s taken too long to eat, just give it a quick stir before adding the whipped topping again to freshen up the texture.
FAQs
-
Can I make this Candy Corn Layered Pudding Dessert Cups Recipe ahead of time?
Absolutely! You can prepare the pudding layers a few hours in advance and layer them in individual cups. Just add the Cool Whip and garnish right before serving to keep things fresh.
-
What if I don’t have orange food coloring?
You can use natural alternatives like carrot juice or pumpkin puree mixed into the pudding for color and flavor, though it will change the taste slightly. Otherwise, yellow with a tiny bit of red food coloring works too.
-
Can I use homemade pudding for this recipe?
Definitely! If you prefer homemade pudding, just make a classic vanilla pudding and split and color it the same way. It’s a bit more work, but the results are fantastic and super fresh.
-
How many servings does this recipe make?
This recipe makes about 10 individual dessert cups, perfect for a party or a family gathering.
Final Thoughts
I absolutely love how this Candy Corn Layered Pudding Dessert Cups Recipe brings a little joy and color to the dessert table with almost no effort at all. It’s one of those recipes I reach for when I want to impress guests without breaking a sweat—or just treat my family to something festive and sweet. Give it a try; I promise you’ll enjoy the creamy layers, the fun presentation, and the smiles it brings. It’s the kind of recipe that feels special but is ridiculously easy to make, which is why it’s such a keeper in my kitchen.
Print
Candy Corn Layered Pudding Dessert Cups Recipe
- Prep Time: 15 minutes
- Cook Time: 0 minutes
- Total Time: 25 minutes
- Yield: 10 dessert cups 1x
- Category: Dessert
- Method: No-Cook
- Cuisine: American
- Diet: Vegetarian
Description
These Candy Corn Layered Pudding Dessert Cups are a festive, no-bake treat perfect for Halloween or fall-themed parties. The dessert features creamy vanilla pudding tinted orange to resemble candy corn colors, layered beautifully in individual cups and topped with fluffy Cool Whip and candy decorations. Easy to prepare and visually appealing, this dessert is a fun way to celebrate the season.
Ingredients
Pudding Mixture
- 2 boxes (5.1 oz each) Vanilla Instant Pudding and Pie Filling
- 6 cups cold milk
- Orange food coloring
Topping and Decorations
- 8 oz Cool Whip, thawed
- Candy corn for decoration
- Orange and yellow colored sugars for decoration
Instructions
- Prepare Pudding: In a large mixing bowl, combine both packages of vanilla instant pudding with 6 cups of cold milk. Stir according to the pudding package directions until the mixture thickens.
- Divide Pudding: Separate the prepared pudding into two bowls, placing one-third of the pudding into one bowl and two-thirds into the other.
- Color the Larger Portion: Add orange food coloring drops slowly to the bowl containing two-thirds of the pudding, stirring after each drop. Continue until you reach a bright orange shade resembling candy corn.
- Layer Pudding in Cups: Fill 10 plastic dessert cups with one-third of vanilla pudding, then top with double that amount (two-thirds) of the orange-colored pudding, creating a distinct layered look with yellow on the bottom and orange on top. Leave some space at the top of each cup for the whipped topping.
- Add Topping: Spoon Cool Whip over the pudding layers in each cup, spreading it evenly to create a fluffy top layer.
- Decorate: Garnish each cup with candy corn pieces and sprinkle with orange and yellow colored sugars to enhance the festive appearance.
Notes
- Use plastic dessert cups or small clear glasses to showcase the colorful layers effectively.
- For added flavor, consider mixing a teaspoon of vanilla extract into the pudding mixture before setting.
- Allow the assembled cups to chill in the refrigerator for at least 30 minutes before serving for best texture and flavor.
- Alternatively, homemade whipped cream can replace Cool Whip for a fresher topping.
- Adjust the amount of food coloring depending on your preferred intensity of the orange layer.
Nutrition
- Serving Size: 1 dessert cup
- Calories: 220
- Sugar: 24g
- Sodium: 180mg
- Fat: 7g
- Saturated Fat: 5g
- Unsaturated Fat: 2g
- Trans Fat: 0g
- Carbohydrates: 35g
- Fiber: 0g
- Protein: 3g
- Cholesterol: 10mg

