

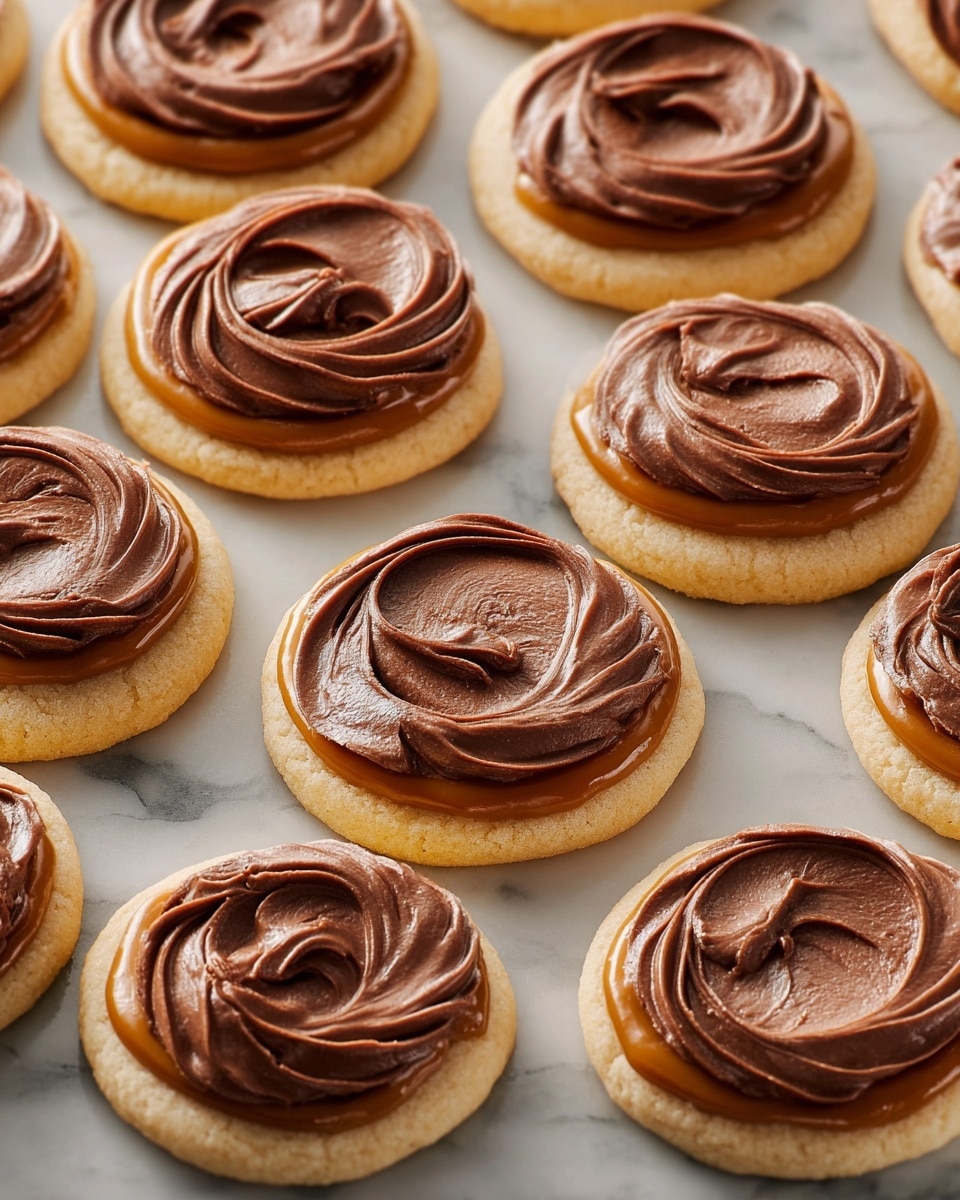
If you’re a fan of that perfect balance between crunchy cookie, gooey caramel, and smooth chocolate, then you’re in for a real treat with this Twix Cookies Recipe. Trust me, this one quickly became a staple in my kitchen because it captures all those Twix bar flavors in a homemade cookie form — and you won’t believe how easy it is to make. So whether you’re baking for a crowd or just yourself (no judgment here!), keep reading because these cookies will absolutely blow your mind.
Why You’ll Love This Recipe
- True Twix Flavor: It perfectly mimics the classic candy bar’s layers in cookie form, creating nostalgia in every bite.
- Simple Ingredients: You probably already have everything in your pantry, making this a no-fuss baking adventure.
- No Candy Bars Needed: Making it from scratch saves money and allows for fresh, homemade goodness.
- Versatile and Customizable: You can tweak it for dietary needs or switch up the chocolate and caramel for fun variations.

Ingredients You’ll Need
The ingredients come together seamlessly to create that distinct Twix experience—rich buttery cookies, luscious caramel, and smooth chocolate. Each element complements the other, so make sure to pick good-quality caramel and chocolate for the best results!
- Unsalted butter: Softened butter gives your cookies that tender, melt-in-your-mouth texture without any bitter undertones.
- Powdered sugar: I love using powdered sugar here for an ultra-smooth dough—plus, it helps the cookies stay soft rather than crunchy.
- Pure vanilla extract: A splash of vanilla brings warmth and depth to your cookie dough.
- All-purpose flour: The backbone of the dough—make sure it’s fresh and measure carefully to keep the perfect cookie consistency.
- Kosher salt: Salt is crucial here—it balances sweetness and brightens all the flavors wonderfully.
- Caramel: I recommend using a good-quality jarred caramel or homemade if you’re up for it; it’s the yummy gooey heart of these cookies.
- Milk chocolate chips: Chips melt beautifully, creating that chocolate layer you crave—you can also try semi-sweet if you prefer less sweet.
Variations
I love experimenting with this Twix Cookies Recipe — it’s so adaptable. Feel free to customize based on what you have on hand or your preferred flavor profile. You can really make it your own!
- Salted caramel twist: Adding a pinch of flaky sea salt over the caramel just before the chocolate sets adds a delicious contrast that my family craves.
- Dark chocolate version: When I switched to bittersweet chocolate chips, the cookies took on a more sophisticated flavor that impressed all the chocoholics.
- Gluten-free option: I’ve substituted the all-purpose flour with a gluten-free blend and kept everything else the same—with fantastic results!
- Mini cookie bites: To make them bite-sized, just cut the dough into smaller rounds; they’re perfect for parties or lunchboxes.
How to Make Twix Cookies Recipe
Step 1: Cream Your Butter and Sugar
Start by beating the softened butter and powdered sugar on medium-high speed until creamy and fluffy. This usually takes about 2-3 minutes. I found that this step sets the texture for the cookies, so don’t skip the thorough beating. Then add the vanilla and mix until it’s fully incorporated—your dough is starting to come alive!
Step 2: Mix in Dry Ingredients and Chill
Next, add the flour and kosher salt and combine on medium-low speed just until the dough comes together. You don’t want to overmix here, or the cookies will turn out tough. Once the dough forms, turn it onto a floured surface, knead it a few times to bring it together, and shape it into a disk. Wrap it well in plastic and pop it in the fridge for at least an hour. This chilling step helps the dough relax and makes rolling easier.
Step 3: Roll and Cut Your Cookies
When you’re ready to bake, preheat your oven to 350°F and line your baking sheets with parchment paper. Let the dough sit out for 5-10 minutes so it’s easier to roll. Roll it on a lightly floured surface until it’s about 1/4-inch thick. Then, using a 2 1/2-inch round cookie cutter, cut out as many cookies as you can—about 24. I like to reroll the scraps carefully to maximize yield without overworking the dough.
Step 4: Bake and Cool
Bake your cookies for 12 to 14 minutes, or until the edges just start turning golden and the centers feel set. To get perfect baking time, I usually check a few minutes early the first time with my oven because every oven bakes differently. Once out of the oven, let them cool completely on the baking sheet to keep their shape intact—this patience really pays off!
Step 5: Add the Caramel Layer
Once the cookies have cooled, spoon a generous amount of caramel onto the center of each cookie. Spread it evenly but leave a small border around the edges. I learned that a thinner caramel layer can get lost, so don’t be shy here! Then pop the cookies into the fridge for about 10 minutes to let the caramel firm up slightly before the chocolate topping.
Step 6: Top with Melted Chocolate
In a microwave-safe bowl, heat the chocolate chips in 30-second bursts, stirring each time until smooth and melty. Spread the melted chocolate over the caramel, again leaving the edges visible for that classic Twix look. Refrigerate for at least 30 minutes so the chocolate sets completely. This final chill is key, so don’t rush it—your patience results in gorgeous layered cookies.
Step 7: Enjoy or Store for Later
If you can wait, these cookies are incredible after a chill in the fridge, but they taste amazing room temperature too. Keep reading below for my tips on storing and make-ahead tricks!
Pro Tips for Making Twix Cookies Recipe
- Chill Your Dough Well: Don’t rush this step—chilling helps prevent spreading and gives you neat cookie edges.
- Melt Chocolate Gently: Overheating chocolate can make it grainy; short bursts and stirring save your batch.
- Use Parchment Paper: This stops sticking and keeps your baking sheet clean—makes cleanup a breeze.
- Leave a Caramel Border: Keeping edges uncovered prevents the chocolate from spilling over and helps define each layer.
How to Serve Twix Cookies Recipe
Garnishes
I usually keep these classic and simple, but for extra flair, a sprinkle of flaky sea salt or a drizzle of white chocolate over the top looks stunning and adds flavor depth. Sometimes a tiny sprinkle of crushed peanuts adds a nice crunch that reminds me of other candy bars.
Side Dishes
These cookies are a perfect partner for an afternoon coffee or a glass of cold milk. I also enjoy pairing them with a scoop of vanilla ice cream when serving as a dessert—it’s like a double indulgence that friends and family adore.
Creative Ways to Present
For parties, I arrange the Twix cookies on a wooden board with raw caramel candies and chunks of chocolate for a “build your own Twix” vibe. Another fun idea is stacking them in little towers wrapped with twine as edible favors guests always appreciate.
Make Ahead and Storage
Storing Leftovers
After baking, I store the Twix cookies in an airtight container in the refrigerator to keep the caramel and chocolate layers firm. They stay fresh for up to two days—perfect if you’re serving over a couple of days or want to prep in advance.
Freezing
Believe it or not, these cookies freeze beautifully! Just layer them between parchment in a freezer-safe container. When you’re ready to enjoy, thaw them in the fridge overnight to keep layers intact without condensation ruining the chocolate.
Reheating
If you like the caramel a bit melty, I briefly microwave the cookies for 10-15 seconds. Just be careful not to overdo it or the chocolate will soften too much. Otherwise, they’re fantastic straight from the fridge!
FAQs
-
Can I use homemade caramel instead of store-bought in this Twix Cookies Recipe?
Absolutely! Homemade caramel can add a beautiful depth of flavor, especially if you like a bit more buttery richness. Just make sure your caramel isn’t too hot when spreading onto the cookies and has a spreadable consistency to avoid soggy bases.
-
What’s the best way to prevent the chocolate from cracking after chilling?
Make sure to melt the chocolate gently and spread it evenly. When chilling, avoid extreme temperature changes—don’t put the cookies directly from the fridge to a warm room. Also, let cookies come to room temperature slightly before handling to minimize cracking.
-
Can I make the dough ahead of time?
Yes! You can make and chill the cookie dough up to 24 hours before cutting and baking. Just keep it wrapped tightly in the fridge. This can even improve the flavor by letting ingredients meld.
-
Is it possible to make these cookies dairy-free?
It’s doable with some swaps—use dairy-free butter and chocolate chips, and a caramel alternative like coconut caramel. The texture may vary slightly, but it still satisfies those Twix cravings!
-
How long do these Twix cookies keep fresh?
Stored in an airtight container in the refrigerator, they stay fresh best for up to 2 days. After that, the texture of the caramel and cookie may start to shift, so try to enjoy them sooner rather than later.
Final Thoughts
When I first made this Twix Cookies Recipe, I was amazed at how the homemade version could capture all those favorite candy bar flavors with such simple ingredients. I absolutely love how they come together—each bite is a little burst of nostalgia with buttery cookie, gooey caramel, and melty chocolate. Whether you’re making them for a holiday party, a sweet snack, or just because you deserve a treat, I promise this recipe won’t disappoint. Give it a try, and soon enough, these will be your go-to cookies too!
Print
Twix Cookies Recipe
- Prep Time: 15 mins
- Cook Time: 14 mins
- Total Time: 3 hrs
- Yield: 24 cookies 1x
- Category: Dessert
- Method: Baking
- Cuisine: American
Description
These Twix Cookies combine a buttery, tender cookie base with a luscious caramel center and a smooth milk chocolate topping, capturing the classic Twix candy bar flavor in a delightful homemade treat perfect for any occasion.
Ingredients
Cookie Dough
- 1 cup (2 sticks) unsalted butter, softened
- 1 cup (115 g) powdered sugar
- 1 tsp pure vanilla extract
- 3 cups (360 g) all-purpose flour, plus more for surface
- 3/4 tsp kosher salt
Filling & Topping
- 1 (10-oz) jar caramel
- 1 1/2 cups (255 g) milk chocolate chips
Instructions
- Prepare Dough: In the bowl of a stand mixer fitted with the paddle attachment, or using a handheld electric mixer in a large bowl, beat softened butter and powdered sugar on medium-high speed until creamy. Add vanilla extract and beat until incorporated. Add flour and kosher salt and mix on medium-low speed until just combined.
- Chill Dough: Turn the dough out onto a clean work surface and knead a few times until it holds together nicely. Form into a disk, wrap tightly in plastic wrap, and refrigerate until chilled for at least 1 hour or up to overnight.
- Preheat Oven and Prepare Baking Sheets: About 5 to 10 minutes before baking, remove dough from the refrigerator to let it soften slightly at room temperature. Preheat the oven to 350°F (175°C) and line two baking sheets with parchment paper.
- Cut Cookies: On a lightly floured surface, roll the dough out to 1/4 inch thickness. Use a 2 1/2-inch round cookie cutter to cut rounds from the dough. Place the cut rounds on the prepared baking sheets, leaving space between each. Reroll dough scraps and cut additional rounds until you have about 24 cookies total.
- Bake Cookies: Bake the cookies in the preheated oven until the edges turn golden and the centers are just set, approximately 12 to 14 minutes. Remove from oven and allow the cookies to cool completely on the baking sheets.
- Apply Caramel Layer: Once cooled, spoon caramel into the center of each cookie, spreading it evenly but leaving a small border of cookie visible around the edges. Place the cookies in the refrigerator for about 10 minutes until the caramel sets and hardens.
- Melt Chocolate and Finish Cookies: In a small heatproof bowl, microwave the milk chocolate chips in 30-second intervals, stirring well between each, until all chocolate is melted and smooth. Spread the melted chocolate over the caramel layer, again leaving edges of caramel visible. Refrigerate the cookies until the chocolate topping is fully hardened, for at least 30 minutes.
- Make Ahead and Storage: These Twix Cookies can be made up to 2 days in advance. Store them in an airtight container in the refrigerator to keep them fresh.
Notes
- Ensure the dough is well chilled for easier rolling and cutting.
- Use parchment paper on baking sheets to prevent sticking and for easy cleanup.
- When melting chocolate, stir frequently to avoid burning.
- Allow cookies to cool completely before adding caramel and chocolate to prevent melting and sliding.
- Cookies keep best refrigerated and should be served at room temperature for optimal flavor and texture.
Nutrition
- Serving Size: 1 cookie
- Calories: 180
- Sugar: 12g
- Sodium: 90mg
- Fat: 9g
- Saturated Fat: 5g
- Unsaturated Fat: 3g
- Trans Fat: 0g
- Carbohydrates: 23g
- Fiber: 1g
- Protein: 2g
- Cholesterol: 20mg


