

Whenever October rolls around, I get so excited to bring some spooky and fun treats to the table that are actually easy enough for a busy weeknight. That’s why I absolutely love this Easy Halloween Hand Pies Recipe—it’s quick, cute, and kid-friendly, plus the results are totally fan-freaking-tastic. If you’re looking for a recipe that will wow your friends and family without stressing you out, this is the one you want to try.
Why You’ll Love This Recipe
- Super Simple Ingredients: You only need a handful of things, most likely already in your pantry or fridge.
- Quick to Make: Prep and baking take less than 30 minutes, perfect for last-minute party plans or sweet cravings.
- Impressively Thematic: These hand pies bring the Halloween spirit right to your table with clever styling and tasty jam filling.
- Kid-Friendly Fun: Great for baking with little helpers; crafting the hand shapes is a blast for kids and adults alike.

Ingredients You’ll Need
The magic of this Easy Halloween Hand Pies Recipe is how these simple ingredients come together with minimal fuss to create something surprisingly delightful. Choosing good-quality pie crust and your favorite jam is key here.
- All-purpose flour: Just enough to dust your surface so the dough doesn’t stick—don’t overdo it or the dough gets tough.
- Store-bought pie crust: Using ready-made crusts saves time and hassle, and they bake up wonderfully flaky and golden.
- Raspberry or strawberry jam: Pick a fruit jam you love since it’s the star flavor inside these pies; fresh tasting jams work best.
- Egg: Whisked with water for the egg wash that gives the pies that irresistible golden sheen.
- Sliced almonds: These become the creepy “nails” on the fingers—adds texture and a nice nutty touch.
Variations
I love that this Easy Halloween Hand Pies Recipe is so adaptable—you can get creative depending on what you’ve got on hand or what flavors you’re craving. I’ve tinkered with a few swaps and added some fun twists with great results.
- Savory Variation: Instead of jam, try filling these hand pies with cheesy spinach or pumpkin and herb mixtures for a spooky appetizer that’s just as fun.
- Gluten-Free Option: You can substitute the store-bought crust with gluten-free pie dough if you’re serving friends with dietary needs; just watch the baking time closely.
- Jam Swaps: I’ve also used apricot or blackberry jam, which gave a nice twist on the flavor and color—feel free to experiment with your favorites!
- Decorative Fun: Add small chocolate chips with the almonds for extra “creepy” finger nails or use colored sugar to sprinkle on top before baking.
How to Make Easy Halloween Hand Pies Recipe
Step 1: Prep Your Workspace and Oven
Preheat your oven to 425°F and line two baking sheets with parchment paper. This setup gets you ready for a smooth, no-stick bake. Lightly flour your work surface to keep the dough from sticking while rolling and cutting.
Step 2: Cut Out the Hands
Unroll the pie crusts gently so they don’t tear. I usually take a hand cut-out template or a cookie cutter shaped like a hand and trace around it carefully with a sharp knife. Then arrange half the hands on your baking sheets well spaced—remember they puff up a bit so give them room! Don’t toss those scraps—roll them back out about ¼ inch thick and cut more hands. It’s amazing how many you can get out of just two crusts.
Step 3: Fill and Seal
Spoon about a tablespoon of your jam into the center of each cutout on the baking sheets. Now, place a second hand shape on top, pressing lightly to seal around the edges. I like using a fork to crimp the edges tightly around the palms—that seal helps keep the jam from oozing out. For the fingers, there’s no filling, so just press them together softly so they hold their shape without breaking.
Step 4: Add the Final Touches Before Baking
Using a small paring knife, make tiny slits on each finger where the knuckles would be—this helps steam escape and adds a creepy, realistic detail. Then brush the entire hand pie with your egg wash for that gorgeous golden finish after baking.
Step 5: Bake and Decorate
Bake them for 10 to 15 minutes until the pies are beautifully golden and cooked through—time depends on how big your pies are. Once out of the oven, add a dab of jam to the tip of each finger and gently press on a sliced almond to look like nails. I love this step because it really makes the “hands” pop visually and tastes great too.
Pro Tips for Making Easy Halloween Hand Pies Recipe
- Use a Sharp Knife or Cookie Cutter: It makes cutting crisp hand shapes easier and cleaner—especially important for the small fingers.
- Don’t Overfill: Too much jam can leak out while baking; just a tablespoon keeps your pies neat and delicious.
- Chill After Assembling: If you have time, pop the assembled pies in the fridge for 10 minutes before baking—they hold their shape even better.
- Egg Wash for Golden Color: Brushing with the egg wash right before baking gives that perfect shiny, golden surface that’s just irresistible.
How to Serve Easy Halloween Hand Pies Recipe
Garnishes
I usually keep the garnishes pretty simple—just that dab of jam and sliced almonds for the nails. Sometimes, I’ve sprinkled a little coarse sugar on top before baking for a festive sparkle, but honestly, the hand shapes themselves steal the show. If you want to get wild, a small drizzle of melted chocolate or some edible glitter can add a fun touch!
Side Dishes
These hand pies pair wonderfully with a warm cup of apple cider or even a creamy pumpkin soup for an autumn snack spread. If it’s a party, I like to set them alongside a platter of spooky cheese balls, fresh fruit, or vegetable sticks for contrast.
Creative Ways to Present
I’ve had fun wrapping these pies in wax paper tied with twine for a grab-and-go treat at Halloween parties. Another time, I placed them on a platter arranged like a spooky hand coming out of the ground, surrounded by edible “dirt” made of crushed cookies. It’s a simple trick but impresses your guests every time!
Make Ahead and Storage
Storing Leftovers
You can store leftover hand pies in an airtight container at room temperature for up to two days. I keep mine on the counter, and they stay flaky and delicious enough to enjoy the next day—though they’re best fresh right out of the oven!
Freezing
I’ve frozen these pies both before and after baking. When freezing pre-baked pies, I wrap each individually to prevent sticking and freeze in a single layer; then you can bake straight from frozen with a few extra minutes in the oven. For baked pies, a quick freeze then airtight container keeps them tasty for up to a month.
Reheating
To reheat, I pop hand pies in a 350°F oven for about 10 minutes to crisp them back up without drying them out. Avoid microwaving since it tends to make the crust soggy. Using the oven really brings back that flaky, golden texture.
FAQs
-
Can I use homemade pie crust for this Easy Halloween Hand Pies Recipe?
Absolutely! Homemade pie crust works beautifully if you want that extra homemade touch. Just be sure to roll it out evenly about ¼ inch thick so the pies bake uniformly and hold their shape well.
-
What other fillings can I use besides jam?
While fruity jams are classic, you can get creative with chocolate spread, cream cheese mixtures, or even savory fillings like cheesy spinach or pumpkin for a different Halloween vibe.
-
How can I make these pies look extra spooky?
Try adding food coloring to the egg wash for a tinted crust, use mini chocolate chips for “warts,” or sprinkle edible glitter and colored sugar on top before baking to boost the Halloween aesthetic.
-
Can I make these hand pies vegan?
Yes! Use a dairy-free pie crust and swap the egg wash for a mixture of almond milk and maple syrup or aquafaba to get that golden color and shine.
-
How long do these pies keep fresh?
Stored in an airtight container at room temperature, they’re best within 2 days. For longer storage, freezing is your friend, lasting up to a month with proper wrapping.
Final Thoughts
This Easy Halloween Hand Pies Recipe holds a special place on my seasonal treat list because it’s as fun to make as it is to eat. From the first time I baked them, everyone in my family went crazy for their cute spooky vibe and satisfying jammy center. I truly think you’ll enjoy how quick and delightful these are—perfect for sharing a little Halloween magic with your loved ones. Give it a try this season; you won’t regret it!
Print
Easy Halloween Hand Pies Recipe
- Prep Time: 10 minutes
- Cook Time: 15 minutes
- Total Time: 25 minutes
- Yield: 8 (4-inch) hand pies 1x
- Category: Dessert
- Method: Baking
- Cuisine: American
Description
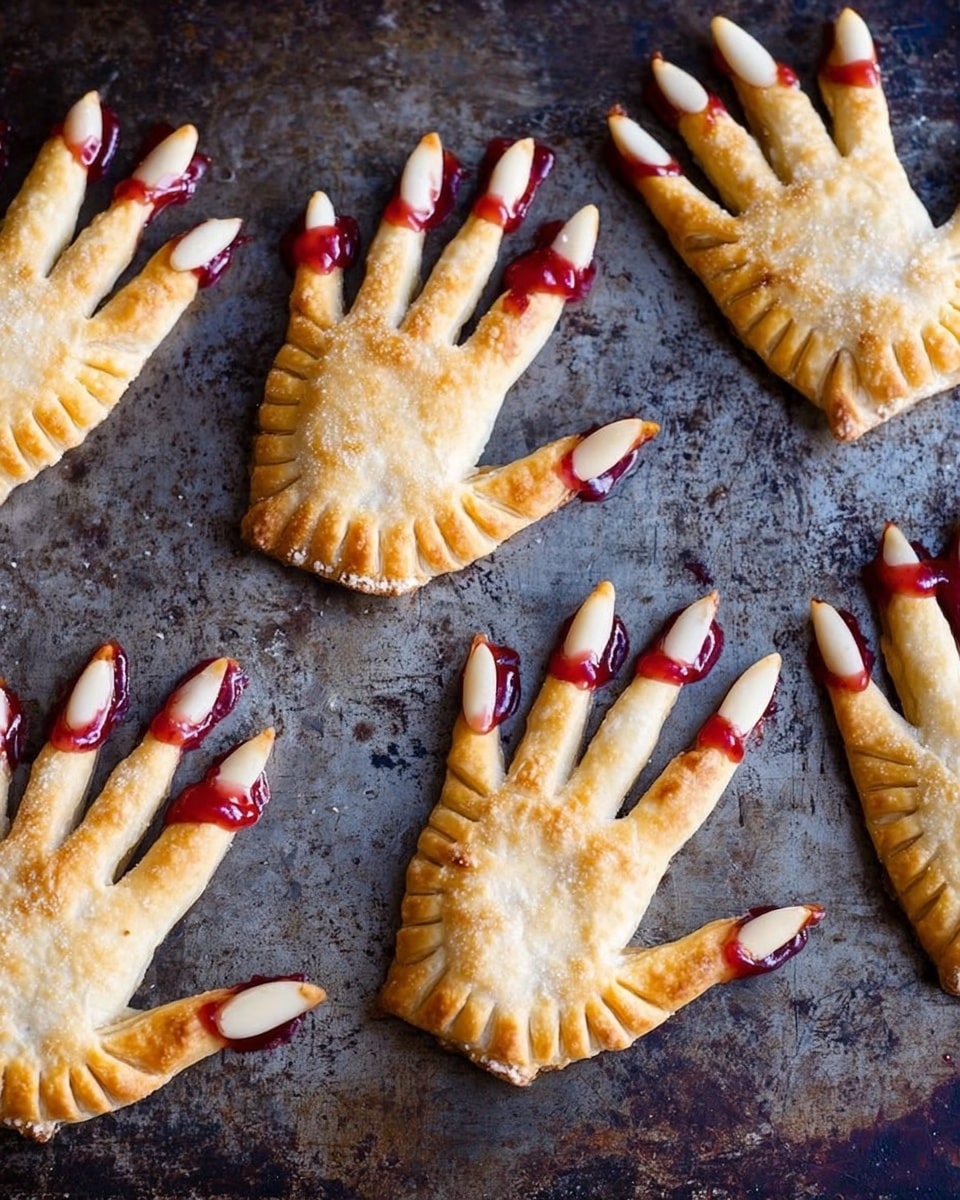
These Easy Halloween Hand Pies are a fun and festive treat perfect for spooky celebrations. Made with store-bought pie crust filled with raspberry or strawberry jam, they feature a playful hand shape topped with almond ‘nails’ for a creepy yet delicious dessert.
Ingredients
Pie Crust
- All-purpose flour, for rolling out dough
- 1 (14.1-oz.) package store-bought pie crust (2 crusts total)
Filling & Toppings
- 1/3 cup raspberry or strawberry jam, plus more for decorating
- 1 large egg, whisked with 1 Tablespoon water (egg wash)
- Sliced almonds
Instructions
- Preheat and Prepare Baking Sheets: Preheat your oven to 425°F (218°C). Line two baking sheets with parchment paper to prevent sticking and ensure easy cleanup.
- Roll and Cut Dough: Lightly flour your work surface and unroll the pie crusts. Use a sharp knife to trace around a hand cut-out or use a hand-shaped cookie cutter. Arrange half of the cut-out hand shapes on the prepared baking sheets, spacing them at least 2 inches apart. Re-roll the scraps to 1/4-inch thickness to cut out additional hand shapes.
- Add Jam Filling: Place a spoonful of raspberry or strawberry jam in the center of each hand base on the baking sheets.
- Seal the Hand Pies: Place a second hand-shaped crust on top of each jam-filled base. Press lightly to seal around the edges. Use a fork to crimp the edges around the palms to secure the filling. Lightly press the fingers edges together without crimping since there’s no filling in the fingers.
- Vent and Egg Wash: Using a paring knife, cut small slits over the knuckle areas of the fingers to allow steam to escape. Brush the entire surface of each hand pie with the egg wash to achieve a golden, glossy finish.
- Bake: Bake the hand pies in the preheated oven for 10 to 15 minutes, or until they are golden brown and cooked through. Baking time may vary depending on the size of your pies.
- Decorate Nails: Remove the pies from the oven. Add a small dollop of jam to the tip of each finger and press a sliced almond onto the jam to form the ‘nails’.
- Serve or Store: Serve the hand pies immediately while warm, or allow them to cool and store in an airtight container at room temperature.
Notes
- Use a sharp knife or a sturdy hand-shaped cookie cutter for clean edges.
- Ensure the edges are well sealed to prevent the jam from leaking during baking.
- Adjust jam quantity according to pie size, being careful not to overfill.
- These pies are best eaten fresh but can be stored for up to 2 days at room temperature.
- For a dairy-free option, substitute the egg wash with a plant-based milk glaze.
Nutrition
- Serving Size: 1 hand pie (approx. 4 inches)
- Calories: 220
- Sugar: 15g
- Sodium: 180mg
- Fat: 10g
- Saturated Fat: 3g
- Unsaturated Fat: 6g
- Trans Fat: 0g
- Carbohydrates: 28g
- Fiber: 1g
- Protein: 3g
- Cholesterol: 30mg


