

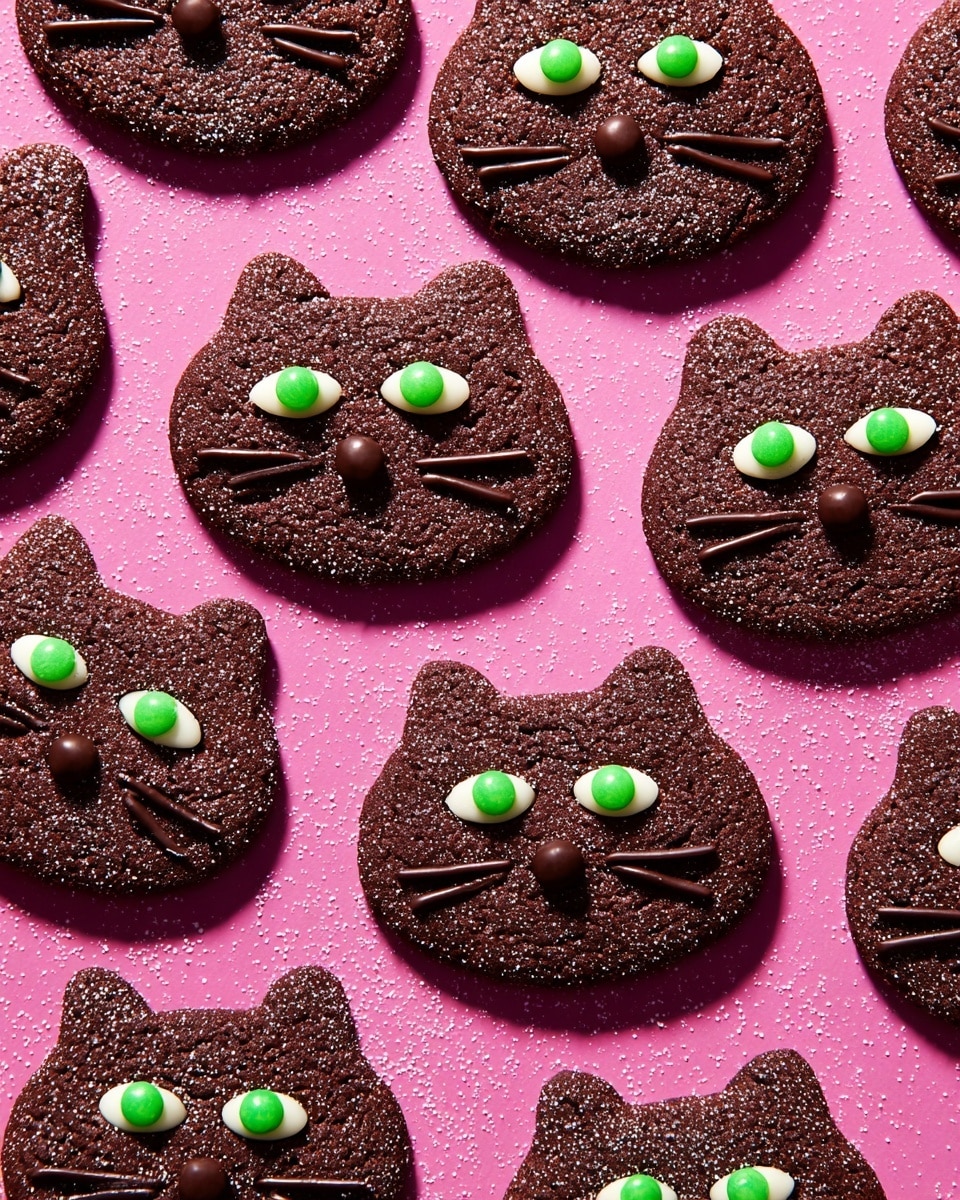
If you’re looking for a cookie recipe that’s not only delicious but also brings some spooky fun to your kitchen, you’re going to love this one. I’m excited to share my Hocus Pocus Binx Cookies Recipe with you—a perfect treat inspired by the mischievous black cat Binx from the classic movie. These cookies aren’t just cute; they have this deep, rich cocoa flavor that makes them absolutely addictive. Plus, the way they’re decorated with almonds and M&Ms to look like little black cats will totally charm your family and friends. Give these a try, and I promise you’ll be making them for every Halloween and movie night to come!
Why You’ll Love This Recipe
- Beautiful and Fun Design: These cookies actually look like little black cats, perfect for delighting kids and adults alike.
- Rich, Chocolatey Flavor: The black cocoa powder gives an intense cocoa kick that pairs wonderfully with the brown sugar’s caramel notes.
- Easy Decoration Technique: Using sliced almonds and M&Ms for eyes and noses is so simple but effective—no fancy tools needed.
- Make-Ahead Friendly: You can refrigerate the dough up to two days and the baked cookies stay fresh in an airtight container for days.

Ingredients You’ll Need
This recipe uses a smart blend of black cocoa and all-purpose flour to get that distinct dark color and tender crumb you want in festive cookies. Each ingredient plays a role—from the salted butter to lift flavor to the sanding sugar that adds a perfect sparkly texture on the outside.
- All-purpose flour: The base for our cookies, providing structure and tenderness.
- Black cocoa powder: Gives the cookies that signature deep black color and intense chocolate flavor.
- Baking soda: Leavens the cookies slightly to keep them from getting too dense.
- Kosher salt: Balances sweetness and enhances the chocolate notes.
- Granulated sugar: Adds sweetness and helps with the crunchy texture on the edges.
- Unsalted butter: Use softened for proper creaming with the sugars, lending richness and flavor.
- Light brown sugar: Adds moisture and a subtle caramel undertone that complements cocoa beautifully.
- Large egg: Binds everything together and gives chewiness to the cookies.
- Pure vanilla extract: Enhances all the flavors, making the cookies taste well-rounded.
- Sanding sugar: For rolling the dough balls to add texture and sparkle.
- Sliced raw almonds: Used for the cat eyes; a thin, oval shape is perfect here.
- Semisweet chocolate chips: Melted for the piped whiskers and to stick M&Ms on.
- Mini green M&Ms: For those bright cat eyes that really pop!
- Mini brown M&Ms: Used as tiny noses on the cats.
Variations
I love that you can easily tweak this Hocus Pocus Binx Cookies Recipe to suit your mood or dietary needs. Once you have the base down, feel free to swap or add touches that make it your own—after all, every kitchen is a place for creativity.
- Nut-Free Variation: Replace the sliced almonds with chocolate drops or mini candy eyes for a nut-free version that’s just as adorable.
- Vegan Option: I haven’t tried a vegan butter in these yet, but swapping the butter and egg with plant-based alternatives might work—just be sure to chill the dough well so it holds shape.
- Spice It Up: Add a pinch of cinnamon or a dash of espresso powder to the dry ingredients for an interesting depth of flavor.
- Different “Cat” Colors: Swap the green and brown M&Ms for other colors if you want to create a variety of whimsical cat faces for a party platter.
How to Make Hocus Pocus Binx Cookies Recipe
Step 1: Whip up the cookie dough
First, grab a medium bowl and whisk together the flour, black cocoa powder, baking soda, and kosher salt. This dry mix is what gives the cookies their rich color and texture. In a separate large bowl, beat the granulated sugar, softened butter, and brown sugar with an electric mixer on medium-high speed until you get this smooth, creamy consistency. The creaming step is crucial—it traps air and helps make the cookies tender. Then, add the egg and vanilla extract, beating again until they’re thoroughly combined. Finally, add the dry ingredients and mix on low speed just until everything comes together—overmixing can toughen the cookies. Cover the dough and pop it in the fridge to chill for at least 30 minutes, or up to two days. Trust me, chilling really helps the dough firm up so it’s easier to shape later.
Step 2: Shape your Binx cookie bodies and ears
Preheat your oven to 350°F and line two baking sheets with parchment paper. Using a medium cookie scoop—or about 1 1/2 tablespoons—you want to portion out 24 dough balls. Reserve the leftover dough for those cute little ears. Roll each scooped portion into 1-inch balls, then roll them in sanding sugar until they’re coated nicely. This gives your cookies a slight sparkle and a delightful crunch on the outside. Place them spaced about 2 inches apart on the baking sheets, then gently flatten each to form a 2-inch circle—this reminds me of patting a cat’s paw! Next, take tiny 1/2-inch balls from the reserved dough and roll those as well in sanding sugar to make the ears. Pinch the tops just a bit to form triangles, then attach two small dough ears to the top edge of each flattened cookie body. This shaping step can be so fun, like playing with edible clay.
Step 3: Add almond eyes and bake
Before baking, place two sliced raw almonds on each cookie to create the eyes. Position them with the skinnier points facing each other, which really gives that classic, curious feline look. Pop your cookie sheets into the oven and bake for around 8-10 minutes, until the edges are set but the cookies still feel slightly soft in the middle. Timing can vary slightly depending on your oven, so keep a close eye. After baking, let the cookies cool on the sheets for 5 minutes before transferring to a wire rack to cool completely. This keeps them from breaking apart when hot.
Step 4: Pipe on chocolate details and add M&M decorations
Once your cookies have cooled completely, it’s time for the fun decorating part! Melt semisweet chocolate chips in a small heatproof bowl in 10-second increments in the microwave, stirring after each interval until smooth. Transfer the melted chocolate to a piping bag with a tiny round tip or just use a zip-top bag and snip a very small corner. Pipe a dot of chocolate onto the center of each almond eye, then carefully place a green mini M&M on that dot to create the cat’s eyes. Next, pipe another dot below the eyes for the nose and press on a mini brown M&M. Finally, pipe two thin whiskers on each side of the nose—this little detail really brings the cats to life! Let the chocolate set completely before serving or storing.
Step 5: Enjoy or store your precious Binx cookies
You can enjoy these right away, or store them in an airtight container at room temperature for up to 3 days. This makes them perfect for prepping ahead of a party or Halloween gathering.
Pro Tips for Making Hocus Pocus Binx Cookies Recipe
- Chill for Best Shape: I learned that chilling the dough really makes rolling and shaping so much easier, and the cookies hold their form better when baked.
- Sanding Sugar Magic: Rolling the dough balls in sanding sugar before flattening adds a subtle crunch and sparkle that you don’t want to skip.
- Handle Almonds Gently: Press the sliced almonds lightly to avoid breaking them, and keep the skinnier points facing inward for the best “cat eye” effect.
- Use a Small Piping Tip: Using a tiny tip for the whiskers and chocolate dots gives you neat, precise details that make these cookies really stand out.
How to Serve Hocus Pocus Binx Cookies Recipe
Garnishes
I like to keep the garnishes simple since the cookies themselves are the showstopper. But if I’m feeling fancy, I might sprinkle a few extra sanding sugar crystals or add a tiny dusting of edible glitter just before the chocolate sets—kids think that’s pure magic!
Side Dishes
These cookies are perfect on their own but pair beautifully with a warm cup of spiced apple cider or a creamy chai latte. For a party, I sometimes serve them alongside pumpkin-shaped sugar cookies or mini caramel apples for a festive spread.
Creative Ways to Present
If you’re throwing a Halloween bash or a Hocus Pocus movie night, arrange these cookies in a circle on a dark serving plate with a little orange candy corn scattered around for contrast. Another fun idea: put them in small clear bags tied with black and orange ribbons as party favors. Kids flip out over the thoughtful detail!
Make Ahead and Storage
Storing Leftovers
I store any leftover Binx cookies in an airtight container at room temperature, layered with parchment paper to keep them from sticking together. They stay fresh and soft for about three days, which is perfect because they rarely last that long in my house!
Freezing
For longer storage, I freeze the dough balls before baking. Just shape the dough into balls, freeze on a tray, then transfer them to a freezer bag. When you’re ready, bake them straight from frozen, adding a minute or two to the baking time. The baked cookies themselves freeze well too—just thaw at room temperature before serving.
Reheating
If you have leftovers that have softened too much, a quick 5-10 second zap in the microwave revives them wonderfully. Or, pop them in a warm oven at 300°F for about 5 minutes to restore some crisp edges without drying them out.
FAQs
-
Can I use regular cocoa powder instead of black cocoa powder?
You can substitute regular cocoa powder, but the cookies will be lighter in color and less intense in chocolate flavor. Black cocoa has almost a charcoal-like appearance and a deeper richness, which really brings the “Binx” look to life.
-
How do I prevent the almond eyes from falling off after baking?
Press the sliced almonds gently but firmly into the unbaked dough before placing them in the oven. Chilling the dough beforehand also helps keep everything stable. After baking, use melted chocolate to “glue” the M&Ms in place, ensuring the decorations don’t slide off.
-
Can I make these cookies gluten-free?
To make it gluten-free, swap the all-purpose flour for a gluten-free flour blend that’s suitable for cookies. Just check that the blend includes xanthan gum or add it separately to help with texture. The black cocoa and other ingredients remain the same.
-
Will these cookies keep their shape during baking?
Yes! Chilling the dough is the key. It firms up the fat and starches, so when the cookies bake, they spread less and maintain their adorable cat shape and ears beautifully.
-
How do I store decorated Hocus Pocus Binx Cookies?
Store them in a single layer in an airtight container at room temperature. If stacking, separate layers with parchment paper to avoid smudging the chocolate decorations. Keep them away from heat and humidity to preserve the chocolate details.
Final Thoughts
This Hocus Pocus Binx Cookies Recipe feels like a little piece of festive magic in the kitchen. I remember the first time I made them; my kids were utterly enchanted by their cat faces, and I loved how the dark cocoa flavor was rich but not overpowering. These cookies always bring a smile and spark conversation whether it’s a cozy night in or a Halloween party. I hope you enjoy baking (and eating) them as much as I do—these will definitely become one of your seasonal favorites!
Print
Hocus Pocus Binx Cookies Recipe
- Prep Time: 10 mins
- Cook Time: 10 mins
- Total Time: 1 hr 45 mins
- Yield: 24 cookies 1x
- Category: Dessert
- Method: Baking
- Cuisine: American
Description
Hocus Pocus Binx Cookies are whimsical Halloween treats inspired by the beloved black cat Binx. These chocolatey, crunchy cookies feature black cocoa for deep color and flavor, decorated with sliced almonds for eyes, and vibrant M&M candies to create cute cat faces. Perfect for festive celebrations, they offer both a fun baking experience and a delicious, eye-catching result.
Ingredients
Dry Ingredients
- 1 1/2 cups (180 g) all-purpose flour
- 1/4 cup (20 g) black cocoa powder
- 1/2 tsp baking soda
- 1/4 tsp kosher salt
Wet Ingredients & Sugars
- 3/4 cup (150 g) granulated sugar
- 1/2 cup (1 stick) unsalted butter, softened
- 1/2 cup (105 g) packed light brown sugar
- 1 large egg
- 1 tsp pure vanilla extract
Decorations
- Sanding sugar, for rolling
- 48 sliced raw almonds
- 1/4 cup semisweet chocolate chips
- 48 mini green M&M’s
- 24 mini brown M&M’s
Instructions
- Mix Dry Ingredients: In a medium bowl, whisk together the all-purpose flour, black cocoa powder, baking soda, and kosher salt until well combined.
- Cream Sugars and Butter: In a large bowl, use an electric mixer on medium-high speed to beat the granulated sugar, softened unsalted butter, and packed light brown sugar until the mixture is creamy and smooth. Add the egg and continue beating until fully incorporated. Beat in the pure vanilla extract.
- Combine Wet and Dry: Add the dry ingredients to the wet mixture and beat on low speed until just combined, ensuring not to overmix. Cover the bowl with plastic wrap and refrigerate the dough until chilled, at least 30 minutes or up to 2 days.
- Preheat Oven and Prepare Sheets: Preheat your oven to 350°F (177°C). Line two baking sheets with parchment paper to prevent sticking.
- Scoop Main Dough: Using a medium cookie scoop (approximately 1 1/2 tablespoons), portion out 24 balls of dough, then reserve the remaining dough for ears. Roll each portion into 1-inch balls and then coat each in sanding sugar. Place them on the prepared baking sheets about 2 inches apart. Flatten each ball into a 2-inch circle.
- Form Cat Ears: Take the reserved dough and scoop small 1/4-teaspoon balls. Roll these into 1/2-inch balls and coat with sanding sugar. Arrange two smaller balls on the top outer edge of each flattened cookie to resemble cat ears, pinching slightly to form triangle shapes.
- Add Eyes: Place two sliced almonds on each cookie’s flattened area to represent eyes, positioning the skinnier points towards the center of the cookie.
- Bake: Bake the cookies in the preheated oven for 8 to 10 minutes, or until the edges are set but not hard. After baking, let the cookies cool on the baking sheet for 5 minutes, then transfer them to a wire rack to cool completely.
- Prepare Chocolate Decorations: Place semisweet chocolate chips in a small heatproof bowl and microwave in 10-second increments, stirring between each, until melted and smooth. Transfer the melted chocolate to a small piping bag fitted with an extra-small round tip or use a zip-top bag with a small corner cut off.
- Decorate Faces: Pipe a small dot of melted chocolate in the center of each almond and place a mini green M&M on it for the pupils. Pipe another dot below the eyes and attach one mini brown M&M as the nose. Finish by piping two whiskers on each side of the nose. Allow the chocolate to set completely before serving.
- Make Ahead: These cookies can be baked and assembled up to 3 days in advance. Store them in an airtight container at room temperature to maintain freshness.
Notes
- Chilling the dough helps to prevent spreading and keeps the cookies thick enough to shape ears and faces.
- If black cocoa powder is unavailable, use natural unsweetened cocoa powder, noting the cookies will be less dark.
- Use sanding sugar instead of regular granulated sugar for a sparkly, textured coating on the cookies.
- For easier piped decorations, ensure the melted chocolate is not too hot but still fluid.
- To keep cookies fresh longer, store in an airtight container in a cool, dry place.
Nutrition
- Serving Size: 1 cookie
- Calories: 150
- Sugar: 14 g
- Sodium: 90 mg
- Fat: 7 g
- Saturated Fat: 4 g
- Unsaturated Fat: 2.5 g
- Trans Fat: 0 g
- Carbohydrates: 20 g
- Fiber: 2 g
- Protein: 2 g
- Cholesterol: 25 mg


