

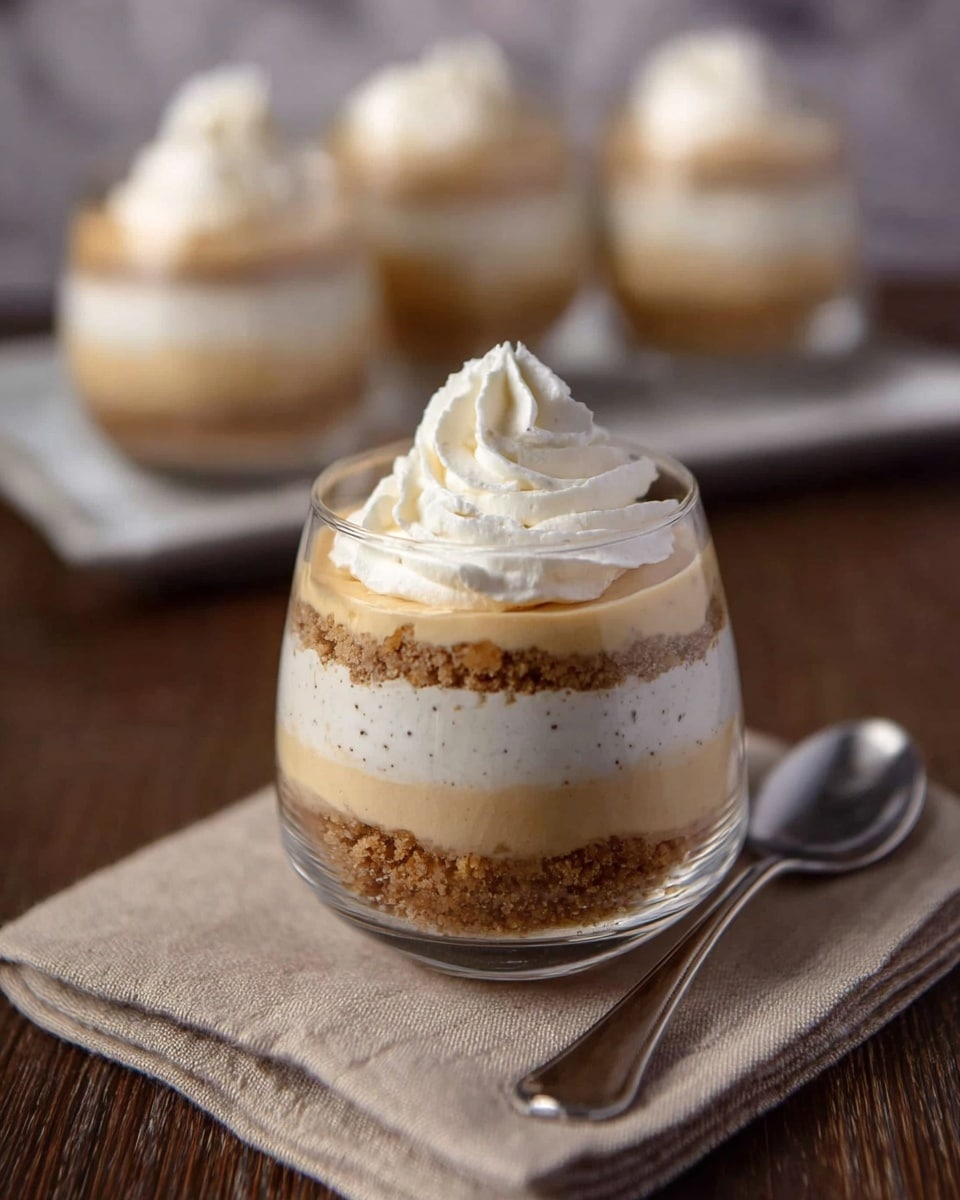
I absolutely love this No-Bake Pumpkin Cheesecake Cups Recipe because it comes together quickly and requires no oven time—perfect for those busy days when you want an impressive dessert without the fuss. The creamy pumpkin filling is perfectly spiced and sweet, balanced with a buttery graham cracker crust that adds just the right amount of crunch. It’s a total crowd-pleaser and always has everyone asking for seconds.
Whether you’re hosting a fall gathering or just craving something cozy and indulgent, these pumpkin cheesecake cups hit that sweet spot. Plus, making them in individual cups means portion control is a breeze, and they’re super cute to serve. You’ll find that this no-fuss dessert is as easy to share as it is to make.
Why You’ll Love This Recipe
- No-Bake Convenience: Skip the oven and still get a luscious pumpkin cheesecake that sets beautifully in the fridge.
- Perfectly Spiced Pumpkin Flavor: The warm spices blend just right to make every bite irresistibly cozy and seasonal.
- Individual Portions: Easy to serve and great for parties without the mess of slicing a big pie.
- Creamy & Crunchy Layers: The graham cracker crust adds a pleasant texture contrast against the silky cheesecake and fluffy Chantilly cream.

Ingredients You’ll Need
The magic of this No-Bake Pumpkin Cheesecake Cups Recipe lies in simple ingredients that work harmoniously. Using quality cream cheese and fresh spices really takes these cups from good to unforgettable.
- Graham crackers: Make sure to crush them finely for that perfect crust layer that holds together nicely.
- Light brown sugar: Adds a gentle molasses note; I prefer light but dark works too for a richer taste.
- Unsalted butter: Melted to bind the crust, room temperature butter can sometimes make the crust crumbly.
- Cream cheese: Chilled and softened for fluffiness; avoid overly soft or room temperature to prevent runny cheesecake.
- Vanilla extract: Enhances flavors and adds sweetness depth.
- Ground cinnamon, nutmeg, ginger, cloves: My favorite warming fall spice mix—freshly ground is best if you can!
- Pumpkin puree: Use 100% pure canned pumpkin, not pumpkin pie filling, for the best texture and flavor control.
- Heavy whipping cream: For that rich Chantilly cream topping, whip until stiff peaks form for the right texture.
- Granulated sugar: Sweetens the whipped cream just enough without overpowering.
Variations
I love how adaptable this No-Bake Pumpkin Cheesecake Cups Recipe is—you can easily tweak it based on what you have on hand or who you’re serving. Sometimes, I switch up the crust or experiment with dairy-free options.
- Gluten-Free Variation: I swapped graham crackers with gluten-free cookies once, and it worked wonderfully without losing that crunchy texture.
- Dairy-Free Option: Use vegan cream cheese and coconut cream instead of heavy cream for a delicious plant-based twist I’ve enjoyed.
- Spice Level: I sometimes add a pinch of cayenne or extra ginger for a subtle kick that really awakens the flavors.
- Extra Toppings: Toasted pecans or a drizzle of caramel sauce take these cups to the next level for special occasions.
How to Make No-Bake Pumpkin Cheesecake Cups Recipe
Step 1: Make the Graham Cracker Crust
Start by crushing your graham crackers into fine crumbs—either a food processor or a sealed plastic bag with a rolling pin works great. Mix the crumbs with brown sugar, then stir in the melted butter until everything is evenly moistened. I like to press about 3 tablespoons of this crumb mixture gently into the bottom of each glass or cup; don’t press too hard or the crust will be too dense. This base is what gives you that wonderful crunch beneath the creamy pumpkin layer.
Step 2: Whip Up the Pumpkin Cheesecake Filling
This filling is where all the creaminess and flavor happens. Beat the chilled cream cheese until it’s light and fluffy—trust me, this is key for a smooth texture. Add your brown sugar, vanilla, and spices, mixing until well-blended before folding in the pumpkin puree. I cover mine and pop it into the fridge while I prepare the Chantilly cream; chilling helps the flavors meld and makes assembly easier.
Step 3: Make the Chantilly Cream
In a chilled bowl with a whisk attachment, combine heavy whipping cream and granulated sugar. Whip until stiff peaks form—that means when you lift the whisk out, the cream holds its shape without drooping. This luscious cream will lighten up the cheesecake mixture, giving you that dreamy texture without weighing it down.
Step 4: Assemble Your Pumpkin Cheesecake Cups
Fold about half of the Chantilly cream gently into the pumpkin cheesecake mixture to keep it airy and soft. Spoon or pipe a generous layer of this filling over the graham cracker crust in each cup. Then add a layer of the remaining Chantilly cream on top. To finish, sprinkle 2–3 tablespoons of your leftover crumb crust over the Chantilly cream for a little extra crunch and a pretty presentation. I usually repeat the layering if my cups are tall enough. Chill all the cups in the fridge for at least an hour so everything sets perfectly.
Pro Tips for Making No-Bake Pumpkin Cheesecake Cups Recipe
- Chill Bowls and Tools: For whipping Chantilly cream, chilling your bowl and whisk helps you get those stiff peaks faster and with better volume.
- Use Cold Cream Cheese: Starting with cold cream cheese prevents the filling from becoming too runny and ensures a nice, thick texture.
- Gentle Folding: When mixing the whipped cream into the pumpkin cheesecake, fold gently to keep the airiness intact—this makes all the difference.
- Don’t Skip Chilling Time: Allowing at least an hour in the fridge isn’t just for setting; it really lets all the flavors develop and blend beautifully.
How to Serve No-Bake Pumpkin Cheesecake Cups Recipe
Garnishes
I usually keep garnishes simple but elegant— a sprinkle of extra ground cinnamon or nutmeg on top adds warmth and color. Sometimes I add a couple of pecan halves or a drizzle of caramel sauce, which my family absolutely adores for that extra sweetness and texture. Fresh whipped cream dollops or a few toasted pumpkin seeds can also add a lovely finishing touch.
Side Dishes
This dessert pairs wonderfully with a warm spiced apple cider or a cup of freshly brewed coffee. If you’re serving it as part of a larger meal, light pumpkin soup or a crisp green salad balances its richness perfectly. For fall entertaining, sliced pears or candied nuts also complement the flavors beautifully.
Creative Ways to Present
For special occasions, I love layering the cups in clear glasses or mason jars to show off the beautiful contrast between crust, pumpkin, and cream. Adding a mini cinnamon stick or edible gold leaf can instantly glam things up. It’s also fun to create a mini pumpkin patch scene with crushed cookie “soil” and candy “pumpkins” for festive fall entertaining.
Make Ahead and Storage
Storing Leftovers
I usually cover the cups tightly with plastic wrap or use airtight lids if I’m storing them in mason jars. They keep beautifully in the fridge for up to 3 days, and the flavors actually mature nicely with a bit of extra chill time. Just make sure to keep them cold until serving to keep the cream fresh and the crust crisp.
Freezing
Freezing these can be a bit tricky because of the whipped cream, but I’ve had success freezing the pumpkin cheesecake filling separately in a sealed container. Thaw it overnight in the fridge, then whip fresh Chantilly cream before assembling the cups on the day you want to serve. This way, you get the best texture and freshness.
Reheating
This dessert is best served cold, so no reheating needed! If you’re worried about it being too firm from the fridge, just let the cups sit at room temperature for about 10 minutes before serving to soften slightly. It helps the flavors open up and the texture become dreamy again.
FAQs
-
Can I use fresh pumpkin instead of canned for this recipe?
Yes, you can! Just roast and puree fresh pumpkin until smooth. Keep in mind it might have a slightly different moisture content, so you might want to strain excess liquid or adjust the texture by adding a bit more cream cheese or whipped cream.
-
How long do the No-Bake Pumpkin Cheesecake Cups last in the fridge?
They last up to 3 days when stored properly in airtight containers. Beyond that, the crust might start to soften too much, and the flavors can diminish, so it’s best to enjoy them fresh.
-
Can I prepare these pumpkin cheesecake cups ahead of time for a party?
Absolutely! In fact, I recommend making them a few hours in advance or even the day before to let the flavors meld and the filling set perfectly. Just keep them chilled until ready to serve.
-
What’s the best way to soften cream cheese quickly?
To soften cream cheese quickly, I either cut it into small cubes and let it sit at room temperature for 30 minutes or microwave it in short 10-second bursts until just soft—be careful not to melt it.
-
Can I substitute the graham cracker crust with something else?
Yes! Digestive biscuits, gingersnap cookies, or even crushed pretzels can make delicious crusts depending on your flavor preference. Just be sure to finely crush and bind them well with melted butter.
Final Thoughts
This No-Bake Pumpkin Cheesecake Cups Recipe has been a go-to for me ever since I discovered how easy and delicious it is. It’s that perfect autumn dessert that feels fancy but doesn’t stress me out in the kitchen, which is honestly the dream. I hope you’ll give this a try soon and enjoy every creamy, spiced bite as much as my family and I do. It really is a wonderful way to celebrate pumpkin season without turning on your oven!
Print
No-Bake Pumpkin Cheesecake Cups Recipe
- Prep Time: 15 minutes
- Cook Time: 0 minutes
- Total Time: 2 hours (including chilling time)
- Yield: 4 servings 1x
- Category: Dessert
- Method: No-Cook
- Cuisine: American
- Diet: Vegetarian
Description
These No-Bake Pumpkin Cheesecake Cups are a delightful and easy-to-make dessert, featuring a crunchy graham cracker crust layered with spiced pumpkin cheesecake filling and topped with smooth Chantilly cream. Perfect for autumn or anytime you crave a creamy, seasonal treat without using the oven.
Ingredients
Graham Cracker Crust
- 1 cup graham crackers, finely crushed (about 7 crackers)
- ½ cup light brown sugar, packed
- ¼ cup unsalted butter, melted
Pumpkin Cheesecake
- 8 ounces cream cheese, chilled
- 6 tablespoons light brown sugar, packed
- ½ teaspoon vanilla extract
- ½ teaspoon ground cinnamon
- ¼ teaspoon ground nutmeg
- ¼ teaspoon ground ginger
- 1 pinch ground cloves
- 1 cup pumpkin puree, chilled, canned
Chantilly Cream
- 2 cups heavy whipping cream
- ¼ cup granulated sugar
Instructions
- Prepare Graham Cracker Crust: In a medium-sized bowl, combine the finely crushed graham crackers with the light brown sugar. Stir in the melted butter until all crumbs are moistened thoroughly. Divide and press about 3 tablespoons of this mixture into the bottom of each of four serving glasses, creating an even layer to form the crust.
- Make Pumpkin Cheesecake Filling: Using a mixer fitted with a whisk attachment, beat the chilled cream cheese until it becomes light and fluffy. Gradually add the packed light brown sugar and continue beating until fully combined. Add the vanilla extract and all the warm spices—cinnamon, nutmeg, ginger, and cloves—and beat again until the mixture is smooth and uniform. Gently fold in the chilled pumpkin puree until fully incorporated. Cover the bowl and refrigerate the mixture while preparing the Chantilly cream.
- Whip Chantilly Cream: In a clean mixing bowl with a whisk attachment, beat the heavy whipping cream along with the granulated sugar until stiff peaks form, signifying thick and stable whipped cream.
- Assemble the Cups: Carefully fold 1 cup of the prepared Chantilly cream into the chilled pumpkin cheesecake mixture to lighten the texture. Reserve the remaining Chantilly cream for topping. Spoon or pipe the pumpkin cheesecake mixture over the prepared graham cracker crust in each glass. Next, add a layer of the reserved Chantilly cream on top of the cheesecake filling. Sprinkle 2 to 3 tablespoons of the graham cracker crumb crust over the Chantilly cream for added crunch. Optionally repeat layering if desired.
- Chill Before Serving: Place the assembled cheesecake cups in the refrigerator and chill for at least one hour to allow the flavors to meld and the dessert to set properly before serving.
Notes
- For best results, use chilled cream cheese and pumpkin puree to help achieve a smooth, creamy texture.
- If you prefer a sweeter dessert, adjust the sugar quantities to taste.
- These cups can be assembled a day ahead and stored covered in the refrigerator.
- For a nut-free crust, ensure the graham crackers do not contain nuts or substitute with another suitable cookie.
- To add extra flavor, sprinkle cinnamon or nutmeg on top before serving.
Nutrition
- Serving Size: 1 cup (1 cheesecake cup)
- Calories: 390
- Sugar: 25g
- Sodium: 220mg
- Fat: 29g
- Saturated Fat: 17g
- Unsaturated Fat: 10g
- Trans Fat: 0g
- Carbohydrates: 28g
- Fiber: 1g
- Protein: 5g
- Cholesterol: 95mg

