
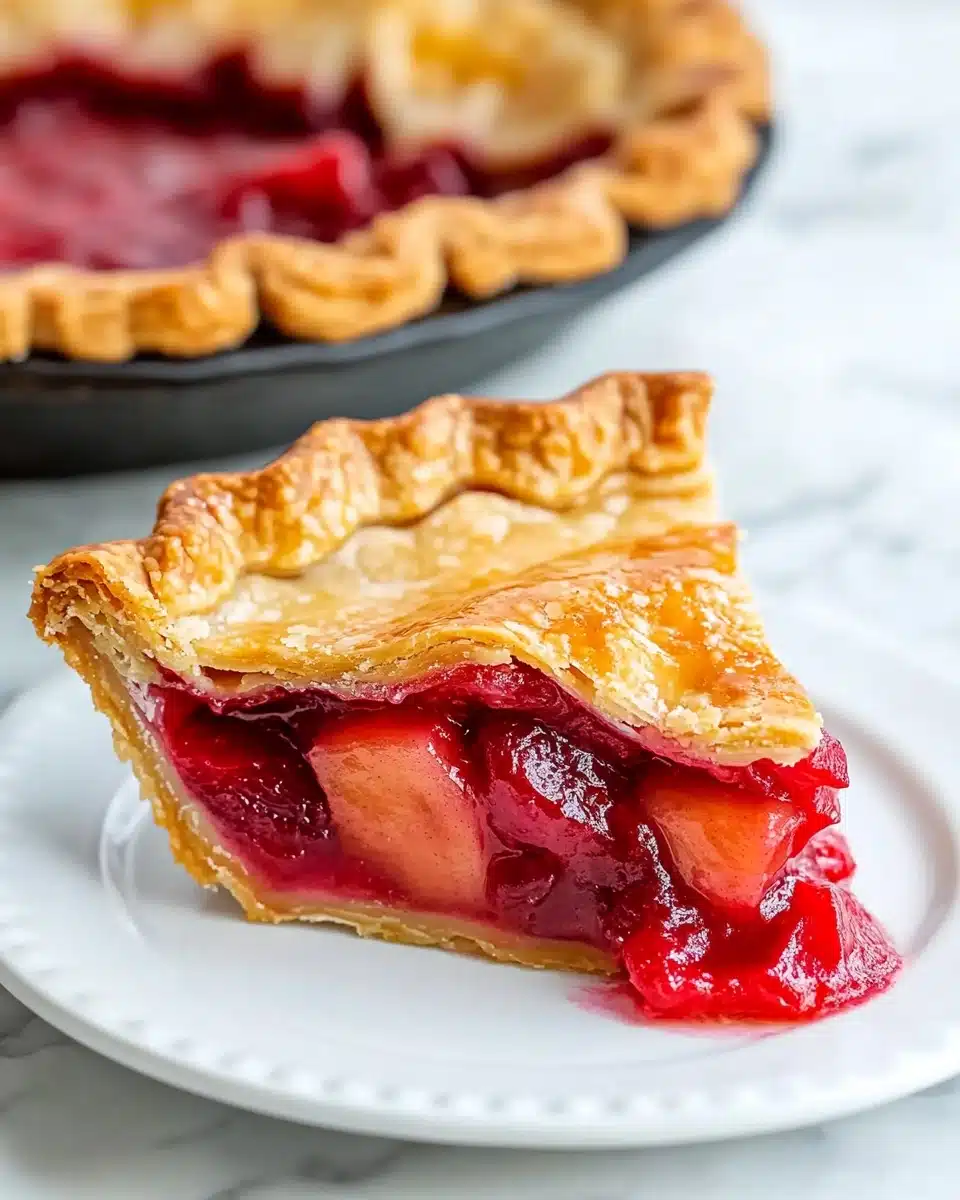
Is there anything more irresistible than a slice of Strawberry Rhubarb Pie, with its vibrant pink filling and flaky, golden crust? This classic dessert effortlessly strikes a perfect balance between sweet and tart, making it just as welcome at a summer picnic as it is on your holiday table.
Why You’ll Love This Recipe
- Unbeatable Balance: Each bite bursts with sweet strawberries and tangy rhubarb, delivering that legendary flavor combination only Strawberry Rhubarb Pie can offer.
- Homemade Comfort: This pie brings you all the coziness of classic Americana, complete with a buttery, tender crust made right in your own kitchen.
- Crowd-Pleasing Beauty: Its gorgeous ruby filling peeks through a golden lattice or crimped top—always earning “oohs” and “aahs” at gatherings.
- Easy as Pie (Really!): With a handful of basic ingredients and simple steps, you’ll be amazed how quickly this dessert comes together for both beginners and seasoned bakers.

Ingredients You’ll Need
The magic of Strawberry Rhubarb Pie happens with just a few fresh, wholesome ingredients. Each one plays an important role—adding color, sweetness, thickness, or that nostalgic pie flavor we all adore.
- Rhubarb stalks: This tart, celery-like veggie is the heart of this pie—remember to trim all the leaves (they’re toxic) and stick to the crunchy, pink stalks.
- Fresh strawberries: Their sweetness and vibrant red hue mellow the rhubarb’s tang while giving the filling gorgeous color.
- Sugar: Adjust the amount to taste—more for a sweeter pie, less if you love that signature tang.
- Quick-cooking tapioca: This helps thicken all those sweet-tart juices, avoiding a runny mess in the finished pie.
- Salt: Just a pinch brings together all the wonderful flavors.
- Fresh orange zest: Adds a bright, citrusy note that elevates the fruit filling beautifully.
- Pie crust (double crust recipe, 9-inch): Homemade or store-bought works! Your crust provides that flaky, golden envelope.
- Egg white or cream: For brushing the top—optional but ensures a lovely glisten and rich color after baking.
Variations
Don’t be afraid to get creative with your Strawberry Rhubarb Pie! You can tweak the filling, crust, or even swap a few flavors for results that suit any craving or dietary need.
- Mixed Berry Medley: Toss in a handful of raspberries or blueberries for deeper color and an extra layer of juicy sweetness.
- Gluten-Free Option: Simply use your favorite gluten-free pie crust for a dessert everyone can enjoy.
- Citrus Twist: Swap the orange zest for lemon or lime to give your pie a slightly different (and equally amazing) zing.
- Oat Crumble Topping: Skip the top crust and scatter a buttery oat streusel over your filling for an irresistible crisp-meets-pie mashup.
How to Make Strawberry Rhubarb Pie
Step 1: Preheat the Oven
Start by placing your oven rack in the center and preheating to 400°F. Having your oven properly heated ensures your pie starts baking with hot, even heat—crucial for that perfect, crisp crust.
Step 2: Prepare the Filling
In a large mixing bowl, gently combine the sliced rhubarb and strawberries with sugar, quick-cooking tapioca, salt, and fresh orange zest. Let this mixture sit for about 10 minutes—this pause allows the fruit to release some of its juices and the tapioca to start working its magic.
Step 3: Roll Out and Fill the Pie
On a lightly floured surface, roll out one disc of your favorite pie dough and gently fit it into your pie dish. Trim the dough so there’s about a half-inch overhang, then evenly arrange your strawberry-rhubarb filling inside. Spread out the fruit for even baking and lots of juicy bites in every slice.
Step 4: Add the Top Crust
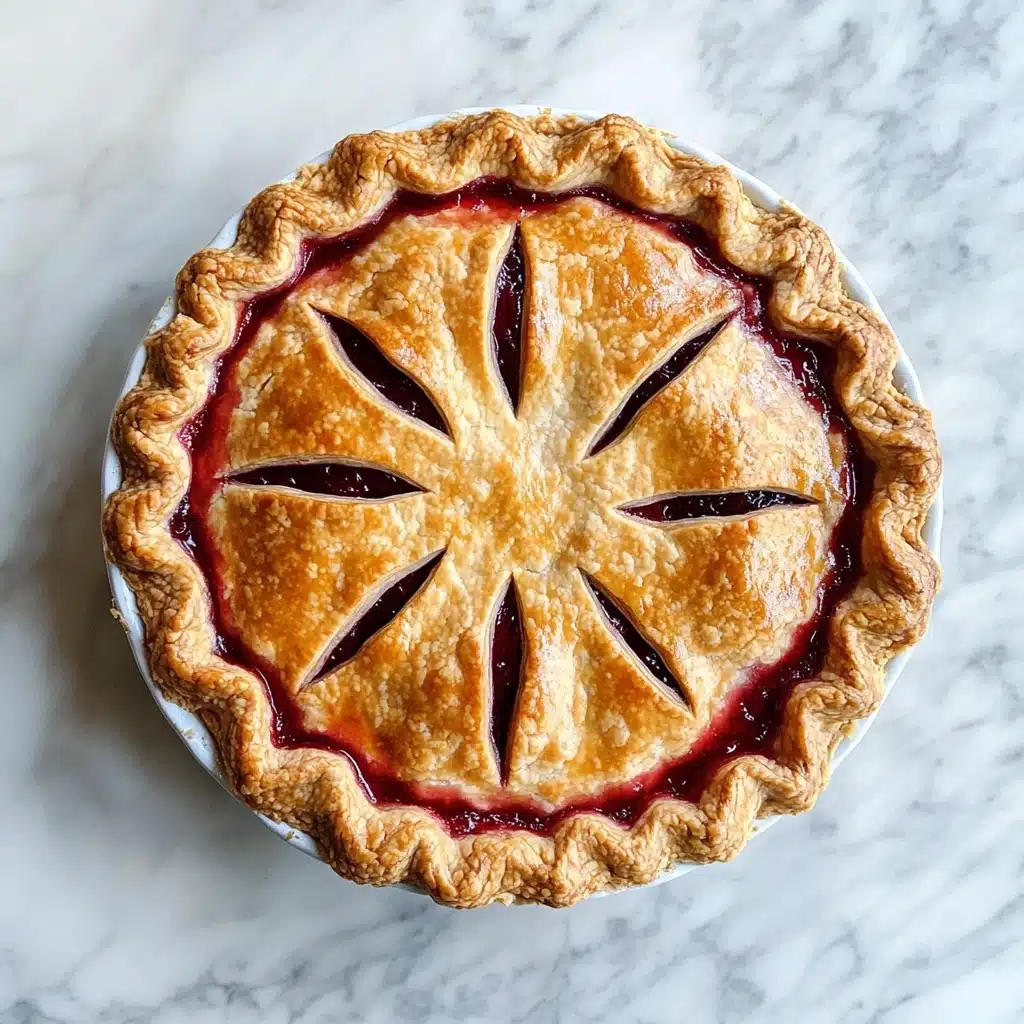
Roll out the second crust and lay it over your filled pie. Trim, leaving about an inch of dough around the edge, then tuck the upper crust over and pinch it together with the bottom crust. For a classic look, crimp the edge with your fingers or press with a fork. Vent the top by slicing a few small slits—so those fragrant, bubbling juices can escape.
Step 5: Optional Glaze
If you love a beautifully glossy finish, lightly brush the top of your pie with beaten egg white or cream. This step is optional, but it gives your Strawberry Rhubarb Pie a bakery-worthy sheen and color.
Step 6: Bake Your Pie
Place your pie on the middle rack of your 400°F oven, with a baking sheet below to catch any fruit juices that bubble over. Bake for 20 minutes, then turn the heat down to 350°F and continue baking for 40–50 minutes longer. The pie is ready when the crust is golden and the filling is visibly bubbling through the vents—trust me, the aroma is pure happiness!
Step 7: Cool and Serve
Carefully remove the Strawberry Rhubarb Pie from the oven and let it cool on a rack. Serving it warm is pure bliss, but if you let it cool completely, the filling will set up beautifully for tidy slices. Enjoy as-is, or top with a scoop of vanilla ice cream.
Pro Tips for Making Strawberry Rhubarb Pie
- Juiciness Control: For the thickest filling, let your mixed filling sit for a full 10 minutes—and don’t skip the quick-cooking tapioca! It soaks up those extra fruit juices for luscious, sliceable pie.
- Cold Butter, Flaky Crust: If you’re making dough from scratch, keep your butter and water ice cold for a supremely tender, flaky crust every time.
- Edge Shield: Midway through baking, if the edges of your crust are browning too fast, shield them with strips of foil to prevent burning but keep the center baking evenly.
- Cooling Patience: Allowing your Strawberry Rhubarb Pie to cool fully ensures a set filling—rushing to cut too early can lead to a runny, messy slice (but hey, it’ll still taste amazing!).
How to Serve Strawberry Rhubarb Pie
Garnishes
A classic Strawberry Rhubarb Pie truly shines with a scoop of vanilla ice cream or a cloud of lightly whipped cream. For added sparkle, sprinkle the top crust with raw sugar before baking for a shimmering, crunchy finish.
Side Dishes
Serve this pie alongside fresh berries for a bright dessert plate, or pair with hot coffee or iced tea for a comforting afternoon treat. It’s also lovely with lemon or shortbread cookies for an effortless dessert platter.
Creative Ways to Present
Try presenting individual Strawberry Rhubarb Pie slices in mason jars with a swirl of cream for a picnic-friendly twist, or bake mini pies in ramekins for cute, hand-held servings. For holidays, cut decorative shapes into the top crust for extra flair.
Make Ahead and Storage
Storing Leftovers
Leftover Strawberry Rhubarb Pie can be covered loosely with foil or plastic wrap and kept at room temperature for up to two days, or stored in the fridge for up to five days. The filling’s flavor actually deepens after a night in the fridge!
Freezing
You can freeze either unbaked or fully baked Strawberry Rhubarb Pie. Wrap tightly in several layers of plastic wrap and foil—bake straight from frozen, adding extra time, or thaw overnight in the fridge before serving for best results.
Reheating
For the fresh-baked experience, gently reheat slices in a 300°F oven for 10–15 minutes. This revives the crust’s crispiness while warming the vibrant filling—pro tip: a few minutes under the broiler restores a golden top crust.
FAQs
-
Can I use frozen strawberries or rhubarb in this pie?
Yes! You can absolutely use frozen fruit—just be sure to thaw and drain well before adding to the filling. Otherwise, excess moisture can make the pie too runny.
-
How do I know when my Strawberry Rhubarb Pie is done?
Your pie is ready when the crust is deeply golden and you see the filling bubbling noticeably through the vent holes. Bubbling is key—it means the juices are thick and set!
-
What can I use instead of tapioca for thickening?
If you don’t have quick-cooking tapioca, substitute with 3 tablespoons of cornstarch or 1/4 cup of flour. Keep in mind, each thickener gives a slightly different texture to the filling.
-
Do I really need to let the pie cool before slicing?
Letting your Strawberry Rhubarb Pie rest helps the juices thicken and hold their shape, making for beautiful slices. If you’re craving warm pie, just know the filling may be a little more relaxed—but still super delicious!
Final Thoughts
If you’re searching for a recipe that’s equal parts nostalgia and pure delight, this Strawberry Rhubarb Pie is sure to become a favorite in your home. It’s the kind of treat that begs to be shared, savored, and repeated all season long—give it a try, and watch the smiles appear!
Print
Strawberry Rhubarb Pie Recipe
- Prep Time: 25 mins
- Cook Time: 80 mins
- Total Time: 105 mins
- Yield: 8 servings 1x
- Category: Dessert
- Method: Baking
- Cuisine: American
- Diet: Vegetarian
Description
A delightful and classic Strawberry Rhubarb Pie recipe that balances the tartness of rhubarb with the sweetness of fresh strawberries, all wrapped in a flaky pie crust. Perfect for any occasion!
Ingredients
Rhubarb filling:
- 3 1/2 cups (440g) rhubarb stalks, cut into 1/2 inch pieces
- 2 cups (280g) stemmed and sliced strawberries
- 3/4 to 1 cup sugar
- 4 tablespoons quick-cooking tapioca
- 1/4 teaspoon salt
- 1 teaspoon finely grated orange zest
Pie crust:
- 1 double-crust 9-inch pie dough
- 1 large egg white, beaten, or 1 tablespoon cream for brushing (optional)
Instructions
- Preheat the oven: Place rack in the middle and preheat the oven to 400°F.
- Assemble the pie filling: Gently combine rhubarb, strawberries, sugar, tapioca, salt, and orange zest in a bowl. Let sit for 10 minutes.
- Roll out the bottom crust and fill the pie: Line a pie dish with one disc of pastry dough. Transfer the filling and spread out evenly.
- Top the pie: Place the second disc of pastry dough over the pie. Trim, tuck, and crimp the edges. Cut slits in the top for steam to escape. Optional: brush with egg white or cream for a glaze.
- Bake the pie: Bake at 400°F for 20 minutes, then reduce heat to 350°F and bake for an additional 40-50 minutes.
- Cool and serve: Let cool on a rack. Serve warm or cold. Store at room temperature for up to 2 days or refrigerate for 5 days.
Nutrition
- Serving Size: 1 slice
- Calories: Approximately 320 kcal
- Sugar: Approximately 25g
- Sodium: Approximately 300mg
- Fat: Approximately 12g
- Saturated Fat: Approximately 6g
- Unsaturated Fat: Approximately 5g
- Trans Fat: 0g
- Carbohydrates: Approximately 50g
- Fiber: Approximately 3g
- Protein: Approximately 3g
- Cholesterol: Approximately 20mg

