
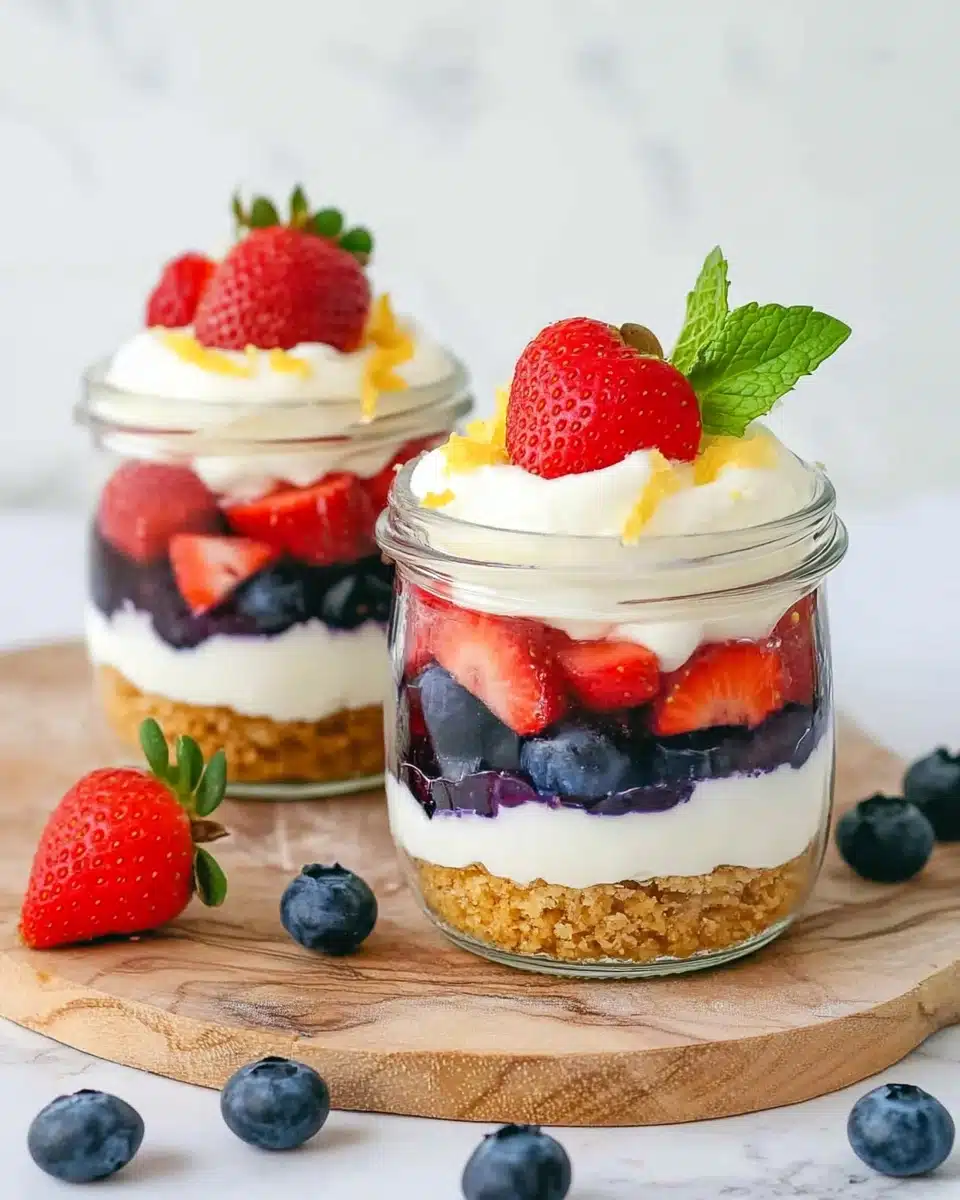
Dive spoon-first into these creamy, luscious No-Bake Cheesecake Jars—your soon-to-be favorite dessert for every season and occasion! Perfectly portable, beautifully layered, and endlessly customizable, this dessert is a total game-changer for anyone craving a cheesecake fix without all the fuss.
Why You’ll Love This Recipe
- Lightning-Fast: You can whip up these No-Bake Cheesecake Jars in just 30 minutes—no oven required, no water bath drama, no stress!
- Perfectly Portable: Thanks to the charming jar presentation, they travel gracefully to picnics, potlucks, or backyard barbecues without a mess.
- Make-Ahead Friendly: Prepare them the day before your gathering for a dessert that gets dreamier while it sits in the fridge.
- Customizable Layers: Mix and match with seasonal fruits, cookie crumbs, or added flavors to truly make these jars your own.

Ingredients You’ll Need
The best thing about these No-Bake Cheesecake Jars? The ingredient list is short but oh-so-mighty. Each component adds a special touch—from the buttery crunch at the base to the pillowy cheesecake filling and those little bursts of juicy berries up top.
- Graham cracker crumbs: Classic for cheesecake, they create that nostalgic, buttery base in every bite.
- Unsalted butter: Melted, so it binds the crumb crust and adds a rich, toasty flavor.
- Sugar: A touch for sweetness in the crust to balance the tangy filling.
- Heavy whipping cream: Freshly whipped, this gives the cheesecake its dreamy, cloud-like texture.
- Cream cheese: The heart of any cheesecake—make sure it’s soft and at room temperature for ultimate smoothness.
- Confectioners’ sugar: Dissolves perfectly, bringing gentle sweetness and a silky texture to the filling.
- Lemon juice: Just a splash brightens the whole dessert and brings out the cheesecake’s tang.
- Milk: Helps loosen the mixture for a super creamy, pipeable filling.
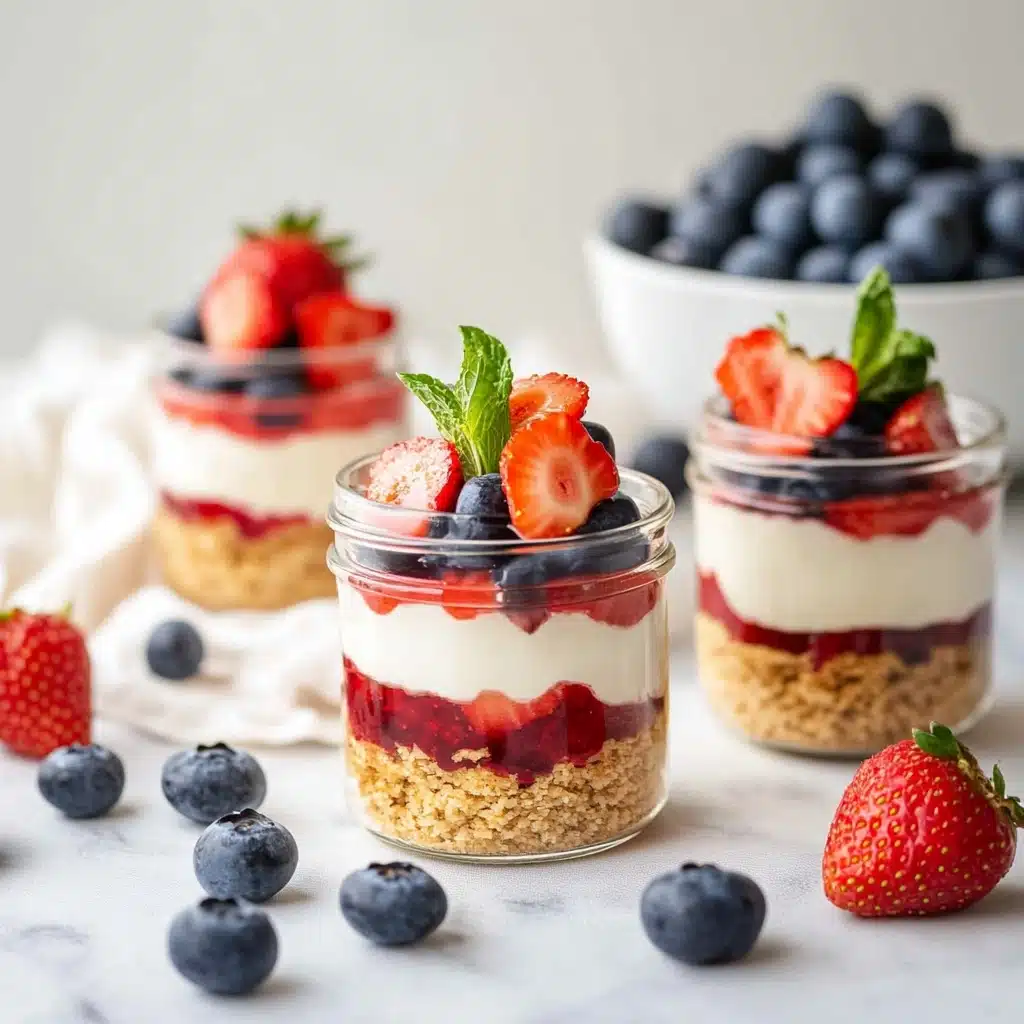
- Fresh mixed berries: Blueberries and strawberries add fresh, colorful layers (and a sweet-tart pop!)
- Fresh mint (optional): A few sprigs make these jars look as good as they taste.
Variations
The beauty of No-Bake Cheesecake Jars is how effortlessly they adjust to your cravings or dietary needs. A few tweaks and swaps can turn this already fabulous dessert into a personal masterpiece every time you make it!
- Oreo Cookie Crust: Swap the graham crackers for Oreo crumbs for a chocolatey twist that’s irresistible.
- Dairy-Free Delight: Use plant-based cream cheese and coconut whipped cream for a vegan-friendly version.
- Citrus Zing: Fold in a little orange or lime zest to the cheesecake filling for a new dimension of brightness.
- Seasonal Fruit Swap: Try peaches, blackberries, or cherries depending on what’s fresh or in season.
- Nutty Crunch: Add toasted, chopped pecans or almonds for extra texture and richness.
How to Make No-Bake Cheesecake Jars
Step 1: Make the Graham Cracker Crust
Start by blitzing your graham crackers into fine crumbs using a food processor (or pop them in a zip-top bag and smash with a rolling pin for a little stress relief!). Mix the crumbs with melted butter and a spoonful of sugar until they look like wet sand. Spoon the mixture evenly into the bottoms of your jars and gently press down to form a sturdy base that’ll hold up to all that creamy goodness.
Step 2: Whip the Cream
Grab a chilled bowl, pour in the whipping cream, and beat with an electric mixer until you get those irresistible soft, fluffy peaks. The whipped cream gives your cheesecake filling its light and airy lift, so don’t skimp on this step!
Step 3: Make the Cheesecake Filling
In a separate bowl, beat your softened cream cheese until it’s luxuriously smooth. Add confectioners’ sugar and blend until fully combined, then whip in the lemon juice and milk. You’re looking for a luscious, silky consistency—so take a taste at this point (chef’s reward, right?).
Step 4: Fold and Pipe
Gently fold the whipped cream into the cream cheese mixture using a spatula. This step is key for a dreamy, cloudlike texture. Fill a large piping bag with your cheesecake filling (or use a sturdy zip-top bag with the corner snipped) to make layering neat, tidy, and extra pretty.
Step 5: Layer and Decorate
Pipe a generous layer of cheesecake filling into each jar, scatter on a handful of berries, then repeat the layers: more creamy filling, more berries. Top each jar with a sprig of fresh mint if you’d like. These No-Bake Cheesecake Jars are ready to devour right away, but chilling for a bit lets the flavors mingle even more.
Pro Tips for Making No-Bake Cheesecake Jars
- Room-Temperature Magic: Make sure the cream cheese is completely softened, so your filling comes out extra smooth with zero lumps.
- Don’t Overwhip the Cream: Stop beating as soon as soft peaks form; overwhipping makes the cream grainy instead of silky.
- Neat Layers Every Time: Use a piping bag or a large zip-top bag for easy and mess-free layering of the creamy filling into each jar.
- Fresh Berries for Best Results: If your berries are extra juicy, pat them dry before adding them—nobody likes watery cheesecake!
How to Serve No-Bake Cheesecake Jars
Garnishes
Dress up your No-Bake Cheesecake Jars with a flourish of extra berries, a sprinkle of crushed graham crackers, or a dainty mint leaf. If you’re feeling fancy, add a drizzle of homemade berry sauce or a dusting of lemon zest for a wonderfully fragrant finish.
Side Dishes
These cheesecake jars are the star, but if you’d like to offer a refreshing side, serve with a platter of sliced seasonal fruit, or some crisp almond biscotti on the side for a little crunch between bites. Iced tea, cold brew, or a glass of bubbly prosecco pairs beautifully too!
Creative Ways to Present
For parties, try using mini jam jars or even small shot glasses for bite-sized treats—so cute on a dessert table! For something extra-special, tie a ribbon around each jar and add a tiny dessert spoon tucked underneath—your guests will feel like they’re opening a sweet little present.
Make Ahead and Storage
Storing Leftovers
Cover each cheesecake jar tightly and pop them in the fridge, where they’ll happily keep for up to three days. The layers stay fresh, the crust holds its texture, and the flavors only get better as they chill.
Freezing
If you want to freeze your No-Bake Cheesecake Jars, leave off the berries and mint, seal tightly, and freeze for up to one month. Thaw overnight in the refrigerator, add fresh fruit right before serving, and they’ll taste as good as new.
Reheating
No reheating needed—these jars are delicious straight from the fridge! If they’ve been frozen, just let them defrost in the refrigerator for several hours (or overnight) until creamy and ready to enjoy.
FAQs
-
Can I make No-Bake Cheesecake Jars in advance?
Absolutely! These jars actually benefit from a few hours in the fridge—the flavors meld and the filling firms up slightly. Just cover and chill until you’re ready to serve for best results.
-
Can I use frozen berries instead of fresh?
You can, but it’s best to thaw and drain them first to prevent extra liquid from watering down the layers. Fresh berries do hold their shape and pop better in the jars.
-
What’s the best substitute for graham crackers?
Digestive biscuits, vanilla wafers, or even crushed shortbread cookies all work beautifully as a crust base. Pick your favorite and follow the same steps!
-
Do No-Bake Cheesecake Jars need to chill before eating?
Nope! They’re delicious straight away—but if you do have the patience, a short chill in the fridge makes the flavors even richer and lets the jars set up a little more.
Final Thoughts
I truly can’t wait for you to try these No-Bake Cheesecake Jars! Whether you’re celebrating something big, hosting brunch, or just want a sweet treat on a Tuesday, this dessert puts smiles on faces and keeps life deliciously simple. Enjoy every creamy, crunchy, berry-bright spoonful—you deserve it!
Print
No-Bake Cheesecake Jars Recipe
- Prep Time: 30 mins
- Total Time: 30 minutes
- Yield: 4 servings 1x
- Category: Dessert
- Method: No-Bake
- Cuisine: American
- Diet: Vegetarian
Description
These delightful No-Bake Cheesecake Jars are a quick and easy dessert perfect for any occasion. Layers of creamy cheesecake filling, fresh berries, and a buttery graham cracker crust make for a delicious treat.
Ingredients
For the bottom:
- 1/2 cup (60g) graham cracker crumbs, about 8 graham crackers
- 1 teaspoon sugar
- 2 Tablespoons (30g) unsalted butter, melted
For the cheesecake:
- 2 cups (250 ml) whipping cream, freshly whipped
- 1 block (8 ounces/225g) cream cheese, softened at room temperature
- 1/2 cup (60g) confectioners’ sugar
- 2 teaspoons fresh lemon juice
- 2 teaspoons milk (any fat content)
- Fresh mixed berries (here blueberries and chopped strawberries)
- Fresh mint, for serving (optional)
Instructions
- For the crust: Place the biscuits in a food processor and process into crumbs. Transfer to a bowl, add melted butter, sugar, and combine until moistened. Divide into the bottom of each jar.
- For the cheesecake filling: In a medium bowl, beat the whipping cream with an electric hand mixer, until light and fluffy. Set aside. In a separate mixing bowl, beat the cream cheese with an electric hand mixer until fluffy. Add confectioners’ sugar, and beat until fully incorporated. Add lemon juice, beat until combined. Pour the milk, and beat again. Fold in the freshly whipped cream into the cream cheese mixture, using a rubber spatula. Fill a large piping bag with the mixture.*
- For assembling: Pipe a layer of the cream cheese mixture evenly into the jars, add some berries, then repeat one more time (cream cheese, then berries again). Top with a few leaves of fresh mint. These no-bake cheesecake jars do not need to be chilled to enjoy right away, but if preparing ahead of time, refrigerate until ready to serve.
Nutrition
- Serving Size: 1 jar
- Calories: Approximately 380 kcal
- Sugar: Approximately 18g
- Sodium: Approximately 200mg
- Fat: Approximately 30g
- Saturated Fat: Approximately 18g
- Unsaturated Fat: Approximately 10g
- Trans Fat: 0g
- Carbohydrates: Approximately 25g
- Fiber: Approximately 1g
- Protein: Approximately 4g
- Cholesterol: Approximately 95mg


