

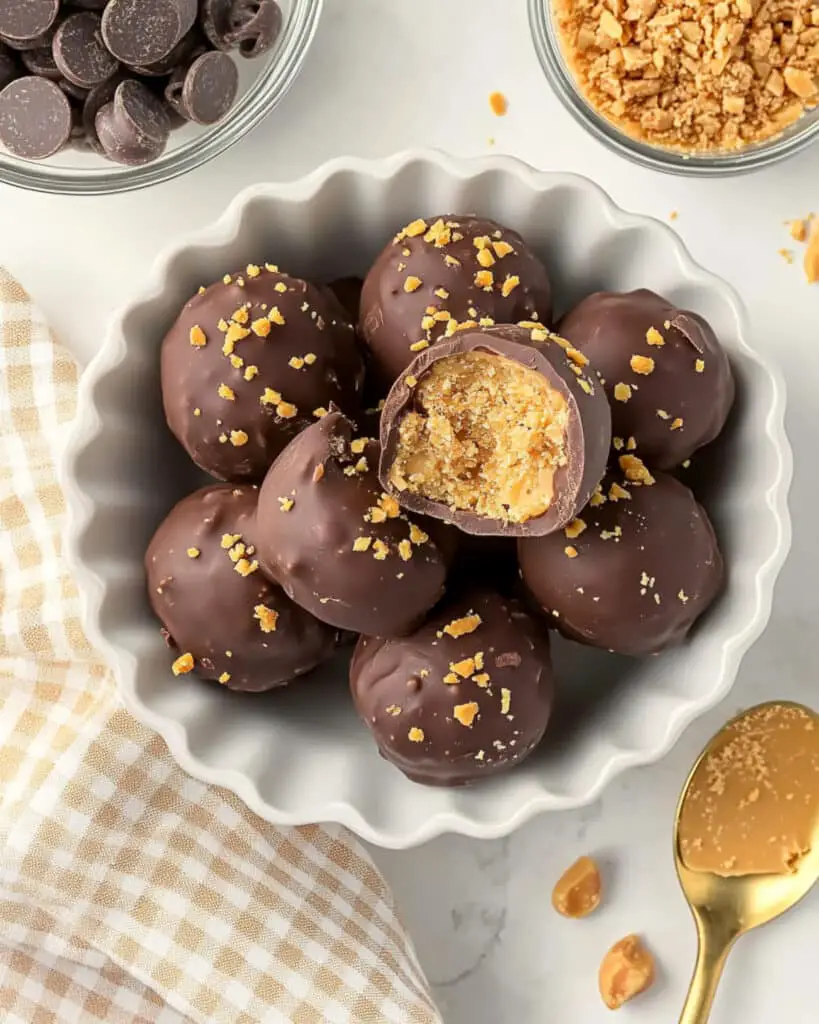
Crunchy, creamy, chocolatey—these Butterfinger Balls are pure happiness in bite-sized form! If you’re searching for a quick dessert that’s big on flavor but light on effort, this recipe is your new go-to. Each ball wraps that unmistakable combo of peanut butter and Butterfinger candy bars inside a rich chocolate shell, making them completely irresistible. With minimal prep and zero baking, they are perfect for crazy weekdays, last-minute parties, or simply when your sweet tooth comes calling. Let’s dive in and create the kind of treat you’ll want to hide from everyone else (but probably should share).
Why You’ll Love This Recipe
- No-Bake Simplicity: Forget preheating the oven or fussing with baking pans—this is all about mix, chill, dip, and enjoy.
- That Classic Butterfinger Crunch: The unmistakable crispy-sweet flavor of Butterfinger bars takes center stage in every bite.
- Crowd-Pleaser: These are an instant hit at parties, bake sales, or family nights—nobody can resist that creamy peanut butter core with a chocolate shell.
- Perfect for Make-Ahead: Stash them in the freezer and have a homemade treat ready anytime the craving strikes.
- Fun to Make: Kids and adults alike love rolling and dipping these—you might want to make an extra batch if you have helpers!

Ingredients You’ll Need
Every ingredient in this recipe is simple, easy to find, and essential to the perfect Butterfinger ball. Here’s what goes into them, plus a little note on why:
- Peanut Butter: The star of the show. Go with creamy for a smooth texture, or use crunchy if you like extra bits. Natural peanut butter is a bit too oily here—stick to the classic kind for best results.
- Butter: Softened, so it creams in smoothly and gives just the right richness.
- Vanilla Extract: Just a splash adds warmth and brings all the flavors together.
- Powdered Sugar: Sweetens and helps bind everything into a dough-like consistency that’s easy to roll.
- Crushed Butterfinger Bars: These provide that signature crispy-crunch and a deep caramel-candy flavor. Crush them in a zip bag with a rolling pin for perfect texture!
- Semi-Sweet Chocolate Chips: The perfect coating—rich, glossy, and not too sweet.
- Coconut Oil or Vegetable Oil: Makes the melted chocolate extra silky and smooth for perfect dipping.
Note: You’ll find the complete list of ingredients, along with their exact measurements, in the printable recipe card at the bottom of this post.
Variations
If you love to experiment or want to use what you have on hand, here are some fun ways to make Butterfinger Balls your own:
- Different Candy Bars: Try Snickers, Reese’s Peanut Butter Cups, or even chopped toffee bars in place of Butterfingers for a fun twist.
- Nut-Free Version: Use sunflower seed butter and a nut-free crispy candy for allergy-friendly treats.
- Chocolate Choices: Swap semi-sweet for milk or dark chocolate, or even white chocolate for a different flavor profile.
- Extra Crunch: Roll the finished balls in chopped nuts or sprinkles for added texture and color.
How to Make Butterfinger Balls
Step 1: Whip Up the Filling
Start by beating together the peanut butter, softened butter, and vanilla extract with a mixer. You want everything creamy and fluffy, so don’t be shy—let it go for a couple of minutes.
Step 2: Sweeten and Thicken
Gradually add the powdered sugar—about a half-cup at a time—mixing after each addition. Keep going until the mixture is soft and thick but still workable. This is what helps the balls hold their shape.
Step 3: Add the Butterfinger Magic
Fold in most of the crushed Butterfinger bars, but set a small handful aside for sprinkling on top at the end. Stir until all those caramelized crispy bits are evenly distributed.
Step 4: Chill and Shape
Pop the mixture in the fridge for at least 30 minutes. Chilling is non-negotiable—it makes rolling so much easier! Once chilled, use your hands to roll the mixture into small balls and place them on a parchment-lined pan. Chill again for another 30 minutes for best dipping results.
Step 5: Dip in Chocolate
Meanwhile, combine your chocolate chips and oil in a microwave-safe bowl. Microwave in short bursts, stirring in between, until the chocolate is gorgeously smooth. Here’s where the oil works its magic, making dipping a breeze.
Step 6: Coat and Decorate
One at a time, dip each chilled ball into the melted chocolate—using a fork makes this less messy. Gently shake off any excess chocolate and return the ball to your pan. Sprinkle a bit of the reserved Butterfinger crumbs on top before the chocolate sets.
Step 7: Set and Enjoy
Let them cool at room temperature until the chocolate hardens (or pop in the fridge if you’re impatient). Then dig in—you’ve made the best treat!
Pro Tips for Making the Recipe
- Chilling is key! If the mixture is too soft, toss it back in the fridge for another 10-15 minutes.
- Double dip for a thicker shell. If you’re a total chocophile, let the first layer of chocolate set, then dip again!
- Don’t overheat the chocolate. Use 50% power settings in the microwave, stirring often to prevent burning.
- Use parchment paper for easy cleanup. No one wants sticky messes, especially when chocolate’s involved.
How to Serve
These Butterfinger Balls are pure joy on their own—just pile them onto a tray and watch them disappear! For a party platter, tuck them among fresh berries, pretzels, or even mini cupcakes. They’re fantastic as a bite-sized dessert after dinner, or pop them into a lunchbox for a midday treat. They pair perfectly with coffee, hot chocolate, or even a glass of cold milk.
Make Ahead and Storage
Storing Leftovers
Keep Butterfinger Balls in an airtight container in the fridge for up to one week. They’re at their best when chilled but still creamy inside.
Freezing
Butterfinger Balls freeze beautifully! Place them in a single layer on a pan until solid, then transfer to a zip bag or container. They’ll stay fresh in the freezer for up to 3 months. Grab one straight from frozen for a firmer texture, or let it sit at room temp for a few minutes to soften.
Reheating
No need to reheat, but if you prefer a meltier center, let the balls sit at room temperature for 10-15 minutes before eating.
FAQs
-
Can I use natural peanut butter in this recipe?
Natural peanut butter tends to separate and is often too oily for this recipe, making the mixture harder to roll and hold its shape. For best results, stick to classic creamy peanut butter.
-
Can I make these without a mixer?
Yes! While a mixer makes it easier to blend ingredients smoothly, you can absolutely mix everything by hand. The butter must be very soft to avoid lumps, and some elbow grease goes a long way.
-
Do I have to chill the mix before rolling?
Yes. Don’t skip the chilling steps! It makes the filling firm enough to roll into balls and helps them keep their shape while dipping.
-
Is there a way to make this recipe dairy-free?
You can! Swap the butter for a vegan butter substitute and use dairy-free chocolate chips. Just check that your peanut butter and candy bars are also dairy-free.
Final Thoughts
With minimal fuss, maximum flavor, and that unmistakable Butterfinger crunch, these no-bake Butterfinger Balls are destined to be a household staple. Once you try them, you’ll see just how easy homemade treats can be—and you might never go back to store-bought candy again. Grab your favorite mixing bowl and get ready to enjoy pure peanut-buttery, chocolatey bliss. Happy snacking!
Print
Butterfinger Balls Recipe
- Prep Time: 1 hour 20 minutes
- Cook Time: 0 minutes
- Total Time: 1 hour 20 minutes
- Yield: 36 balls 1x
- Category: Desserts
- Method: No-cook
- Cuisine: American
- Diet: Vegetarian
Description
Butterfinger Balls are a delicious no-bake treat made with a creamy peanut butter and crushed Butterfinger filling, coated in smooth chocolate, and finished with a sprinkle of Butterfinger bits. Perfect for parties, gifting, or a sweet snack, these bite-sized candies offer a satisfying crunch and chocolate-peanut butter flavor in every bite.
Ingredients
For the Filling
- 1 1/2 cups peanut butter
- 1/2 cup butter, softened
- 1/2 teaspoon vanilla extract
- 2 cups powdered sugar
- 1 cup crushed Butterfinger bars (reserve some for topping)
For the Chocolate Coating
- 3 cups semi-sweet chocolate chips
- 1 tablespoon coconut oil or vegetable oil
Instructions
- Cream Peanut Butter Mixture: In a mixing bowl, combine peanut butter, softened butter, and vanilla extract. Use a mixer on medium speed to beat until the mixture becomes fluffy and well incorporated.
- Add Powdered Sugar: Gradually add the powdered sugar, a little at a time, mixing as you go until fully combined and a dough forms.
- Mix in Butterfinger: Gently stir in the crushed Butterfinger bars, reserving a small amount for topping later. Place the mixture in the refrigerator and chill for 30 minutes to firm up.
- Shape Balls: Remove the mixture from the fridge and roll into small balls (about 1 inch in diameter). Place the balls on a parchment-lined baking sheet. Chill again for another 30 minutes to help them hold their shape.
- Prepare Chocolate Coating: In a microwave-safe bowl, combine chocolate chips and coconut oil or vegetable oil. Microwave at 50% power for 1 minute. Stir, then continue microwaving in 30-second intervals, stirring after each, until the chocolate is fully melted and smooth.
- Dip and Decorate: Using a fork, dip each chilled peanut butter ball into the melted chocolate, making sure to coat it completely. Tap off the excess chocolate, then place the ball back onto the parchment-lined pan. Immediately sprinkle a pinch of reserved crushed Butterfinger bars on top for garnish.
- Repeat: Continue this process for all peanut butter balls until each is coated and topped.
- Set and Serve: Allow the chocolate coating to set at room temperature. Once set, the Butterfinger Balls are ready to serve and enjoy.
Notes
- You can use crunchy or creamy peanut butter based on preference.
- Stored in an airtight container, Butterfinger Balls stay fresh for up to one week in the refrigerator.
- If working in a warm kitchen, you may want to let the balls set in the refrigerator to help the chocolate harden faster.
- Butterfinger Balls also freeze well for up to 2 months.
Nutrition
- Serving Size: 1 ball
- Calories: 140
- Sugar: 11g
- Sodium: 52mg
- Fat: 9g
- Saturated Fat: 3.5g
- Unsaturated Fat: 4g
- Trans Fat: 0g
- Carbohydrates: 14g
- Fiber: 1g
- Protein: 2g
- Cholesterol: 5mg


