
If you’re looking for a treat that’s as pretty as it is delicious, you’re going to love this Pink White Chocolate Fudge Recipe. I absolutely adore how easy it is to whip up, and it makes such a gorgeous gift or party snack. When I first tried this, I was blown away by the creamy texture and that stunning blush color — perfect for Valentine’s Day, baby showers, or any time you want to add a little sweetness and charm to your day.
Why You’ll Love This Recipe
- Effortlessly Elegant: It comes together quickly with just a few ingredients, but looks impressively beautiful.
- Perfect Texture: Creamy, smooth, and melts in your mouth every time.
- Customizable Color & Flavors: You can create ombré effects and add mix-ins like dried cherries or sprinkles.
- Kid-Friendly and Fun: Little hands will love helping, especially cutting out those adorable heart shapes.

Ingredients You’ll Need
The beauty of this Pink White Chocolate Fudge Recipe is in its simplicity. Each ingredient plays a crucial role in creating that luscious texture and perfect taste. To get the best results, I’ve found using high-quality white chocolate or melting wafers really makes a difference — smooth melting and no grainy finish.
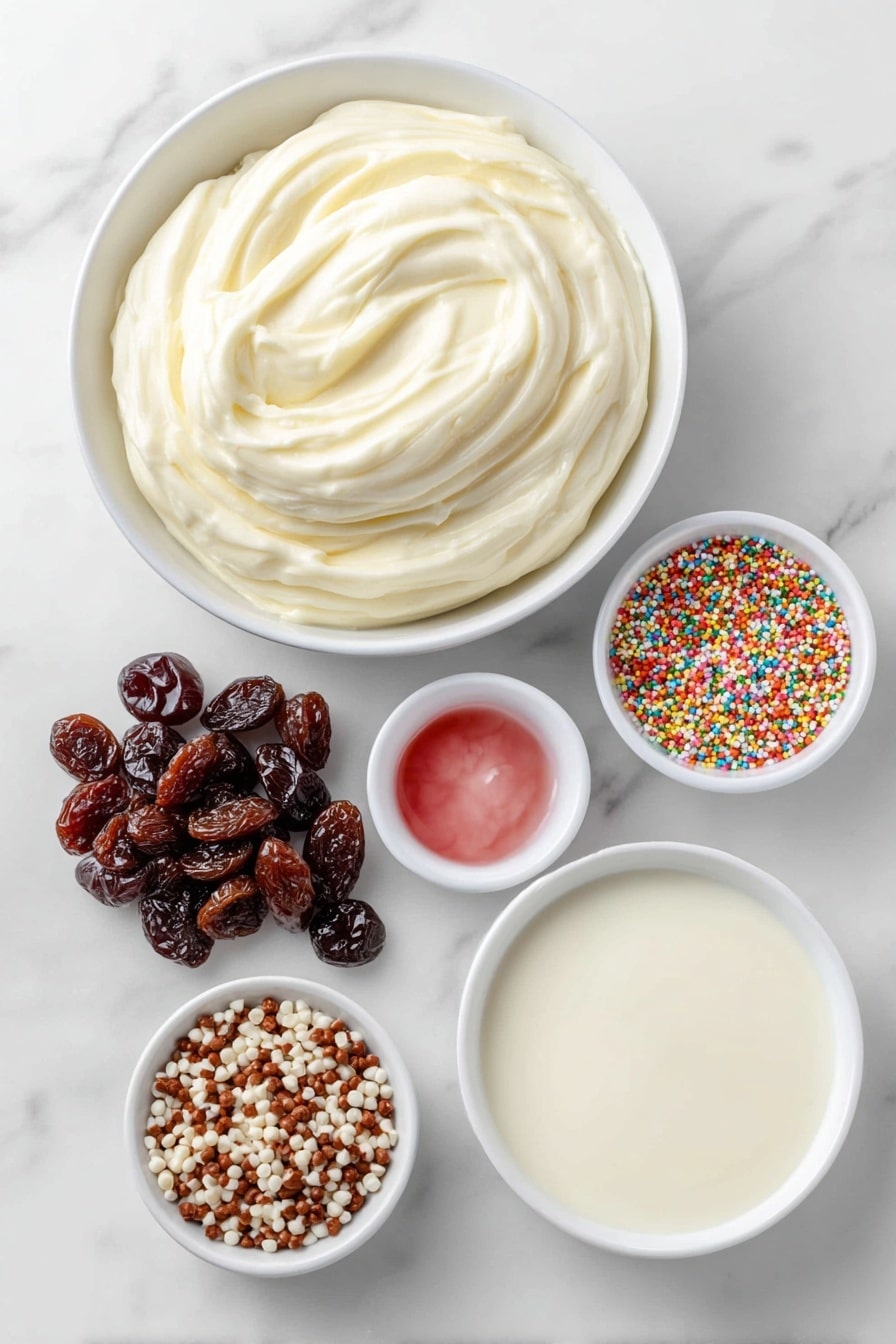
- White chocolate melting wafers or high-quality chopped chocolate: Choose good quality for that creamy melt, and chop chocolate finely if not using wafers.
- Sweetened condensed milk: This adds that rich sweetness and moisture that fudge needs to set perfectly.
- Pink gel food coloring: Just a few drops give you beautiful, vibrant color without making the fudge too runny.
- Sprinkles (optional): These add fun texture and a party vibe if you decide to add them.
- Dry cherries (optional): I love these for a little tart contrast against the sweet white chocolate — they add a great chewiness too!
Variations
I enjoy mixing things up sometimes with this Pink White Chocolate Fudge Recipe; it’s so fun to play with colors and add-ins to match different occasions or just your mood. Don’t be afraid to get creative — this fudge is forgiving and perfect for personalization.
- Ombre Pink Fudge: For a pretty gradient effect, add the pink food coloring in stages—mix some thoroughly and leave a portion white, then pour side by side into the pan without fully blending.
- Cherry-Chocolate Combo: Toss in some dried cherries like I do; their subtle tartness pairs wonderfully with the sweet white chocolate and adds great texture.
- Sprinkles Variety: Use themed sprinkles for holidays (hearts, stars, or pastel colors) to make your fudge festive and celebratory.
- Flavor Twist: Try adding a splash of vanilla or almond extract for an extra layer of flavor. I once added rose water — it made the fudge smell heavenly!
How to Make Pink White Chocolate Fudge Recipe
Step 1: Prep Your Pan
First things first, line a 9×9 inch pan with parchment paper, letting it overhang on two sides. This little trick makes it so much easier to lift the fudge out later without any sticky mess. I always use this method — it’s a game changer!
Step 2: Chop Chocolate if Needed
If you’re using white chocolate bars instead of melting wafers, chop them into small pieces. This helps them melt evenly and faster in the microwave without burning — a mistake I made on my first try, so trust me here!
Step 3: Melt Chocolate with Condensed Milk
Put the white chocolate and sweetened condensed milk into a large, microwave-safe bowl. Heat in short increments — about 20 to 30 seconds at a time — stirring well after each. I found it usually takes just two intervals to get it perfectly melted and silky smooth. Remember, stirring well distributes the heat and melts the chocolate gently without scorching it.
Step 4: Add Color and Optional Mix-ins
Once the chocolate is smooth, add a few drops of pink gel food coloring. For an ombré look, here’s a trick I discovered: only mix some of the batch with the pink, leaving part of the mixture white. Pour them into the pan side-by-side or gently swirl with a knife. If you want, fold in dried cherries or sprinkles now for some extra fun.
Step 5: Chill the Fudge
Pour the fudge mixture into your prepared pan and smooth it out. Pop it into the fridge for about an hour or until firm. Patience here pays off — the fudge needs to harden enough so it cuts cleanly without crumbling.
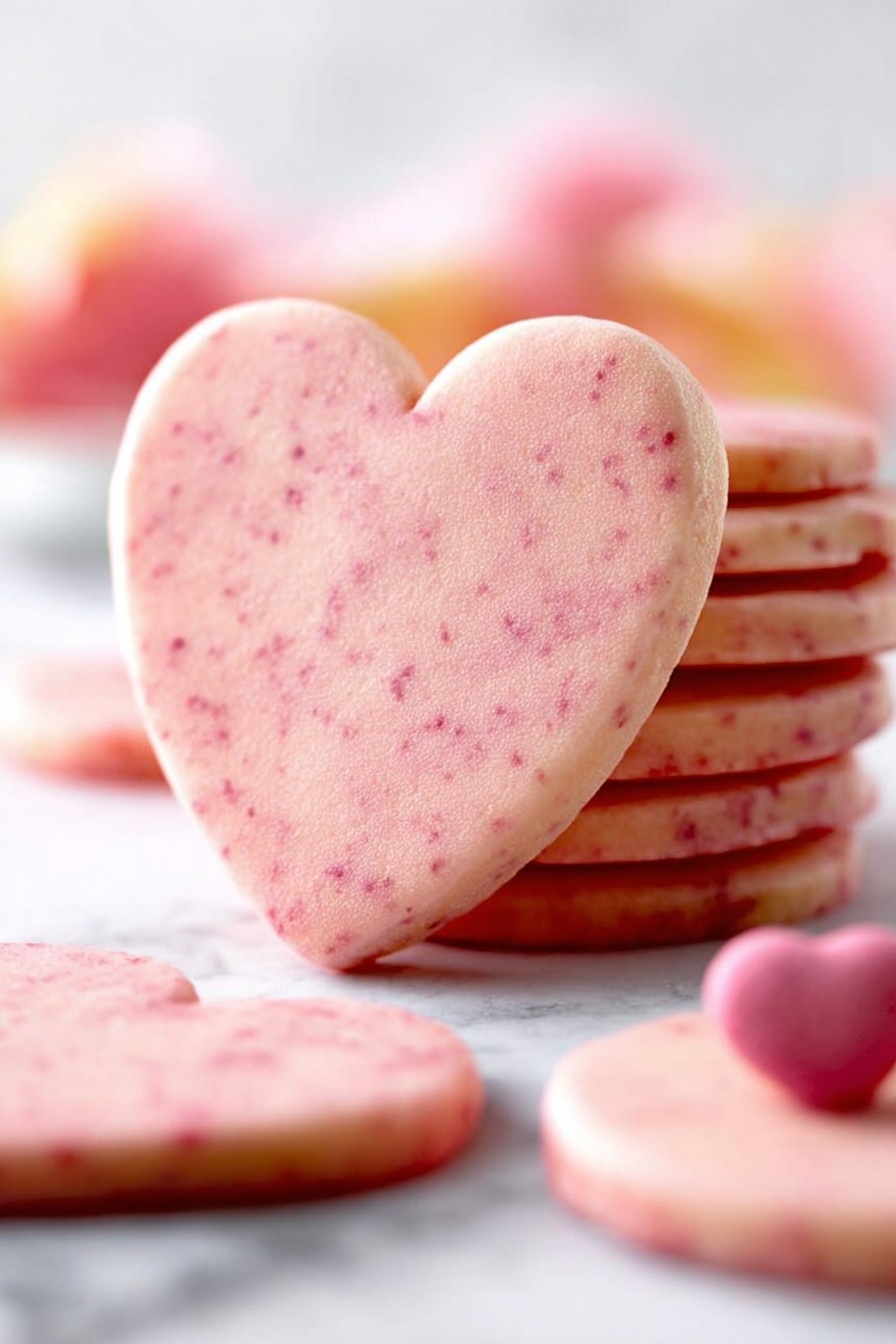
Step 6: Cut Into Heart Shapes
This is my favorite part: using a small heart-shaped cookie cutter to make adorable fudge bites. To save your fingers (and keep the cutter from sticking), place a kitchen towel over it and press gently but firmly. It’s such a fun way to make a special presentation, and my family goes crazy for these little hearts every time.
Step 7: Serve and Enjoy!
Arrange your pink white chocolate fudge hearts on a pretty plate or box them up as a thoughtful homemade gift. Trust me, you’ll want to make extra because these disappear fast!
Pro Tips for Making Pink White Chocolate Fudge Recipe
- Microwave in Short Bursts: Always heat in 20-30 second increments and stir well — white chocolate burns quickly if you’re not careful.
- Use Gel Food Coloring: It provides vibrant color without thinning your fudge mixture the way liquid food colorings can.
- Parchment Paper Overhang: This simple setup makes it so much easier to remove the fudge block for slicing or cutting shapes.
- Gentle Cutting Pressure: Use a kitchen towel over cookie cutters to protect your hands and cut cleanly through the chilled fudge.
How to Serve Pink White Chocolate Fudge Recipe
Garnishes
I love sprinkling a few white or pink nonpareils on top for extra sparkle. Sometimes, I add a dusting of edible glitter if it’s a special occasion — it really amps up the wow factor! Simple dried rose petals or tiny fresh mint leaves also work beautifully if you’re going for an elegant look.
Side Dishes
This fudge pairs surprisingly well with a hot cup of tea or coffee. I often serve it alongside fresh berries or a light citrus fruit salad to balance the sweetness. For parties, it’s great next to a cheese board with mild cheeses and nuts.
Creative Ways to Present
For birthdays or holidays, I’ve layered the fudge in glass jars with colorful sprinkles between layers, tied with a ribbon — instant edible gift! Another idea is arranging the heart-shaped fudge on a tiered dessert stand or placing them alongside cupcakes decorated with matching pink themes.
Make Ahead and Storage
Storing Leftovers
I keep leftovers in an airtight container in the fridge. It keeps the fudge perfectly firm but easy to bite into. If you’re leaving it at room temperature for a short while, just cover with plastic wrap to prevent it from drying out.
Freezing
Freezing works well if you want to store this fudge longer. I wrap individual pieces in wax paper first to avoid them sticking together, then place them in a sealed freezer bag. When you’re ready to enjoy, just thaw in the fridge overnight — it tastes just as good!
Reheating
I don’t recommend reheating fudge directly since it can melt and become sticky. Instead, if you want it a bit softer, leave it at room temperature for 10-15 minutes before serving. That slight softness makes it easier to bite without losing that creamy texture.
FAQs
-
Can I use regular white chocolate bars instead of melting wafers in this Pink White Chocolate Fudge Recipe?
Absolutely! Just be sure to chop the white chocolate bars into small, even pieces before melting so they melt evenly and you don’t end up with lumps. Using melting wafers is simply a convenience to speed up the process.
-
How much pink food coloring should I add for the best color?
Start with just a few drops — gel food coloring is very concentrated. You can always add more to deepen the color, but too much might affect the fudge’s texture slightly.
-
Can I add flavor extracts to this fudge?
Yes, definitely! A splash (about ½ teaspoon) of vanilla, almond, or even rose extract can elevate the flavor nicely without changing the texture.
-
How do I prevent the fudge from sticking to the cookie cutter?
Cover your cookie cutter with a clean kitchen towel and apply gentle pressure when cutting. This helps avoid sticky fingers and gives you sharper, cleaner shapes.
-
How long will this fudge keep in the fridge?
Stored in an airtight container, it will keep well for up to 1 week in the fridge and maintain its creamy texture.
Final Thoughts
This Pink White Chocolate Fudge Recipe has quickly become one of my go-to sweet treats for celebrations and casual snacking alike. It’s charmingly simple, delightfully creamy, and just so fun to make and share. Whether you’re gifting it or sneaking bites yourself, you’ll find this fudge brightens any day with its lovely color and luscious flavor. Give it a try — I promise it’ll become a new favorite in your kitchen, just like it did in mine!
Print
Pink White Chocolate Fudge Recipe
- Prep Time: 10 minutes
- Cook Time: 5 minutes
- Total Time: 1 hour 15 minutes
- Yield: 12 servings 1x
- Category: Dessert
- Method: Microwaving
- Cuisine: American
- Diet: Vegetarian
Description
This Pink White Chocolate Fudge recipe is a deliciously creamy and sweet treat made with white chocolate melting wafers and sweetened condensed milk, enhanced with a touch of pink gel food coloring for a festive look. Easy to prepare and perfect for gifting or special occasions, this fudge can be customized with optional dried cherries and sprinkles for added texture and flavor.
Ingredients
Main Ingredients
- 20 ounces white chocolate melting wafers or high-quality chopped white chocolate
- ½ cup + 1 tablespoon sweetened condensed milk
- Pink gel food coloring, a few drops
Optional Ingredients
- Sprinkles
- Dry cherries
Instructions
- Prepare the Pan: Line a 9×9 inch pan with parchment paper, allowing the paper to overhang on two sides. This will help with lifting the fudge out easily once it’s set. Set the pan aside.
- Chop Chocolate if Necessary: If using regular white chocolate instead of melting wafers, chop it into small, uniform pieces to ensure it melts evenly when microwaved.
- Combine Ingredients: Place the white chocolate and sweetened condensed milk together in a large, microwave-safe bowl.
- Microwave to Melt: Microwave the mixture in 20 to 30 second increments, stirring thoroughly after each interval. This helps the chocolate melt smoothly without burning. Typically, two intervals are enough, but continue until fully melted and smooth.
- Add Food Coloring: Stir well until the chocolate mixture is smooth, then add a few drops of pink gel food coloring. For an ombre effect, gently swirl the color without fully mixing, leaving some of the mixture white.
- Add Optional Mix-ins: If desired, fold in dried cherries and/or sprinkles to add texture and flavor variety to your fudge.
- Set the Fudge: Pour the mixture into the prepared pan, spreading it evenly. Refrigerate for about 1 hour or until the fudge is firm and set.
- Cut Shapes: Once hardened, use a heart-shaped cookie cutter to cut the fudge into hearts. To make cutting easier and protect your hands, place a kitchen towel on top of the cookie cutter and gently press down.
- Serve and Enjoy: Present the shaped fudge on a serving dish and enjoy this sweet, creamy treat.
Notes
- Use high-quality white chocolate or melting wafers for best texture and flavor.
- Do not overheat the chocolate as it can seize or burn; stirring frequently helps prevent this.
- The pink gel food coloring is preferred over liquid to avoid altering the fudge’s consistency.
- For a different look, try other gel food colors or omit the coloring entirely for classic white fudge.
- Store fudge in an airtight container in the refrigerator to keep it fresh.
- Allow fudge to come to room temperature before serving for a softer texture.
Nutrition
- Serving Size: 1 piece (approx. 1 oz)
- Calories: 180
- Sugar: 20g
- Sodium: 25mg
- Fat: 10g
- Saturated Fat: 6g
- Unsaturated Fat: 3g
- Trans Fat: 0g
- Carbohydrates: 22g
- Fiber: 0g
- Protein: 2g
- Cholesterol: 10mg


