

If you’ve ever craved a dessert that’s both visually stunning and irresistibly delicious, you’re in for a treat with this Red Velvet Cake with Cream Cheese Frosting Recipe. I absolutely love how this cake comes together with its tender crumb, subtle cocoa flavor, and that signature smooth, tangy cream cheese frosting that steals the show every time. Whether you’re baking for a special occasion or just because, this recipe will become your new favorite go-to for rich, moist, and beautifully vibrant cake.
Why You’ll Love This Recipe
- Moist and Tender Cake: The combination of sour cream and oil keeps the cake super moist and soft—no dry crumbs here!
- Classic Cream Cheese Frosting: Rich, tangy, and silky smooth frosting perfectly complements the subtle cocoa flavor of the cake.
- Eye-Catching Red Color: Vibrant, visually stunning layers that make this cake a showstopper at any gathering.
- Easy to Make at Home: With clear steps and straightforward ingredients, even if you’ve never baked a layer cake before, you’ll nail it.

Ingredients You’ll Need
Getting the right balance of ingredients is what makes this Red Velvet Cake with Cream Cheese Frosting Recipe so special. Each component plays a role—from the cocoa powder bringing subtle chocolate undertones to the cream cheese frosting adding that perfect tangy sweetness.
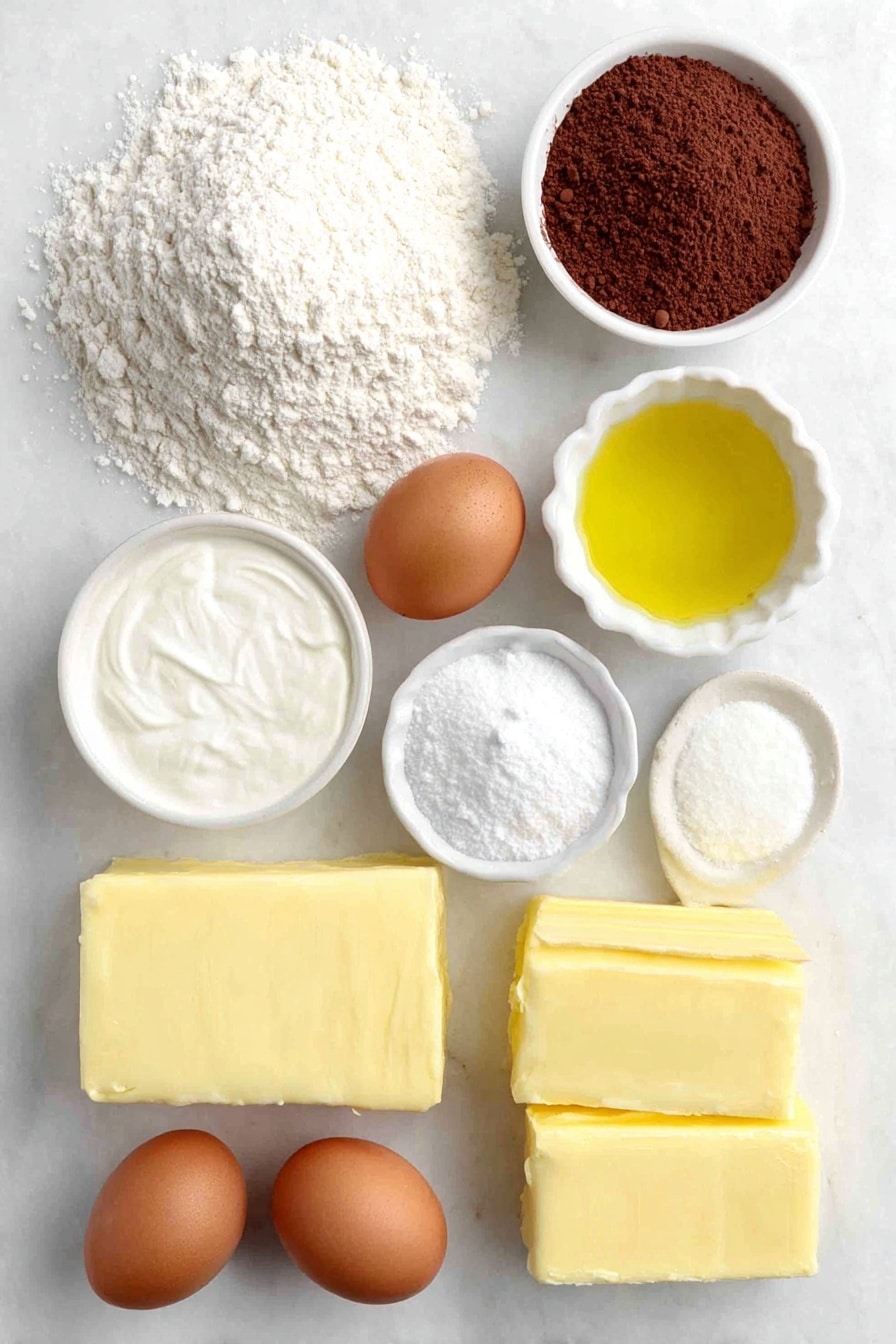
- All-purpose flour: Provides structure for the cake, be sure to measure it properly by spooning the flour into your cup and leveling it off.
- Unsweetened cocoa powder: Adds that hint of chocolate flavor without overpowering the classic red velvet taste.
- Baking soda: Helps your cake rise beautifully, lending a light and airy texture.
- Kosher salt: Balances the sweetness and enhances all the flavors.
- Unsalted butter: Melted for the cake to keep it moist and softened for the frosting.
- Vegetable oil: Key to that moist texture; plus it keeps the cake tender longer than butter alone.
- Granulated sugar: Sweetens the cake while helping with structure and texture.
- Sour cream: Adds a slight tang and moisture that makes all the difference in crumb and flavor.
- Milk: Room temperature milk lightens the batter and adds tenderness.
- Eggs: Room temperature eggs provide structure and richness.
- Pure vanilla extract: Enhances the cake’s flavor with warm floral notes.
- Red food coloring: The red velvet signature! Gel food coloring works great for vibrant color without thinning the batter.
- Cream cheese: The star ingredient for frosting, softened to room temperature for a creamy texture.
- Powdered sugar: For smooth, sweet frosting without graininess.
Variations
I love making this Red Velvet Cake with Cream Cheese Frosting Recipe my own by tweaking it a bit depending on the occasion or mood. Feel free to customize the recipe and make it your own—after all, baking is as much about creativity as it is about precision!
- Less Sweet Frosting: I sometimes cut back on the powdered sugar in the frosting when I want a more balanced sweetness that lets the cream cheese tang shine through.
- Buttermilk Swap: For a slightly tangier cake, try substituting buttermilk for the milk—it’s a trick I picked up that adds even more depth of flavor.
- Gluten-Free Version: Use a 1-to-1 gluten-free flour blend. I’ve tried this with success; just be sure to follow the blend’s instructions for best results.
- Decorative Touch: Add fresh berries or edible flowers on top for a festive look—my family goes crazy for that extra pop of color and flavor.
How to Make Red Velvet Cake with Cream Cheese Frosting Recipe
Step 1: Prep Your Pans and Dry Ingredients
Start by preheating your oven to 350°F and greasing three 9-inch round cake pans. I like to grease and then line the bottoms with parchment paper—it ensures your cake layers come out perfectly clean. In a large bowl, whisk together the flour, cocoa powder, baking soda, and salt. This dry mix sets the foundation, so giving it a good mix upfront helps avoid clumps in your batter.
Step 2: Mix Wet Ingredients to Luxurious Smoothness
In your stand mixer fitted with the paddle attachment, beat the melted butter, vegetable oil, and sugar together until super smooth. This step is where the magic starts—once the sugar dissolves a bit, your cake texture will feel lighter after baking. Next, add the sour cream, milk, eggs, and vanilla extract, beating until everything comes together seamlessly. Then, pour in the red food coloring and mix until the batter turns that classic bold red hue.
Step 3: Combine Dry and Wet Mixtures Gently
Now, slowly add the dry ingredients into the wet, mixing on low just until combined. Overmixing at this stage can make the cake dense, so you want to stop when you still see some streaks of flour. This method keeps the crumb tender and airy.
Step 4: Bake and Cool Your Cake Layers
Divide the batter evenly between your pans—about 634 grams per pan if you’re weighing, but eyeballing works fine too. Bake for 25-30 minutes or until a toothpick poked into the center comes out clean. When done, let the cakes cool in the pans for at least 10 minutes before removing them to wire racks. This resting time helps the layers firm up just enough to frost without crumbling.
Step 5: Whip Up That Dreamy Cream Cheese Frosting
With your stand mixer whisk attachment, beat softened cream cheese until totally smooth. Add your softened butter and continue mixing until everything is well blended. Now, sift powdered sugar into the bowl to avoid lumps, then whip until you achieve a creamy frosting with stiff peaks. Finish with vanilla extract and salt, mixing until luscious and silky.
Step 6: Assemble and Decorate
Using a serrated bread knife, carefully slice off the domed tops of your cakes to create flat layers—this makes stacking easier and neater. Place the first cake layer on your stand, cut side down, and smooth a generous layer of frosting on top. Repeat with the second layer, then add the third without frosting on top before you crumb coat and frost the entire cake. If you saved those trimmed cake bits, crumbling them onto the sides or top creates a beautiful rustic finish that also hides any imperfections. Don’t forget, you can pipe any leftover frosting for an extra decorative touch!
Pro Tips for Making Red Velvet Cake with Cream Cheese Frosting Recipe
- Use Room Temperature Ingredients: It really makes a difference in mixing everything smoothly and achieving the perfect cake rise.
- Don’t Overmix the Batter: I learned this the hard way—too much mixing can lead to a tough cake, so mix until just combined.
- Trim Cake Tops for Even Layers: This little extra step results in professional-looking layers and a stable cake structure.
- Use Gel Food Coloring: It gives vibrant color without altering your batter’s consistency like liquid coloring can.
How to Serve Red Velvet Cake with Cream Cheese Frosting Recipe

Garnishes
For garnish, I love sprinkling crumbled cake bits around the edges of the frosted cake—adds texture and keeps things rustic-chic. Fresh berries or even a dusting of cocoa powder can elevate the presentation for special occasions. Sometimes, I pipe extra frosting rosettes on top to make it feel more festive, especially for birthdays.
Side Dishes
This cake pairs beautifully with a simple cup of coffee or a glass of cold milk. For parties, I like serving it alongside fresh fruit or a light whipped cream to balance the richness. A scoop of vanilla ice cream also turns it into a decadent dessert experience!
Creative Ways to Present
For holiday gatherings, I’ve stacked mini Red Velvet cupcakes with cream cheese frosting on tiered stands for a fun twist. Another idea is to turn this cake into a layered trifle with crumbled cake, whipped frosting, and fresh berries in a clear dish—that’s always a crowd pleaser. Even cutting the cake into neat squares and serving as petite bites is a smart way to share this treat without the fuss.
Make Ahead and Storage
Storing Leftovers
I store leftover cake in an airtight container in the fridge, where it keeps beautifully for up to 3 days. Make sure to cover it well so the frosting doesn’t dry out or absorb other fridge smells. My family enjoys snacking on chilled slices straight from the fridge because it also makes the frosting firmer and more refreshing.
Freezing
This cake freezes surprisingly well! Wrap individual slices or whole layers tightly in plastic wrap, then place them in a freezer-safe bag or container for up to 3 months. When you’re ready to enjoy, thaw overnight in the fridge for best texture. I like to freeze cake layers before frosting—it makes assembly easier on busy days.
Reheating
If you want to warm leftover cake slices, I recommend microwaving them wrapped in a slightly damp paper towel for 10-15 seconds. That little moisture keeps the cake tender instead of drying it out. Just remember, the frosting won’t melt nicely with heat, so a gentle touch is key.
FAQs
-
Can I make this Red Velvet Cake with Cream Cheese Frosting Recipe without red food coloring?
Yes! Red food coloring is traditional for that classic vibrant look, but if you prefer to skip it, the cake will still taste delicious with a subtle cocoa flavor and cream cheese frosting. Some people use natural alternatives like beet juice, but the color will be less intense and can vary.
-
How do I prevent my cream cheese frosting from being too runny?
Make sure your cream cheese and butter are softened but still cool, not melting. Also, sift your powdered sugar well, and don’t add liquid ingredients beyond what the recipe calls for. If frosting feels too soft, chilling it briefly helps firm it up for easier spreading.
-
Can I bake this cake in two layers instead of three?
Absolutely! Just divide the batter evenly between two pans and adjust the baking time slightly, checking with a toothpick for doneness around 30-35 minutes. You might want to double the frosting to fully cover a two-layer cake generously.
-
How do I avoid the cake layers from doming too much?
Try rotating the pans halfway through baking for even heat distribution and avoid overfilling your pans (only fill about two-thirds full). Also, leveling the batter across pans helps; this way, when you trim the tops, you’ll have nice flat surfaces for stacking.
Final Thoughts
This Red Velvet Cake with Cream Cheese Frosting Recipe holds a special place in my heart because it’s the one I always shy away from buying at bakeries—mainly because nothing beats my homemade version. The bright red layers paired with that creamy tangy frosting make any occasion feel extra festive. Trust me, once you try baking it yourself, you’ll feel accomplished and delighted every time someone asks for seconds. So go on, give it a whirl—you’ll love sharing this crowd-pleaser with your family and friends!
Print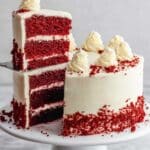
Red Velvet Cake with Cream Cheese Frosting Recipe
- Prep Time: 30 minutes
- Cook Time: 25-30 minutes
- Total Time: 1 hour 5 minutes
- Yield: 12 servings 1x
- Category: Dessert
- Method: Baking
- Cuisine: American
Description
This classic Red Velvet Cake features moist, tender layers with a hint of cocoa, vibrant red color, and a rich cream cheese frosting. Perfect for celebrations or an elegant dessert, this recipe guides you through creating a stunning three-layer cake with smooth, creamy frosting and optional decorative cake crumbs for a beautiful finish.
Ingredients
For the Cake:
- 3½ cups all-purpose flour (420 grams)
- ¼ cup unsweetened cocoa powder (21 grams)
- 1½ teaspoons baking soda (9 grams)
- 1 teaspoon kosher salt (3 grams)
- ½ cup unsalted butter, melted (113 grams, 1 stick)
- 1¼ cups vegetable oil (250 grams)
- 2½ cups granulated sugar (500 grams)
- 1 cup sour cream, room temperature (227 grams)
- ¾ cup milk, room temperature (170 grams)
- 3 large eggs, room temperature (150 grams)
- 1 tablespoon pure vanilla extract (12 grams)
- 2 tablespoons red food coloring (28 grams)
For the Frosting:
- 24 ounces cream cheese, room temperature (680 grams, 3 bricks)
- 1 cup unsalted butter, room temperature (226 grams, 2 sticks)
- 5 cups powdered sugar (565 grams)
- 2 teaspoons pure vanilla extract (8 grams)
- ½ teaspoon kosher salt
Instructions
- Preheat and Prepare Pans: Preheat your oven to 350°F (177°C) and grease three 9-inch round cake pans. This prepares the baking vessels ensuring the cakes won’t stick.
- Whisk Dry Ingredients: In a large bowl, whisk together the all-purpose flour, unsweetened cocoa powder, baking soda, and kosher salt until evenly combined. Set aside.
- Cream Butter, Oil, and Sugar: Using a stand mixer fitted with the paddle attachment, beat melted unsalted butter, vegetable oil, and granulated sugar until the mixture is smooth and creamy, ensuring even sweetness and moisture.
- Add Wet Ingredients: Beat in the sour cream, milk, eggs, and pure vanilla extract until the batter is uniform and smooth. Then incorporate the red food coloring, mixing thoroughly until the batter has a bright, even red hue.
- Combine Wet and Dry Ingredients: Gently add the dry ingredients into the wet ingredients and stir just until combined to avoid overmixing which can toughen the cake.
- Divide Batter and Bake: Evenly distribute the batter among the three prepared cake pans (about 634 grams each). Bake in the preheated oven for 25 to 30 minutes or until a toothpick inserted in the center comes out clean. Remove from oven and cool for at least 10 minutes.
- Prepare Frosting: In a clean bowl, beat cream cheese with the whisk attachment until smooth. Add room temperature butter and continue beating until fully incorporated and creamy.
- Add Powdered Sugar: Sift the powdered sugar into the mixture and beat until well combined and smooth. Add vanilla extract and kosher salt, then mix until the frosting develops stiff peaks and a silky texture.
- Level Cake Layers: Using a bread knife, carefully shave off the rounded tops of each cake layer to create flat, even surfaces for stacking. Save the trimmed cake crumbs for decoration.
- Assemble Cake Layers: Place the first cake layer on a cake stand or plate with the cut side down. Spread a generous layer of cream cheese frosting evenly over the top.
- Add Second Layer: Place the second cake layer on top and spread another layer of frosting equally over it.
- Add Third Layer: Add the final cake layer. Use the remaining frosting to cover the entire exterior of the cake smoothly and evenly.
- Decorate: Optionally, crumble leftover cake scraps and press them onto the sides or top of the cake for texture and decoration. Use any remaining frosting to pipe decorative designs atop the cake.
Notes
- For best results, use room temperature ingredients to ensure smooth blending and proper texture.
- Store the cake in an airtight container in the refrigerator for up to 3 days to maintain freshness.
- The cake can be frozen for up to 3 months; thaw in the refrigerator before serving.
- To avoid overbaking, check the cake starting at 25 minutes with a toothpick inserted in the center; it should come out clean or with moist crumbs.
- If desired, substitute vegetable oil with a neutral oil like canola or sunflower for slight variation in flavor.
Nutrition
- Serving Size: 1 slice (approx. 1/12th of cake)
- Calories: 520
- Sugar: 40 g
- Sodium: 350 mg
- Fat: 32 g
- Saturated Fat: 14 g
- Unsaturated Fat: 17 g
- Trans Fat: 0 g
- Carbohydrates: 56 g
- Fiber: 2 g
- Protein: 5 g
- Cholesterol: 80 mg


