

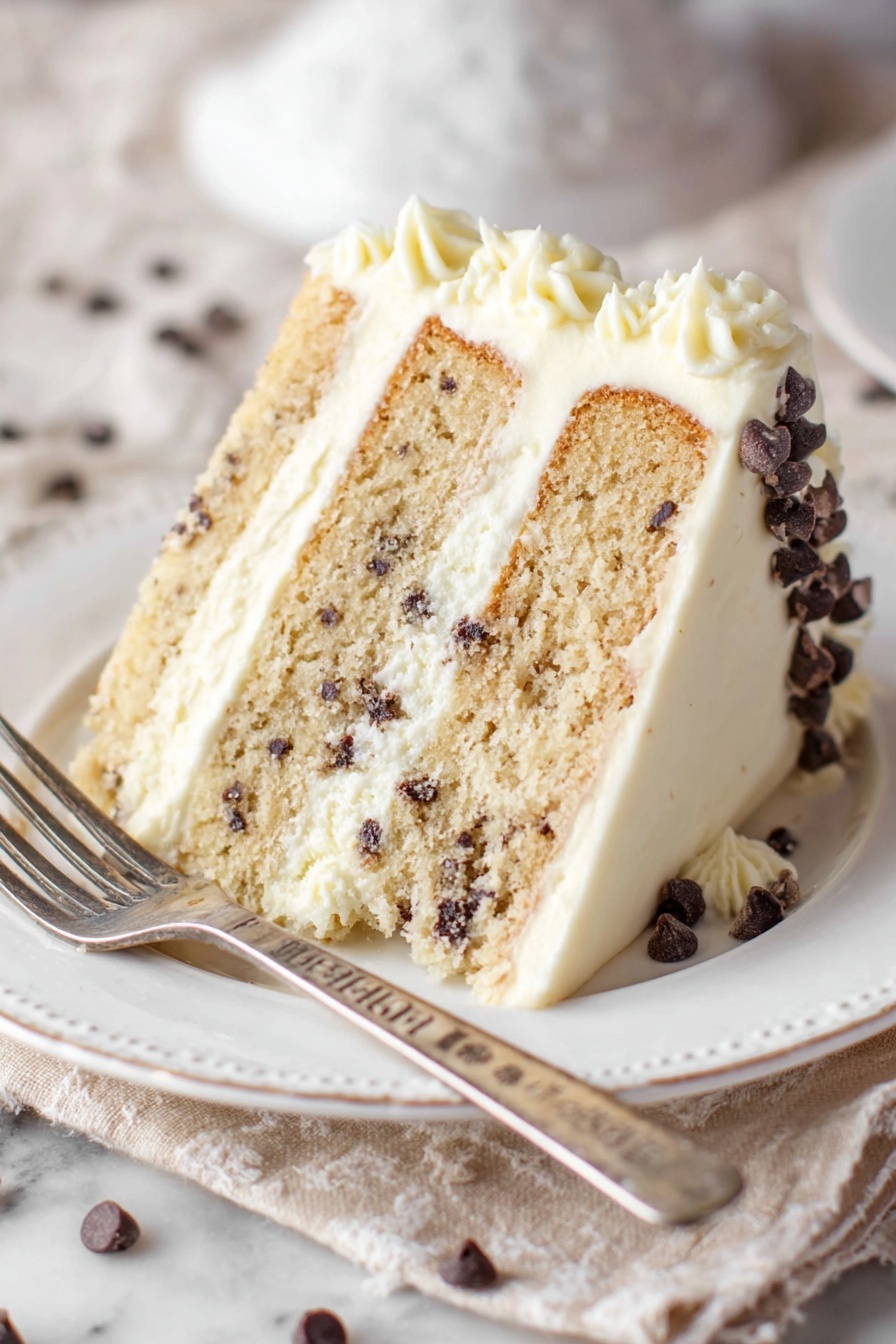
If you’ve ever dreamed of combining the rich, creamy indulgence of traditional cannoli filling with the classic elegance of a layered cake, you’re in for a treat. This Cannoli Layer Cake with Mascarpone Filling Recipe is honestly one of my all-time favorites to bake and share. It’s like a little slice of Italy in your kitchen—with that delicate ricotta and mascarpone filling married perfectly with tender, spiced cake layers and creamy buttercream. Trust me, once you try this, you’ll want to make it over and over. Let’s walk through this delightful recipe together so you can nail every step and impress your friends and family.
Why You’ll Love This Recipe
- Authentic Flavor Fusion: Combines the best elements of cannoli and layer cake for a unique, irresistible dessert.
- Creamy, But Light Filling: The mascarpone and ricotta blend creates a silky filling that’s not overly sweet or heavy.
- Perfectly Moist Spiced Cake Layers: The cinnamon-infused layers keep the cake moist and flavorful without overshadowing the filling.
- Show-Stopping Presentation: The mini chocolate chips and elegant frosting piping make this dessert pop beautifully on any table.

Ingredients You’ll Need
This recipe blends some familiar pantry staples with a few special ingredients to keep things authentic and oh-so-delicious. When shopping, try to pick the freshest ricotta and mascarpone you can find—it truly makes a difference in texture and flavor.

- Ricotta Cheese: Choose whole milk ricotta for creaminess; don’t skip straining it to avoid a watery filling.
- Mascarpone Cheese: Essential for that rich, silky texture in both the filling and buttercream.
- Powdered Sugar: Adds smooth sweetness; perfect for delicate fillings and frostings.
- Mini Chocolate Chips: Tiny chocolate bursts that add authenticity and a lovely texture contrast.
- All-Purpose Flour: Make sure it’s measured well—using a kitchen scale if you can—for the best cake rise and texture.
- Baking Powder & Baking Soda: These leavening agents ensure the cake layers rise just right and stay tender.
- Ground Cinnamon: Adds warmth and complements the cheeses beautifully.
- Unsalted Butter: Essential for the buttercream and cake layers; room temperature is key for smooth mixing.
- Vegetable Oil: Keeps the cake moist and tender without weighing it down.
- Sugar & Light Brown Sugar: The combo brings depth—white sugar for sweetness and brown sugar for a subtle molasses note.
- Vanilla Extract: Enhances all the flavors; fresh and pure is best.
- Eggs: Large eggs help with the cake’s structure and moisture balance.
- Milk & Sour Cream: The perfect duo to add richness and keep the cake tender yet sturdy.
Variations
If you like playing around in the kitchen, this Cannoli Layer Cake with Mascarpone Filling Recipe is a fantastic canvas to customize. I’ve personally experimented with a few twists that keep things exciting while honoring the classic flavors.
- Adding Orange Zest: I love tossing in a teaspoon of fresh orange zest to the filling—it brightens the flavor and pairs beautifully with the chocolate chips.
- Gluten-Free Version: I once swapped the all-purpose flour with a gluten-free blend that includes xanthan gum, and the texture stayed just as tender.
- Nutty Crunch: You can sprinkle finely chopped toasted pistachios between the layers or on the frosting for an extra textural punch, and my family goes crazy for it.
- Lower Sugar Option: I’ve reduced the powdered sugar in the filling slightly to keep it less sweet while still maintaining that creamy consistency—just add a bit more if you love sweeter treats.
How to Make Cannoli Layer Cake with Mascarpone Filling Recipe
Step 1: Straining the Ricotta
Straining the ricotta is a step you absolutely don’t want to skip. When I first tried this recipe, I ignored it, and the filling was too loose and watery. So here’s the trick: Line a fine-mesh strainer with two layers of cheesecloth and place your ricotta on top. Cover it with additional cheesecloth or plastic wrap, then set the strainer over a bowl so there’s space below for the liquid to collect. I like to put a small weight—like a clean can—on top to gently press the liquid out. Pop it into the fridge and let it strain for at least 4 hours or overnight if you can. This step makes a huge difference, yielding a thick, luscious filling that’s creamy but not runny.
Step 2: Mixing the Mascarpone Filling
Once your ricotta is perfectly strained, add it with the mascarpone and powdered sugar to a mixing bowl. I recommend mixing gently on low speed or just folding by hand with a spatula—over-mixing can thin out the mascarpone, making your filling runny, which nobody wants. Incorporate the mini chocolate chips last for that beautiful texture contrast. Pop the filling into the fridge to firm up for a couple of hours while you prep the cake layers. Trust me, chilling it makes it easier to spread and enhances its flavor.
Step 3: Baking the Spiced Cake Layers
Prepare three 8-inch cake pans with parchment and grease—this ensures your layers come out cleanly every time. Preheat your oven to 350°F (176°C). Next, combine the dry ingredients in one bowl—flour, baking powder, baking soda, ground cinnamon, and salt. In a separate large bowl, beat the butter, oil, sugars, and vanilla extract for a good 2-3 minutes. The fluffier, the better here. Then, add eggs one at a time, scraping the bowl between additions so everything blends evenly.
Alternate adding the dry ingredients with the milk-sour cream mixture—don’t worry if the batter looks a bit curdled; that’s totally normal with the sour cream. Divide the batter evenly among the pans and bake 20-24 minutes, testing with a toothpick until a few moist crumbs cling. Let the cakes cool a bit before removing from pans, then transfer to racks to cool completely. I always make these layers a day ahead when I can—it just feels more relaxed!
Step 4: Whipping Up the Mascarpone Buttercream
This buttercream is where richness meets elegance. Beat butter and mascarpone just until combined—again, don’t overdo it or it may separate. Add powdered sugar in two batches, beating until silky and smooth between additions. Sometimes it looks a bit flaky or separates when you add sugar, but keep mixing gently and it comes together beautifully. Stir in vanilla last. You’ll end up with a frosting that’s indulgently creamy but still pipeable and sturdy, perfect for building your cake.
Step 5: Building and Decorating the Cake
Now for the fun part! Using a serrated knife, level the cake layers by slicing off any domed tops. I like to make these layers extra flat to ensure even stacking and a polished look. Place your first layer on a serving plate and pipe a dam of frosting around the edge—this helps keep all that luscious mascarpone filling from spilling out. Spread half the filling inside the dam. Repeat with the second layer and remaining filling, then top with the final cake layer.
Apply a thin crumb coat of buttercream to trap stray crumbs. Pop the cake in the fridge for about 1-2 hours to set firmly; I sometimes speed this up by chilling it in the freezer for 30 minutes. Once cool, apply the remaining buttercream smoothly around the outside of the cake. For a final touch, press mini chocolate chips along the cake’s bottom edge—this is one of my favorite finishing touches because it feels so festive. Pipe some decorative frosting along the top edge—my go-to is Ateco tip 847 for pretty beads. Refrigerate until you’re ready to serve.
Pro Tips for Making Cannoli Layer Cake with Mascarpone Filling Recipe
- Don’t Rush Straining Ricotta: I learned the hard way that skimping on this step makes your filling watery—aim for at least 4 hours, or overnight if possible.
- Gentle Mixing Matters: Whether filling or buttercream, overmixing mascarpone can thin it out; I tone down my mixer speed or fold by hand to keep the texture perfect.
- Level Those Layers: Even a slight dome can make your cake look lopsided; I always use a serrated knife to slice off any peaks for clean stacking.
- Chocolate Chips at the Finish: Adding mini chips at the base and inside gives delightful pops of chocolate; don’t skip them—they’re a classic touch.
How to Serve Cannoli Layer Cake with Mascarpone Filling Recipe
Garnishes
I love garnishing this cake with extra mini chocolate chips and a light dusting of powdered sugar right before serving—it’s simple but adds a snow-kissed elegance. Sometimes, I’ll scatter finely chopped toasted pistachios or a few candied orange peel strips on top to enhance that traditional cannoli vibe. Fresh mint leaves can also add a lovely pop of color and freshness if you’re feeling fancy.
Side Dishes
This cake holds its own as a dessert star, but I enjoy pairing it with a few fresh seasonal berries or a scoop of vanilla bean gelato to complement the creamy mascarpone filling. A cup of strong espresso or a lightly brewed tea also balances the sweetness and roundness of the cake perfectly, making it a wonderful end to a meal.
Creative Ways to Present
For special occasions, I’ve styled this cake by serving individual slices on small plates layered with a drizzle of chocolate ganache and a sprinkle of chopped pistachios. You can also assemble mini cannoli-inspired cupcakes using this filling piped into vanilla cakes, topped with crushed chocolate and orange zest. For a rustic look, dust the entire cake heavily with powdered sugar and scatter chopped nuts on top—everyone always asks for the recipe!
Make Ahead and Storage
Storing Leftovers
Because of the mascarpone and ricotta, you’ll want to keep this cake refrigerated in an airtight container or cake carrier. I wrap my cakes tightly with plastic wrap before covering just to keep it extra fresh. Leftovers keep beautifully for 3-4 days, and the flavors almost deepen after a day—if you have any left, which is rare around here!
Freezing
I’ve frozen this cake successfully by first freezing individual cake layers wrapped tightly in plastic and foil. For the fully assembled cake, freeze it without decorations, well wrapped. Thaw overnight in the fridge before frosting or serving. Just note that mascarpone fillings can become a bit softer after freezing, so a gentle chill before serving helps stabilize the texture.
Reheating
This cake is best enjoyed chilled, but if you want to bring it to room temperature, remove it from the fridge about 30 minutes before serving. I don’t recommend microwaving or warming since the filling can break down. Just a little patience will bring out the creamy flavors beautifully.
FAQs
-
Can I use regular cream cheese instead of mascarpone in this Cannoli Layer Cake with Mascarpone Filling Recipe?
While cream cheese can be a substitute in a pinch, mascarpone has a uniquely rich and silky texture that really defines this cake. Cream cheese tends to be tangier and denser, which could affect the filling’s taste and consistency. If you do use cream cheese, consider blending it with a little heavy cream to mimic mascarpone’s softness.
-
How important is straining the ricotta for this recipe?
Straining ricotta is crucial for achieving the right consistency in the filling. Unstrained ricotta has excess moisture that can make your filling thin and watery, causing the cake layers to become soggy. Trust me, taking the time to strain it for at least 4 hours pays off big time in texture and flavor.
-
Can I make this cake a day in advance?
Absolutely! This cake actually tastes better after resting for a day as the flavors meld together beautifully. Just store it covered in the refrigerator and pull it out about 30 minutes before serving so it softens slightly.
-
What’s the best way to level cake layers?
Using a serrated knife is my go-to method. Place the cake on a turntable or flat surface, and gently saw back and forth to cut off the dome until the top is flat. This technique prevents squashing your cake and ensures an even stack.
-
Can I reduce the sugar in the buttercream?
You can use less powdered sugar, but keep in mind it affects the frosting’s thickness and structure, especially important for piping the dam to keep the filling contained. If you cut back too much, the buttercream may be too soft, so I recommend adjusting gradually and testing the texture as you go.
Final Thoughts
I absolutely love how this Cannoli Layer Cake with Mascarpone Filling Recipe manages to bring the charm of a classic Italian dessert into a stunning layered celebration cake. Every bite is filled with that creamy richness balanced by moist, fragrant cake—a true crowd-pleaser. Whether you’re baking for a special occasion or just to treat yourself, this cake is bound to impress and satisfy. Believe me, once you’ve made it, you’ll want to keep this recipe on hand for all your happy moments. Now, roll up your sleeves and let’s create some magic in the kitchen!
Print
Cannoli Layer Cake with Mascarpone Filling Recipe
- Prep Time: 1 hour 25 minutes
- Cook Time: 20 minutes
- Total Time: 8 hours 45 minutes
- Yield: 12–14 servings 1x
- Category: Dessert
- Method: Baking
- Cuisine: Italian-American
Description
This Cannoli Layer Cake recipe combines the creamy, tangy flavors of ricotta and mascarpone cheeses with a spiced, moist cake layered with luscious fillings and buttercream. Inspired by the classic Italian cannoli dessert, this cake features delicate chocolate chips in both the filling and the frosting, creating a truly decadent and elegant dessert perfect for celebrations and special occasions.
Ingredients
Cannoli Filling:
- 3/4 cups (189g/6 oz) ricotta cheese
- 3/4 cups (170g/6 oz) mascarpone cheese
- 1 1/3 cups (154g) powdered sugar
- 1/4 cup (43g) mini chocolate chips
Cake Layers:
- 2 1/2 cups (325g) all-purpose flour (measured properly)
- 2 tsp baking powder
- 1/4 tsp baking soda
- 1 tsp ground cinnamon
- 1/2 tsp salt
- 1/2 cup (112g) unsalted butter, room temperature
- 1/2 cup (120ml) vegetable oil
- 1 cup (207g) sugar
- 1/2 cup (112g) light brown sugar
- 1 tbsp vanilla extract
- 4 large eggs
- 1/2 cup (120ml) milk
- 3/4 cup (173g) sour cream
Buttercream:
- 1 cup (280g) unsalted butter, room temperature
- 12 oz (339g) mascarpone cheese, cool but not cold
- 8–9 cups (920g-1035g) powdered sugar
- 1 tsp vanilla extract
- 1 cup (169g) mini chocolate chips
Instructions
- Strain the ricotta: Line a large strainer with two layers of cheesecloth and place the ricotta cheese on top. Cover with cheesecloth or plastic wrap. Set the strainer over a bowl, ensuring there is at least an inch or two of space below for liquid to drain. Optionally, place something heavy on top to help press out liquid. Refrigerate for at least 4 hours or overnight until approximately 2 tablespoons of liquid drain from the cheese.
- Make the filling: Combine the strained ricotta, mascarpone cheese, and powdered sugar in a mixer bowl. Mix on low speed just until well combined, or stir gently by hand to avoid overmixing, which can cause the mascarpone to become watery. Fold in the mini chocolate chips. Chill the filling in the refrigerator for 2-3 hours to firm up.
- Prepare the cake pans and preheat oven: Preheat the oven to 350°F (176°C). Grease the sides of three 8-inch cake pans and place parchment paper circles on the bottoms for easy removal.
- Mix dry ingredients: In a medium bowl, sift together the all-purpose flour, baking powder, baking soda, cinnamon, and salt. Set aside.
- Cream butter and sugars: In a large mixing bowl, beat the room temperature butter, vegetable oil, sugar, light brown sugar, and vanilla extract until light and fluffy, about 2-3 minutes.
- Add eggs: Add eggs one at a time, mixing after each addition until mostly combined. Scrape down the bowl sides as needed.
- Add dry ingredients and wet liquids: Mix half the dry ingredients into the batter until just combined. Slowly add the milk and sour cream mixture, then add the remaining dry ingredients. Mix gently until smooth, being careful not to overmix. Scrape down sides as needed.
- Divide batter and bake: Evenly divide the batter among the prepared cake pans. Bake for 20-24 minutes, or until a toothpick inserted into the center comes out with a few moist crumbs.
- Cool the cake layers: Let cakes cool in pans for 2-3 minutes before transferring to wire racks to cool completely.
- Make the buttercream: In a large bowl, beat the butter and mascarpone cheese just until smooth, avoiding overmixing. Gradually add powdered sugar in two parts, mixing carefully to avoid separation, until smooth and thick. Stir in vanilla extract.
- Prepare the cake layers: Level the tops of the cake layers with a serrated knife to create flat surfaces.
- Assemble the cake: Place the first cake layer on a serving plate or cake board. Pipe a dam of buttercream around the edge to contain the filling, then spread half the cannoli filling inside the dam. Repeat with the second cake layer, buttercream dam, and remaining filling. Top with the third cake layer.
- Apply crumb coat and chill: Spread a thin crumb coat of buttercream on the outside of the cake. Refrigerate for 1-2 hours, or freeze for about 30 minutes to speed the process. Keep remaining frosting in the fridge and bring to room temperature about 20 minutes before proceeding.
- Frost the cake: Finish frosting the outside of the cake smoothly with the remaining buttercream. Press mini chocolate chips along the bottom edge of the cake for decoration.
- Decorate the top: Pipe remaining frosting along the top edge of the cake using a piping tip such as Ateco 847 for a professional finish.
- Store the cake: Refrigerate the cake until ready to serve. Keep covered or in an airtight container. Best eaten within 3-4 days.
Notes
- Powdered sugar: The buttercream uses 8 ½ cups of powdered sugar for sufficient thickness to create a sturdy dam and filling support. Reducing sugar will yield less and thinner frosting, potentially compromising structure.
- Filling consistency: The cannoli filling is thinner rather than thick, with moderate powdered sugar to maintain flavor balance. You may add more powdered sugar if you prefer a firmer consistency.
- Straining ricotta: Properly straining ricotta is crucial to avoid excess moisture in the filling, ensuring the cake layers remain moist but not soggy.
- Mixing tips: Avoid overmixing mascarpone in filling and buttercream to prevent thinning and separation.
- Chilling: Chilling the filling and crumb coat ensures clean and neat final frosting application.
Nutrition
- Serving Size: 1 slice (approx. 1/12 of cake)
- Calories: 480
- Sugar: 38g
- Sodium: 190mg
- Fat: 28g
- Saturated Fat: 16g
- Unsaturated Fat: 10g
- Trans Fat: 0.3g
- Carbohydrates: 50g
- Fiber: 1.5g
- Protein: 6g
- Cholesterol: 115mg


