

If you’re looking for a dessert that’s both elegant and delightfully tangy-sweet, then this Raspberry Goat Cheese Cheesecake Recipe is about to become your new go-to. I absolutely love how creamy and rich this cheesecake turns out, with the fresh raspberry swirl adding just the right burst of bright flavor that keeps you coming back for more. Whether you’re making this for a special occasion or just to treat yourself, I promise you’ll find every bite irresistible. So grab your apron and let’s dive into this fan-freaking-tastic cheesecake adventure together!
Why You’ll Love This Recipe
- Unique Flavor Combination: The creamy goat cheese balances perfectly with the tart raspberries for a sophisticated twist on classic cheesecake.
- Made-from-Scratch Crust: The homemade buttery crumb crust adds a buttery, crunchy base that elevates this dessert.
- Impressive Yet Approachable: You’ll wow guests with a cheesecake that looks fancy but is surprisingly straightforward to make.
- Perfect Make-Ahead Dessert: This cheesecake holds up beautifully overnight, which means less stress on the day of your event.

Ingredients You’ll Need
For this Raspberry Goat Cheese Cheesecake Recipe, you’re working with ingredients that truly complement each other — creamy cheeses, fresh raspberries, and a buttery crust. The key to success is using good-quality fresh or frozen raspberries and room-temperature cheeses for the smoothest texture.
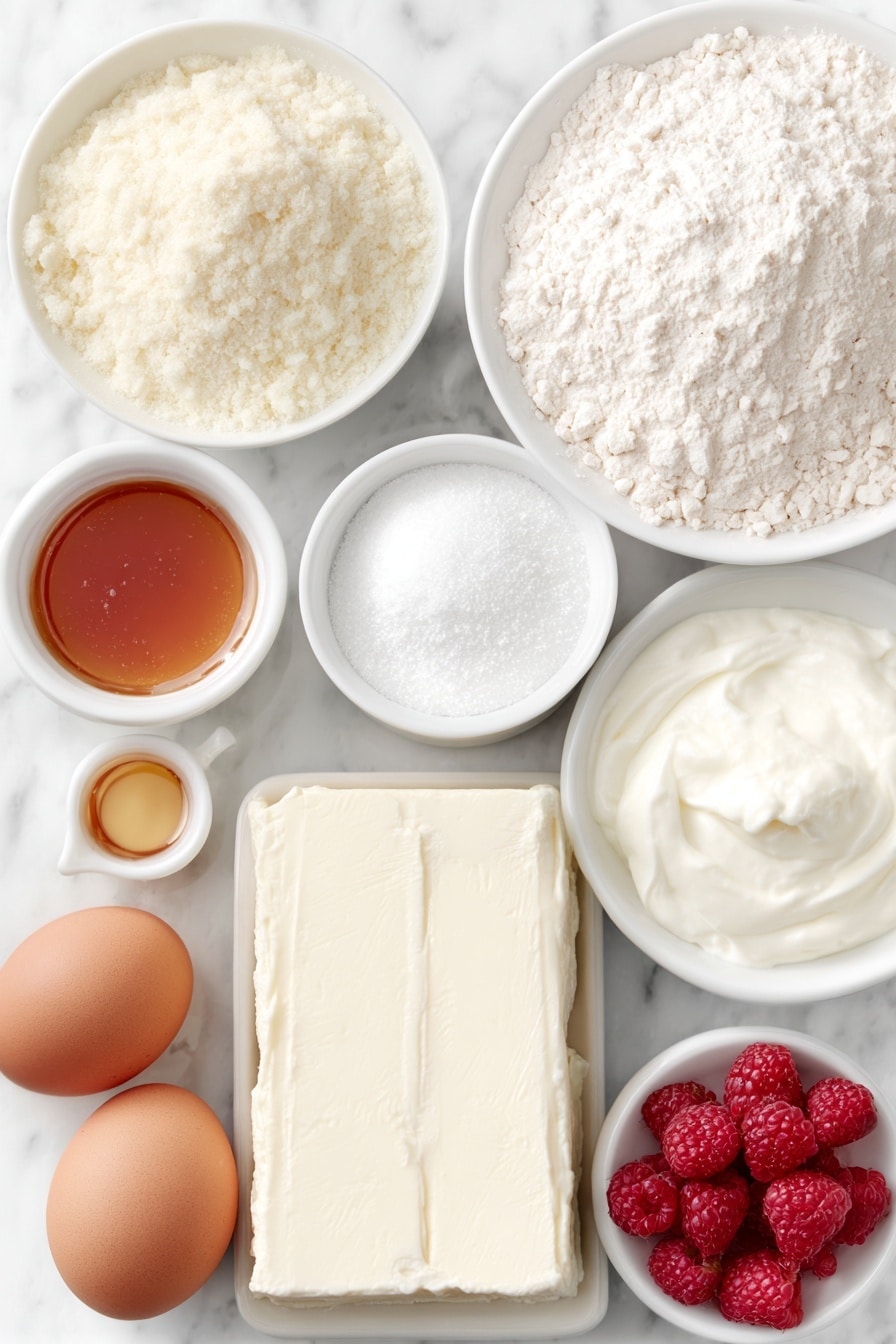
- Unsalted Butter: Room temperature butter helps create the perfect crumbly crust for this cheesecake.
- Sugar: Balances the tanginess of the goat cheese and raspberries.
- Honey: Adds natural sweetness and a lovely depth of flavor to the crust.
- All-Purpose Flour: Binds the crust ingredients together without overpowering the flavor.
- Pinch of Salt: Essential for bringing out all those buttery, sweet flavors in the crust.
- Cornstarch: Thickens the raspberry sauce so it swirls beautifully without sinking into the filling.
- Lemon Juice: Brightens the raspberry sauce and balances the sweetness.
- Fresh or Frozen Raspberries: Use whichever you have on hand—both work wonderfully here.
- Cream Cheese: Room temperature for that creamy, rich texture in the cheesecake.
- Goat Cheese: The star of this recipe, lending a tangy creaminess that’s not overpowering.
- Mascarpone Cheese: Helps smooth out the mix and add a subtle sweetness.
- Sour Cream: Keeps the cheesecake moist and adds a slight tang.
- Vanilla Extract: Enhances all the flavors with a warm aroma.
- Eggs: The binding agents that ensure your cheesecake sets perfectly.
- Honey (optional): For drizzling on top before serving to add a glossy finish and extra sweetness.
Variations
I love making this Raspberry Goat Cheese Cheesecake Recipe my own by tweaking a few things based on the occasion or what I have in my fridge. Feel free to experiment—you’ll find that this recipe adapts beautifully.
- Lemon Zest Twist: I sometimes add a teaspoon of lemon zest to the cheesecake batter for an extra zing that brightens the whole dessert.
- Crust Shortcut: When time is tight, I swap the custom crust for store-bought shortbread cookie crumbs mixed with melted butter. It’s a huge time-saver and still so tasty.
- Berry Mix: Swap raspberries for mixed berries like blueberries or blackberries—I’ve done this with great results.
- Dairy-Free Version: Although I haven’t tried this myself, you could experiment using vegan cream cheese and sour cream alternatives for a dairy-free take.
How to Make Raspberry Goat Cheese Cheesecake Recipe
Step 1: Prepare and Bake the Crust
Start by creaming the butter, sugar, and honey until fluffy—that’s the secret to a tender, flavorful crust. Once combined, add the flour and salt, then mix until the dough comes together. I like to split the dough into two logs wrapped in parchment paper and chill them—it makes slicing into even pieces way easier. After chilling, slice into thin rounds and bake until golden and crisp. Then, pulse them into fine crumbs before mixing with the melted butter. Press firmly into your springform pan and give it a quick bake to set that crust. Trust me, this little extra step prevents sogginess and adds a buttery crunch you’ll love.
Step 2: Make the Raspberry Swirl
While the crust cools, simmer your raspberries with sugar and a touch of lemon juice—it’s like magic watching the berries soften and release their juices. Adding the cornstarch slurry will thicken the sauce just right for swirling. When I first made this, I almost skipped straining but it’s totally worth the few extra minutes to get a smooth, seedless puree that swirls beautifully without textural surprises. Let it cool completely while you prepare the cheesecake batter.
Step 3: Mix the Goat Cheese Cheesecake Filling
This is where the magic really comes together. Beat the cream cheese and goat cheese until fluffy, scraping those sides often—no lumpy bits here! I add the mascarpone and sugar next, followed by sour cream and vanilla, mixing just until smooth. Then, add the eggs one at a time. I’ve found that slow egg incorporation is key to avoiding cracks later. If the mixture looks a bit runny, don’t worry—that’s the perfect consistency for a decadent cheesecake that sets with a creamy texture.
Step 4: Assemble and Bake with Water Bath
Pour the cheesecake filling into your crust, then drop spoonfuls of raspberry puree all over the top. Get a toothpick ready and swirl gently to create that gorgeous marbled effect. Now, here’s the part that changed my cheesecake game: baking it in a water bath. Wrap your springform pan in foil tightly to prevent leaks, nest it inside a larger pan filled halfway with warm water, and bake gently at 350°F. This method ensures even cooking and stops cracks from forming. After one hour, turn off the oven and let it chill inside for another hour. Patience here makes all the difference in texture.
Step 5: Chill and Serve
Once baked, let your cheesecake cool to room temperature, then refrigerate for at least 5-6 hours or overnight. This resting time lets the flavors meld and the texture firm up beautifully. Before serving, I like to drizzle a bit of honey over each slice for an extra touch of sweetness—a little makes it feel truly special.
Pro Tips for Making Raspberry Goat Cheese Cheesecake Recipe
- Room Temperature Cheeses: Always bring cream cheese, goat cheese, and mascarpone to room temperature—this avoids lumps and ensures a silky batter.
- Water Bath Setup: Wrap your springform pan tightly in foil and keep an eye on the water level during baking to prevent leaks and water getting inside the cheesecake.
- Gentle Swirling: When swirling the raspberry sauce, use a light hand to create pretty marbling without mixing it all in.
- Avoiding Cracks: Don’t open the oven during baking and let the cheesecake cool gradually in the oven with the door shut—this prevents cracks and drying out.
How to Serve Raspberry Goat Cheese Cheesecake Recipe

Garnishes
For garnishes, I like to keep it simple and elegant. Fresh raspberries scattered on top enhance the flavor and add a beautiful pop of color. A light drizzle of honey (trust me on this!) adds just the right bit of sweetness and shine. Sometimes, I sprinkle a few finely chopped pistachios or fresh mint leaves to add a little crunch and freshness — it’s a subtle touch that impresses every time.
Side Dishes
This cheesecake pairs wonderfully with a light, fruity side to balance its richness. I often serve it alongside a simple mixed green salad with a balsamic glaze or fresh fruit salad featuring citrus segments and kiwi. For drinks, a cup of herbal tea or a glass of sparkling rosé complements this dessert beautifully.
Creative Ways to Present
For special occasions, I’ve layered this cheesecake with multiple raspberry swirls for a dramatic marbled effect, making it look like a dessert masterpiece. You can also slice individual portions and serve each with a dollop of whipped cream and a mint sprig on a pretty dessert plate. A fun twist I discovered is serving mini cheesecakes in small glass jars—makes them perfect for parties and portable treats!
Make Ahead and Storage
Storing Leftovers
Leftovers should be kept tightly covered in the fridge to preserve moisture and flavor—plastic wrap over the pan or tightly sealed containers work best. I’ve found that this cheesecake stays wonderfully fresh for 3 to 4 days. Just make sure it’s well-covered so it doesn’t absorb any fridge odors.
Freezing
If you want to freeze the cheesecake, I recommend freezing it uncut for best results. Wrap the entire springform pan or transfer the cheesecake to a freezer-safe container, then cover tightly with plastic wrap and foil. When you’re ready to enjoy, thaw in the refrigerator overnight. I’ve done this for holiday prep, and it tastes just as good as fresh!
Reheating
Cheesecake is best enjoyed chilled, so I don’t usually reheat leftovers. If you prefer a softer texture, bring it to room temperature for about 30 minutes before serving. This way, the flavors and creamy texture really shine through without compromising quality.
FAQs
-
Can I use frozen raspberries for the raspberry swirl?
Absolutely! Frozen raspberries work just as well as fresh ones in this recipe. Just be sure to thaw them first and drain any excess juice before cooking to get the perfect consistency for your swirl.
-
What’s the best way to prevent cracks in my cheesecake?
The key is baking your cheesecake with a water bath and letting it cool gradually in the oven after baking with the door closed. Also, avoid over-mixing the batter and don’t open the oven while it’s baking. These steps help create a smooth, crack-free surface.
-
Can I make the crust ahead of time?
Yes! The dough can be made in advance and refrigerated for up to 2 days or frozen for longer storage. Even better, you can bake the cookie rounds ahead, crush them, and keep the crumbs ready to mix with melted butter right before assembling the crust.
-
Is there a shortcut for the crust?
Certainly! You can use 2 1/4 cups of store-bought shortbread cookie crumbs combined with 3 tablespoons of melted butter as a quick and delicious alternative to the homemade cookie crust.
Final Thoughts
This Raspberry Goat Cheese Cheesecake Recipe truly holds a special place in my dessert repertoire—not just because it tastes incredible, but because it feels like a celebration in every slice. The tangy goat cheese paired with the fresh raspberry swirl makes it memorable, while the buttery crust provides the perfect foundation. If you love cheesecake that’s both creamy and bursting with flavor, you’re going to adore making this one at home. Give it a try, and I bet it will become a favorite you’ll want to bake again and again—trust me, your friends and family will go crazy for it too!
Print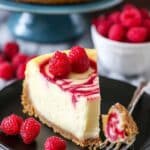
Raspberry Goat Cheese Cheesecake Recipe
- Prep Time: 1 hour 15 minutes
- Cook Time: 2 hours 40 minutes
- Total Time: 3 hours 55 minutes
- Yield: 12–14 slices 1x
- Category: Baking
- Method: Baking
- Cuisine: American
Description
This Raspberry Goat Cheese Cheesecake recipe combines a tender, buttery crust made from shortbread-like cookies with a luscious, tangy goat cheese and mascarpone filling swirled with a vibrant homemade raspberry puree. Baked in a water bath, the cheesecake achieves a creamy, smooth texture with a delightful fruity ripple, perfect for special occasions or an indulgent dessert.
Ingredients
For the Crust:
- 1 cup, plus 3 tablespoons (266g) unsalted butter, room temperature
- 1/2 cup (104g) sugar
- 3 tbsp honey
- 2 cups (260g) all purpose flour
- Pinch of salt
For the Raspberry Swirl:
- 2 tsp cornstarch
- 1 tsp fresh lemon juice
- 1 tbsp warm water
- 2 cups (255g) fresh or frozen raspberries
- 2 tbsp sugar
For the Goat Cheese Cheesecake:
- 16 oz cream cheese, room temperature
- 12 oz goat cheese, room temperature
- 4 oz mascarpone cheese, slightly softened
- 1 1/2 cups (310g) sugar
- 1 cup (230g) sour cream
- 2 tsp vanilla extract
- 4 large Eggland’s Best eggs
Additional:
- Honey, for serving (optional)
Instructions
- Make the Crust Dough: In a large mixing bowl, cream together 1 cup of butter, sugar, and honey on medium speed until fluffy. Gradually mix in flour and salt until a dough forms.
- Form and Chill the Dough: Divide the dough in half, place each half on parchment paper, and shape into logs about 1 1/4 inches in diameter. Wrap with parchment then plastic wrap, and freeze for 30 minutes or refrigerate for 2 hours until firm.
- Preheat and Prepare for Baking Cookies: Preheat oven to 325°F. Line a cookie sheet with a silicone baking mat or parchment paper.
- Slice and Bake Cookie Rounds: Cut chilled dough into 1/4 inch pieces and place on the cookie sheet 1/2 inch apart. Bake 15-20 minutes until edges are golden. Let cool completely.
- Prepare Cookie Crumbs for Crust: Process cooled cookies in a food processor into fine crumbs, measure 2 1/4 cups. Melt remaining 3 tablespoons butter and stir into the crumbs.
- Form and Bake the Cheesecake Crust: Press crumb mixture evenly into the bottom of a greased 9-inch springform pan lined with parchment paper. Bake for 10 minutes, then cool. Wrap the pan’s exterior with aluminum foil to prevent water bath seepage.
- Make Raspberry Swirl: Whisk cornstarch, lemon juice, and warm water until dissolved. Heat raspberries and sugar over medium heat in a small saucepan, stirring for 3 minutes until juices release. Add cornstarch mixture and cook another 3 minutes, smashing the fruit to thicken. Puree and strain the mixture; set aside to cool.
- Make the Cheesecake Filling: Preheat oven to 350°F. Beat cream cheese and goat cheese together on medium speed until fluffy, scrape down sides as needed. Add mascarpone and sugar, mix well. Add sour cream and vanilla, mixing on low speed until combined.
- Incorporate Eggs: Add eggs one at a time, beating until fully incorporated after each. Scrape the bowl’s sides between additions.
- Assemble Cheesecake: Pour filling into the prepared crust. Spoon raspberry puree over the top in dollops and gently swirl with a toothpick or knife.
- Prepare Water Bath and Bake: Place springform pan in a larger pan. Pour warm water into the larger pan to reach halfway up sides of springform pan, ensuring water does not touch foil top. Bake 1 hour at 350°F.
- Cooldown in Oven: After baking, turn off oven and leave door closed for 1 hour. This allows gentle continued cooking as the cheesecake cools.
- Refrigerate: Remove cheesecake from water bath and foil, chill in refrigerator for 5-6 hours or overnight until firm.
- Serve: Serve chilled, optionally drizzled with honey. Store tightly covered and consume within 3-4 days.
Notes
- For a shortcut crust, use 2 1/4 cups of store-bought shortbread cookie crumbs combined with 3 tablespoons melted butter. Press into springform pan and bake as directed.
- The crust dough can be made up to 2 days in advance and refrigerated before slicing and baking.
- Ensure the springform pan’s outer side is well sealed with foil to prevent water from the water bath from seeping in.
- Using a water bath during baking helps achieve a smooth, crack-free cheesecake texture.
- Allowing the cheesecake to cool slowly in the oven further reduces cracking and improves texture.
Nutrition
- Serving Size: 1 slice (approximately 1/14th of the cheesecake)
- Calories: 450
- Sugar: 30g
- Sodium: 220mg
- Fat: 33g
- Saturated Fat: 18g
- Unsaturated Fat: 13g
- Trans Fat: 0g
- Carbohydrates: 30g
- Fiber: 2g
- Protein: 7g
- Cholesterol: 120mg
