

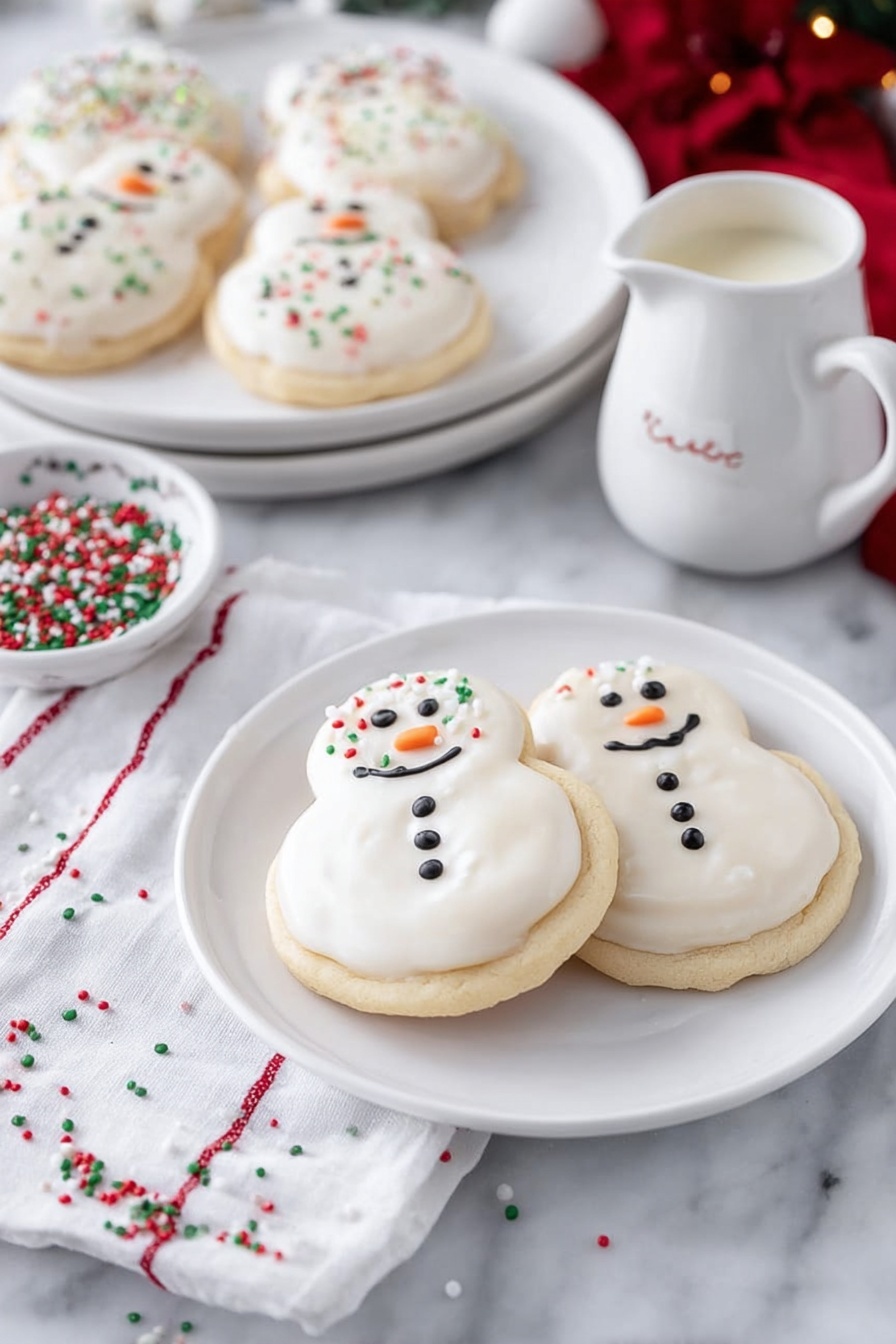
If you’re looking for a fun, whimsical treat that brings the magic of winter right into your kitchen, then you’re going to absolutely adore this Melted Snowman Sugar Cookies Recipe. I first whipped up these charming cookies during a holiday get-together, and ever since, they’ve become a go-to for parties and cozy afternoons alike. They’re not just adorable—they’re downright delicious, with a buttery sugar cookie base and a smooth, sweet candy coating that makes every bite a little celebration. Stick with me here, and I’ll share all my best tips so your Melted Snowman cookies turn out just like mine—maybe even better!
Why You’ll Love This Recipe
- Whimsical Fun: These snowman cookies bring out your playful side and delight both kids and adults alike.
- Easy But Impressive: Using a sugar cookie mix makes this recipe foolproof, yet the final look feels like a labor of love.
- Customizable Decorations: You can get creative with sprinkles, icing, and candy accents to make them your own.
- Perfect Gift Idea: These cookies are great for gifting because they store well and look stunning in a festive jar.

Ingredients You’ll Need
You probably have most of these ingredients on hand or can easily grab them at the store. The sugar cookie mix gives you a consistent, tender texture without fuss, while the candy melts make decorating a breeze. Plus, the festive candy decorations bring this recipe to life with minimal effort.
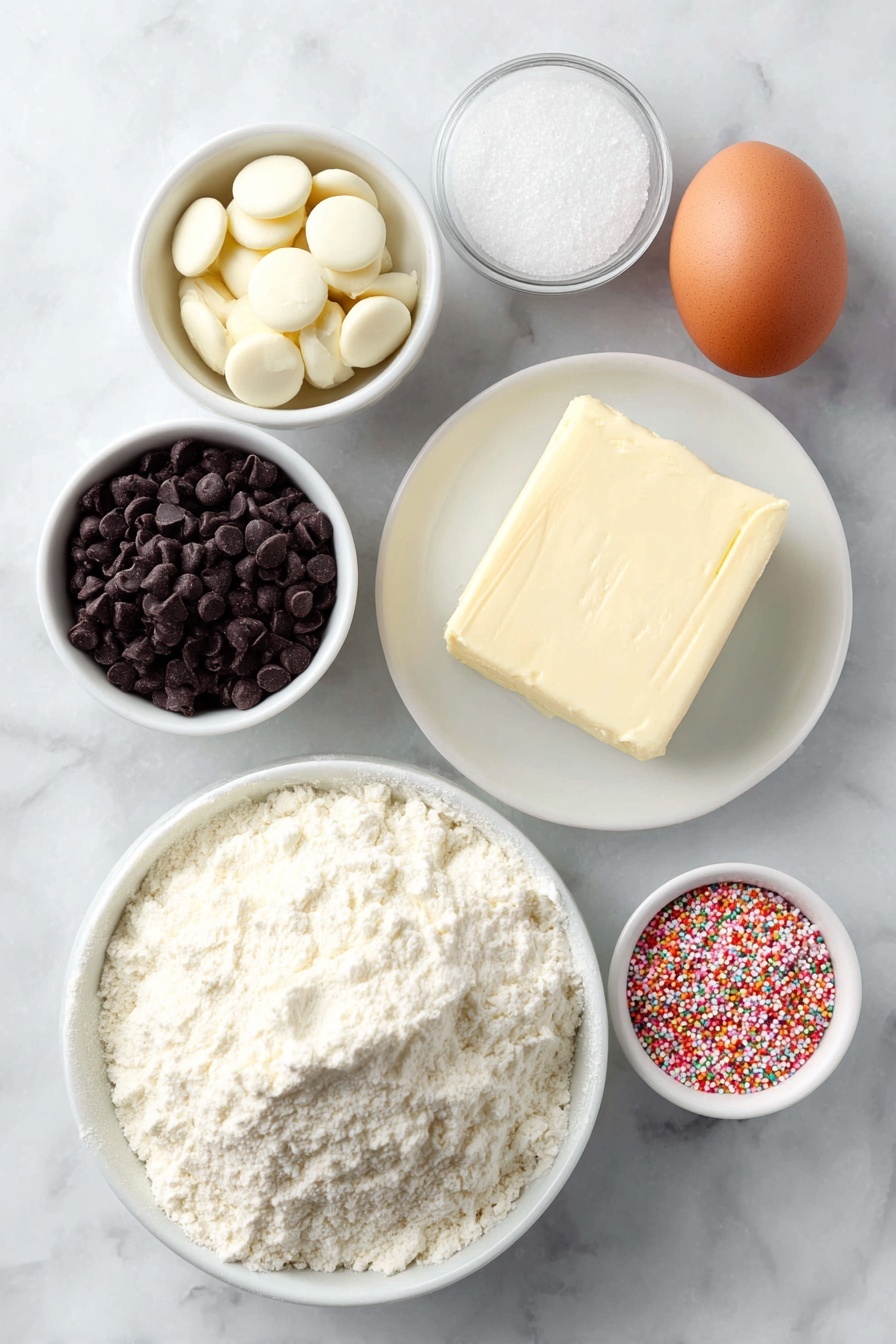
- Betty Crocker sugar cookie mix: Using a pre-made mix saves time without compromising the classic sugar cookie flavor we all love.
- Unsalted butter: Make sure it’s softened to room temperature for easy mixing and a tender crumb.
- Large egg: Adds moisture and structure to the cookie dough.
- White candy melts: These melt smoothly for coating and help glue the snowman parts together.
- Black sugar pearls or candy confetti: Perfect for the snowman’s eyes and buttons—they add a cute, slightly crunchy detail.
- Orange candy-coated sunflower seeds or orange jimmies: These serve as the classic carrot nose, adding color and texture.
- White sparkling sugar: Sprinkling this on top adds that frosty sparkle that makes the snowman come alive.
- Festive sprinkles: Optional but fun—sprinkles can add pops of color and extra holiday cheer.
Variations
I love mixing things up depending on the occasion or who I’m baking for. The beauty of the Melted Snowman Sugar Cookies Recipe is how easy it is to personalize—so feel free to get creative and make these uniquely yours.
- Single cookie snowmen: Sometimes I just decorate one large cookie to look like a fully melted snowman, which is perfect if you want a simpler project with the same adorable effect.
- Use your favorite sugar cookie recipe: If you prefer homemade dough, this technique works beautifully with cut-out sugar cookies—especially circles around 2 to 2.5 inches for bodies and 1 inch for heads.
- Custom decorations: Try adding sour belt candy scarves or icing arms for extra personality, especially if you’re making these with kids.
- Dietary swaps: I’ve swapped in dairy-free butter and vegan candy melts with good results—just keep an eye on the baking times since these might vary slightly.
How to Make Melted Snowman Sugar Cookies Recipe
Step 1: Mix the Cookie Dough
Start by preheating your oven to 375°F and lining a baking sheet with parchment paper—this prevents sticking and helps the cookies bake evenly. In a large bowl or your stand mixer, combine the sugar cookie mix with the softened butter and egg. I usually use my paddle attachment for a smooth mix, but a sturdy wooden spoon works great too. Mix just until a soft dough forms. Overmixing can make the cookies tough, so keep it gentle.
Step 2: Shape the Snowmen
Roll about two-thirds of the dough into walnut-sized balls for the snowman bodies and flatten them slightly. Then shape the rest into small marble-sized balls for the heads—these don’t get flattened. Place them all on your lined sheet, spacing them an inch or two apart. I always double-check that I have the same number of “bodies” as “heads” before baking to avoid cookie mishaps later on.
Step 3: Bake and Cool
Bake your cookies for 8 to 10 minutes, keeping a close eye as ovens vary—when the edges just start to turn golden, they’re ready. Let them cool on the baking sheet for about 5 minutes so they firm up enough to transfer, then move them to a wire rack to cool completely. Patience here pays off because warm cookies can get too soft and tricky to decorate.
Step 4: Melt the Candy Coating
Fill a small pot with an inch or two of water and bring it to a simmer. Place your white candy melts in a glass or metal bowl that sits over the pot without touching the water—think double boiler style. Stir frequently as the melts soften, so they don’t burn or seize. You want a nice smooth, glossy coating.
Step 5: Assemble and Decorate Your Melted Snowmen
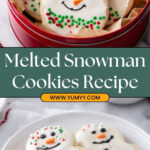
Set your cooling rack over a sheet of waxed or parchment paper to catch drips. Dab a small dot of melted candy coating on the bottom of a “head” cookie and stick it toward the edge of a larger “body” cookie—this little glue step helps hold the snowman together. Once that’s set a bit, spoon the melted candy over the entire body cookie, letting some spill over the edges—it’s this drippy effect that makes the snowman look “melted” and so charming.
While the candy is still wet, place two black sugar pearls or candy confetti pieces on the head for eyes and an orange candy-coated sunflower seed or jimmy for the carrot nose. Then, add three black sugar pearls vertically on the body for buttons. If you want to get fancy, sprinkle some white sparkling sugar all over the snowman and add other festive sprinkles for a little extra flare. Let everything dry completely before moving or storing.
Pro Tips for Making Melted Snowman Sugar Cookies Recipe
- Prevent Cookie Spread: Chill your dough balls briefly if your kitchen is warm; this helps the cookies keep their shape and size.
- Candy Melts Handling: If your candy melts start to seize, add a tiny bit of vegetable oil or shortening to smooth them out.
- Decorate Quickly: Once you coat the cookies with melted candy, work fast to add eyes, noses, and buttons before the coating sets.
- Drying Time: Let your cookies dry in a cool, dry place—avoid the fridge as condensation can ruin the shine and texture.
How to Serve Melted Snowman Sugar Cookies Recipe
Garnishes
I love finishing these cookies with a generous sprinkle of white sparkling sugar because it looks just like freshly fallen snow dusting the snowman. Sometimes I add tiny star-shaped sprinkles or silver dragées to give them extra sparkle during the holidays—it’s all about making them as festive as they taste!
Side Dishes
These cookies pair wonderfully with a warm beverage like hot cocoa or chai tea. When I’m serving a platter at parties, I also include some fresh fruit slices or spiced nuts on the side to balance the sweetness with a bit of brightness and crunch.
Creative Ways to Present
For gift-giving, I like arranging these Melted Snowman Sugar Cookies Recipe in mason jars layered with parchment paper and tied with rustic twine or a festive ribbon. You could also place them in decorative tins or stack them on a cake stand surrounded by mini pinecones and evergreen sprigs for a charming winter centerpiece.
Make Ahead and Storage
Storing Leftovers
Once completely dry, I store these cookies in an airtight container at room temperature. They stay fresh and maintain their crisp edges and beautiful candy coating for up to a week. I’ve found that letting them sit for a day actually helps the flavors meld together even more deliciously.
Freezing
You can freeze these cookies, but do so carefully. I layer them between sheets of parchment paper in a freezer-safe container to prevent sticking and keep their shape. When you’re ready to enjoy, thaw them overnight in the fridge and then bring to room temperature before serving.
Reheating
I prefer to serve these cookies at room temperature to preserve that perfect snap of the sugar cookie and the crisp candy shell. If you want to warm them slightly, gently heat them for 5-10 seconds in the microwave, but be careful not to melt the candy coating again or soften the cookie too much.
FAQs
-
Can I use homemade sugar cookie dough for this Melted Snowman Sugar Cookies Recipe?
Absolutely! While this recipe uses a sugar cookie mix for convenience, you can substitute your favorite homemade sugar cookie recipe. Just make sure your cookies hold their shape well when baked so the snowmen don’t spread too thin before decorating.
-
What can I do if my candy melts seize up?
If your candy melts become grainy or clumpy, gently stir in a teaspoon of vegetable oil or shortening and heat slowly over simmering water. This usually smooths the candy back out and makes it easier to work with.
- Can I make these cookies ahead of time for a holiday party?
Yes! These cookies keep well at room temperature in an airtight container for about a week. I recommend making them a day or two ahead so they can fully dry, which helps preserve their shape and crispiness for your party.
- Can I add icing or other candies to decorate the snowmen?
Definitely. Many bakers add icing arms, scarves from sour belts, or use colored sugar for extra fun details. Feel free to get creative with decorations that make your melted snowmen feel unique and festive!
Final Thoughts
This Melted Snowman Sugar Cookies Recipe is one of those magical kitchen projects that brings smiles while you make it and pure joy when you share it. I love how versatile it is—perfect for a quiet weekday treat or a festive party centerpiece. The first time I made these, my family couldn’t get enough of those sweet, melty candy-coated snowmen. You’ll enjoy how easy it is to customize and decorate, making each batch a small, delicious work of art. So, pull out that cookie mix, gather your candy melts, and let’s make some melted snowmen that charm their way right into your heart. Trust me, you’ll want to make these again and again!
Print
Melted Snowman Sugar Cookies Recipe
- Prep Time: 1 hour
- Cook Time: 9 minutes
- Total Time: 1 hour 9 minutes
- Yield: 16 cookies 1x
- Category: Dessert
- Method: Baking
- Cuisine: American
Description
These Melted Snowman Cookies are a festive twist on classic sugar cookies, featuring soft baked cookie ‘bodies’ and ‘heads’ stacked and decorated to resemble melting snowmen. Coated with smooth white candy melts and embellished with playful candy eyes, carrot noses, and sparkling sugar, these cookies are perfect for holiday celebrations and creative cookie decorating fun.
Ingredients
Cookie Dough
- 1 package Betty Crocker sugar cookie mix (1 pound 1.5 ounces)
- ½ cup unsalted butter, softened
- 1 large egg
Decoration
- 12 ounces white candy melts
- Black sugar pearls or black candy confetti for eyes and buttons
- Orange candy-coated sunflower seeds or orange jimmies for noses
- White sparkling sugar
- Various festive sprinkles
Instructions
- Preheat and Prepare Baking Sheet: Preheat your oven to 375°F. Line a baking sheet with parchment paper to prevent sticking and ensure easy cleanup.
- Make the Cookie Dough: In a large bowl or stand mixer fitted with a paddle attachment, combine the sugar cookie mix, softened butter, and egg. Mix until a soft dough forms, using a wooden spoon or the mixer on low speed.
- Shape the Cookies: Roll approximately two-thirds of the dough into walnut-sized balls for the snowman bodies. Flatten these slightly and place them onto the prepared baking sheet. Use the remaining dough to roll into marble-sized balls for the heads, placing these onto the cookie sheet without flattening. Ensure you have an equal number of heads and bodies.
- Bake the Cookies: Bake in the preheated oven for 8-10 minutes, or until edges are just beginning to turn golden. Let cookies cool on the baking sheet for about 5 minutes until firm enough to transfer, then move to a cooling rack to cool completely before decorating.
- Melt the Candy Coating: Bring 1-2 inches of water in a small pot to a simmer. Place white candy melts in a heatproof mixing bowl that fits on top of the pot without touching the water. Stir frequently until the candy melts are completely smooth and melted.
- Prepare to Decorate: Set a piece of waxed or parchment paper under the cooling rack to catch drips. Then place the cooled cookies onto the rack.
- Assemble the Snowmen: Dab a small amount of melted candy coating on the bottom of a small cookie (head) and attach it offset toward the edge of a larger cookie (body). Allow this to set slightly, then spoon melted candy coating over the entire cookie, letting some spill over the edges to create a ‘melting’ effect.
- Add Details: Quickly press two black sugar pearls or candy confetti onto the small cookie to form eyes, and place an orange candy-coated sunflower seed or jimmy on the center for the carrot nose. On the larger cookie, apply three black sugar pearls or confetti as buttons. Optionally, decorate further with festive sprinkles and sprinkle white sanding sugar over the entire snowman for sparkle.
- Dry and Store: Allow the decorated cookies to dry completely, then store in an airtight container to maintain freshness.
Notes
- You can decorate a single large cookie to look like a fully melted snowman instead of stacking two cookies.
- Other decorations like cookie icing can be used to draw arms or sour belt candies to make scarves.
- This decorating method also works well with your preferred sugar cookie mix or home-made cut-out sugar cookies, using 2 to 2.5-inch diameter for bodies and 1-inch for heads.
Nutrition
- Serving Size: 1 cookie
- Calories: 180
- Sugar: 14g
- Sodium: 110mg
- Fat: 8g
- Saturated Fat: 4.5g
- Unsaturated Fat: 2.5g
- Trans Fat: 0g
- Carbohydrates: 24g
- Fiber: 0.5g
- Protein: 2g
- Cholesterol: 20mg


