

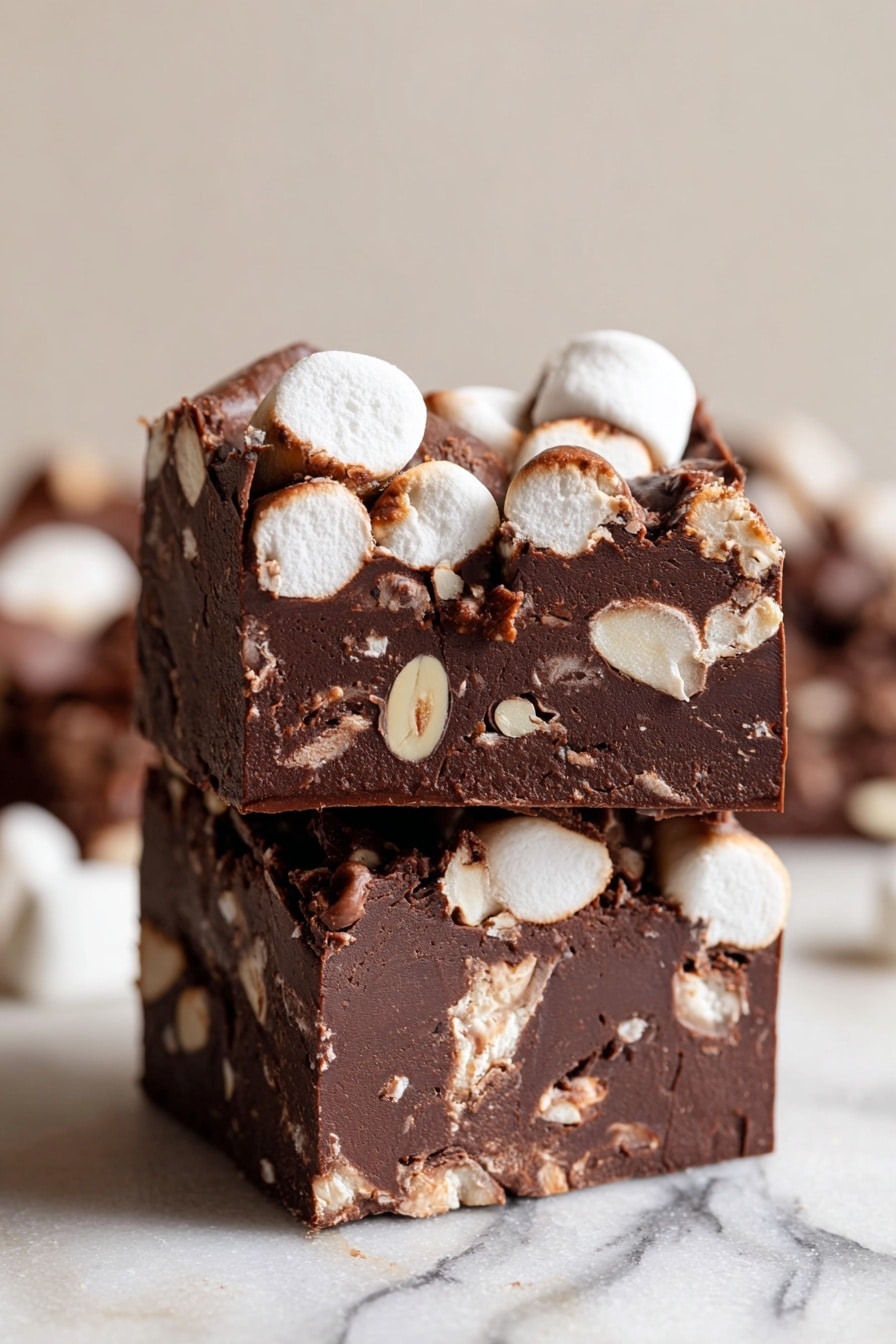
If you’re craving a no-fuss, crowd-pleasing treat, you’ve got to try this Easy Rocky Road Fudge Recipe. It’s one of those sweet things that feels fancy but comes together in just minutes—perfect for last-minute parties or when you want to treat yourself without much hassle. Seriously, once I found this recipe, it quickly became my go-to sweet fix whenever I want something chocolaty, nutty, and delightfully marshmallowy.
Why You’ll Love This Recipe
- Quick & Easy: This fudge comes together in about 10 minutes of hands-on time, so you can satisfy your sweet tooth fast.
- No Baking Required: You just melt, mix, and chill—perfect for when you don’t want to turn on the oven.
- Snack-Friendly Texture: The combination of smooth chocolate, mini marshmallows, and crunchy nuts creates a delightful Rocky Road experience in every bite.
- Great for Gifting: This fudge sets nicely and keeps well, making it ideal for sharing with friends and family.

Ingredients You’ll Need
These ingredients work beautifully together to create a fudge that’s rich, creamy, and texturally fun. When shopping, I recommend grabbing good-quality chocolate chips and fresh mini marshmallows for the best taste and texture.

- Dark or Semi-Sweet Chocolate Chips: I like using semi-sweet because it balances sweetness and deep cocoa flavor; dark chips are great if you prefer richer fudge.
- Sweetened Condensed Milk: This is the magic ingredient that gives the fudge its creamy, melt-in-your-mouth texture without any fuss.
- Butter: Adds richness and helps the fudge set up smooth and luscious.
- Mini Marshmallows: For that signature rocky road chewiness—they melt slightly but keep a nice bite.
- Sliced Almonds or Walnuts: I use almonds for a mild crunch, but walnuts work perfectly too if you want a bolder nutty kick.
Variations
I love how flexible this Easy Rocky Road Fudge Recipe is—you can easily swap out nuts or add other mix-ins to make it your own. Don’t hesitate to get creative and tweak it based on your preferences or what’s in your pantry.
- Add Dried Fruit: I once tossed in some chopped dried cherries for a tart contrast, and it was a total hit with friends.
- Use Different Nuts: Pecans or pistachios can add a unique twist and flavor dimension.
- Dairy-Free Version: Swap the butter for a plant-based alternative and use dairy-free chocolate chips for a vegan-friendly fudge.
- Extra Crunch: Add crushed pretzels or cereal for an added texture surprise that some people love.
How to Make Easy Rocky Road Fudge Recipe
Step 1: Prep Your Pan
Start by lining an 8×8 baking dish with parchment or wax paper. This little step makes a huge difference when it comes time to lift out your fudge—trust me, you’ll thank yourself instead of trying to pry sticky fudge out by hand!
Step 2: Melt and Mix Your Fudge Base
In a medium saucepan over medium heat, combine the chocolate chips, sweetened condensed milk, and butter. Stir often, scraping the bottom and sides, until the chocolate fully melts and you’ve got a smooth, glossy mixture. Don’t rush it—slow and steady wins here to avoid burning the chocolate or curdling the milk.
Step 3: Stir in Half the Marshmallows and Nuts
Remove your saucepan from the heat. Now fold in half of the mini marshmallows and almond slices (or walnuts). This ensures they get incorporated throughout the fudge for that classic rocky road texture inside.
Step 4: Transfer and Layer the Fudge
Quickly pour your fudge mixture into the prepared pan and spread it evenly with a spatula. Then sprinkle the remaining marshmallows and nuts on top—this not only looks pretty but adds an extra burst of texture when you bite in.
Step 5: Chill and Set
Cover your dish and pop it in the fridge for at least 2 hours. This is where the magic happens as the fudge firms up into that perfect sliceable consistency. If you’re impatient like me, chilling properly really pays off.
Pro Tips for Making Easy Rocky Road Fudge Recipe
- Don’t Skip the Stirring: Stirring constantly while melting keeps the chocolate smooth and prevents scorching.
- Use Good-Quality Chocolate: Trust me, the taste difference is noticeable, and it makes the fudge extra luscious.
- Add Nuts Last for Crunch: If you mix all the nuts in at once, sometimes they get too soft; saving some for the top gives you that perfect crunch.
- Chill Properly: Patience is key — letting the fudge chill until firm makes slicing easier and cleaner.
How to Serve Easy Rocky Road Fudge Recipe
Garnishes
I usually keep the fudge simple with just the marshmallows and nuts on top, but for special occasions I love adding a light dusting of cocoa powder or a drizzle of white chocolate to make it look extra fancy. Sprinkling some sea salt flakes also highlights the chocolate beautifully.
Side Dishes
This fudge pairs wonderfully with a chilly glass of milk or a hot cup of coffee or tea. For parties, I like serving it alongside fresh fruit or a light cheese platter to balance its sweetness.
Creative Ways to Present
For gifting or entertaining, I’ve wrapped fudge squares individually in colorful parchment paper tied with twine—this little touch makes gifting so much easier and looks super cute. You can also cut the fudge into fun shapes using small cookie cutters around the holidays.
Make Ahead and Storage
Storing Leftovers
I keep my fudge in an airtight container in the fridge, and it stays fresh for up to two weeks. It’s nice that it doesn’t dry out or get hard, just perfectly soft and ready whenever I want a bite.
Freezing
If you want to make a big batch, freezing works great. I wrap pieces tightly in plastic wrap and then store them in a freezer-safe bag. When thawed in the fridge overnight, the fudge tastes just as delicious as freshly made.
Reheating
Usually, I don’t reheat fudge because I love the texture cold, but if you want it softer, a quick 5-10 second zap in the microwave makes it easier to chew without melting it completely.
FAQs
-
Can I use milk chocolate for this recipe?
Absolutely! Milk chocolate will make your Rocky Road fudge sweeter and creamier. Just be mindful it may change the richness slightly, but it’s still delicious.
-
Is it necessary to refrigerate this fudge?
Yes, refrigerating helps the fudge set properly because of the condensed milk and butter. It also keeps the fudge fresh longer and easier to handle.
-
Can I substitute the nuts if I have allergies?
Definitely! If you’re allergic to nuts, you can skip them or add seeds like pumpkin or sunflower seeds for crunch and texture instead.
-
How do I get the fudge to have a smooth texture?
Melting slowly over medium heat and stirring continuously helps prevent graininess. Using a good quality chocolate and not overheating the mixture are key factors.
Final Thoughts
This Easy Rocky Road Fudge Recipe is one of those delightful sweets I always come back to whenever I want a chocolate treat that feels special yet is so simple to make. It’s perfect for sharing, gifting, or just sneaking a piece when nobody’s looking. I’d recommend giving it a try—you’ll love how it hits that sweet spot between nostalgic comfort and gourmet indulgence without any fuss.
Print
Easy Rocky Road Fudge Recipe
- Prep Time: 10 minutes
- Cook Time: 4 minutes
- Total Time: 2 hours 14 minutes
- Yield: 9 squares 1x
- Category: Dessert
- Method: Stovetop
- Cuisine: American
Description
This classic Rocky Road Fudge recipe combines rich dark chocolate, sweet condensed milk, creamy butter, crunchy nuts, and fluffy mini marshmallows to create an indulgent, no-bake treat that’s perfect for sharing or gifting.
Ingredients
Fudge Base
- 3 cups dark or semi-sweet chocolate chips (about 18 ounces)
- 1 (14 ounce) can sweetened condensed milk
- 4 tablespoons butter
Mix-ins
- 5 ounces mini marshmallows
- 4 ounces sliced almonds or walnuts
Instructions
- Prepare the Baking Dish: Line an 8×8 inch baking dish with parchment paper or wax paper, allowing some overhang to easily lift the fudge out later, and set aside.
- Melt the Chocolate Mixture: In a medium saucepan, combine the chocolate chips, sweetened condensed milk, and butter. Place over medium heat and gently stir continuously, scraping the bottom to prevent scorching, until the chocolate has fully melted and the mixture is smooth and well combined.
- Add Marshmallows and Nuts: Remove the saucepan from heat and immediately stir in half of the mini marshmallows and half of the sliced almonds or walnuts, incorporating them evenly throughout the fudge base.
- Transfer to Baking Dish: Pour the fudge mixture quickly into the prepared baking dish, spreading it out into an even layer using a spatula to smooth the surface.
- Top with Remaining Mix-ins: Sprinkle the remaining mini marshmallows and sliced nuts evenly over the top of the fudge to add texture and visual appeal.
- Chill to Set: Cover the baking dish loosely with plastic wrap or foil and refrigerate for at least 2 hours to allow the fudge to firm up completely.
- Cut and Serve: Once set, use the parchment or wax paper overhang to lift the fudge from the pan. Cut into 9 squares and serve or store as desired.
Notes
- Storage: Store homemade fudge in an airtight container in the refrigerator for up to 2 weeks to maintain freshness and texture.
- Use parchment or wax paper for easy removal from the baking dish.
- To customize, substitute almonds with walnuts or your preferred nuts.
- For a nut-free version, simply omit the nuts and add extra marshmallows.
Nutrition
- Serving Size: 1 square (approximately 1/9th of recipe)
- Calories: 320
- Sugar: 30g
- Sodium: 45mg
- Fat: 20g
- Saturated Fat: 9g
- Unsaturated Fat: 10g
- Trans Fat: 0g
- Carbohydrates: 35g
- Fiber: 2g
- Protein: 4g
- Cholesterol: 15mg


